Page 3 - Contents
Warning and Safety instructions . . . . . . . . . . . . . . . . . . . . . . . . . . . . . . . . . . . . . 5 Guide to the appliance . . . . . . . . . . . . . . . . . . . . . . . . . . . . . . . . . . . . . . . . . . . . 14 Models . . . . . . . . . . . . . . . . . . . . . . . . . . . . . . . . . . . ....
Page 5 - Warning and Safety instructions
This appliance complies with all relevant safety requirements.Inappropriate use can, however, lead to personal injury anddamage to property. To avoid the risk of accidents and damage to the appliance,please read these instructions carefully before installation andbefore using it for the first time. ...
Page 6 - Correct application; This hob is not designed for commercial use. It is intended for
Correct application ~ This hob is not designed for commercial use. It is intended for use in domestic households and similar working and residentialenvironments. ~ The appliance is not intended for outdoor use. ~ It is intended for domestic use only to cook food and keep it warm. Any other use is no...
Page 7 - Safety with children
Safety with children ~ Children under 8 years of age must be kept away from the appliance unless they are constantly supervised. ~ Children 8 years and older may only use the appliance unsupervised if they have been shown how to use it in a safe wayand understand the hazards involved. ~ Children mus...
Page 8 - Technical safety
Technical safety ~ Installation, maintenance and repairs may only be carried out by a Miele authorised service technician. Installation, maintenance andrepairs by unqualified persons could be dangerous. ~ A damaged appliance can be dangerous. Check the appliance for visible signs of damage. Do not u...
Page 10 - Correct use
Correct use ~ Oil and fat can overheat and catch fire. Do not leave the appliance unattended when cooking with oil or fat.If oil or fat does catch fire, do not attempt to put out the flames withwater. Disconnect the appliance from the mains and use a suitablefire blanket, saucepan lid, damp towel or...
Page 13 - Cleaning and care
~ Metal utensils stored in a drawer under the hob can become hot if the appliance is used intensively for a long time. Do not store anymetal items or utensils in a drawer under the hob ~ This hob is fitted with a cooling fan. If a drawer is fitted directly underneath the hob, ensure that there is su...
Page 14 - Models; Guide to the appliance
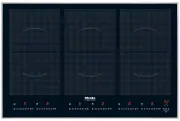
Models KM 6328 abcd PowerFlex cooking zones with TwinBooster can be combined to form a PowerFlex cooking area: a + b c + d e Control panel Guide to the appliance 14 e a 8 8 8 8 00 b c d
Page 16 - Sensor controls / displays
Sensor controls / displays Guide to the appliance 16 8 8 0 0 a b c min d e f g h i j k l m
Page 18 - Cooking zones
Cooking zones Cooking zone KM 6328 Minimum to maximum C in cm* Rating in watts for 230 V** y w x z 15–23 NormalTwinBooster level 1TwinBooster level 2 210030003700 y + w z + x 22–23 / 15 x 23 – 23 x 39 NormalTwinBooster level 1TwinBooster level 2 340048007400 Total: 7400 Cooking zone KM 6366 / KM 636...
Page 19 - Caring for the environment
Disposal of the packingmaterial The transport and protective packinghas been selected from materialswhich are environmentally friendly fordisposal and should be recycled. Recycling the packaging reduces theuse of raw materials in themanufacturing process and alsoreduces the amount of waste in landfi...
Page 20 - Cleaning for the first time; Before using for the first time
Please stick the extra data plate for the appliance suppliedwith this documentation in the space provided in the "Aftersales service, data plate, guarantee" section of this booklet. Cleaning for the first time ^ Remove any protective wrapping and adhesive labels. ^ Before using for the first...
Page 21 - The induction principle; Induction
The induction principle An induction coil is located under each cooking zone. Whena cooking zone is switched on, this coil creates a magneticfield which impacts directly on the base of the pan and heatsit up. The cooking zone itself is heated up indirectly by theheat given off by the pan. An inducti...
Page 22 - Noises
Noises When using an induction cooking zone, the following noisescan occur in the pan, depending on what it is made of andhow it has been constructed. – On the higher power levels, it might buzz. This will decrease or cease altogether when the power level isreduced. – If the pan base is made of laye...
Page 23 - Pans; Suitable pans include:
Pans Suitable pans include: – stainless steel pans with a magnetic base – enamelled steel pans – cast iron pans Unsuitable pans: – stainless steel pans without a magnetic base – aluminium and copper pans – glass, ceramic or earthenware pots and pans To test whether a pot or pan is suitable for use o...
Page 24 - Settings; Power level range
Settings Melting butterDissolving gelatine 1 to 2 Making milk puddings 2 Warming small quantities of liquidCooking riceDefrosting frozen vegetablesCooking pulses 3 Warming liquid and semi-solid foodsMaking omelettes and lightly frying eggsSteaming fruitCooking dumplings 4 Steaming vegetables, fishDe...
Page 25 - How the hob is operated; Operation
How the hob is operated The hob is equipped with electronic sensor controls whichreact to finger contact. To operate the hob, touch the relevant sensor. Each time youtouch a sensor, an audible tone sounds. Take care to keep the control panel clean and do notplace anything on top of it. The sensors m...
Page 26 - To switch the hob on; Setting and altering the power level; Activating/deactivating
Do not leave the appliance unattended whilst it is beingused. To switch the hob on ^ Touch the s sensor. 0 will appear in each of the cooking zone displays. If no further entry is made, the hob will switch itself off after a fewseconds for safety reasons. Setting and altering the power level ^ Touch...
Page 27 - Continued cooking
Auto heat-up When Auto heat-up has been activated, the cooking zoneswitches on automatically at the highest power setting andthen switches to the continued cooking setting selected. Theheat-up time depends on which continued cooking settinghas been chosen (see chart). To activate Auto heat-up ^ Touc...
Page 28 - Booster; To switch on the Booster; To switch on the TwinBooster; Level 2; To switch off the Booster/TwinBooster
Booster The cooking zones are equipped with a Booster orTwinBooster (see "Guide to the appliance"). When activated, the power is boosted for a maximum of10 minutes so that large quantities can be heated up quickly,e.g. when boiling water for cooking pasta. Taking a pan off the zone whilst th...
Page 29 - Keeping warm function; To switch the keeping warm function on/off
Keeping warm function Each cooking zone has a keeping warm function. This function is for keeping food that has just been cookedwarm, i.e. food that is still hot. It is not for reheating foodthat has gone cold. If the keeping warm function has been activated, the cookingzone will switch off automati...
Page 30 - Switching off and residual heat indicators; Switching off a cooking zone; Switching off the hob; Residual heat indicator
Switching off and residual heat indicators Switching off a cooking zone ^ Touch the "0" on the numerical keypad of the cooking zoneyou wish to use. A 0 will flash in the cooking zone display for a few seconds. If the cooking zone is still hot, the residual heat indicator willthen appear in t...
Page 31 - Tips on saving energy
– Use a pan lid whenever possible to minimise heat loss. uncovered covered – Select a smaller pan when cooking small quantities. A smaller pan uses less energy than a larger pan with verylittle in it. – Cook with as little water as possible. – Once food has come to the boil or the oil in the pan is ...
Page 32 - Minute minder; To set the minute minder time; Timer
The timer can be used for two different functions: – to set the minute minder – to set a cooking zone to switch off automatically. You can enter a time up to a maximum of 99 minutes. When the set time has elapsed 00 will appear in the display. At the same time a buzzer will sound for a few seconds. ...
Page 33 - To switch a cooking zone off automatically
To switch a cooking zone off automatically You can set a time at the end of which a cooking zone willswitch off automatically.All the cooking zones can be programmed at the same time. If the time programmed is longer than the maximumoperational time allowed, the cooking zone will switch offafter the...
Page 34 - To use both timer functions at the same time; minute minder as well; one or more switch-off times as well
To use both timer functions at the same time The minute minder and automatic switch-off functions can beused at the same time. If you have programmed in one or more switch-off times andwould like to use the minute minder as well : ^ Touch the + sensor repeatedly until 00 and min appear in the timer ...
Page 35 - Stop and Go; Recall; Additional functions
Stop and Go Your appliance has a Stop and Go feature which, whenactivated, reduces the power of all cooking zones in use topower level 1. When Stop and Go is activated, the cookingzone power levels and the setting of the timer cannot bealtered and the hob can only be switched off. When Stop and Go i...
Page 36 - System lock; To activate the system lock; To deactivate the system lock; Safety features
System lock The hob is fitted with a system lock to prevent it from beingswitched on without supervision. If the hob is switched on when the system lock is active, LC appears in the timer display for a few seconds. The system lock is deactivated if there is an interruption tothe power supply. To act...
Page 38 - Overheating protection
Overheating protection All the induction coils and the cooling elements for theelectronics are fitted with an overheating protectionmechanism. Before the induction coils or cooling elementsget too hot, the overheating protection mechanism cuts in inone of the following ways: – If the booster functio...
Page 40 - Spots; sugar, plastic or aluminium foil; immediately
Do not use washing-up liquid to clean the ceramic surface.Washing-up liquid will not remove all soiling and deposits.It will form an invisible coating which will cause permanentdiscolouration of the ceramic surface.Clean the hob regularly with a suitable ceramic hobcleaning agent. Wipe off all coars...
Page 41 - Problem solving guide
With the help of the following notes, minor faults in the performance of theappliance, some of which may result from incorrect operation can be put rightwithout contacting the Service Department. Installation work and repairs to electrical appliances must only be carried outby a suitably qualified a...
Page 44 - Optional accessories
Miele offer a comprehensive range of useful accessories aswell as cleaning and conditioning products for your Mieleappliances. These can be ordered online at: or from Miele (see back cover for contact details) Pans Miele offer a wide range of pans which are perfect for Mielehobs. Please refer to the...
Page 45 - Safety instructions for installation
The appliance must only be installedand connected to the electricitysupply by a suitably qualified andcompetent person in strictaccordance with current nationaland local safety regulations.Fit the wall units and extractor hoodbefore fitting the hob to avoiddamaging the appliance. ~ The veneer or lam...
Page 46 - Safety distance above the appliance; Safety distances
Safety distance above the appliance A minimum safety distance must be maintained between the appliance andthe cooker hood above it. See thecooker hood manufacturer's operatingand installation instructions for details. If the manufacturer's instructions arenot available for the cooker hood, aminimum ...
Page 47 - right
Safety distances to the sides andback of the hob Ideally the hob should be installed withplenty of space on either side. Theremay be a wall at the rear or a tall unit orwall on one side (right or left) (see illustrations). a Minimum distance of 50 mmbetween the back of the worktop cut-out and the re...
Page 50 - Installation notes; Tiled worktop; Hob with frame or bevelled edge
Installation notes Seal between the hob and theworktop Do not use sealant between the hoband the worktop. This could result indamage to the hob or the worktop ifthe hob ever needs to be removedfor servicing. The sealing strip under the edge of thetop part of the appliance provides asufficient seal f...
Page 51 - Building-in dimensions
Building-in dimensions KM 6328 a Front b Casing depth c Mains connection box The mains connection cable (1440 mm long) is supplied separately. Hob with frame or bevelled edge 51
Page 53 - Installing the hob; Preparing the worktop
Installing the hob Preparing the worktop ^ Make the worktop cut-out accordingto the dimensions given in thebuilding-in diagram. Remember tomaintain the minimum safety distances (see "Safety instructions for installation"). ^ Seal the cut surfaces with a suitableheat-resistant sealant to avoi...
Page 56 - Granite and marble worktops
Granite and marble worktops Preparing the worktop a Worktop b Hob c Gap As the ceramic glass and theworktop cut-out have a certaindimensional tolerance, the size ofgap c can vary (min. 1 mm). ^ Make the worktop cut-out as shownin "Building-in dimensions".Observe the safety distances (see �...
Page 58 - Electrical connection
All electrical work should be carriedout by a suitably qualified andcompetent person, in strictaccordance with current local andnational safety regulations (BS 7671in the UK). Installation, repairs and other workby unqualified persons could bedangerous. The manufacturercannot be held liable forunaut...
Page 59 - Wiring diagram; a b c d e
The electrical safety of this appliancecan only be guaranteed whencontinuity is complete between it andan effective earthing system, whichcomplies with current local and nationalsafety regulations. It is most importantthat this basic safety requirement ispresent and regularly tested and wherethere i...
Page 60 - Guarantee; After sales service, data plate
In the event of any faults which you cannot remedy yourself, please contact: – your Miele dealer, or – Miele (see back cover for contact details). Please note that telephone calls may be monitored and recorded for trainingpurposes (UK only). When contacting your Dealer or Miele, please quote the mod...


 Miele 04 950 470 Manual
 Miele 07 682 190 Manual
 Miele 09 798 350 Manual
 Miele 09 900 700 Manual
 Miele 10 014 160 Manual
 Miele 217 Manual
 Miele 2013 Manual
 Miele 2819i Manual
 Miele 10502220 User Manual
 Miele 10639470 User Manual
 Miele 11423630 User Manual
 Miele 11502710 User Manual
 Miele 11502940 User Manual
 Miele 11614040 User Manual