Page 2 - Contents
Contents 2 Warning and Safety instructions .......................................................................... 4 Caring for the environment ................................................................................ 14 Overview .............................................................
Page 4 - Warning and Safety instructions
Warning and Safety instructions 4 This appliance conforms to current safety requirements.Inappropriate use can, however, lead to personal injury anddamage to property. To avoid the risk of accidents and damage to the appliance,please read these instructions carefully before using it for the firsttim...
Page 5 - Correct application; This cooktop is designed for domestic use and for use in similar
Warning and Safety instructions 5 Correct application This cooktop is designed for domestic use and for use in similar environments by guests in hotel or motel rooms, bed & breakfastsand other typical living quarters. This does not include common/shared facilities or commercial facilities with...
Page 6 - Safety with children
Warning and Safety instructions 6 Safety with children Young children must not be allowed to use this appliance. Older children may use the appliance without supervision if its operation has been clearly explained to them and they are able touse it safely. Children must be able to recognise and ...
Page 7 - Technical safety
Warning and Safety instructions 7 Technical safety Unauthorised installation, maintenance and repairs can cause considerable danger for the user. Installation, maintenance andrepairs must only be carried out by a Miele authorised technician. Damage to the cooktop can compromise your safety. Chec...
Page 9 - In areas which may be subject to infestation by cockroaches or
Warning and Safety instructions 9 In areas which may be subject to infestation by cockroaches or other vermin, pay particular attention to keeping the appliance andits surroundings clean at all times. Any damage caused bycockroaches or other vermin will not be covered by the warranty. DO NOT MOD...
Page 10 - Correct use
Warning and Safety instructions 10 Correct use The cooktop gets hot when in use and remains hot for a while after being switched off. There is a danger of burning until theresidual heat indicators go out. Do not use the appliance to heat up the room. Due to the high temperatures radiated, object...
Page 11 - When the appliance is switched on either deliberately or by
Warning and Safety instructions 11 When the appliance is switched on either deliberately or by mistake, or when there is residual heat present, there is the risk ofany metal items left on the cooktop heating up, with the danger ofburning. Depending on the material, other items left on the cooktopc...
Page 13 - Cleaning and care; Do not use a steam cleaning appliance to clean this appliance.
Warning and Safety instructions 13 Cleaning and care Do not use a steam cleaning appliance to clean this appliance. The steam could reach the electrical components and cause a shortcircuit.
Page 14 - Caring for the environment
Caring for the environment 14 Disposal of the packingmaterial The transport and protective packaginghas been selected from materials whichare environmentally friendly fordisposal, and can normally be recycled. Recycling the packaging reduces theuse of raw materials in themanufacturing process and al...
Page 15 - Overview; Cooktop; Single circle zone
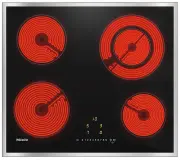
Overview 15 Cooktop KM 6520 FR, KM 6520 FL a Single circle zone b Single circle zone c Double circle zone d Single circle zone e Controls and indicators
Page 16 - Double circle zone
Overview 16 KM 6522 FR a Double circle zone b Single circle zone c Extended cooking zone d Single circle zone e Controls and indicators
Page 17 - Triple circle zone
Overview 17 KM 6527 FR a Triple circle zone b Single circle zone c Single circle zone d Controls and indicators
Page 18 - Controls and display; Sensor controls
Overview 18 Controls and display Sensor controls a For switching the cooktop on/off b Numerical keybank- For setting the power level- For setting the timer c For switching on an extended cooking zone d Stop & Go e Cooking zone selection and display Cooking zone ready for use Keep warm settin...
Page 19 - Extended power level range setting
Overview 19 h Extended power level range setting i Stop & Go activated j Extension
Page 20 - Cooking zone data
Overview 20 Cooking zone data KM 6520 FR, KM 6520 FL Cooking zone Ø in cm Rating in watts for 230 V 18.0 1800 16.0 1500 12.0/21.0 750/2200 14.5 1200 Total: 6700 KM 6522 FR Cooking zone Ø in cm Rating in watts for 230 V 12.0/21.0 750/2200 14.5 1200 17.0 / 17.0 x 29.0 1500/2400 18.0 ...
Page 21 - Before using for the first time
Before using for the first time 21 Please stick the extra data plate forthe appliance supplied with thisdocumentation in the space providedin the “Service” section of thisbooklet. Alternatively, the additionallabel can be stuck near the applianceif the appliance markings are notvisible after insta...
Page 22 - How the cooking zones work
How the cooking zones work 22 Single circle cooking zones have oneheating element, whilst double circlecooking zones and extended zoneshave two. Depending on the model, theheating elements may be separated byan insulating ring.Each cooking zone has overheatingprotection (a temperature limiter), whic...
Page 23 - Pans; The most suitable cookware
Pans 23 The most suitable cookware is metal pots and pans with thick bases that,when cold, bulge inwards slightly. Onwarming, the base flattens and sits levelon the cooking zone. This optimises theconduction of heat. Cold Hot Glass, ceramic, or stoneware is less suitable . These materials do not con...
Page 24 - Tips on saving energy
Tips on saving energy 24 – Check that the diameter of the pan base is wide enough for the cookingzone so that heat is not lostunnecessarily. – Use a pan lid whenever possible to minimise heat loss. – Select a smaller pan when cooking small quantities. A small pan on asmall cooking zone uses less ene...
Page 26 - Operation; Operating principles; sensor needs to be touched
Operation 26 Operating principles This ceramic cooktop is equipped withelectronic sensor controls which reactto finger contact. For safety reasons,when switching the appliance on, theOn/Off sensor needs to be touched for a little longer than the other sensors.Each time you touch a sensor, anacous...
Page 27 - Risk of fire with overheated food.; Switching on the cooktop; Touch the; Setting the power level
Operation 27 Risk of fire with overheated food. Unattended food can overheat andignite.Do not leave the cooktop unattendedwhilst it is being used. Switching on the cooktop Touch the sensor. Further sensor controls will light up. If no further entry is made, thecooktop will switch itself off af...
Page 28 - Residual heat indicator; Risk of burning on hot cooking
Operation 28 Residual heat indicator If a cooking zone is still hot, the residualheat indicator will light up after it hasbeen switched off. The lines of the residual heat indicatorgo out one after another as the cookingzone cools down. The last horizontalline only goes out when the cookingzone is s...
Page 29 - Extension; Switching a heating element off
Operation 29 Extension If you switch a double or triple cookingzone on, the second heating element isalways switched on automatically. Thesecond heating element of an extendedcooking zone and the third heatingelement of a triple zone must bemanually switched on. On cooktops with a multi-circle cooki...
Page 30 - Activating Auto heat-up
Operation 30 Auto heat-up When Auto heat-up has been activated,the cooking zone switches onautomatically at the highest setting andthen switches to the continued cookingsetting which you have previouslyselected. The heat-up time depends onwhich continued cooking setting hasbeen chosen (see chart). A...
Page 31 - Timer; Minute minder; Setting the minute minder
Timer 31 The cooktop has to be switched on ifyou wish to use the timer.You can set a time up to a maximumof 99 minutes. The timer can be used for the following2 functions: – For setting the minute minder – For automatically switching a cooking zone off Minute minder Setting the minute minder Example...
Page 32 - Set the required time.
Timer 32 Switching off a cooking zoneautomatically You can set a time after which thecooking zone will switch offautomatically. This function can beused on all zones at the same time. If the time programmed is longer thanthe maximum operational timeallowed, the safety switch-off willswitch off the c...
Page 33 - starts flashing in
Timer 33 Using both timer functions atthe same time The minute minder and automaticswitch-off functions can be used atthe same time. If you have programmed one or moreswitch-off times, and would like to usethe minute minder as well: Touch the timer display repeatedlyuntil the indicator lights of t...
Page 34 - Additional functions; Activating/Deactivating; Recall; Switch the cooktop on again.
Additional functions 34 Stop & Go When Stop & Go is activated, the powerof all cooking zones in use is reduced topower level 1.The power levels set for the cookingzones and the timer settings cannot bechanged, the cooktop can only beswitched off. The minute minder,switch-off times, and the A...
Page 35 - Demonstration mode; Model number/Serial number
Additional functions 35 Demonstration mode This function enables the cooktop to bedemonstrated in showrooms withoutheating up. Activating/deactivating thedemonstration mode Switch the cooktop on. Touch and hold the 0 and 2 sensorcontrols on the numerical keybank atthe same time for 6 seconds. In...
Page 36 - Safety features; System lock / Safety lock; system lock
Safety features 36 System lock / Safety lock Your cooktop is equipped with a systemlock and a safety lock to prevent thecooktop and the cooking zones beingswitched on or any settings beingaltered unintentionally. The system lock is activated when the cooktop is switched off. If the systemlock is act...
Page 37 - Activating the safety lock
Safety features 37 Activating the safety lock Touch and hold the and sensors at the same time for 6 seconds. The seconds can be seen countingdown in the timer display. When thistime has elapsed will appear in the timer display. The safety lock isactivated. Deactivating the safety lock To...
Page 38 - Excessive operating time
Safety features 38 Safety switch-off Safety switch-off if the sensors arecovered Your cooktop will switch offautomatically if one or several of thesensors remain covered for longer than10 seconds, for example, by fingercontact, food boiling over or by anobject such as an oven glove or a teatowel. ...
Page 39 - Overheating protection
Safety features 39 Overheating protection Each zone is equipped with overheatingprotection (internal temperature limiter).This switches off the heating elementautomatically before the ceramicsurface overheats. As soon as thecooking zone temperature has cooledsufficiently, heating is switched onagain...
Page 40 - Programming; Changing the programming; Calling up programming mode
Programming 40 You can adapt the programming of thecooktop to your personal needs.Several settings can be altered insuccession. After accessing programming mode, (Programme) and (Code) and 2 cooking zone indicators will appear inthe timer display. The programme is shown in the lefthand cooking z...
Page 43 - Unsuitable cleaning agents
Cleaning and care 43 Risk of burning on hot cooking zones!The cooking zones will be hot afteruse.Switch the cooktop off.Allow the cooking zones to cooldown before cleaning the cooktop. Risk of damage due to moisture ingress.The steam from a steam cleanercould reach electrical componentsand cause...
Page 44 - Cleaning the ceramic surface; Spots
Cleaning and care 44 Cleaning the ceramic surface Risk of damage by pointed objects.The seal between the cooktop andthe worktop could be damaged.The seal between the ceramicsurface and the frame could bedamaged.Do not use pointed objects forcleaning. Do not use washing-up liquid toclean the applia...
Page 45 - Problem solving guide; Problem
Problem solving guide 45 With the help of the following guide, minor faults in the performance of theappliance, some of which may result from incorrect operation, can be remediedwithout contacting Miele. This will save you time and money because you will notneed a service call. Please note that a ca...
Page 48 - Optional accessories; Cleaning and care products; Removes finger marks and light soiling.
Optional accessories 48 Miele offers a range of usefulaccessories, as well as cleaning andconditioning products for yourappliance. These products can be ordered fromthe Miele online shop. They can also be ordered directly fromMiele (see end of this booklet forcontact details). Cleaning and care prod...
Page 49 - Safety instructions for installation; Risk of damage from incorrect installation.; The veneer or laminate coatings of worktops (or adjacent kitchen
Safety instructions for installation 49 Risk of damage from incorrect installation. Incorrect installation can cause damage to the cooktop.The cooktop must only be installed by a qualified person. Danger of electric shock! Incorrect connection to the power supply may result in an electric shock....
Page 50 - Safety distances
Safety distances 50 Safety distance above thecooktop The safety distance specified by themanufacturer of the rangehood must bemaintained between the cooktop andthe rangehood above it. For any flammable objects, e.g. utensilrails, wall units etc., a minimum safetydistance of 600 mm must bemaintained ...
Page 51 - back edge; Interim shelf
Safety distances 51 Safety distances to the sidesand back of the appliance The minimum distance shown belowmust be maintained between the backedge of the cooktop and a tall unit orwall. Ideally the cooktop should be installedwith plenty of space on either side.There may be a wall at the rear or a ta...
Page 52 - Installation notes; Damage caused by incorrect
Installation notes 52 Installation of surface-mounted appliances Seal between the cooktop and theworktop Damage caused by incorrect installation.Using sealant under the cooktopcould result in damage to thecooktop and the worktop if thecooktop ever needs to be removedfor servicing.Do not use sealan...
Page 53 - Flush-mounted installation; Natural stone worktops
Installation notes 53 Flush-mounted installation Flush-mounted installation is onlypossible in natural stone (granite,marble), solid wood and tiledworktops. Certain models are suitablefor building into glass worktops -please see the relevant label on thecooktop. When using a worktop madefrom any oth...
Page 54 - Installation dimensions – Surface-mounted; All dimensions in this instruction booklet are given in mm.
Installation dimensions – Surface-mounted 54 All dimensions in this instruction booklet are given in mm. KM 6520 FR a Front b Mains connection box with mains connection cableMains connection cable L = 1440 mm c Spring clips
Page 55 - Front
Installation dimensions – Surface-mounted 55 KM 6522 FR a Front b Mains connection box with mains connection cableMains connection cable L = 1440 mm c Spring clips
Page 57 - Installation dimensions – Flush
Installation dimensions – Flush 57 All dimensions in this instruction booklet are given in mm. KM 6520 FL a Front b Mains connection box with mains connection cableMains connection cable L = 1440 mm c Stepped cut-out, natural stone worktop d Wooden strip 13 mm (not supplied)
Page 58 - Installation; Preparing the worktop
Installation 58 Installation of surface-mounted appliances Preparing the worktop Create the worktop cut-out.Remember to maintain the minimumsafety distances (see “Safetydistances”). Wooden worktops Seal the cut surfaces with a suitableheat-resistant sealant to avoidswelling caused by moisture. T...
Page 59 - Granite and marble worktops
Installation 59 Granite and marble worktops You will need heavy duty double-sidedadhesive tape (not included with thecooktop) to fasten the spring clips. Attach the adhesive tape along the top edge of the cut-out in thepositions shown in the cooktopillustration. Position the spring clips on t...
Page 60 - Check that the cooktop works.
Installation 60 Flush-mounted installation Create the worktop cut-out.Remember to maintain the minimumsafety distances (see “Safetydistances”). Solid wood, tiled and glass worktops:Fix a wooden frame 7 mm below thetop edge of the worktop (see“Building-in diagram - Flush-mountedinstallation”). ...
Page 61 - Electrical connection; Risk of damage from incorrect; Total power output
Electrical connection 61 Risk of damage from incorrect connection.Incorrect installation, maintenanceand repairs can be dangerous tousers.Miele cannot be held liable fordamage or injury caused byunauthorised installation,maintenance or repair work, or by aninadequate or faulty on-site earthingsyst...
Page 62 - Mains connection cable; Danger of electric shock!; Wiring diagram
Electrical connection 62 Mains connection cable The cooktop must be connected to theelectrical supply with a specialconnection cable, type H 05 VV-F (PVCinsulated) with a suitable diameter. Please see the wiring diagram forconnection. See the data plate on the cooktop forthe correct voltage and freq...
Page 63 - Service; Contact in case of fault; The manufacturer's warranty for this appliance is 2 years.
Service 63 Contact in case of fault In the event of any faults which you cannot remedy yourself, please contact Miele. Contact information for Miele can be found at the end of this booklet. Please quote the model and serial number of your appliance when contactingMiele. This information can be found...
Page 67 - Miele New Zealand Limited
www.miele.com.au Miele Experience Centre and Head Office Melbourne: 1 Gilbert Park DriveKnoxfield, VIC 3180 Miele Experience Centre South Melbourne: 206-210 Coventry StreetSouth Melbourne, VIC 3205 Miele Experience Centre and Office Sydney: 3 Skyline PlaceFrenchs Forest, NSW 2086 Miele Experience Ce...


 Miele 04 950 470 Manual
 Miele 07 682 190 Manual
 Miele 09 798 350 Manual
 Miele 09 900 700 Manual
 Miele 10 014 160 Manual
 Miele 217 Manual
 Miele 2013 Manual
 Miele 2819i Manual
 Miele 10502220 User Manual
 Miele 10639470 User Manual
 Miele 11423630 User Manual
 Miele 11502710 User Manual
 Miele 11502940 User Manual
 Miele 11614040 User Manual