Page 2 - SPECIFICATIONS; GENERAL SAFETY RULES
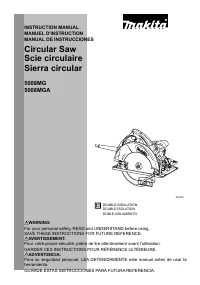
2 ENGLISH SPECIFICATIONS Model 5008MG / 5008MGA Blade diameter 210 mm (8-1/4") at 0° 75.5 mm (3") at 45° 57 mm (2-1/4") Max. Cutting depth at 50° 51.5 mm (2") No load speed (RPM) 5,200/min. Overall length 332 mm (13-1/8") Net weight 4.8 kg (10.6 lbs) • Due to our continuing progr...
Page 3 - SPECIFIC SAFETY RULES; Do not reach underneath the workpiece.
3 power tool for your application. The correct power tool will do the job better and safer at the rate for which it was designed. 17. Do not use the power tool if the switch does not turn it on and off. Any power tool that cannot be controlled with the switch is dangerous and must be repaired. 18. D...
Page 4 - Do not use dull or damaged blades.
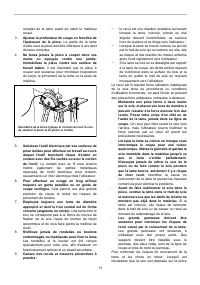
4 the kerf closing down, the blade stalls and the motor reaction drives the unit rapidly back toward the operator; − if the blade becomes twisted or misaligned in the cut, the teeth at the back edge of the blade can dig into the top surface of the wood causing the blade to climb out of the kerf and ...
Page 6 - Adjusting depth of cut; Positive stopper
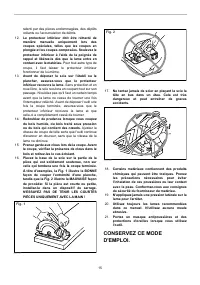
6 000029 18. Some material contains chemicals which may be toxic. Take caution to prevent dust inhalation and skin contact. Follow material supplier safety data. 19. Do not stop the blades by lateral pressure on the saw blade. 20. Always use blades recommended in this manual. Do not use any abrasive...
Page 7 - ASSEMBLY; Hex wrench storage
7 NOTE: • When changing the positive stopper's position, loosening the lever and tilting the bevel angle to less than the desired stopper position number allows to change it. • When the arrow on the positive stopper points 22.5, the bevel angle can be adjusted 0 - 22.5°;when the arrow points 45, it ...
Page 8 - OPERATION
8 Removing or installing saw blade 1 2 007330 CAUTION: • Be sure the blade is installed with teeth pointing up at the front of the tool. • Use only the Makita wrench to install or remove the blade. To remove the blade, press the shaft lock so that the blade cannot revolve and use the hex wrench to l...
Page 9 - MAINTENANCE; Adjusting for accuracy of 90; ACCESSORIES
9 the screw on the front of the base. It also makes repeated cuts of uniform width possible. MAINTENANCE CAUTION: • Always be sure that the tool is switched off and unplugged before attempting to perform inspection or maintenance. Adjusting for accuracy of 90 ° cut (vertical cut) This adjustment has...
Page 10 - MAKITA LIMITED ONE YEAR WARRANTY
10 MAKITA LIMITED ONE YEAR WARRANTY Warranty Policy Every Makita tool is thoroughly inspected and tested before leaving the factory. It is warranted to be free of defects from workmanship and materials for the period of ONE YEAR from the date of original purchase. Should any trouble develop during t...
Page 11 - SP; Sécurité de la zone de travail
11 FRAN Ç AIS SP É CIFICATIONS Modèle 5008MG / 5008MGA Diamètre de la lame 210 mm (8-1/4") à 0° 75.5 mm (3") à 45° 57 mm (2-1/4") Profondeur de coupe max. à 50° 51.5 mm (2") Vitesse à vide (T/MIN) 5,200/min. Longueur totale 332 mm (13-1/8") Poids net 4.8 kg (10.6 lbs) • Étant don...
Page 12 - GLES DE S
12 position d'arrêt avant de brancher l'outil. Vous ouvrez la porte aux accidents si vous transportez les outils électriques avec le doigt sur l'interrupteur ou les branchez alors que l'interrupteur est en position de marche. 12. Retirez toute clé de réglage ou de serrage avant de mettre l'outil sou...
Page 16 - Symboles; glage de la profondeur de coupe; Butoir positif; Vis
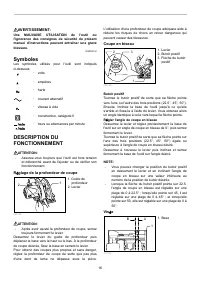
16 AVERTISSEMENT: Une MAUVAISE UTILISATION de l'outil ou l'ignorance des consignes de sécurité du présent manuel d'instructions peuvent entraîner une grave blessure. USD201-2 Symboles Les symboles utilisés pour l'outil sont indiqués ci-dessous. ・ volts ・ ampères ・ hertz ・ courant alternatif ・ vitess...
Page 17 - Pour le mod; ASSEMBLAGE
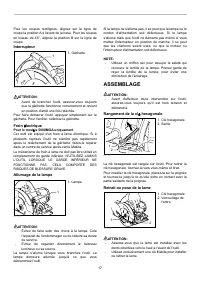
17 Pour les coupes rectilignes, alignez sur la ligne de coupe la position A à l'avant de la base. Pour les coupes en biseau de 45°, alignez la position B sur la ligne de coupe. Interrupteur 1 007329 ATTENTION: • Avant de brancher l'outil, assurez-vous toujours que la gâchette fonctionne correctement...
Page 18 - UTILISATION; Garde parall
18 Pour retirer la lame, appuyez sur le blocage de l'arbre de sorte que la lame ne puisse pas tourner, et utilisez la clé hexagonale pour desserrer le boulon hexagonal en tournant dans le sens contraire des aiguilles d'une montre. Retirez ensuite le boulon hexagonal, le flasque extérieur et la lame....
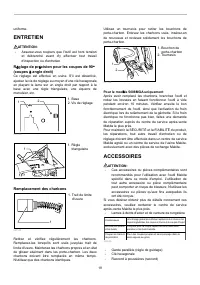
Page 19 - ENTRETIEN; glage de pr; ACCESSOIRES
19 uniforme. ENTRETIEN ATTENTION: • Assurez-vous toujours que l'outil est hors tension et débranché avant d'y effectuer tout travail d'inspection ou d'entretien. R é glage de pr é cision pour les coupes de 90 ° (coupes à angle droit) Ce réglage est effectué en usine. S'il est désactivé, ajustez la v...
Page 20 - GARANTIE LIMITÉE D’UN AN MAKITA
20 GARANTIE LIMITÉE D’UN AN MAKITA Politique de garantie Chaque outil Makita est inspecté rigoureusement et testé avant sa sortie d’usine. Nous garantissons qu’il sera exempt de défaut de fabrication et de vice de matériau pour une période d’UN AN à partir de la date de son achat initial. Si un prob...
Page 22 - NORMAS ESPEC
22 rígido y protección para oídos utilizado en las condiciones apropiadas reducirá las heridas personales. 11. Evite el encendido accidental de la herramienta. Asegúrese de que el interruptor se encuentra en posición de apagado (OFF) antes de conectar la herramienta. Si transporta la herramienta elé...
Page 24 - No utilice discos dañados o desafilados.
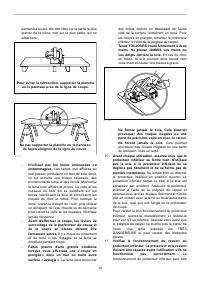
24 Para minimizar el riesgo de que el disco se atore y retroceda bruscamente y cuando la operación de corte requiera apoyar la sierra sobre la pieza de trabajo, la sierra deberá apoyarse sobre la porción más grande y cortar la porción más pequeña. Para evitar retrocesos bruscos, apoye el tablero o p...
Page 26 - Ajuste de la profundidad de corte; Tope de seguridad; a visual
26 USD201-2 S í mbolos A continuación se muestran los símbolos utilizados para la herramienta. ・ voltios ・ amperios ・ hercios ・ corriente alterna ・ velocidad en vacío ・ Construcción clase II ・ revoluciones alternaciones o carreras por minuto DESCRIPCI Ó N DEL FUNCIONAMIENTO PRECAUCIÓN: • Asegúrese s...
Page 27 - MONTAJE
27 Para cortes rectos, alinee la posición A de la parte delantera de la base con la línea de corte. Para cortes en bisel a 45°, alinee la posición B con la misma. Accionamiento del interruptor 1 007329 PRECAUCIÓN: • Antes de conectar la herramienta, compruebe siempre que el gatillo interruptor se ac...
Page 28 - OPERACI
28 PRECAUCIÓN: • Asegúrese de que el disco esté instalado con los dientes orientados hacia arriba en la parte delantera de la herramienta. • Utilice solamente la llave Makita para instalar o desmontar el disco. Para quitar el disco de corte, presione el bloque del eje para evitar el giro del disco m...
Page 29 - MANTENIMIENTO; Ajuste para corte preciso de 90
29 Gu í a lateral (regla gu í a) (accesorio) 1 001480 La útil guía lateral le permite hacer cortes rectos extra-precisos. Simplemente saque la guía lateral deslizándola hasta ajustarla bien contra el costado de la pieza de trabajo y sujétela en posición con el tornillo de la parte delantera de la ba...
Page 30 - ACCESORIOS; GARANTÍA LIMITADA MAKITA DE UN AÑO
30 ACCESORIOS PRECAUCIÓN: • Estos accesorios o acoplamientos están recomendados para utilizar con su herramienta Makita especificada en este manual. El empleo de cualesquiera otros accesorios o acoplamientos conllevará un riesgo de sufrir heridas personales. Utilice los accesorios o acoplamientos so...
Page 32 - Makita Corporation
32 Some dust created by power sanding, sawing, grinding, drilling, and otherconstruction activities contains chemicals known to the State of Californiato cause cancer, birth defects or other reproductive harm. Some examplesof these chemicals are:• lead from lead-based paints,• crystalline silica fro...