LG LUV250C - User Manual
LG LUV250C Vacuum – User Manual, read for free online in PDF format. We hope this helps you resolve any issues you may have. If you have further questions, please contact us through the contact form.


Table of Contents:
- Page 5 – IMPORTANT SAFETY INSTRUCTIONS
- Page 8 – Attaching the Wand
- Page 9 – Attaching the Hose
- Page 10 – Adjusting the height of the vacuum head.; Wand Release Operation
- Page 11 – Accessories
- Page 12 – Using the Crevice Tool:
- Page 13 – Using the Pet Hair Turbine Tool
- Page 14 – Filter frame and foam pre filter:
- Page 15 – TO REMOVE THE DUST TANK,
- Page 16 – Draw out the filter from front cover.; To clean the foam pre filter:
- Page 28 – Sujeción de la tubo; Inserte el tubo dentro del cuerpo principal de la
- Page 29 – Enrolle el cable alrededor del gancho y
- Page 30 – Oprima este botón para encender o apagar el; Nota: El cepillo rotativo no dará vueltas cuando; la aspiradora esté en posición vertical.; Operación para desacoplar el tubo; Oprima el botón de desenganche en el tubo y retire; No coloque ningún objeto en el espacio entre; Para poner en marcha la aspiradora, oprima el; Ajustar la aspiradora según la altura; de la aspiradora para diferentes alturas de alfombra,
- Page 31 – NOTA
- Page 32 – Uso del cepillo para el polvo:; Presione el botón para soltar la varilla y tire del; Uso del tubo; Use la boquilla plana para las áreas muy difíciles
- Page 34 – Armazón de filtro y prefiltro de espuma:
- Page 37 – Retire la tapa de escobillas del agitador.; Tenga cuidado a NO apretar DEMASIADO el
- Page 43 – Raccordement du tube; Fonctionnement du tube rallonge
- Page 48 – Insérez le tube dans le boîtier principal
- Page 49 – Pour installer le tuyau; MISE EN GARDE; Rangement des accessoires; Pour ranger le cordon :
- Page 50 – Fonctionnement du dégagement du tube; Fonctionnement des commandes; Risque de blessures; Réglage de l'aspirateur selon la hauteur
- Page 51 – Brosse à épousseter; Utilisez la brosse à épousseter pour nettoyer les; Suceur plat
- Page 52 – Utilisation de la brosse à épousseter :; Utilisation du tube; ATTENTION; Pour dégager le tube et la poignée :; Installation des accessoires; Utilisation du suceur plat :; Conseils et astuces
- Page 54 – Rangement de l'aspirateur; Éléments du réservoir à poussière
- Page 55 – Vidage du réservoir à poussière; POUR ENLEVER LE RÉSERVOIR À POUSSIÈRE,; Nettoyage du réservoir à poussière; N'utilisez JAMAIS l'aspirateur si les filtres ou
- Page 57 – Remplacement de la courroie de la
- Page 59 – Nettoyage de l'extérieur de; Risques de chocs électriques et de
- Page 60 – être effectués par le centre de service LG de votre localité.; consigne peut causer un choc électrique ou des blessures.; PROBLÈME
Model
Language
Page
)
H
*
W
(
e
z
i
S
l
a
ir
e
t
a
M
Designer
Designer Confirm
Color(cover/body)
n
o
it
p
ir
c
s
e
D
.
o
N
t
r
a
P
Date
e
t
a
D
.
o
N
Chage Record
Change content
ECO No.
1
2
3
4
5
6
7
8
9
LuV250C
MFL66993601
2011.01.28
Dufeng
64
"Loading the manual" means you need to wait until the file loads and becomes available for online reading. Some manuals are very large, and the time they take to appear depends on your internet speed.
Summary
4 This is the safety alert symbol. This symbol alerts you to potential hazards that can result in propertydamage and / or serious bodily harm or death.All safety messages will follow the safety alert symbol and either the word WARNING or CAUTION. Indicates a hazardous situation which, if not avoided...
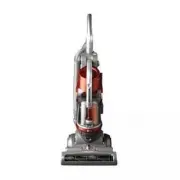
Vacuum Cleaner Body Dusting Brush & Crevice Tool 1.Vacuum Cleaner Body 2.Dusting Brush and Crevice Tool Attaching the Wand 2. Insert the wand into the main body of the vacuum cleaner. 7
Attaching the Hose 3. Align the hose with the holder on the side of the vacuum. Personal Injury and Product Damage Hazard!DO NOT use outlets above counters. Your vacuum cleaner features convenient on-boardstorage for the Dusting brush & Crevice tool. ,QVHUWWKH'XVWLQJEUXVK &UHYLFHWRRORQWRWKH...