Page 2 - Symbolbeschreibung; Ihr Cool Control
2 Inhaltsverzeichnis Bedienelemente 3 Bedienelemente Cool Control Wireless ............................................................................................................... 3 Wichtige Hinweise 4 Bestimmungsgemäße Verwendung .................................................................
Page 3 - Bedienelemente; Bedienelemente Cool Control Wireless
3 Bedienelemente de en fr it nl es pt sv ru Bedienelemente 1 Cool Control 2 Deckel3 Edelstahlbehälter4 Betriebsanzeige5 Netzteil mit Netzkabel 6 Q Taste Ein/Aus 7 Anschlussbuchse 8 Verbindungsstück (kann je nach Kaffeevollautomat und dazugehöriger Cappuccino-Düse variieren) 9 Milchschlauch10 Verbind...
Page 4 - Wichtige Hinweise; Bestimmungsgemäße Verwendung
4 Wichtige Hinweise Wichtige Hinweise Bestimmungsgemäße Verwendung Dieses Gerät (Kaltgetränkespender) ist dazu bestimmt, im Haushalt und ähnlichen Anwen-dungen verwendet zu werden, beispielsweise von Kunden in Hotels, Motels und anderen Wohnein-richtungen, von Personal in Geschäften, Büros und ander...
Page 5 - Vorbereiten und in Betrieb; Aufstellen und anschließen; Milch kühlen
5 1 Vorbereiten und in Betrieb nehmen de en fr it nl es pt sv ru U Das Gerät nur an Netzspannung gemäß Typenschild anschließen. Das Typenschild ist auf der Unterseite Ihres Cool Control ange-bracht. Weitere technische Daten finden Sie in dieser Bedienungsanleitung (siehe Kapitel 5 »Technische Daten«...
Page 6 - Cool Control Wireless; Kompatibilität; Deckel und Funkempfänger deinstallieren
6 2 Cool Control Wireless Q T Drücken Sie die Taste Ein/Aus. Ist der Deckel richtig ausgerichtet und eingerastet, beginnt das Gerät zu kühlen. E Ihr JURA Cool Control hält die Milch immer im optimalen Temperaturbereich. Die Milch kann nicht gefrieren. E Um Energie zu sparen, wird der Kühlvorgang...
Page 7 - Reinigung und Pflege; Transport
7 3 Reinigung und Pflege de en fr it nl es pt sv ru Mögliche Fehler beheben: U Im Display wird »Error Milk« angezeigt, beide LEDs leuchten. U Der Milchfüllstandsensor ist defekt. Servicefall. U Beide LEDs blinken. U Die Verbindung zwischen Deckel und Funkempfänger ist gestört oder nicht hergestellt....
Page 8 - Technische Daten
8 5 Technische Daten 5 Technische Daten Spannung 100–240 V ~, 50–60 Hz Sicherheitsprüfung Konformitätszeichen A CE0051 Leistung 25 W Temperaturbereich Kühlt bis 25 °C unter Umgebungstemperatur, aber nicht unter 4 °C Fassungsvermögen Edelstahlbehälter 1,1 l Kabellänge ca. 1,8 m Gewicht ca. 1,9 kg Maß...
Page 9 - Symbol description; Your Cool Control
9 de en fr it nl es pt sv ru Table of contents Control elements 10 Controls on the Cool Control Wireless .............................................................................................................. 10 Important information 11 Proper use ................................................
Page 10 - Control elements; Controls on the Cool Control Wireless
10 Control elements Control elements 1 Cool Control 2 Cover3 Stainless steel container 4 Operating display 5 Power supply unit with mains cable 6 Q On/Off button 7 Socket 8 Connector (may vary depending on the machine and the associated cappuccino frother) 9 Milk pipe 10 Connector11 Adapter12 Metal ...
Page 11 - Important information; Proper use
11 Important information de en fr it nl es pt sv ru Important information Proper use This machine (chilled drinks dispenser) is intended for use in the home and similar situations, for example by customers in hotels, motels and other residential buildings and by workers in shops, offices and other w...
Page 12 - Preparing and using for the; Setting up and connecting; Cooling milk
12 1 Preparing and using for the first time People, including children, who U do not have the physical, sensory or mental capabilities to use the machine safely or U are inexperienced or lack knowledge in how to use the machine safely must be supervised by a responsible person when using it, or must...
Page 13 - Compatibility
13 2 Cool Control Wireless de en fr it nl es pt sv ru 2 Cool Control Wireless E This chapter only applies to the Cool Control Wireless 1 l. Compatibility E The Cool Control Wireless is unfortunately not compatible with all JURA coffee machines. Ask your dealer or visit www.jura.com. Setting up the c...
Page 14 - Cleaning and maintenance; Technical data
14 3 Cleaning and maintenance 3 Cleaning and maintenance E Do not use harsh or abrasive cleaning agents or hard objects to clean the machine. This may damage the machine, the coating of the stainless steel container holder and the stainless steel container. E Please note that only the stainless stee...
Page 15 - JURA contact details / legal
15 6 JURA contact details / legal information de en fr it nl es pt sv ru 6 JURA contact details / legal information JURA Elektroapparate AGKaffeeweltstrasse 10CH-4626 NiederbuchsitenTel. +41 (0)62 38 98 233 @ You will find additional contact details for your country at www.jura.com. Directives The m...
Page 16 - Description des symboles; Votre Cool Control
16 Table des matières Eléments de commande 17 Eléments de commande du Cool Control Wireless .........................................................................................17 Remarques importantes 18 Utilisation conforme .........................................................................
Page 17 - Eléments de commande; Eléments de commande du Cool Control Wireless
17 Eléments de commande de en fr it nl es pt sv ru Eléments de commande 1 Cool Control 2 Couvercle3 Récipient en inox 4 Témoin de fonctionnement 5 Alimentation avec câble secteur 6 Q Touche Marche/Arrêt 7 Prise de raccordement 8 Raccord (peut varier selon la machine à café et la buse Cappuccino corr...
Page 18 - Remarques importantes; Utilisation conforme
18 Remarques importantes Remarques importantes Utilisation conforme Cet appareil (distributeur de boissons froides) est conçu pour être utilisé dans un cadre domestique ou similaire, par exemple par les clients d'hôtels, motels et autres établissements résidentiels ou par le personnel de magasins, b...
Page 19 - Préparation et mise en service; Installation et raccordement; Refroidissement du lait
19 1 Préparation et mise en service de en fr it nl es pt sv ru U Branchez l'appareil uniquement sur la tension secteur indiquée sur la plaque signalétique. La plaque signalétique se situe en dessous de votre Cool Control. Vous trouverez d'autres caractéristiques techniques dans ce mode d'emploi (voi...
Page 21 - Indications des LED / Dépannage; Nettoyage et entretien
21 3 Nettoyage et entretien de en fr it nl es pt sv ru Indications des LED / Dépannage LED du couvercle et du récepteur radio : Indication Description La LED ne s'allume pas. Le couvercle n'est pas alimenté en courant. Le Cool Control est éteint. La LED s'allume. La liaison sans fil entre le couverc...
Page 22 - Elimination; Caractéristiques techniques
22 5 Caractéristiques techniques Elimination Eliminez les anciens appareils dans le respect de l'environnement. H Les anciens appareils contiennent des matériaux recyclables de valeur qui doivent être récupérés. C'est pourquoi il convient de les éliminer par le biais d'un système de collecte adapté....
Page 23 - Descrizione dei simboli adottati; Il vostro Cool Control
23 de en fr it nl es pt sv ru Indice Elementi di comando 24 Elementi di comando Cool Control Wireless ....................................................................................................24 Avvertenze importanti 25 Uso conforme ............................................................
Page 24 - Elementi di comando; Elementi di comando Cool Control Wireless
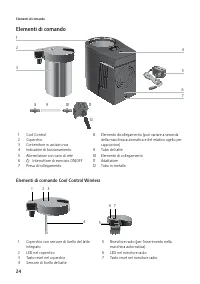
24 Elementi di comando Elementi di comando 1 Cool Control 2 Coperchio3 Contenitore in acciaio inox 4 Indicatore di funzionamento 5 Alimentatore con cavo di rete 6 Q Interruttore di esercizio ON/OFF 7 Presa di collegamento 8 Elemento dicollegamento (può variare a seconda della macchina automatica e d...
Page 25 - Avvertenze importanti; Uso conforme
25 Avvertenze importanti de en fr it nl es pt sv ru Avvertenze importanti Uso conforme Questo apparecchio (distributore di bevande fredde) è concepito per l'uso domestico e per applicazioni simili, ad esempio da parte di clienti in alberghi, motel e altre strutture residenziali, dal personale in neg...
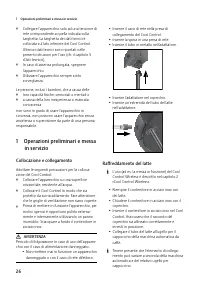
Page 26 - Operazioni preliminari e messa; Collocazione e collegamento; Raffreddamento del latte
26 1 Operazioni preliminari e messa in servizio U Collegare l'apparecchio solo ad una tensione di rete corrispondente a quella indicata sulla targhetta. La targhetta dei dati tecnici è collocata sul lato inferiore del Cool Control. Ulteriori dati tecnici sono riportati nelle presenti istruzioni per ...
Page 28 - Indicatori LED / eliminare gli errori; Pulizia e manutenzione; Trasporto
28 3 Pulizia e manutenzione Indicatori LED / eliminare gli errori LED nel coperchio e nel ricevitore radio: Visualizza-zione Descrizione Il LED non è acceso. Il coperchio non viene alimentato con corrente. Il Cool Control è disattivato. Il LED è acceso. Il collegamento wireless tra coperchio e ricev...
Page 29 - Smaltimento; Dati tecnici
29 5 Dati tecnici de en fr it nl es pt sv ru Smaltimento Smaltire gli apparecchi usati in conformità con le normative ambientali. H Gli apparecchi usati contengono materiali pregiati riciclabili che devono essere avviati al riciclaggio. Pertanto occorre smaltire gli apparecchi usati servendosi degli...
Page 30 - Beschrijving van de symbolen; Uw Cool Control
30 Inhoudsopgave Bedieningselementen 31 Bedieningselementen Cool Control Wireless ....................................................................................................31 Belangrijke aanwijzingen 32 Eigenlijk gebruik.........................................................................
Page 31 - Bedieningselementen; Bedieningselementen Cool Control Wireless
31 Bedieningselementen de en fr it nl es pt sv ru Bedieningselementen 1 Cool Control 2 Afdekking3 Roestvrijstalen houder 4 Bedrijfsindicatie5 Netvoeding met netsnoer 6 Q Toets Aan/Uit 7 Aansluitbus 8 Verbindingsstuk (kan variëren, afhankelijk van de volautomaat en de bijbehorende cappuccinatore) 9 M...
Page 32 - Belangrijke aanwijzingen; Eigenlijk gebruik
32 Belangrijke aanwijzingen Belangrijke aanwijzingen Eigenlijk gebruik Dit apparaat (melkkoeler) is bestemd voor huis-houdelijk of soortgelijk gebruik, bijvoorbeeld door klanten in hotels, motels en andere inrichtingen, of door personeel in winkels, kantoren en andere werkomgevingen. Het is uitsluit...
Page 33 - Voorbereiden en in bedrijf; Opstellen en aansluiten; Melk koelen
33 1 Voorbereiden en in bedrijf stellen de en fr it nl es pt sv ru U Het apparaat alleen op de netspanning aansluiten zoals weergegeven op het typeplaatje. Het typeplaatje bevindt zich aan de onderzijde van uw Cool Control. Meer technische gegevens vindt u in deze gebruiks-aanwijzing (zie hoofdstuk ...
Page 35 - Reiniging en onderhoud
35 3 Reiniging en onderhoud de en fr it nl es pt sv ru LED-indicaties / storingen verhelpen LED in afdekking en in draadloze ontvanger: Indicatie Beschrijving LED brandt niet. De afdekking wordt niet van stroom voorzien. De Cool Control is uitgeschakeld. LED brandt. De wireless verbinding tussen afd...
Page 36 - Afvoer; Technische gegevens
36 5 Technische gegevens Afvoer Voer oude apparaten milieuvriendelijk af. H Oude apparaten bevatten waardevolle, recyclebare materialen die moeten worden gerecycled. Voer oude apparaten daarom af via de hiervoor bestemde inzamelpunten. 5 Technische gegevens Spanning 100–240 V ~, 50–60 Hz Veiligheids...
Page 37 - Descripción de símbolos; Su Cool Control
37 de en fr it nl es pt sv ru Índice de contenidos Elementos de control 38 Elementos de control del Cool Control Wireless .............................................................................................38 Advertencias importantes 39 Utilización conforme a lo previsto ......................
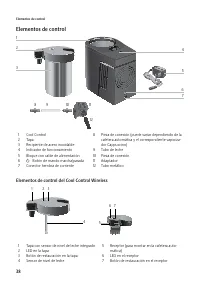
Page 38 - Elementos de control; Elementos de control del Cool Control Wireless
38 Elementos de control Elementos de control 1 Cool Control 2 Tapa3 Recipiente de acero inoxidable 4 Indicador de funcionamiento 5 Bloque con cable de alimentación 6 Q Botón de mando marcha/parada 7 Conector hembra de corriente 8 Pieza de conexión (puede variar dependiendo de la cafetera automática ...
Page 39 - Advertencias importantes; Utilización conforme a lo previsto
39 Advertencias importantes de en fr it nl es pt sv ru Advertencias importantes Utilización conforme a lo previsto Esta máquina (distribuidor de bebidas frías) está destinada a un uso doméstico o similar, como pueden ser los clientes de hoteles, moteles y otros edificios destinados al alojamiento de...
Page 40 - Preparación y puesta en fun-; Instalación y conexión
40 1 Preparación y puesta en funcionamiento U Antes de proceder con los trabajos de limpieza, desconecte el Cool Control y desenchufe el enchufe de alimentación. Limpie el Cool Control siempre con un paño húmedo, nunca mojado, y protéjalo de salpicaduras de agua continuadas. U No llene directamente ...
Page 41 - Refrigerar leche; Compatibilidad
41 2 Cool Control Wireless de en fr it nl es pt sv ru Refrigerar leche E El manejo (por ejemplo, la puesta en funcionamiento) del Cool Control Wireless se describe en el capítulo 2 «Cool Control Wireless». T Llene de leche el recipiente de acero inoxidable. T Cierre el recipiente de acero inoxidable...
Page 42 - Desinstalar la tapa y el receptor; Limpieza y conservación
42 3 Limpieza y conservación E La máquina comienza a refrigerar en cuanto se haya colocado el recipiente de acero inoxi-dable y la tapa esté correctamente encajada. El proceso de refrigeración finaliza en cuanto se saca el recipiente de acero inoxidable del Cool Control. E En caso de que haya muy po...
Page 43 - Transporte y eliminación; Transporte; Datos técnicos
43 4 Transporte y eliminación respetuosa con el medioambiente de en fr it nl es pt sv ru E En caso de que no se haya utilizado la tapa con sensor de nivel de leche durante un periodo de tiempo prolongado, lave a fondo el sensor de nivel de leche con un paño humedecido y lavavajillas suave antes de v...
Page 44 - Contactos JURA/advertencias
44 6 Contactos JURA/advertencias legales 6 Contactos JURA/advertencias legales JURA Elektroapparate AGKaffeeweltstrasse 10CH-4626 NiederbuchsitenTel. +41 (0)62 38 98 233 @ Puede encontrar otros datos de contacto online para su país en www.jura.com. Directivas La máquina cumple las siguientes directi...
Page 45 - Descrição dos símbolos; O seu Cool Control
45 de en fr it nl es pt sv ru Índice Elementos de comando 46 Elementos de comando do Cool Control Wireless ......................................................................................... 46 Indicações importantes 47 Utilização conforme a finalidade ............................................
Page 46 - Elementos de comando; Elementos de comando do Cool Control Wireless
46 Elementos de comando Elementos de comando 1 Cool Control 2 Tampa3 Recipiente em aço inoxidável 4 Indicador de funcionamento 5 Caixa de alimentação com cabo 6 Q Tecla Liga/Desliga 7 Tomada de ligação 8 Peça de ligação (pode variar conforme a máquina de café e o respetivo bocal para Cappuccino) 9 T...
Page 47 - Indicações importantes; Utilização conforme a finalidade
47 Indicações importantes de en fr it nl es pt sv ru Indicações importantes Utilização conforme a finalidade Este aparelho (dispensador de bebidas frias) des-tina-se a ser utilizado em contexto doméstico ou afins, nomeadamente em hotéis, motéis e outros tipos de alojamento, para uso dos respetivos c...
Page 48 - Preparação e colocação em; Instalação e ligação; Arrefecer leite
48 1 Preparação e colocação em funcionamento U Conecte o aparelho apenas a uma tensão de rede, conforme indicado na placa de caracte-rísticas. A placa de características está localizada no lado inferior do seu Cool Control. Para mais informações sobre os dados técnicos, consulte o presente manual de...
Page 50 - Indicações LED/Eliminação de erros; Limpeza e manutenção
50 3 Limpeza e manutenção Indicações LED/Eliminação de erros LED na tampa e no aparelho recetor: Indicação Descrição O LED não se ilumina. A tampa não está ligada à eletricidade. O Cool Control está desligado. O LED ilumina-se. A ligação wireless entre a tampa e o aparelho recetor foi estabele-cida....
Page 51 - Eliminação; Dados técnicos
51 5 Dados técnicos de en fr it nl es pt sv ru Eliminação Por favor, elimine os aparelhos velhos de forma ecológica. H Os aparelhos velhos possuem materiais recicláveis valiosos e devem ser entregues para a reciclagem. Portanto, elimine os aparelhos velhos através de postos de recolha adequados. 5 D...
Page 52 - Symbolbeskrivning; Din Cool Control
52 Innehållsförteckning Manöverorgan 53 Manöverorgan på Cool Control Wireless ..........................................................................................................53 Viktig information 54 Användning för avsett ändamål ................................................................
Page 53 - Manöverorgan; Manöverorgan på Cool Control Wireless
53 Manöverorgan de en fr it nl es pt sv ru Manöverorgan 1 Cool Control 2 Lock3 Rostfri behållare 4 Indikator5 Nätdel med nätsladd 6 Q Knapp Till/Från 7 Anslutningsuttag 8 Anslutningsdel (utformningen kan variera bero-ende på kaffemaskin och tillhörande cappuccino-skummare) 9 Mjölkslang10 Anslutnings...
Page 54 - Viktig information; Användning för avsett ändamål
54 Viktig information Viktig information Användning för avsett ändamål Denna apparat (Cool Control) är avsedd att använ-das i hemmet eller liknande, t.ex. av gäster på hotell, motell etc., av personal i butiker, på kontor och i andra arbetsmiljöer. Den är endast avsedd för att kyla och hålla mjölk f...
Page 55 - Förberedelse och idrifttagning; Uppställning och anslutning; Kylning av mjölk
55 1 Förberedelse och idrifttagning de en fr it nl es pt sv ru Personer, inklusive barn, som på grund av U fysiska, sensoriska eller kognitiva funktionshin-der eller på grund av U oerfarenhet eller okunskap inte kan sköta apparaten på ett säkert sätt, får endast använda den om en ansvarig person ger...
Page 56 - Kompatibilitet
56 2 Cool Control Wireless 2 Cool Control Wireless E Detta kapitel gäller endast Cool Control Wireless 1 l. Kompatibilitet E Cool Control Wireless är tyvärr inte kompatibel med alla helautomatiska kaffemaskiner från JURA. Fråga din återför-säljare eller titta efter på www.jura.com. Idrifttagning av ...
Page 57 - Rengöring och skötsel; Tekniska data
57 3 Rengöring och skötsel de en fr it nl es pt sv ru 3 Rengöring och skötsel E Använd inga starka, slipande rengöringsme-del eller hårda föremål vid rengöringen. Detta kan skada apparaten, ytan på utrymmet för den rostfria behållaren samt själva behållaren. E Observera att endast den rostfria behål...
Page 58 - mation
58 6 JURA kontakt / juridisk information 6 JURA kontakt / juridisk infor- mation JURA Elektroapparate AGKaffeeweltstrasse 10CH-4626 NiederbuchsitenTel. +41 (0)62 38 98 233 @ Ytterligare kontaktuppgifter för ditt land hittar du på www.jura.com. Direktiv Apparaten uppfyller kraven enligt följande dire...
Page 59 - Описание символов; Ваша холодильная установка Cool Control
59 de en fr it nl es pt sv ru Оглавление Элементы управления 60 Элементы управления холодильной установки Cool Control Wireless................................................ 60 Важные указания 61 Использование по назначению .............................................................................
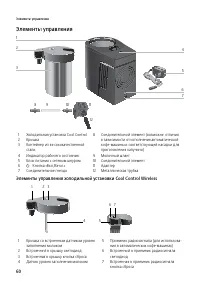
Page 60 - Элементы управления
60 Элементы управления Элементы управления 1 Холодильная установка Cool Control 2 Крышка3 Контейнер из высококачественной стали 4 Индикатор рабочего состояния 5 Блок питания с сетевым шнуром 6 Q Кнопка «Вкл./Выкл.» 7 Соединительное гнездо 8 Соединительный элемент (возможны отличия в зависимости от и...
Page 61 - Важные указания; Использование по назначению
61 Важные указания de en fr it nl es pt sv ru Важные указания Использование по назначению Данная холодильная установка предусмотрена для бытового использования или использо-вания, например, посетителями отеля, мотеля и других учреждений, предоставляющих услуги по проживанию, а также персоналом магаз...
Page 62 - Подготовка и ввод в эксплу-; Размещение и подключение
60 Элементы управления U никогда не оставляйте свисающим сетевой шнур. Вы можете споткнуться о него или повредить его; U не допускайте воздействия на холодиль-ную установку Cool Control таких погодных факторов, как дождь, мороз и прямые солнечные лучи; U не опускайте холодильную установку Cool Contr...
Page 63 - Охлаждение молока
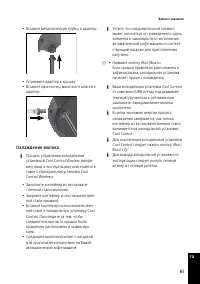
61 Важные указания de en fr it nl es pt sv ru T Вставьте металлическую трубку в адаптер. T Установите адаптер в крышку. T Вставьте один конец молочного шланга в адаптер. Охлаждение молока E Процесс управления холодильной установкой Cool Control Wireless (напри-мер, ввод в эксплуатацию) описывается в...
Page 64 - Холодильная установка Cool
60 Элементы управления 2 Холодильная установка Cool Control Wireless E Данная глава относится только к холо- дильной установке Cool Control Wireless 1 л. Совместимость E К сожалению, холодильная установка Cool Control Wireless совместима не со всеми автоматическими кофе-машинами JURA. Подробную инфо...
Page 65 - Светодиодные индикаторы/; Очистка и обслуживание
61 Важные указания de en fr it nl es pt sv ru Светодиодные индикаторы/ устранение неисправностей Светодиод в крышке и на приемнике радио-сигнала: Состояние светодиода Описание Светодиод не горит. Подача электропитания к крышке не осуществляется. Холодильная установка Cool Control выключена. Светодио...
Page 66 - Транспортировка и утилиза-; Транспортировка; Технические данные
60 Элементы управления 4 Транспортировка и утилиза- ция в соответствии с эколо- гическими требованиями Транспортировка Сохраните упаковку холодильной установки Cool Control. Она послужит защитой при транспортировке. Перед транспортировкой выполните очистку контейнера из высококаче-ственной стали. Ут...
Page 67 - Контактная информация
61 Важные указания de en fr it nl es pt sv ru 6 Контактная информация компании JURA/правовая информация JURA Elektroapparate AGKaffeeweltstrasse 10CH-4626 NiederbuchsitenТел. +41 (0)62 38 98 233 @ Контактные данные, действительные для Вашей страны, см. на интернет-странице www.jura.com. Директивы Хо...