Epson XP 440 - Installation Manual

Epson XP 440 – Installation Manual, read for free online in PDF format. We hope this helps you resolve any issues you may have. If you have further questions, please contact us through the contact form.


Start Here
2
Slide the edge guide to the left.
3
Slide out the output tray.
4
Load paper, glossy or printable side up and short edge fi rst,
against the right side of the rear paper feed slot.
5
Slide the edge guide against the paper, but not too tightly,
and fl ip the feeder guard back.
Note:
Make sure you place the paper against the right side of the
rear paper feed slot. Otherwise, the printer cannot detect the paper
and the paper setup screen is not displayed on the control panel.
6
Check the current paper settings on the control panel.
To use these settings, press
OK. If you want to change the
settings, press or to select
Change, then press OK.
Select the paper size, press
OK, select the paper type,
press
OK, then press OK again to confi rm settings.
Read these instructions before using your product.
Note
for Spanish speakers/Nota para hispanohablantes:
Para
obtener instrucciones de confi guración en español, consulte la Guía de
instalación en
www.epson.com/support/xp340sp,
www.epson.com/support/xp440sp o www.epson.com/support/xp446sp
(requiere una conexión a Internet).
1
Unpack
Note:
Do not open ink cartridge packages until you are ready to install
the ink. Cartridges are vacuum packed to maintain reliability.
1
Remove all protective materials from the product.
2
Lift up the scanner unit and remove all protective materials
from inside the product.
Caution:
Do not touch the fl at white cable.
3
Lower the scanner unit.
2
Turn on and configure
1
Connect the power cord to the back of the product and to
an electrical outlet.
Caution:
Do not connect to your computer yet.
2
Raise the control panel and turn on the product.
Caution:
Do not lower the control panel without fi rst squeezing the
release bar underneath or you may damage the product.
3
Press or to select your language, then press
OK.
Note:
You can change the language later using the product’s
control panel. For more information, see the online User’s Guide.
3
Install ink cartridges
Caution:
Keep ink cartridges out of the reach of children and do not
drink the ink.
1
Lift up the scanner unit.
Caution:
Do not touch the fl at, white cable.
2
Gently shake the ink cartridges.
3
Unpack the ink cartridges.
4
Remove only the yellow tape from each ink cartridge.
Caution:
Do not remove any other labels or seals, or ink will leak.
Do not touch the green chip on the cartridge.
5
Insert the cartridge in the holder for each color. Press each
cartridge down until it clicks. Make sure all cartridges are
pushed down into place.
6
Lower the scanner unit, then press
to start charging the
ink delivery system.
7
The printer starts charging the ink. Ink charging takes
approximately 4 minutes. When you see a completion
message on the printer’s LCD screen, charging is complete.
Caution:
Don’t turn off the printer while it is charging or you’ll
waste ink.
Note:
• The printer is designed for use with Epson
®
cartridges only, not
third-party cartridges or ink.
• The cartridges included with the printer are designed for printer
setup and not for resale. After some ink is used for charging, the
rest is available for printing.
4
Load paper
1
Make sure the product is done charging ink. Then fl ip the
feeder guard forward, raise the paper support, and tilt it
backwards slightly.
XP-340/XP-440/XP-446
4133408 Rev.0
1-F
C
4133408 Rev.0
1-F
M
4133408 Rev.0
1-F
Y
4133408 Rev.0
1-F
K
"Loading the manual" means you need to wait until the file loads and becomes available for online reading. Some manuals are very large, and the time they take to appear depends on your internet speed.
Was this manual helpful?
About this manual
- Brand
- Epson
- Model
- XP 440
- Document type
- Installation Manual
- Language(s)
- English
- Pages
- 4
- File size
- 1.7 MB
- Format
Other Manuals for Epson XP 440
Ask a question
Related manuals
Popular Epson Other
 Epson PictureMate Flash - PM 280 - PictureMate Flash Compact Photo Printer User Manual
 Epson TM-T70II Troubleshooting Guide
 Epson U925 - TM B/W Dot-matrix Printer User Manual
 Epson RR 70W User Manual
 Epson 9890 Manual
 Epson 206636 - PocketJet 3 Plus User Manual
 Epson Printer TM-H5000II User Manual
 Epson TM-T88V User Manual
More Epson Other models
 Epson XP-850 Manual
 Epson XP-860 Installation Manual
 Epson XP-950 User Manual
 Epson XP-960 Manual
 Epson XP202 Manual
- Epson XP205 Manual
 Epson XP 4100 Installation Manual
- Epson XP 4105 Installation Manual
 Epson XP 6000 Installation Manual
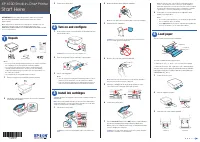 Epson XP 6100 Installation Manual
 Epson XP 15000 User Manual
 Epson XXX-00 User Manual