Page 2 - Contents
Contents Guide to This Manual Introduction to the Manuals. . . . . . . . . . . . . . . . . . . 6 Searching for Information. . . . . . . . . . . . . . . . . . . . 6 Printing Only the Pages You Need. . . . . . . . . . . . . . 7 About This Manual. . . . . . . . . . . . . . . . . . . . . . . . . 7 Marks...
Page 5 - Guide to This Manual
Guide to This Manual Introduction to the Manuals. . . . . . . . . . . . . . . . . . . . . . . . . . . . . . . . . . . . . . . . . . . 6 Searching for Information. . . . . . . . . . . . . . . . . . . . . . . . . . . . . . . . . . . . . . . . . . . . . 6 Printing Only the Pages You Need. . . . . . . ....
Page 6 - Introduction to the Manuals; Support; Searching by keyword
Introduction to the Manuals The following manuals are supplied with your Epson printer. As well as the manuals, check the various types ofhelp information available from the printer itself or from the Epson software applications. ❏ Important Safety Instructions (paper manual) Provides you with instr...
Page 7 - Printing Only the Pages You Need; Print; Marks and Symbols
❏ Mac OS: Hold down the command key, and then press ← . Printing Only the Pages You Need You can extract and print only the pages you need. Click Print in the File menu, and then specify the pages you want to print in Pages in Pages to Print . ❏ To specify a series of pages, enter a hyphen between t...
Page 8 - Related Information; Notes on Screenshots and Illustrations; Windows
Related Information & Links to related sections. Notes on Screenshots and Illustrations ❏ Screenshots of the printer driver are from Windows 10 or macOS High Sierra. The content displayed on thescreens varies depending on the model and situation. ❏ Illustrations used in this manual are examples ...
Page 10 - Important Instructions
Important Instructions Safety Instructions. . . . . . . . . . . . . . . . . . . . . . . . . . . . . . . . . . . . . . . . . . . . . . . . . 11 Printer Advisories and Warnings. . . . . . . . . . . . . . . . . . . . . . . . . . . . . . . . . . . . . . . 12 Protecting Your Personal Information. . . . ....
Page 12 - Safety Instructions for Ink; Advisories and Warnings for Setting Up the Printer
Safety Instructions for Ink ❏ Be careful when you handle used ink cartridges, as there may be some ink around the ink supply port. ❏ If ink gets on your skin, wash the area thoroughly with soap and water. ❏ If ink gets into your eyes, flush them immediately with water. If discomfort or vision proble...
Page 13 - Advisories and Warnings for Using the Printer
❏ Avoid places subject to rapid changes in temperature and humidity. Also, keep the printer away from directsunlight, strong light, or heat sources. Related Information & “Installation Location and Space” on page 187 Advisories and Warnings for Using the Printer ❏ Do not insert objects through t...
Page 15 - Part Names and Functions
Part Names and Functions Front. . . . . . . . . . . . . . . . . . . . . . . . . . . . . . . . . . . . . . . . . . . . . . . . . . . . . . . . . . . 16 Inside. . . . . . . . . . . . . . . . . . . . . . . . . . . . . . . . . . . . . . . . . . . . . . . . . . . . . . . . . . . 17 Rear. . . . . . . . . ...
Page 16 - Front
Front A Paper support Supports loaded paper. B Edge guide Feeds the paper straight into the printer. Slide to the edges of thepaper. C Paper tray Loads all paper types supported by the printer. D Output tray Holds the ejected paper. When you start printing, this tray is ejectedto fit the paper size ...
Page 17 - Inside
A Control panel Allows you to make settings and perform operations on the printer.Also displays the printer’s status. B Paper cassette1 Loads paper. C Paper cassette2 Inside A Maintenance box cover Open when replacing the maintenance box. The maintenance box isa container that collects a very small ...
Page 18 - Rear
Rear A Rear cover Remove when removing jammed paper. B AC inlet Connects the power cord. C USB port Connects a USB cable to connect with a computer. D LAN port Connects a LAN cable. Part Names and Functions > Rear 18 https://manual-hub.com/
Page 19 - Guide to the Control Panel
Guide to the Control Panel Control Panel. . . . . . . . . . . . . . . . . . . . . . . . . . . . . . . . . . . . . . . . . . . . . . . . . . . . . 20 Home Screen Configuration. . . . . . . . . . . . . . . . . . . . . . . . . . . . . . . . . . . . . . . . . . 21 Menu Screen Configuration. . . . . . . ...
Page 20 - Control Panel
Control Panel A Turns the printer on or off. Unplug the power cord when the power light is off. B Displays the home screen. C Displays menus and messages. D Flashes or turns on when an error occurs. E Flashes when the printer is processing data. It turns on when there are queued jobs. F Displays the...
Page 21 - Home Screen Configuration
Home Screen Configuration A You can check the approximate ink levels and the approximate service life of the maintenancebox. B Displays the network connection status. See the following for more details. “Guide to the Network Icon” on page 22 C Indicates that Quiet Mode is set for the printer. When t...
Page 22 - Guide to the Network Icon
Guide to the Network Icon The printer is not connected to a wired (Ethernet) network or unset it. The printer is connected to a wired (Ethernet) network. The printer is not connected to a wireless ( Wi-Fi) network. The printer is searching for SSID, unset IP address, or having a problem with a wirel...
Page 23 - Entering Characters; How To
Entering Characters You can enter characters and symbols by using on-screen keyboard when you make network settings and so on. A Indicates the character count. B Moves the cursor to the input position. C Switches between upper case and lower case. D Switches the character type. ABC: Alphabet 123#: N...
Page 25 - Loading Paper
Loading Paper Paper Handling Precautions. . . . . . . . . . . . . . . . . . . . . . . . . . . . . . . . . . . . . . . . . . 26 Paper Size and Type Settings. . . . . . . . . . . . . . . . . . . . . . . . . . . . . . . . . . . . . . . . . . 26 Loading Paper. . . . . . . . . . . . . . . . . . . . . . ....
Page 26 - Paper Handling Precautions
Paper Handling Precautions ❏ Read the instruction sheets supplied with the paper. ❏ To achieve high-quality printouts with genuine Epson paper, use the paper in the environment stated on thesheets supplied with the paper. ❏ Fan and align the edges of the paper before loading. Do not fan or curl phot...
Page 27 - List of Paper Type
ink by making sure you are not printing on the wrong paper size or printing in the wrong color due to usingsettings that do not match the paper type. If displayed paper size and type differ from the loaded paper, select the item to change. If the settings match theloaded paper, close the screen. Not...
Page 28 - Loading Pre-punched Paper
Select , and then select How To > Load paper . Select the paper type and paper source you want to use to display the animations. If you want to stop viewing the animation, close the screen. Loading Pre-punched Paper Load a single sheet of pre-punched paper in the paper tray. Paper size: A3, B4, A...
Page 29 - Loading Long Papers
Loading Long Papers ❏ Paper tray Load long paper in the paper tray by allowing the leading edge of the paper to roll over. Select User-Defined as the paper size setting. ❏ Make sure the end of the paper is cut perpendicularly. A diagonal cut may cause paper feed problems. ❏ Long paper cannot be held...
Page 30 - Printing
Printing Printing Documents. . . . . . . . . . . . . . . . . . . . . . . . . . . . . . . . . . . . . . . . . . . . . . . . 31 Printing on Envelopes. . . . . . . . . . . . . . . . . . . . . . . . . . . . . . . . . . . . . . . . . . . . . . . 65 Printing Web Pages. . . . . . . . . . . . . . . . . . . ...
Page 31 - Printing from a Computer - Windows; Printing Using Easy Settings
Printing Documents Printing from a Computer - Windows If you cannot change some of the printer driver settings, they may have been restricted by the administrator.Contact your printer administrator for assistance. Printing Using Easy Settings Note: Operations may differ depending on the application....
Page 32 - Menu Options for the Printer Driver; Main Tab
6. Change the settings as necessary. See the menu options for the printer driver for details. Note: ❏ You can also see the online help for explanations of the setting items. Right-clicking an item displays Help . ❏ When you select Print Preview , you can see a preview of your document before printin...
Page 34 - More Options Tab
Show Settings/Hide Settings: Displays a list of items currently set on the Main and More Options tabs. You can show or hide the current setting list screen. Restore Defaults: Return all settings to their factory default values. The settings on the More Options tab are also reset to their defaults. I...
Page 37 - Adding Printing Presets for Easy Printing
Adding Printing Presets for Easy Printing If you create your own preset of frequently used print settings on the printer driver, you can print easily byselecting the preset from the list. 1. On the printer driver's Main or More Options tab, set each item (such as Document Size and Paper Type ). 2. C...
Page 39 - Printing a Booklet
& “Printing Using Easy Settings” on page 31 Printing a Booklet You can also print a booklet that can be created by re-ordering the pages and folding the printout. Note: ❏ This feature is not available with borderless printing. ❏ If you do not use paper that is suitable for 2-sided printing, the ...
Page 40 - Printing Several Pages on One Sheet
5. Set the other items on the Main and More Options tabs as necessary, and then click OK . 6. Click Print . Related Information & “Available Paper and Capacities” on page 159 & “Loading Paper” on page 27 & “Printing Using Easy Settings” on page 31 Printing Several Pages on One Sheet You ...
Page 41 - Printing to Fit the Paper Size
Printing to Fit the Paper Size Select the paper size you loaded in the printer as the Destination Paper Size setting. Note: This feature is not available with borderless printing. 1. On the printer driver's More Options tab, make the following settings. ❏ Document Size: Select the size of the paper ...
Page 42 - Printing a Reduced or Enlarged Document at any Magnification
Printing a Reduced or Enlarged Document at any Magnification You can reduce or enlarge the size of a document by a specific percentage. 1. On the printer driver's More Options tab, select the document size from the Document Size setting. 2. Select the paper size you want to print on from the Output ...
Page 43 - Making Posters Using Overlapping Alignment Marks
Note: This feature is not available with borderless printing. 1. On the printer driver's Main tab, select 2x1 Poster , 2x2 Poster , 3x3 Poster , or 4x4 Poster as the Multi-Page setting. 2. Click Settings , make the appropriate settings, and then click OK . Note:Print Cutting Guides allows you to pri...
Page 48 - Printing with a Header and Footer; More Options
10. Cut off the remaining margins along the outer guide. Printing with a Header and Footer You can print information such as a user name and printing date in headers or footers. 1. On the printer driver's More Options tab, click Watermark Features , and then select Header/Footer . Printing > Prin...
Page 49 - Printing a Watermark
2. Settings , and then select the items you want to print. Note: ❏ To specify the first page number, select Page Number from the position you want to print in the header or footer, and then select the number in Starting number . ❏ If you want to print text in the header or footer, select the positio...
Page 50 - Printing Password-Protected Files
3. Set the other items on the Main and More Options tabs as necessary, and then click OK . “Main Tab” on page 32 “More Options Tab” on page 34 4. Click Print . Related Information & “Loading Paper” on page 27 & “Printing Using Easy Settings” on page 31 Printing Password-Protected Files Yon c...
Page 51 - Printing Multiple Files Together; Main; Printing Using the Color Universal Print Feature
Printing Multiple Files Together Job Arranger Lite allows you to combine several files created by different applications and print them as a singleprint job. You can specify the print settings for combined files, such as multi-page layout, and 2-sided printing. 1. On the printer driver's Main tab, s...
Page 52 - Adjusting the Print Color
❏ Paper Type: Plain paper, Copy paper, Letterhead, Recycled paper, Colored paper, Preprinted paper, High qualityplain paper ❏ Quality: Standard or a higher quality ❏ Print Color: Color ❏ Applications: Microsoft® Office 2007 or later ❏ Text Size: 96 pts or smaller 1. On the printer driver's More Opti...
Page 53 - Printing to Emphasize Thin Lines
1. On the printer driver's More Options tab, select the method of color correction from the Color Correction setting. ❏ Automatic: This setting automatically adjusts the tone to match the paper type and print quality settings. ❏ Custom: Click Advanced , you can make your own settings. 2. Set the oth...
Page 54 - Printing Clear Bar Codes; Printing from a Computer - Mac OS
Printing Clear Bar Codes You can print a bar code clearly and make it easy to scan. Only enable this feature if the bar code you printedcannot be scanned. You can use this feature under the following conditions. ❏ Paper Type: Plain paper, Letterhead, Recycled, Color, Preprinted, High Quality Plain P...
Page 56 - Menu Options for Layout; Reverse page orientation:; Menu Options for Color Matching
7. Click Print . Note: If you want to cancel printing, on your computer click the printer icon in the Dock . Select the job you want to cancel, and then do one of the following. However, you cannot cancel a print job from the computer once it has been completelysent to the printer. In this case, can...
Page 59 - Two-sided Printing Settings
4. Click Print . The next time you want to print using the same settings, select the registered preset name from the Presets . Related Information & “Loading Paper” on page 27 & “Printing Using Easy Settings” on page 54 Printing on 2-Sides You can print on both sides of the paper. Note: ❏ Th...
Page 60 - Layout; Pages per Sheet
& “Loading Paper” on page 27 & “Printing Using Easy Settings” on page 54 Printing Several Pages on One Sheet You can print several pages of data on a single sheet of paper. 1. Select Layout from the pop-up menu. 2. Set the number of pages in Pages per Sheet , the Layout Direction (page order...
Page 62 - Printing Documents from Smart Devices (iOS)
Related Information & “Loading Paper” on page 27 & “Printing Using Easy Settings” on page 54 Adjusting the Print Color You can adjust the colors used in the print job. These adjustments are not applied to the original data. PhotoEnhance produces sharper images and more vivid colors by automa...
Page 63 - Printing Documents Using Epson Smart Panel; Printing Documents Using AirPrint
Printing Documents Using Epson Smart Panel Note: Operations may differ depending on the device. 1. Set up your printer for wireless printing. 2. If Epson Smart Panel is not installed, install it. “Application for Easily Operating the Printer from a Smart device (Epson Smart Panel)” on page 168 3. Co...
Page 64 - Printing Documents from Smart Devices (Android); Printing Documents Using Epson Print Enabler; Settings
Printing Documents from Smart Devices (Android) You can print documents from a smart device such as a smartphone or tablet. Printing Documents Using Epson Smart Panel Note: Operations may differ depending on the device. 1. Set up your printer for wireless printing. 2. If Epson Smart Panel is not ins...
Page 65 - Printing Using Mopria Print Service; Printing on Envelopes from a Computer (Windows)
5. From an Android application such as Chrome, tap the menu icon and print whatever is on the screen. Note: If you do not see your printer, tap All Printers and select your printer. Printing Using Mopria Print Service Mopria Print Service enables instant wireless printing from Android smart phones o...
Page 66 - Printing on Envelopes from a Computer (Mac OS); Printing Web Pages from a Computer
6. Click Print . Printing on Envelopes from a Computer (Mac OS) 1. Load envelopes in the printer. “Loading Paper” on page 27 2. Open the file you want to print. 3. Select Print from the File menu or another command to access the print dialog. 4. Select the size as the Paper Size setting. 5. Select P...
Page 68 - Registering to Epson Connect Service from the Control Panel; General Settings
Registering to Epson Connect Service from the Control Panel Follow the steps below to register the printer. 1. Select Settings on the control panel. 2. Select General Settings > Web Service Settings > Epson Connect Services > Unregister to print the registration sheet. 3. Follow the instruc...
Page 69 - Maintaining the Printer
Maintaining the Printer Checking the Status of Consumables. . . . . . . . . . . . . . . . . . . . . . . . . . . . . . . . . . . . 70 Improving Print Quality. . . . . . . . . . . . . . . . . . . . . . . . . . . . . . . . . . . . . . . . . . . . . 70 Cleaning the Printer. . . . . . . . . . . . . . . ....
Page 70 - Checking the Status of Consumables; Adjusting the Print Quality
Checking the Status of Consumables You can check the approximate ink levels and the approximate service life of the maintenance box from the printer's control panel. Select on the home screen. Note: ❏ You can also check the approximate ink levels and the approximate service life of the maintenance b...
Page 72 - Checking and Cleaning the Print Head; Maintenance; Print Head Nozzle Check
❏ This pattern allows you to perform alignment if you see horizontal banding at regular intervals. Find and select the number for the least separated and overlapping pattern. Checking and Cleaning the Print Head If the nozzles are clogged, the printouts become faint, there is visible banding, or une...
Page 73 - Preventing nozzle clogging
❏ If you cannot see any broken lines or missing segments as in the following "OK" pattern, the nozzles are not clogged. Print head cleaning is not necessary. Select to exit. 5. Select . 6. Follow the on-screen instructions to clean the print head. 7. When cleaning is finished, follow the on-...
Page 74 - Cleaning the Paper Path for Ink Smears; Cleaning the Translucent Film
3. Select one of the alignment menus. ❏ Ruled Line Alignment: Select this if your printouts look blurry or vertical ruled lines appear misaligned. ❏ Horizontal Alignment: Select this if you see horizontal banding at regular intervals. 4. Follow the on-screen instructions to load paper and print the ...
Page 78 - Disabling your Wi-Fi Connection; Installing the Applications Separately
❏ Select Sleep Timer or Power Off Settings > Power Off If Inactive or Power Off If Disconnected , and then make settings. ❏ Select Sleep Timer or Power Off Timer , and then make settings. Disabling your Wi-Fi Connection If you used to use Wi-Fi (wireless LAN) but no longer need to do so due to a ...
Page 79 - Checking if a genuine Epson printer driver is installed - Windows
1. Make sure the printer and the computer are available for communication, and the printer is connected to theInternet. 2. Start EPSON Software Updater. The screenshot is an example on Windows. 3. For Windows, select your printer, and then click to check for the latest available applications. 4. Sel...
Page 80 - Checking if a genuine Epson printer driver is installed - Mac OS
Select Control Panel > View devices and printers ( Printers , Printers and Faxes ), and then do the following to open the print server properties window. ❏ Windows Windows 10/Windows 8.1/Windows 8/Windows 7/Windows Server 2019/Windows Server 2016/Windows Server 2012 R2/Windows Server 2012/Windows...
Page 81 - Uninstalling Applications; Uninstalling Applications - Windows
Select System Preferences from the Apple menu > Printers & Scanners (or Print & Scan , Print & Fax ), and then select the printer. Click Options & Supplies , and if the Options tab and Utility tab are displayed on the window, a genuine Epson printer driver is installed on your com...
Page 82 - Uninstalling Applications - Mac OS
3. Open Control Panel : ❏ Windows 10/Windows Server 2019/Windows Server 2016 Click on the start button, and then select Windows System > Control Panel . ❏ Windows 8.1/Windows 8/Windows Server 2012 R2/Windows Server 2012 Select Desktop > Settings > Control Panel . ❏ Windows 7/Windows Vista/W...
Page 83 - Updating Applications and Firmware; Updating the Printer's Firmware using the Control Panel
5. Select Go > Applications > Epson Software > Uninstaller . 6. Select the application you want to uninstall, and then click Uninstall . c Important: The Uninstaller removes all drivers for Epson inkjet printers on the computer. If you use multiple Epson inkjetprinters and you only want to ...
Page 84 - Updating Firmware Using Web Config; Updating Firmware without Connecting to the Internet
2. Select General Settings > System Administration > Firmware Update > Update . Note: Select Notification > On to set the printer to regularly check for available firmware updates. 3. Check the message displayed on the screen and start searching for available updates. 4. If a message is ...
Page 88 - Solving Problems
Solving Problems The Printer Does Not Work as Expected. . . . . . . . . . . . . . . . . . . . . . . . . . . . . . . . . . 89 A Message is Displayed on the LCD Screen. . . . . . . . . . . . . . . . . . . . . . . . . . . . . . . 111 Paper Gets Jammed. . . . . . . . . . . . . . . . . . . . . . . . . . ...
Page 89 - The Printer Does Not Turn On or Off; Power Does Not Turn On; Solutions; Solutions; Power Turns Off Automatically; Solutions; Paper Does Not Feed Properly; No Paper Feeds
The Printer Does Not Work as Expected The Printer Does Not Turn On or Off Power Does Not Turn On The following causes can be considered. The power cord is not plugged in properly to the electrical outlet. Solutions Make sure the power cord is securely plugged in. The P button was not pressed for lon...
Page 90 - Paper Feeds at a Slant
The installation location is inappropriate. Solutions Place the printer on a flat surface and operate in the recommended environmental conditions. & “Environmental Specifications” on page 186 Unsupported paper is being used. Solutions Use paper supported by this printer. & “Available Paper a...
Page 91 - Several Sheets of Paper are Fed at a Time
& “Unavailable Paper Types” on page 163 Paper handling is inappropriate. Solutions Follow paper handling precautions. & “Paper Handling Precautions” on page 26 The paper is loaded incorrectly. Solutions Load paper in the correct direction, and slide the edge guide against the edge of the pap...
Page 92 - Paper handling is inappropriate.; The paper is moist or damp.; The paper settings on the printer are incorrect.; Cannot Print; Cannot Print from Windows; Checking the Connection Status
Paper handling is inappropriate. Solutions Follow paper handling precautions. & “Paper Handling Precautions” on page 26 The paper is moist or damp. Solutions Load new paper. Static electricity is causing sheets of paper to stick to each other. Solutions Fan the paper before loading. If the paper...
Page 93 - Cannot connect to a Network; Something is wrong with the network devices for Wi-Fi connection.
1. Double-click the Epson Printer Connection Checker icon on the desktop. Epson Printer Connection Checker starts. If there is no icon on the desktop, follow the methods below to start Epson Printer Connection Checker. ❏ Windows 10 Click the start button, and then select Epson Software > Epson Pr...
Page 94 - A privacy separator on the wireless router is available.; The IP address is incorrectly assigned.
Devices cannot receive signals from the wireless router because they are too far apart. Solutions After moving the computer or the smart device and the printer closer to the wireless router, turn off thewireless router, and then turn it back on. When changing the wireless router, the settings do not...
Page 95 - There is a problem with the network settings on the computer.; Network
There is a problem with the network settings on the computer. Solutions Try accessing any website from your computer to make sure that your computer's network settings arecorrect. If you cannot access any website, there is a problem on the computer. Check the network connection of the computer. See ...
Page 96 - The Printer Cannot Connect by USB (Windows); The USB cable is not plugged into the electrical outlet correctly.; There is a problem with the USB hub.; There is a problem with the USB cable or the USB inlet.; There is a problem with the software or data.
13. Connect the Ethernet cables that you removed in step 1 to the computer and the printer. If the problem still occurs, devices other than the printer may be causing the problem. The Printer Cannot Connect by USB (Windows) The following causes can be considered. The USB cable is not plugged into th...
Page 97 - There is a problem with the printer's status.; There is still a job waiting to be printed.; The printer is pending or offline.; The printer is not selected as the default printer.
There is a problem with the printer's status. Solutions Click EPSON Status Monitor 3 on the printer driver's Maintenance tab, and then check the printer status. If EPSON Status Monitor 3 is disabled, click Extended Settings on the Maintenance tab, and then select Enable EPSON Status Monitor 3 . Ther...
Page 98 - The printer port is not set correctly.; Suddenly the Printer Cannot Print over a Network Connection; The network environment has been changed.; The printer is not connected to the network.
If you install the printer driver multiple times, copies of the printer driver may be created. If copies suchas "EPSON XXXX Series (copy 1)" are created, right-click the copied driver icon, and then click Remove Device . The printer port is not set correctly. Solutions Click Print Queue on t...
Page 100 - Cannot Print from Mac OS
Network connection: EPSON XXXX Series (network) If you install the printer driver multiple times, copies of the printer driver may be created. If copies suchas "EPSON XXXX Series (copy 1)" are created, right-click the copied driver icon, and then click Remove Device . The printer port is not...
Page 103 - The Printer Cannot Connect by USB (Mac OS)
1. Remove the Ethernet cable connected to the computer and the printer. 2. When IEEE802.3az for the computer is enabled, disable it. See the documentation provided with the computer for details. 3. Connect the computer and the printer with an Ethernet cable directly. 4. On the printer, print a netwo...
Page 104 - Cannot Print Even Though a Connection has been Established (Mac OS); There is a problem with the status of the printer.; User feature restrictions are enabled for the printer.
There is a problem with the USB cable or the USB inlet. Solutions If the USB cable cannot be recognized, change the port, or change the USB cable. Cannot Print Even Though a Connection has been Established (Mac OS) The following causes can be considered. There is a problem with the software or data....
Page 105 - Cannot Print from Smart Device; Check the connection with the smart device
Connect the computer or smart device to the same SSID as the printer. & “Re-setting the Network Connection” on page 133 Something is wrong with the network devices for Wi-Fi connection. Solutions Turn off the devices you want to connect to the network. Wait for about 10 seconds, and then turn on...
Page 107 - There is a problem with the network settings on the smart device.; Cannot Print Even Though a Connection has been Established (iOS); Paper Setup Auto Display is disabled.; Paper Setup Auto Display
Connect the computer or smart device to the same SSID as the printer. A privacy separator on the wireless router is available. Solutions Most wireless routers have a privacy separator feature that blocks communication between connecteddevices. If you cannot communicate between the printer and the co...
Page 108 - AirPrint is disabled.
Settings > General Settings > Printer Settings > Paper Source Settings > Paper Setup Auto Display AirPrint is disabled. Solutions Enable the AirPrint setting on Web Config. & “Application for Configuring Printer Operations (Web Config)” on page 169 Suddenly the Printer Cannot Print o...
Page 109 - Cannot Operate the Printer as Expected; Operations are Slow; Printing Is Too Slow; Unnecessary applications are running.; The print quality is set to high.; Bidirectional printing is disabled.; Quiet Mode is enabled.
Check the network connection of the computer. See the documentation provided with the smart devicefor details. Cannot Operate the Printer as Expected Operations are Slow Printing Is Too Slow The following causes can be considered. Unnecessary applications are running. Solutions Close any unnecessary...
Page 110 - The printer is in sleep mode.; Quiet Mode is disabled on the printer.; Error occurred in power supply.
Printing Slows Down Dramatically During Continuous Printing The function that prevents the printer mechanism from overheating and being damaged isoperating. Solutions You can continue printing. To return to normal printing speed, leave the printer idle for at least 30minutes. Printing speed does not...
Page 111 - The Root Certificate Needs to be Updated; The root certificate has expired.; Cannot Cancel Printing from a Computer Running Mac OS X v10.6.8; There is a problem with your AirPrint setup.; Forgot Your Password; You need help from service personnel.
The Root Certificate Needs to be Updated The root certificate has expired. Solutions Run Web Config, and then update the root certificate. Cannot Cancel Printing from a Computer Running Mac OS X v10.6.8 There is a problem with your AirPrint setup. Solutions Run Web Config, and then select Port9100 a...
Page 112 - Paper Gets Jammed; Preventing Paper Jams
Error Messages Solutions Paper Setup Auto Display is set to Off. Somefeatures may not be available. For details, seeyour documentation. If Paper Setup Auto Display is disabled, you cannot use AirPrint. The combination of the IP address and thesubnet mask is invalid. See your documentationfor more de...
Page 113 - Ink Cartridge Handling Precautions; Storing precautions for ink; Handling precautions for replacing ink cartridges
❏ Place the printer on a flat surface and operate in the recommended environmental conditions. “Environmental Specifications” on page 186 ❏ Use the paper supported by this printer. “Available Paper and Capacities” on page 159 ❏ Follow paper handling precautions. “Paper Handling Precautions” on page ...
Page 115 - Ink consumption; Replacing Ink Cartridges
❏ Do not replace ink cartridges with the power off. Do not move the print head by hand; otherwise, you maydamage the printer. ❏ Do not turn off the printer during ink charging. If the ink charging is incomplete, you may not be able to print. ❏ Do not leave the printer with the ink cartridges removed...
Page 116 - Temporarily Printing with Black Ink; Continue Printing Temporarily with Only Black Ink (Control Panel); Proceed; Continue Printing Temporarily with Only Black Ink (Windows)
Continue Printing Temporarily without Replacing Ink Cartridges Temporarily Printing with Black Ink When color ink is expended and black ink still remains, you can use the following settings to continue printing fora short time using only black ink. ❏ Paper Type: Plain paper, Preprinted, Letterhead, ...
Page 118 - Continue Printing Temporarily with Only Black Ink (Mac OS); Continue Printing to Conserve Black Ink (for Windows Only)
7. Click Print in Black in the window displayed. Continue Printing Temporarily with Only Black Ink (Mac OS) Note: To use this feature through a network, connect with Bonjour . 1. Click the printer icon in the Dock . 2. Cancel the job. Note: If you cannot cancel printing from the computer, cancel usi...
Page 119 - Maintenance Box Handling Precautions
Note: ❏ If EPSON Status Monitor 3 is disabled, access the printer driver, click Extended Settings on the Maintenance tab, and then select Enable EPSON Status Monitor 3 . ❏ Composite black looks slightly different from pure black. In addition, the print speed is reduced. ❏ To maintain the quality of ...
Page 120 - Replacing a Maintenance Box
Replacing a Maintenance Box In some print cycles a very small amount of surplus ink may be collected in the maintenance box. To prevent inkleakage from the maintenance box, the printer is designed to stop printing when the absorbing capacity of themaintenance box has reached its limit. Whether and h...
Page 121 - Color Missing, Banding, or Unexpected Colors Appear in Printout; The print head nozzles may be clogged.; The paper type setting does not match the paper loaded.; The print quality is set to low.
Print Quality is Poor Color Missing, Banding, or Unexpected Colors Appear in Printout The print head nozzles may be clogged. Solutions Use the Print Quality Adjustment feature. If you have not used the printer for a long time, the print head nozzles may be clogged and ink drops may not be discharged...
Page 122 - Blurry Prints, Vertical Banding, or Misalignment; The print head position is out of alignment.; The bidirectional printing setting is enabled.; Striped Patterns Appear
The print head position is out of alignment. Solutions Align the print head using the Print Quality Adjustment feature. & “Adjusting the Print Quality” on page 70 Blurry Prints, Vertical Banding, or Misalignment The following causes can be considered. The print head position is out of alignment....
Page 123 - Printout Comes Out as a Blank Sheet
The bidirectional printing setting is enabled. Solutions When printing on plain paper, disable the bidirectional setting. During bidirectional (or high speed) printing, the print head prints while moving in both directions, andvertical lines may be misaligned. Disabling this setting may slow down pr...
Page 124 - Multiple sheets of paper are fed into the printer at the same time.; Paper Is Smeared or Scuffed; Paper is loaded incorrectly.; The paper path is smeared.; The print head is rubbing the surface of the paper.
The print settings and the paper size loaded in the printer are different. Solutions Change the print settings according to the paper size loaded in the paper cassette. Load paper in thepaper cassette that matches the print settings. Multiple sheets of paper are fed into the printer at the same time...
Page 125 - Printed Photos are Sticky; The print was made on the wrong side of the photo paper.
❏ Control panel Select Settings > General Settings > Printer Settings , and then enable Thick Paper . ❏ Windows Click Extended Settings on the printer driver's Maintenance tab, and then select Thick Paper and Envelopes . If the paper is still scuffed after selecting the Thick Paper and Envelop...
Page 126 - Images or Photos are Printed in Unexpected Colors; Color correction has been applied.; Cannot Print Without Margins; Borderless is not set in the print settings.
Images or Photos are Printed in Unexpected Colors The following causes can be considered. The print head nozzles may be clogged. Solutions Use the Print Quality Adjustment feature. If you have not used the printer for a long time, the print head nozzles may be clogged and ink drops may not be discha...
Page 127 - Edges of the Image are Cropped During Borderless Printing; The Position, Size, or Margins of the Printout Are Incorrect; The paper is loaded incorrectly.; The size of the paper is set incorrectly.
Edges of the Image are Cropped During Borderless Printing Because the image is slightly enlarged, the protruding area is cropped. Solutions Select a smaller enlargement setting. ❏ Windows Click Settings next to the Borderless checkbox on the printer driver's Main tab, and then change the settings. ❏...
Page 128 - Printed Characters Are Incorrect or Garbled; The USB cable is not connected correctly.; There is a job waiting to be printed.; You are using the printer driver for a different printer.; The Printed Image Is Inverted; The image is set to invert horizontally in the print settings.
Printed Characters Are Incorrect or Garbled The following causes can be considered. The USB cable is not connected correctly. Solutions Connect the USB cable securely to the printer and the computer. There is a job waiting to be printed. Solutions Cancel any paused print jobs. The computer has been ...
Page 129 - Mirror Image; Print Settings; Mosaic-Like Patterns in the Prints; Images or photos with a low resolution were printed.; Cannot Solve Printing Problems
❏ Mac OS Clear Mirror Image from the print dialog's Print Settings menu. Mosaic-Like Patterns in the Prints Images or photos with a low resolution were printed. Solutions When printing images or photos, print using high-resolution data. Images on web sites are often lowresolution although they look ...
Page 132 - Using a Network Printer from a Second Computer; Setup; Adding or Replacing the Computer or Devices
Connecting to a Printer that has been Connected tothe Network When the printer has already been connected to the network, you can connect a computer or a smart device to theprinter over the network. Using a Network Printer from a Second Computer We recommend using the installer to connect the printe...
Page 133 - Using a Network Printer from a Smart Device; Connecting over a wireless router; Connecting by Wi-Fi Direct; Re-setting the Network Connection; Making Settings for Connecting to the Computer
Using a Network Printer from a Smart Device You can connect a smart device to the printer using one of the following methods. Connecting over a wireless router Connect the smart device to the same Wi-Fi network (SSID) as the printer. See the following for more details. “Making Settings for Connectin...
Page 134 - Next; Making Settings for Connecting to the Smart Device; When Changing the Computer
Select Change connection method for printer (for new network router or changing USB to network, etc.) on the Select Your Operation screen, and then click Next . Follow the on-screen instructions. If you cannot connect, see the following to try to solve the problem. ❏ Windows: “Cannot connect to a Ne...
Page 135 - Changing the Connection Method to the Computer; Changing the Network Connection from Ethernet to Wi-Fi; Changing the Network Connection from Wi-Fi to Ethernet; Changing from USB to a Network Connection
❏ Setting up using the software disc (only for the models that come with a software disc and users with Windowscomputers with disc drives.) Insert the software disc into the computer, and then follow the on-screen instructions. Follow the on-screen instructions. Changing the Connection Method to the...
Page 136 - Connect via wired; Making Wi-Fi Settings from the Control Panel
Select the network connection that you want to use, Connect via wireless network (Wi-Fi) or Connect via wired LAN (Ethernet) , and then click Next . Note: The displayed connection method differs depending on the model. Follow the on-screen instructions. Making Wi-Fi Settings from the Control Panel Y...
Page 137 - Making Wi-Fi Settings by Entering the SSID and Password; Router
Making Wi-Fi Settings by Entering the SSID and Password You can set up a Wi-Fi network by entering the information necessary to connect to a wireless router from theprinter's control panel. To set up using this method, you need the SSID and password for a wireless router. Note: If you are using an w...
Page 140 - Connecting to an iPhone, iPad or iPod touch using Wi-Fi Direct; Other OS Devices
Connecting a Smart Device and Printer Directly (Wi-FiDirect) Wi-Fi Direct (Simple AP) allows you to connect a smart device directly to the printer without a wireless router andprint from the smart device. About Wi-Fi Direct Use this connection method when you are not using Wi-Fi at home or at the of...
Page 141 - iOS
❏ Epson printing app for iOS. Examples of Epson printing apps Install Epson printing app on the smart device in advance. Note: You only need to make these settings for the printer and the smart device that you want to connect to once. Unless youdisable Wi-Fi Direct or restore the network settings to...
Page 142 - Other; Join
The QR code is displayed on the printer's control panel. 5. On your iPhone, iPad or iPod touch, start the standard Camera app, and then scan the QR code displayed onthe printer's control panel in PHOTO mode. Use the Camera app for iOS 11 or later. You cannot connect to the printer using the Camera a...
Page 143 - Printer is not selected.; Complete; Connecting to Android Devices using Wi-Fi Direct
8. On the printer's control panel, select Next . 9. On the iPhone, iPad or iPod touch, start Epson printing app. 10. On the Epson printing app screen, tap Printer is not selected. . On the Epson Smart Panel, the smart device automatically connects to the printer when it starts. 11. Select the printe...
Page 145 - Approve
7. Select the printer that you want to connect to. See the information displayed on the printer's control panel to select the printer. Note: Printers may not been displayed depending on the Android device. If printers are not displayed, connect by selecting Other OS Devices . See the related informa...
Page 148 - Changing the Wi-Fi Direct (Simple AP) Settings Such as the SSID; Start Setup; Change Network Name
7. On the printing app screen for the smart device, select the printer that you want to connect to. See the information displayed on the printer's control panel to select the printer. 8. On the printer's control panel, select Complete . For smart devices that have been connected to the printer befor...
Page 149 - Restore Default Settings
When changing the network name (SSID), all connected devices are disconnected. Use the new network name(SSID) if you want to re-connect the device. Change Password Change the Wi-Fi Direct (simple AP) password for connecting to the printer to your arbitrary value. You can setthe password in ASCII cha...
Page 150 - Checking the Network Connection Status from the Control Panel; Checking the Network Connection Status using the Network Icon; Displaying Detailed Network Information on the Control Panel; Printing a Network Connection Report
Checking the Network Connection Status from the Control Panel You can check the network connection status using the network icon or the network information on the printer’scontrol panel. Checking the Network Connection Status using the Network Icon You can check the network connection status and str...
Page 151 - Messages and Solutions on the Network Connection Report
1. Select Settings on the home screen. To select an item, use the u d l r buttons, and then press the OK button. 2. Select General Settings > Network Settings > Connection Check . The connection check starts. 3. Select Print Check Report . 4. Print the network connection report. If an error ha...
Page 152 - Network Status
Related Information & “E-1” on page 152 & “E-2, E-3, E-7” on page 152 & “E-5” on page 153 & “E-6” on page 153 & “E-8” on page 154 & “E-9” on page 154 & “E-10” on page 154 & “E-11” on page 155 & “E-12” on page 155 & “E-13” on page 155 & “Message on the Netw...
Page 156 - Message on the Network Environment; Printing a Network Status Sheet
If it still does not work after checking the above, try the following. ❏ Turn off the wireless router. Wait for about 10 seconds, and then turn it on. ❏ Make network settings on the computer that is on the same network as the printer using the installer. You canrun it from the following website. htt...
Page 157 - Checking the Network of the Computer (Windows only)
Checking the Network of the Computer (Windows only) By using the command prompt, check the connection status of the computer and the connection path to theprinter. This will lead you to solve the problems. ❏ ipconfig command Display the connection status of the network interface that is currently us...
Page 158 - Product Information
Product Information Paper Information. . . . . . . . . . . . . . . . . . . . . . . . . . . . . . . . . . . . . . . . . . . . . . . . . 159 Consumable Products Information. . . . . . . . . . . . . . . . . . . . . . . . . . . . . . . . . . . . .163 Software Information. . . . . . . . . . . . . . . . ....
Page 159 - Paper Information; Available Paper and Capacities; Genuine Epson Paper; Paper suitable for printing documents
Paper Information Available Paper and Capacities Genuine Epson Paper Epson recommends using genuine Epson paper to ensure high-quality printouts. Note: ❏ The availability of paper varies by location. For the latest information on paper available in your area, contact Epsonsupport. ❏ See the followin...
Page 160 - Paper suitable for printing photos; Commercially Available Paper; Plain papers
Paper suitable for printing photos Media Name Size Loading Capacity (Sheets) PaperCassette 1 PaperCassette 2 Paper Tray Epson Ultra Glossy Photo Paper A4, 13x18 cm (5x7 in.),10x15 cm (4x6 in.), 20x25cm (8x10 in.) 50 - 1 Epson Premium Glossy PhotoPaper A3+ - - 1 A3, A4, 13x18 cm (5x7 in.),10x15 cm (4...
Page 162 - Paper for Borderless Printing; Paper for 2-Sided Printing
Paper for Borderless Printing Genuine Epson Paper ❏ Epson Business Paper *1 ❏ Epson Bright White Paper *1 ❏ Epson Bright White Ink Jet Paper *1 ❏ Epson Photo Quality Ink Jet Paper *2 ❏ Epson Double-sided Photo Quality Ink Jet Paper ❏ Epson Matte Paper-Heavyweight *2 ❏ Epson Ultra Glossy Photo Paper ...
Page 163 - Unavailable Paper Types; Ink Cartridge Codes
Related Information & “Available Paper and Capacities” on page 159 Commercially Available Paper ❏ Plain paper, Copy paper, Preprinted paper, Letterhead, Color paper, Recycled paper, High quality plain paper * ❏ Thick paper * * A3+ size paper is not supported for automatic 2-sided printing. For a...
Page 164 - For Europe; For Asia; Maintenance Box Code
For Europe Icon BK: Black C: Cyan M: Magenta Y: Yellow Suitcase 405 405XL * 405XXL * 405 405XL * 405 405XL * 405 405XL * * "XL" and "XXL" indicate large cartridges. Note: For users in Europe, visit the following website for information on Epson's ink cartridge yields. http://www.epso...
Page 165 - Software for Printing; Application for Printing from a Computer (Windows Printer Driver); Accessing the printer driver from applications
Software for Printing Application for Printing from a Computer (Windows Printer Driver) The printer driver controls the printer according to the commands from an application. Making settings on theprinter driver provides the best printing results. You can also check the status of the printer or keep...
Page 166 - Application for Printing from a Computer (Mac OS Printer Driver); Starting the utility
Starting the utility Access the printer driver window. Click the Maintenance tab. Related Information & “Menu Options for the Printer Driver” on page 32 Application for Printing from a Computer (Mac OS Printer Driver) The printer driver controls the printer according to the commands from an appl...
Page 167 - Guide to Mac OS Printer Driver; Epson Printer Utility; Starting on Windows; Starting on Mac OS
Guide to Mac OS Printer Driver Epson Printer Utility You can run a maintenance feature such as nozzle check and print head cleaning, and by starting EPSON Status Monitor , you can check printer status and error information. Application for Quick and Fun Printing from a Computer (Epson Photo+) Epson ...
Page 168 - Application for Printing Easily from a Smart Device (Epson iPrint); Installing Epson iPrint
Related Information & “Installing the Applications Separately” on page 78 Application for Easily Operating the Printer from a Smart device (Epson SmartPanel) Epson Smart Panel is an application that allows you to perform printer operations easily including printing from asmart device such as a s...
Page 169 - Software for Package Creation; Software for Making Settings or Managing Devices; Application for Configuring Printer Operations (Web Config); Running Web Config on a Web Browser
Software for Package Creation Application for Creating Driver Packages (EpsonNet SetupManager) EpsonNet SetupManager is a software to create a package for a simple printer installation, such as installing theprinter driver, installing EPSON Status Monitor and creating a printer port. This software a...
Page 170 - Running Web Config on Windows
Note: Using the smart device, you can also run Web Config from the product information screen of the Epson Smart Panel. Since the printer uses a self-signed certificate when accessing HTTPS, a warning is displayed on the browserwhen you start Web Config; this does not indicate a problem and can be s...
Page 171 - Software for Managing Devices on the Network (Epson Device Admin); Software for Updating
Starting on Windows ❏ Windows 10/Windows Server 2019/Windows Server 2016 Click the start button, and then select EpsonNet > EpsonNet Config . ❏ Windows 8.1/Windows 8/Windows Server 2012 R2/Windows Server 2012 Enter the application name in the search charm, and then select the displayed icon. ❏ Wi...
Page 172 - Basic Settings
❏ Windows 8.1/Windows 8 Enter the application name in the search charm, and then select the displayed icon. ❏ Windows 7/Windows Vista/Windows XP Click the start button, and then select All Programs (or Programs ) > Epson Software > EPSON Software Updater . Note: You can also start EPSON Softwa...
Page 173 - Printer Settings
Select this setting to turn the printer off automatically when it is not used for a specified period oftime. You can adjust the time before power management is applied. Any increase will affect theproduct’s energy efficiency. Please consider the environment before making any change. Power Off Settin...
Page 175 - Network Settings
Check Paper Width: Select On to check the paper width before printing. This prevents printing beyond the edges of the paper when the paper size setting is incorrect, but this may lower the print speed. Skip Blank Page: Skips blank pages in the print data automatically. Auto Error Solver: Select an a...
Page 177 - Web Service Settings; Epson Connect Services:; System Administration
Advanced: Make the following detailed settings. ❏ Device Name ❏ TCP/IP ❏ Proxy Server ❏ IPv6 Address ❏ Link Speed & Duplex ❏ Redirect HTTP to HTTPS Related Information & “Making Wi-Fi Settings by Entering the SSID and Password” on page 137 & “Making Wi-Fi Settings by Push Button Setup (W...
Page 178 - Delete All Internal Memory Jobs:; Print Counter
Select the menus on the control panel as described below. Settings > General Settings > System Administration Security Settings: You can make the following security settings. Delete All Internal Memory Jobs: Delete all of the jobs stored in the internal memory. Admin Settings: ❏ Admin Password...
Page 179 - Supply Status; Print Quality Adjustment:
Displays the total number of prints, B&W prints, and color prints including items such as the status sheet from thetime you purchased the printer. Supply Status Select the menus on the control panel as described below. Settings > Supply Status Displays the approximate level of the ink and ser...
Page 180 - Configuration Status Sheet:; Printer Specifications
Remove Paper: Select this feature if there are still some torn pieces of paper inside the printer even after removingjammed paper. The printer makes more space between the print head and the surface of the paper toeasily remove the torn pieces of paper. Related Information & “Checking and Cleani...
Page 181 - Printable Area; Printable Area for Single Sheets; Printing with borders; Printable Area for Envelopes
Weight of Paper * Plain Paper 64 to 90 g/m2 Thick Paper 91 to 256 g/m2 Envelopes Envelope #10, DL, C6, C4: 75 to 100 g/m2 * Even when the paper thickness is within this range, the paper may not feed in the printer or the print quality may declinedepending on the paper properties or quality. Printabl...
Page 182 - Network Specifications
Interface Specifications For Computer Hi-Speed USB * * USB 3.0 cables are not supported. Using Port for the Printer The printer uses the following port. These ports should be allowed to become available by the networkadministrator as necessary. Sender (Client) Use Destination(Server) Protocol Port N...
Page 185 - Security Protocol; Supported Third Party Services
Security Protocol SSL/TLS HTTPS Server/Client, IPPS SMTPS (STARTTLS, SSL/TLS) SNMPv3 Supported Third Party Services AirPrint iOS 5 or later/Mac OS X v10.7.x or later Dimensions Dimensions Storage ❏ Width: 515 mm (20.3 in.) ❏ Depth: 400 mm (15.7 in.) ❏ Height: 298 mm (11.7 in.) Printing ❏ Width: 515 ...
Page 186 - Environmental Specifications; Environmental Specifications for Ink Cartridges
Environmental Specifications Operation Use the printer within the range shown in the following graph. Temperature: 10 to 35°C (50 to 95°F) Humidity: 20 to 80% RH (without condensation) Storage Temperature after initial ink charging: -15 to 40°C (5 to 104°F) * Temperature before initial ink charging:...
Page 187 - Installation Location and Space; System Requirements
Installation Location and Space Secure enough place to install and operate the printer correctly. A 529.6 mm B 1118.5 mm C 515 mm D 601.7 mm E 516.8 mm See "Safety Instructions" in this manual to confirm the environmental conditions. Related Information & “Advisories and Warnings for Set...
Page 188 - Standards and Approvals; Standards and Approvals for European Model
Note: ❏ Mac OS may not support some applications and features. ❏ The UNIX File System (UFS) for Mac OS is not supported. Regulatory Information Standards and Approvals Standards and Approvals for U.S. Model Safety UL60950-1 CAN/CSA-C22.2 No.60950-1 EMC FCC Part 15 Subpart B Class B CAN ICES-3 (B)/NM...
Page 189 - Restrictions on Copying
Epson cannot accept responsibility for any failure to satisfy the protection requirements resulting from a non-recommended modification of the products. Frequency Maximum Radio-Frequency Power Transmitted 2400-2483.5 MHz 20 dBm (EIRP) Restrictions on Copying Observe the following restrictions to ens...
Page 190 - Administrator Information
Administrator Information Connecting the Printer to the Network. . . . . . . . . . . . . . . . . . . . . . . . . . . . . . . . . . 191 Settings to Use the Printer. . . . . . . . . . . . . . . . . . . . . . . . . . . . . . . . . . . . . . . . . . . 195 Managing the Printer. . . . . . . . . . . . . . ...
Page 191 - Connecting the Printer to the Network; Before Making Network Connection; Gathering Information on the Connection Setting
Connecting the Printer to the Network You can connect the printer to the network in several ways. ❏ Connect by using advanced settings on the control panel. ❏ Connect by using the installer on the website or on the software disc. This section explains the procedure to connect the printer to the netw...
Page 192 - IP Address Assignment; Automatic assignment by using DHCP function (dynamic IP address):; DNS Server and Proxy Server
Divisions Items Note Port numberinformation ❏ Port number torelease Check the port number used by the printer and computer, thenrelease the port that is blocked by a firewall, if necessary. See the following for the port number used by the printer. “Using Port for the Printer” on page 182 IP Address...
Page 193 - Connecting to the Network from the Control Panel; Assigning the IP Address
When you assign the printer's IP address by using the DHCP function of the DHCP server or router, it isautomatically set. The proxy server is placed at the gateway between the network and the Internet, and it communicates to thecomputer, printer, and Internet (opposite server) on behalf of each of t...
Page 194 - Setting the Proxy Server; Connecting to LAN; Connecting to Ethernet
8. Enter the IP address for the secondary DNS server. Confirm the value reflected on the previous screen. 9. Select Start Setup . Setting the Proxy Server Set up the proxy server if both of the following are true. ❏ The proxy server is built for Internet connection. ❏ When using a function in which ...
Page 195 - Dismiss; Print Check Report; Using the Print Functions; Printer Connection Types; Peer to Peer Connection Settings
4. Select Dismiss to finish. When you select Print Check Report , you can print the diagnosis result. Follow the on-screen instructions to print it. Related Information & “Changing the Network Connection from Wi-Fi to Ethernet” on page 135 Connecting to the Wireless LAN (Wi-Fi) You can connect t...
Page 196 - Server / Client Connection Settings; Print Settings for Peer to Peer Connection
Printer driver: Install the printer driver on each client computer. When using EpsonNet SetupManager, you can provide the driver's package that includes the printer settings. Features: ❏ The print job starts immediately because the print job is sent to the printer directly. ❏ You can print as long a...
Page 197 - Setting Up the Network Ports
Setting Up the Network Ports Create the print queue for network printing on the print server by using standard TCP/IP, and then set the networkport. This example is when using Windows 2012 R2. 1. Open the devices and printers screen. Desktop > Settings > Control Panel > Hardware and Sound o...
Page 198 - Checking the Port Configuration - Windows
Click Continue when the User Account Control screen is displayed. Note: If you specify the printer name on the network where the name resolution is available, the IP address is tracked even ifprinter's IP address has been changed by DHCP. You can confirm the printer name from the network status scre...
Page 199 - Basic Settings for Printing
❏ For LPR Check that LPR is selected in Protocol . Enter "PASSTHRU" in Queue name from LPR Settings . Select LPR Byte Counting Enabled , and then click OK . Sharing the Printer (Windows only) When using the printer under the server / client connection (printer sharing using the Windows serve...
Page 201 - Setting Universal Print; Basic; Setting Up AirPrint
❏ Auto Error Solver Set whether to automatically cancel the error if there is no operation on the control panel for 5 secondsafter displaying the error. 3. Check the settings, and then click OK . Setting Universal Print Set when you print from external devices without using the printer driver. Some ...
Page 202 - Making Basic Operation Settings for the Printer; Setting the Control Panel; Device Management
Items Explanation Geolocation Latitude and Longitude ( WGS84) Enter the printer's location information. This entry is optional. Enter values by using WGS-84 datum, which separates latitude and longitude witha comma. You can enter -90 to +90 for the latitude value, and -180 to +180 for the longitudev...
Page 203 - Power Saving Settings During Inactivity; Synchronizing the Date and Time with Time Server
3. Click OK . Power Saving Settings During Inactivity You can set up the time to shift to the power saving mode or to turn the power off when the printer’s control panelis not operated for a certain period of time. Set the time depending on your usage environment. 1. Access Web Config and select the...
Page 204 - Problems when Making Settings; Hints to Solving Problems; The IP address is not assigned to the printer.
4. Enter Update Interval (min) . You can set up to 10,080 minutes by the minute. 5. Click OK . Note: You can confirm the connection status with the time server on Time Server Status . Problems when Making Settings Hints to Solving Problems ❏ Checking the error message When trouble has occurred, firs...
Page 205 - The common name of the certificate and the printer do not match.; The proxy server setting of local address is not set to web browser.; Introduction of Product Security Features
CA-signed Certificate is expired. If there is a problem with the expiration date of the certificate, "The certificate has expired" isdisplayed when connecting to Web Config with SSL/TLS communication (https). If the messageappears before its expiration date, make sure that the printer's date...
Page 206 - Administrator Settings; Configuring the Administrator Password; Configuring the Administrator Password from the Control Panel
Feature name Feature type What to set What to prevent Setup for accesscontrol If you log on with a useraccount registered inadvance, you are allowed touse the printer. Protects from illegal access byany system other than theauthentication system whenusing it. Register any user account. You can regis...
Page 207 - Configuring the Administrator Password from a Computer; Controlling the Panel Operation; Enabling the Lock Setting; Enabling the Lock Setting from the Control Panel
Note: You can change or delete the administrator password when you select Change or Restore Default Settings on the Admin Password screen and enter the administrator password. Configuring the Administrator Password from a Computer You can set the administrator password using Web Config. 1. Access We...
Page 208 - Lock Setting Items for General Settings Menu
2. Enter the user name and password, and then click OK . 3. Select the Device Management tab > Control Panel . 4. On the Panel Lock , select ON . 5. Click OK . 6. Select Settings > General Settings > Network Settings on the printer’s control panel, and then check that the password is requir...
Page 209 - Logging on to the Printer as an Administrator
General Settings menu Panel Lock Network Settings ✓ Wi-Fi Setup ✓ Wired LAN Setup ✓ Network Status ✓ Wired LAN/Wi-Fi Status ✓ *1 Wi-Fi Direct Status ✓ *1 Print Status Sheet ✓ *1 Connection Check ✓ *2 Advanced ✓ General Settings menu Panel Lock Web Service Settings ✓ Epson Connect Services ✓ General ...
Page 210 - Logging on to the Printer from a Computer; Disabling the External Interface
Enter the password to operate the locked menu items on the control panel. Logging on to the Printer from a Computer When you log in to Web Config as an administrator, you can operate items that are set in the Lock Setting. 1. Enter the printer's IP address into a browser to run Web Config. 2. Click ...
Page 211 - Monitoring a Remote Printer; Checking Information for a Remote Printer; Status; Backing Up the Settings; Export the settings
Windows: Open the device manager and keep it, connect the printer to the computer using a USB cable, and thenconfirm that the device manager's display contents stays unchanged. Mac OS: Connect the printer to the computer using a USB cable, and then confirm that the printer is not listed if youwant t...
Page 212 - Import the settings
2. Select the settings that you want to export. Select the settings you want to export. If you select the parent category, subcategories are also selected.However, subcategories that cause errors by duplicating within the same network (such as IP addresses and soon) cannot be selected. 3. Enter a pa...
Page 213 - Security Settings and Prevention of Danger; Controlling Using Protocols; Controlling protocols; Network Security
Security Settings and Prevention of Danger When a printer is connected to a network, you can access it from a remote location. In addition, many people canshare the printer, which is helpful in improving operational efficiency and convenience. However, risks such asillegal access, illegal use, and t...
Page 214 - Protocols you can Enable or Disable; Protocol Setting Items
3. Click Next . 4. Click OK . The settings are applied to the printer. Related Information & “Application for Configuring Printer Operations (Web Config)” on page 169 & “Protocols you can Enable or Disable” on page 214 & “Protocol Setting Items” on page 214 Protocols you can Enable or Di...
Page 217 - Using a Digital Certificate; About Digital Certification
Items Setting value and Description Enable SNMPv3 SNMPv3 is enabled when the box is checked. User Name Enter between 1 and 32 characters using 1 byte characters. Authentication Settings Algorithm Select an algorithm for an authentication for SNMPv3. Password Enter the password for an authentication ...
Page 218 - Configuring a CA-signed Certificate; Obtaining a CA-signed Certificate
❏ CA Certificate This is a certificate that is in chain of the CA-signed Certificate, also called the intermediate CA certificate. It isused by the web browser to validate the path of the printer's certificate when accessing the server of the otherparty or Web Config. For the CA Certificate, set whe...
Page 219 - CSR; Importing a CA-signed Certificate
6. Click one of the download buttons of CSR according to a specified format by each certificate authority to download a CSR to a computer. c Important: Do not generate a CSR again. If you do so, you may not be able to import an issued CA-signed Certificate. 7. Send the CSR to a certificate authority...
Page 221 - Deleting a CA-signed Certificate; Updating a Self-signed Certificate
Items Settings and Explanation CA Certificate 2 If your certificate’s format is Certificate (PEM/DER) , import a certificate of a certificate authority that issues CA Certificate 1. Specify a file if you need. Related Information & “Importing a CA-signed Certificate” on page 219 Deleting a CA-si...
Page 222 - SSL/TLS Communication with the Printer; Configuring Basic SSL/TLS Settings
5. Click Next . A confirmation message is displayed. 6. Click OK . The printer is updated. Note: You can check the certificate information from Network Security tab > SSL/TLS > Certificate > Self-signed Certificate and click Confirm . Related Information & “Application for Configuring P...
Page 223 - Configuring a Server Certificate for the Printer; Solving Problems for Advanced Security; Problems Using Network Security Features; Cannot Create the Secure IPP Printing Port
Configuring a Server Certificate for the Printer 1. Access Web Config and select the Network Security tab > SSL/TLS > Certificate . 2. Specify a certificate to use on Server Certificate . ❏ Self-signed Certificate A self-signed certificate has been generated by the printer. If you do not obtai...
Page 224 - Problems on Using a Digital Certificate; Cannot Import a CA-signed Certificate; Cannot Update a Self-Signed Certificate; Common Name; Cannot Create a CSR; Common Name
Problems on Using a Digital Certificate Cannot Import a CA-signed Certificate CA-signed Certificate and the information on the CSR do not match. If the CA-signed Certificate and CSR do not have the same information, the CSR cannot be imported. Check thefollowing: ❏ Are you trying to import the certi...
Page 225 - A comma or space is included in the Common Name.; Warning Relating to a Digital Certificate Appears
Unsupported characters have been entered to Common Name, Organization, Organizational Unit,Locality, and State/Province. Enter characters of either IPv4, IPv6, host name, or FQDN format in ASCII (0x20-0x7E). A comma or space is included in the Common Name. If a comma is entered, the Common Name is d...
Page 227 - Delete a CA-signed Certificate by Mistake; There is no backup file for the CA-signed certificate.
Messages Cause/What to do Setup failed. Cause: Cannot finish the configuration because the communication between the printerand computer failed or the file cannot be read by some errors. What to do: After checking the specified file and communication, import the file again. Related Information &...
Page 228 - Where to Get Help
Where to Get Help Technical Support Web Site. . . . . . . . . . . . . . . . . . . . . . . . . . . . . . . . . . . . . . . . . . 229 Contacting Epson Support. . . . . . . . . . . . . . . . . . . . . . . . . . . . . . . . . . . . . . . . . . . 229 https://manual-hub.com/
Page 229 - Before Contacting Epson; About; Help for Users in Europe; World Wide Web
Technical Support Web Site If you need further help, visit the Epson support website shown below. Select your country or region and go to thesupport section of your local Epson website. The latest drivers, FAQs, manuals, or other downloadables are alsoavailable from the site. http://support.epson.ne...
Page 230 - Epson HelpDesk; Repair service center:
Information on product specifications, drivers for download, and products enquiry are available. Epson HelpDesk Phone: +886-2-80242008 Our HelpDesk team can help you with the following over the phone: ❏ Sales enquiries and product information ❏ Product usage questions or problems ❏ Enquiries on repa...


 Epson PictureMate Flash - PM 280 - PictureMate Flash Compact Photo Printer User Manual
 Epson TM-T70II Troubleshooting Guide
 Epson U925 - TM B/W Dot-matrix Printer User Manual
 Epson RR 70W User Manual
 Epson 9890 Manual
 Epson 206636 - PocketJet 3 Plus User Manual
 Epson Printer TM-H5000II User Manual
 Epson TM-T88V User Manual
 Epson WF 2830 User Manual
 Epson WF 3820 Manual
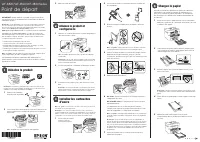 Epson WF 4820 User Manual
 Epson WF 4830 User Manual
 Epson WF5690 Manual
 Epson WF 7210 Installation Manual
 Epson WF 7720 User Manual
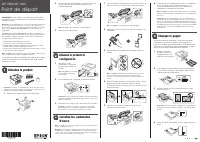 Epson WF 7820 User Manual
 Epson WF 7840 User Manual
 Epson WorkForce 30 Manual
 Epson WorkForce 320 User Manual
 Epson WorkForce 435 User Manual