Page 2 - READ AND SAVE THESE INSTRUCTIONS; This is the safety alert symbol.; DANGER; what can happen if the instructions are not followed.; ENGLISH; Contents
Important safety notice .........................................................................................................................................................................3 Electrical & installation requirements..................................................................
Page 3 - Important Safety Notice; WARNING
3 Important Safety Notice I WARNING To reduce the risk of fire, electrical shock, injury to per- sons, or damage when using the cooktop, follow basic precautions, including the following: I CAUTION Do not store items of interest to children in cabinets above a cooktop – Children climbing on the cook...
Page 4 - CAUTION; • NEVER; IMPORTANT; The device must be regularly cleaned both internally and
4 I CAUTION Strictly observe the following instructions: • The device must be disconnected from the electrical network before performing any installation work. • Installation or maintenance must be performed by a qualified technician, in compliance with the manufac- turer’s instructions and with loc...
Page 5 - ELECTRICAL & INSTALLATION REQUIREMENTS; ELECTRICAL REQUIREMENTS
5 ELECTRICAL & INSTALLATION REQUIREMENTS ELECTRICAL REQUIREMENTS L1 120/240V 3 wire 60Hz RED BLACK L2 240V 120V 120V WHITE N YELLOW/GREEN • Disconnect the device from the electrical network. • The installation must be performed by professionally qualified personnel familiar with the applicable i...
Page 6 - LIST OF MATERIALS; Top Instalation; Flush Instalation; CUTOUT
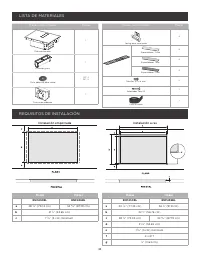
6 LIST OF MATERIALS Supplied Part Pieces Cooktop assembly 1 Grease filter 1 Adhesive tape for glass 30”: 1 36”: 2 Round transition 1 Supplied Part Pieces Spring for installation 4 Spacers .5 mm 8 Spacers 1 mm 4 Spacers 2 mm 4 Screws 4.2 x 8 mm 2 Torx 20 adapter 1 Insulating tape 1 Top Instalation Mo...
Page 7 - PRODUCT DIMENSIONS; ACCESSORIES AND CONSUMABLE PARTS
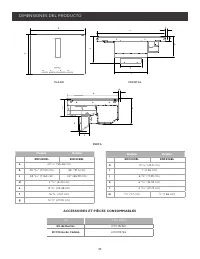
7 PLAN FRONT PROFILE b c a a e f g h j k l h i m d PLAN FRONT PROFILE b c a a e f g h j k l h i m d Model Model ENF430BL ENF436BL a 22 7 ⁄ 32 ” (56.46 cm) b 30 21 ⁄ 64 ” (77.05 cm) 36” (91.5 cm) c 28 13 ⁄ 64 ” (71.64 cm) 34” (86.39 cm) d 2 17 ⁄ 32 ” (6.45 cm) e 13 3 ⁄ 16 ” (33.48 cm) f 16 9 ⁄ 16 ” (...
Page 8 - INSTALLATION
8 INSTALLATION PREPARATION FOR INSTALLATION Before starting the installation: 1. After unpacking the product, check that it has not been damaged during transport and in the event of problem, please contact the reseller or the customer support service before installing it. 2. Check that the product i...
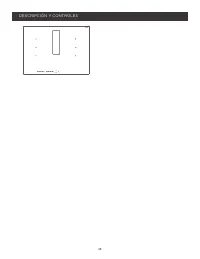
Page 10 - DESCRIPTION OF THE HOOD AND CONTROLS
10 DESCRIPTION OF THE HOOD AND CONTROLS 1 - Cooking zones 2 - Control panel 3 - Extractor fan a b c a b c 1 7 7 7 9 11 10 17 5 16 16 2 4 14 18 1 6 3 3 15 12 13 8 (A) 8 8 8 8 m i n 8 8 8 m i n 8 8 8 Keys Display / LED 1 ON/OFF of the hob / extractor fan for hob 10 View power level 2 Cooking zone posi...
Page 11 - USE; ON
11 USE ON 1. Turn around the flap by pushing down one side. 2. Turn on the hob touching the power button. 3. Touch the “A” button to turn on the fan. 4. Touch and swipe to the right to increase power. 8 5. The extractor will start working. OFF The extractor will keep off you don’t turn around the fl...
Page 14 - EXTRACTION VERSION; USE OF THE EXTRACTOR FAN
14 • Pause The Pause function allows to suspend any function active on the hob, bringing the cooking power to zero. Activation: - press - a “ “ is displayed. To deactivate the function: Note: this operation restores the hob settings to those prior to the pause. - press - within 10 seconds scroll to ...
Page 15 - POWER TABLES
15 POWER TABLES Temperature Manager Description Melting It identifies a suitable cooking level to slowly melt delicate products without compromising their sensory characteristics (chocolate, butter, etc.). Warming It identifies a suitable cooking level to allow to delicately keep the food at the sam...
Page 16 - COOKING TABLES
16 Category of foods Dishes or type of cooking Power level and cooking patterns First stage Powers Second stage Powers Pasta, rice Fresh pasta Heating water Booster-9 Cooking pasta and maintaining the boil 7-8 Fresh pasta Heating water Booster-9 Cooking pasta and maintaining the boil 7-8 Boiled rice...
Page 17 - USER SERVICING AND MAINTENANCE INSTRUCTIONS; • For cleaning, use ONLY a cloth moistened with neutral
17 USER SERVICING AND MAINTENANCE INSTRUCTIONS I CAUTION Before any cleaning or maintenance, make sure the coo- king zones are switched off and the heat indicator has turned off. CLEANING The hob must be cleaned after each use. IMPORTANT • Do not use abrasive sponges, scouring pads. Their use, over ...
Page 18 - CUSTOMER SERVICE; Before contacting Customer Service; TROUBLESHOOTING
18 Information Code Description Possible Causes Solution The command zone switches off due to an excessively high temperature The temperature inside the electronic parts is too high Wait for the hob to cool before reusing it + Acoustic signal Continuous (permanent) key ac- tivation is detected. The ...
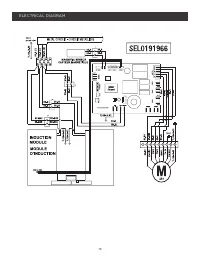
Page 19 - ELECTRICAL DIAGRAM
Page 20 - ELICA North America; TWO-YEAR LIMITED WARRANTY; TO OBTAIN SERVICE UNDER WARRANTY; SERVICE POWER; Register your product in; year of factory
20 ELICA North America TWO-YEAR LIMITED WARRANTY TO OBTAIN SERVICE UNDER WARRANTY Owner must present proof of original purchase date. Please keep a copy of your dated proof of purchase (sales slip) in order to obtain service under warranty. PARTS AND SERVICE WARRANTY For the period of two (2) years ...
Page 21 - LISEZ CES INSTRUCTIONS ET CONSERVEZ-LES; et se conformer à toutes les consignes de sécurité.; pas immédiatement aux instructions suivantes.; FRANÇAIS; Table des matières
Avis de sécurité important ................................................................................................................................................................22Exigences électriques et d’installation...........................................................................
Page 22 - Avis de Sécurité Important; ATTENTION
22 Avis de Sécurité Important I ATTENTION Pour réduire le risque d’incendie, de choc électrique, de blessures corporelles ou de dommages lors de l’utilisation de la table de cuisson, prenez des précautions élémentai- res, y compris les suivantes: I AVERTISSEMENT • Ne stockez pas d’articles intéressa...
Page 24 - UTILISER DES CONDUCTEURS EN CUIVRE OU EN ALUMINIUM; Deux personnes sont nécessaires pour effectuer l’installation.
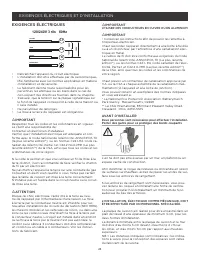
24 EXIGENCES ÉLECTRIQUES ET D’INSTALLATION EXIGENCES ÉLECTRIQUES L1 120/240V 3 fils 60Hz ROUGE NOIR L2 240V 120V 120V BLANC N JAUNE/VERT • Débrancher l’appareil du circuit électrique • L’installation doit être effectuée par du personnel qua- lifié, familiarisé avec les normes applicables en matière ...
Page 25 - LISTE DES PIÈCES; Fierté de l’installation; Installation de la chasse d’eau
25 LISTE DES PIÈCES Pièces Fournies Quantité Assemblage de la table de cuisson 1 Filtre à graisse 1 Ruban adhésif pour le verre 30”: 1 36”: 2 Transition Ronde 1 Pièces Fournies Quantité Ressort pour l’installation 4 Entretoises .5 mm 8 Entretoises 1mm 4 Entretoises 2 mm 4 Vis 4.2 x 8 mm 2 Adaptateur...
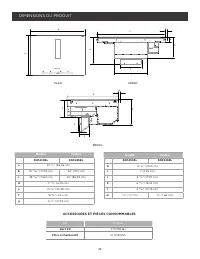
Page 26 - DIMENSIONS DU PRODUIT; ACCESSOIRES ET PIÈCES CONSOMMABLES
26 PLAN FRONT PROFIL b c a a e f g h j k l h i m d Modéle Modéle ENF430BL ENF436BL a 22 7 ⁄ 32 ” (56.46 cm) b 30 21 ⁄ 64 ” (77.05 cm) 36” (91.5 cm) c 28 13 ⁄ 64 ” (71.64 cm) 34” (86.39 cm) d 2 17 ⁄ 32 ” (6.45 cm) e 13 3 ⁄ 16 ” (33.48 cm) f 16 9 ⁄ 16 ” (42.1 cm) g 10 5 ⁄ 8 ” (27.05 cm) Modéle Modéle ...
Page 27 - PRÉPARATION POUR L’INSTALLATION
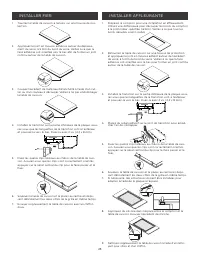
27 INSTALLATION PRÉPARATION POUR L’INSTALLATION Avant de commencer l’installation • Après avoir déballé le produit, vérifier qu’il n’a subi au- cun dommage durant le transport et, en cas de problè- mes, contacter le revendeur ou le Service Client, avant de procéder à l’installation. • Vérifier que l...
Page 29 - DESCRIPTION DE LA HOTTE ET DES COMMANDES
29 DESCRIPTION DE LA HOTTE ET DES COMMANDES 1 - Zones de cuisson 2 - Panneau de contrôle 3 - Ventilateur d’extraction a b c a b c 1 7 7 7 9 11 10 17 5 16 16 2 4 14 18 1 6 3 3 15 12 13 8 (A) 8 8 8 8 m i n 8 8 8 m i n 8 8 8 Clés Led de dissipation 1 ON/OFF de la plaque de cuisson/aspirateur pour plan ...
Page 30 - UTILISER
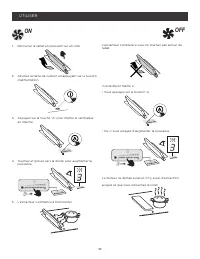
30 UTILISER ON 1. Retourner le rabat en poussant sur un côté. 2. Allumez la table de cuisson en appuyant sur le bouton d’alimentation. 3. Appuyez sur la touche “A” pour mettre le ventilateur en marche. 4. Touchez et glissez vers la droite pour augmenter la puissance. 8 5. L’extracteur commence à fon...
Page 33 - UTILISATION DE L’EXTRACTEUR
33 • Pause La fonction Pause permet d’interrompre n’importe quelle fonction active sur a plaque en ramenant à zéro la puissan- ce de cuisson. Activation: - appuyer sur - le symbole “ “ apparaît sur l’afficheur. Pour désactiver la fonction : Remarque: cette opération permet de rétablir les conditions...
Page 34 - TABLEAUX DE PUISSANCE; Niveau de puissance Typologie de cuisson
34 TABLEAUX DE PUISSANCE Le niveau de puissance (par défaut) Description Chauffer doucement Localiser un niveau approprié de dissoudre lentement produits délicats sans compromettre les caractéristiques sensorielles de puissance (chocolat, le beurre, etc.). Réchauffer Choisir un niveau de puissance a...
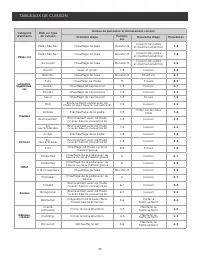
Page 35 - TABLEAUX DE CUISSON
35 TABLEAUX DE CUISSON Catégorie d’aliments Plats ou type de cuisson Niveau de puissance et déroulement cuisson Première étape Puissan- ces Deuxième étape Puissances Pâtes, riz Pâtes fraîches Chauffage de l’eau Booster-9 Cuisson des pâtes et maintien ébullition 7-8 Pâtes fraîches Chauffage de l’eau ...
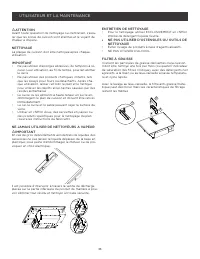
Page 36 - UTILISATEUR ET LA MAINTENANCE
36 UTILISATEUR ET LA MAINTENANCE I ATTENTION Avant toute opération de nettoyage ou d’entretien, s’assu- rer que les zones de cuisson sont éteintes et le voyant de chaleur a disparu. NETTOYAGE La plaque de cuisson doit être nettoyée après chaque utilisation. IMPORTANT • Ne pas utiliser d’éponges abra...
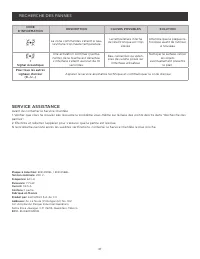
Page 37 - RECHERCHE DES PANNES; SERVICE ASSISTANCE
37 RECHERCHE DES PANNES CODE D’INFORMATION DESCRIPTION CAUSES POSSIBLES SOLUTION La zone commandes s’éteint à cau- seVd’une trop haute température La température interne de l’électronique est trop élevée Attendre que la plaque re- froidisse avant de l’utiliser à nouveau + Signal Acoustique Une activ...
Page 38 - SCHÉMA ÉLECTRIQUE
Page 39 - GARANTIE DE DEUX ANS; POUR OBTENIR UN DEPANNAGE SOUS GARANTIE; QUI EST COUVERT; QUI CONTACTER; Enregistrez votre produit sur; et obtenez une; de
39 ELICA North America GARANTIE DE DEUX ANS POUR OBTENIR UN DEPANNAGE SOUS GARANTIE Le propriétaire doit présenter une preuve de la date d’achat. Garder une copie de votre preuve d’achat datée (ticket de caisse) de façon à pouvoir bénéficier du service après-vente sous garantie. GARANTIE PIECES DE R...
Page 40 - LEA Y GUARDE ESTAS INSTRUCCIONES; siempre todos los mensajes de seguridad.; de suceder si las instrucciones no se siguen.; ESPAÑOL; Contenido
Instrucciones de seguridad importantes .....................................................................................................................................41Requisitos eléctricos y de instalación...........................................................................................
Page 41 - INSTRUCCIONES DE SEGURIDAD IMPORTANTES; AVISO
41 INSTRUCCIONES DE SEGURIDAD IMPORTANTES I AVISO Para reducir el riesgo de incendio, choque eléctrico, lesio- nes a personas o daños al usar la placa de cocción, siga las precauciones básicas, incluyendo las siguientes: I PRECAUCIÓN • No guarde objetos de interés para los niños en los ga- binetes q...
Page 43 - REQUISITOS ELÉCTRICOS Y DE INSTALACIÓN; REQUISITOS ELÉCTRICOS; UTILICE CONDUCTORES DE COBRE O ALUMINIO; IMPORTANTE; Para realizar la instalación, se necesitan al menos dos personas.
43 REQUISITOS ELÉCTRICOS Y DE INSTALACIÓN REQUISITOS ELÉCTRICOS L1 120/240V 3 cables 60Hz ROJO NEGRO L2 240V 120V 120V BLANCO N AMARILLO • Desconectar el aparato de la red eléctrica • La instalación debe ser realizada por personal pro- fesionalmente cualificado y con conocimiento de las normas vigen...
Page 44 - LISTA DE MATERIALES; Instalación empotrada; Instalación a ras; REQUISITOS DE INSTALACIÓN
44 LISTA DE MATERIALES Piezas suministradas Piezas Placa de cocción 1 Filtro de grasa 1 Cinta adhesiva para vidrio 30”: 1 36”: 2 Transición redonda 1 Piezas suministradas Piezas Spring para instalación 4 Espaciadores .5 mm 8 Espaciadores 1 mm 4 Espaciadores 2 mm 4 Tornillos 4.2 x 8 mm 2 Adaptador To...
Page 45 - DIMENSIONES DEL PRODUCTO
45 PLANO FRONTAL PERFIL b c a a e f g h j k l h i m d Modelo Modelo ENF430BL ENF436BL a 22 7 ⁄ 32 ” (56.46 cm) b 30 21 ⁄ 64 ” (77.05 cm) 36” (91.5 cm) c 28 13 ⁄ 64 ” (71.64 cm) 34” (86.39 cm) d 2 17 ⁄ 32 ” (6.45 cm) e 13 3 ⁄ 16 ” (33.48 cm) f 16 9 ⁄ 16 ” (42.1 cm) g 10 5 ⁄ 8 ” (27.05 cm) Modelo Mode...
Page 46 - INSTALACIÓN; PREPARACIÓN PARA LA INSTALACIÓN; Conducto de 4 cables desde la fuente de alimentación do-
46 INSTALACIÓN PREPARACIÓN PARA LA INSTALACIÓN Antes de iniciar la instalación: • Después de desembalar el producto verifique que no se haya dañado durante el transporte y en caso de problemas, contacte con el distribuidor o el Servicio de Atención al Cliente, antes de proceder a la instalación. • A...
Page 48 - DESCRIPCIÓN Y CONTROLES
Page 49 - USO DE LA PLACA DE COCCIÓN; ENCENDIDO
49 USO DE LA PLACA DE COCCIÓN ENCENDIDO 1. Dé la vuelta a la solapa empujando un lado hacia abajo. 2. Encienda la placa tocando el botón de encendido. 3. Toca el botón "A" para encender el ventilador. 4. Toca y desliza hacia la derecha para aumentar la potencia. 8 5. El extractor empezará a ...
Page 50 - RECIPIENTES PARA COCINAR
50 El sistema de cocción por inducción se basa en el fenómeno físico de la inducción magnética. La principal característica de este sistema es la transferencia directa de energía del generador a la olla. Ventajas: En comparación con las placas eléctricas, su placa de inducción es: - Más segura: meno...
Page 52 - USO DEL EXTRACTOR
52 • Recuperación La función recuperación permite recuperar todas las pro- gramaciones configuradas en la placa, en caso de apagado accidental. Activación: - encienda de nuevo la placa dentro de 6 segundos des- de el apagado - pulse dentro de los otros 6 segundos sucesivos USO DEL EXTRACTOR El siste...
Page 53 - TABLAS DE POTENCIA
53 TABLAS DE POTENCIA Nivel de potencia (preestablecido) Descripción Melting Identifica un nivel de potencia apto para derretir lentamente productos deli- cados sin comprometer las características sensoriales (chocolate, mantequi- lla etc.). Warming Identifica un nivel de potencia apto para permitir...
Page 54 - TABLAS DE COCCIÓN
54 TABLAS DE COCCIÓN Categoría de alimentos Platos o tipo de cocción Nivel de potencia y proceso de cocción Primera fase Potencias Segunda fase Potencias Pasta, arroz Pasta fresca Calentamiento del agua Booster-9 Cocción de la pasta y mantenimiento de la ebullición 7-8 Pasta fresca Calentamiento del...
Page 55 - GUÍA DE USO Y MANTENIMIENTO; • NO UTILICE UTENSILIOS NI INSTRUMENTOS PARA
55 GUÍA DE USO Y MANTENIMIENTO I CUIDADO Antes de realizar cualquier operación de limpieza o man- tenimiento, asegúrese de que las zonas de cocción estén apagadas y que el indicador de calor esté apagado. LIMPIEZA La placa de cocción debe limpiarse después de cada uso. I IMPORTANTE • No utilice espo...
Page 56 - SOLUCIÓN DE PROBLEMAS; Servicio al Cliente; Antes de ponerse en contacto con el Servicio de Asistencia
56 SOLUCIÓN DE PROBLEMAS CÓDIGO DE INFORMACIÓN DESCRIPCIÓN CAUSAS POSIBLES SOLUCIÓN La zona de mandos se apaga debido a una temperatura demasiado elevada La temperatura interna de las partes electrónicas es demasiado alta Espere a que la placa se enfríe antes de utilizarla de nuevo + Señal acústica ...
Page 57 - DIAGRAMA ELÉCTRICO
Page 58 - GARANTÍA LIMITADA DE DOS AÑOS; PARA OBTENER SERVICIO DENTRO DE GARANTÍA; PARTES Y GARANTÍA DE SERVICIO; QUIÉN ESTÁ CUBIERTO; Registre su producto en; año de garantía de
58 12NC: Modelo:No. Serie: Fecha de compra en su factura original: ELICA North America GARANTÍA LIMITADA DE DOS AÑOS PARA OBTENER SERVICIO DENTRO DE GARANTÍA El propietario debe presentar su recibo original de la compra. Guarde por favor una copia de su recibo de compra como prue- ba, para recibir e...
Page 59 - ELICA Latinoamérica; QUÉ NO ESTÁ CUBIERTO
59 ELICA Latinoamérica GARANTÍA LIMITADA DE DOS AÑOS PARA OBTENER SERVICIO DENTRO DE GARANTÍA El propietario debe presentar su recibo original de la compra. Guarde por favor una copia de su recibo de compra como prue- ba, para recibir el servicio dentro del periodo de garantía. PARTES Y GARANTÍA DE ...