Page 3 - Definitions: Safety Alert Symbols and Words
English 1 WARNING! Read all safety warnings and all instructions. Failure to follow the warnings and instructions may result in electric shock, fire, and/or serious injury. nOTE: This Operator's Manual covers several models. Features may vary by model. Not all features in this manual are applicable ...
Page 4 - SAFE OPERATION PRACTICES; TRAINING; WARNING; result in serious injury or death.
2 SAFE OPERATION PRACTICES TRAINING 1. Read, understand, and follow all instructions on the machine and in the manual(s) before attempting to assemble and operate. Keep this manual in a safe place for future and regular reference and for ordering replacement parts. 2. Be familiar with all controls a...
Page 5 - CLEARING A CLOGGED DISCHARGE CHUTE; DO NOT MODIFY SNOW BLOWER SPEED
3 SAFE OPERATION PRACTICES 14. Never operate machine at high transport speeds on slippery surfaces. Look down and behind and use care when backing up. 15. After striking a foreign object or if the machine should start to vibrate abnormally, stop the motor, remove the safety key. Inspect thoroughly f...
Page 7 - MINIMUM WIRE SIZE FOR EXTENSION CORDS FOR
5 SAFE OPERATION PRACTICES 8. An extension cord must have adequate wire size (AWG or American Wire Gauge) for safety. The smaller the gauge number of the wire, the greater the capacity of the cable, that is, 16 gauge has more capacity than 18 gauge. An undersized cord will cause a drop in line volta...
Page 8 - DISPOSING OF DAMAGED OR WORN-OUT BATTERIES; About Call2Recycle Battery Seals
6 SAFE OPERATION PRACTICES DISPOSING OF DAMAGED OR WORN-OUT BATTERIES WARNING The following toxic and corrosive material is used in this unit’s battery:LITHIUM-ION, a toxic material. WARNING To prevent contamination of the environment, contact your local waste disposal agency for specific instructio...
Page 9 - SAFETY SYMBOLS; Symbol; warnings and instructions in this manual and on the machine
7 SAFETY SYMBOLS This page depicts and describes safety symbols that may appear on this snow blower. Read, understand, and follow all instructions on the snow blower before attempting to assemble and operate. Symbol Description OPESymbol.com DANGER – READ OPERATOR’S MANUAL: Read, understand and foll...
Page 10 - Important Charging Notes; Longest life and best performance can be obtained if; Charging a Battery; Figure 1; Charging
8 BATTERIES & CHARGERS The battery pack is not fully charged out of the carton. Before using the battery pack and charger, read the safety instructions in the Safe Operation Practices section and then follow charging procedures outlined in this section. When ordering replacement battery packs, b...
Page 11 - Battery and Battery Charger Care; STORAGE RECOMMENDATIONS; Figure 2; Transportation
9 BATTERIES & CHARGERS Battery and Battery Charger Care STORAGE RECOMMENDATIONS 1. The best storage place is one that is cool and dry, away from direct sunlight and excess heat or cold. 2. For long storage, it is recommended to store a fully charged battery pack in a cool dry place out of the ch...
Page 12 - ASSEMBLY; Overview; Figure 3
10 ASSEMBLY Overview • Remove packaging materials from snow blower. • Rotate Handle into the upright position and lock the handles in place. Refer to Handle Assembly. • Install the chute. Refer to Chute Assembly Options. • Complete snow blower assembly. Refer to Set-Up on page 11. Tools Required • A...
Page 13 - Chute Assembly; Figure 6; INSTALLING BATTERY; Figure 9
11 ASSEMBLY Chute Assembly 1. Remove the hex washer screws (a) in the chute base (Figure 6). a a a Figure 6 2. Align the holes in the chute base with the three tabs (b) in the lower chute. 3. Secure the chute base with the hex washer screws (a) removed in Step 2 (Figure 7). b a a a Figure 7 Set-Up C...
Page 14 - OPERATION; Model Features; FEATURES
12 OPERATION Model Features D G1 G2 E F A B C H L J I M K K Figure 10 FEATURES Snow blower controls and features are described below and illustrated above (Figure 10). NOTE: This Operator’s Manual covers several models. Snow blower features may vary by model. Not all features in this manual are appl...
Page 15 - G. CHUTE DIRECTION CONTROLS; Using The Snow Blower; TURNING ON THE SNOW BLOWER
13 OPERATION 1. Battery indicators - shows if a battery is installed in one or both of the battery slots and how much charge each battery has. When all indicator lights are lit the battery is at full charge. As the battery is discharging, the indicator lights will lower. When bottom battery indicato...
Page 16 - TURNING OFF THE SNOW BLOWER; Adjusting the Chute Direction and Pitch; CHUTE DIRECTION
14 OPERATION TURNING OFF THE SNOW BLOWER 1. Release the auger control bail to stop the motor and auger (Figure 11). 2. Remove the safety key if snow blower is to be left unattended ADJUSTING AUGER SPEED/POWER LEVEL NOTE: The snow blower will start in standard mode. The mode button is used to cycle t...
Page 17 - Folding and Unfolding the Handle; Clearing a Clogged Chute Assembly
15 OPERATION Folding and Unfolding the Handle NOTE: When folding or unfolding the handle, If necessary, adjust the wing knobs so that the handle levers are tight enough to hold the upper handle in the operation position but loose enough for the handle lever to flip down to unlock the upper handle to...
Page 18 - PRODUCT CARE
16 PRODUCT CARE WARNING Before servicing, repairing or inspecting the snow blower, disengage the auger control bail. Stop the motor and remove safety key to prevent unintended starting. Troubleshooting BATTERY WILL NOT CHARGE 1. The battery charger is not plugged in. • Plug the battery charger into ...
Page 19 - REPLACING SHAVE PLATE; Battery Disposal; THE RBRC® SEAL; Service; REPLACING THE AUGER DRIVE BELT
17 PRODUCT CARE REPLACING SHAVE PLATE NOTE: The shave plate is attached to the bottom of the auger housing and is subject to wear. It should be checked periodically. 1. Ensure the snow blower is turned off and the safety key is removed. 2. Remove battery(ies). 3. Tip the snow blower back until it re...
Page 20 - Replacement Parts; Accesories; Part Number; Three Year Limited Warranty; YEAR FREE SERVICE
18 PRODUCT CARE Replacement Parts Part Number Description BD-NA262050 Safety key 754P07144 Auger belt BD-NA171659 Wheels BD-NA110007 Battery BD-N878449 Battery charger Accesories Part Number Description 931-2643 Chute Clean-out Tool Three Year Limited Warranty DeWALT will repair or replace, without ...
Page 21 - WALT; Definiciones: Símbolos y palabras de alertas de seguridad
19 ¡ADVERTENCIA! Lea todas las advertencias de seguridad y todas las instrucciones. Si no se siguen las advertencias y las instrucciones se pueden producir descargas eléctricas, incendio y/o lesiones graves. nOTA: Este Manual del Operador corresponde a varios modelos. Las características pueden vari...
Page 22 - PRÁCTICAS DE OPERACIÓN SEGURAS; CAPACITACIÓN; ADVERTENCIA
20 PRÁCTICAS DE OPERACIÓN SEGURAS CAPACITACIÓN 1. Lea, entienda y cumpla todas las instrucciones incluidas en la máquina y en el(los) manual(es) antes de intentar realizar el montaje de la unidad y utilizarla. Guarde este manual en un lugar seguro para consultas futuras y periódicas, así como para s...
Page 23 - PROCEDIMIENTO PARA DESPEJAR UN CANAL DE; NO MODIFIQUE LA VELOCIDAD DEL SOPLADOR DE NIEVE
21 PRÁCTICAS DE OPERACIÓN SEGURAS 14. Nunca opere la máquina a altas velocidades de desplazamiento sobre superficies resbaladizas. Mire hacia abajo y hacia atrás, y tenga cuidado cuando vaya marcha atrás. 15. Después de golpear un objeto extraño o si la máquina comenzara a vibrar de un modo extraño,...
Page 25 - CALIBRE MÍNIMO PARA CABLES PROLONGADORES PARA; Longitud del
23 PRÁCTICAS DE OPERACIÓN SEGURAS 8. Por seguridad, un cable prolongador debe tener un calibre adecuado (AWG o Calibre de Alambre Estadounidense) Cuanto menor el calibre del alambre, mayor la capacidad del cable, es decir, un calibre 16 tiene más capacidad que un calibre 18. Un cable de tamaño insuf...
Page 26 - ELIMINACIÓN DE BATERÍAS DAÑADAS O AGOTADAS; Acerca de los sellos de batería Call2Recycle
24 PRÁCTICAS DE OPERACIÓN SEGURAS ELIMINACIÓN DE BATERÍAS DAÑADAS O AGOTADAS ADVERTENCIA En la batería de esta unidad se utiliza el siguiente material tóxico y corrosivo:ION DE LITIO, un material tóxico. ADVERTENCIA Para evitar la contaminación ambiental, póngase en contacto con su agencia local de ...
Page 27 - SÍMBOLOS DE SEGURIDAD; Símbolo
25 SÍMBOLOS DE SEGURIDAD En esta página, se presentan y describen los símbolos de seguridad que pueden aparecer sobre este soplador de nieve. Lea, comprenda y siga todas las instrucciones que aparecen sobre el soplador de nieve antes de intentar armarlo y hacerlo funcionar. Símbolo Descripción OPESy...
Page 28 - BATERÍAS Y CARGADORES; Notas importantes para la carga; Figura 1; RETARDO FRÍO/CALOR DEL PAQUETE
26 BATERÍAS Y CARGADORES El paquete de baterías no está completamente cargado cuando se saca de la caja. Antes de usar el paquete de baterías y el cargador, lea las instrucciones de seguridad en la sección Prácticas de Operación Seguras y luego siga los procedimientos de carga que se indican en esta...
Page 29 - Cuidado de la batería y del cargador de baterías; RECOMENDACIONES PARA EL ALMACENAMIENTO:; INSTRUCCIONES DE LIMPIEZA DEL PAQUETE DE; Figura 2; Transporte
27 BATERÍAS Y CARGADORES Cuidado de la batería y del cargador de baterías RECOMENDACIONES PARA EL ALMACENAMIENTO: 1. El mejor lugar de almacenamiento es uno que sea frío y seco, lejos de la luz solar directa y del calor o frío excesivos. 2. Cuando se almacene durante mucho tiempo, se recomienda guar...
Page 30 - MONTAJE; Información general; Figura 3
28 MONTAJE Información general • Retire los materiales de empaque del soplador de nieve. • Gire el asa hasta la posición vertical y trabe las asas en su lugar. Consulte la sección Montaje de la manija. • Instale el canal. Consulte la sección Opciones de montaje del canal. • Ensamble el soplador de n...
Page 31 - Montaje de Canal; Figura 6; Configuración; CONTROL DEL NIVEL DE CARGA DE LA BATERÍA; INSTALACIÓN DE LA BATERÍA; Figura 9
29 MONTAJE Montaje de Canal 1. Extraiga los tornillos de arandela hexagonal (a) de la base del canal (Figura 6). a a a Figura 6 2. Alinee los orificios de la base del canal con las tres lengüetas (b) del canal inferior. 3. Fije la base del canal con los tornillos de la arandela hexagonal (a) quitado...
Page 32 - FUNCIONAMIENTO; Características del Modelo; CARACTERÍSTICAS
30 FUNCIONAMIENTO Características del Modelo D G1 G2 E F A B C H L J I M K K Figura 10 CARACTERÍSTICAS Los controles y las características del soplador de nieve se describen a continuación y se ilustran arriba (Figura 10). NOTA: Este manual de operación corresponde a varios modelos. Las característi...
Page 33 - Indicador de modo de potencia máxima:; Cómo usar el soplador de nieve; CÓMO ENCENDER EL SOPLADOR DE NIEVE
31 FUNCIONAMIENTO 1. Indicadores de las baterías: indican si hay una batería instalada en una o en ambas ranuras para baterías, y cuánta carga le queda a cada una de ellas. Cuando todas las luces indicadoras están encendidas la batería está con carga completa. Cuando la batería se descarga, baja la ...
Page 34 - AJUSTE DEL NIVEL DE VELOCIDAD/POTENCIA DE LA; Ajuste de la Dirección e Inclinación del Canal; DIRECCIÓN DEL CANAL
32 FUNCIONAMIENTO AJUSTE DEL NIVEL DE VELOCIDAD/POTENCIA DE LA BARRENA NOTA: el soplador de nieve arranca en el modo estándar. El botón de modo se usa para pasar por los Tres modos de funcionamiento del soplador de nieve (Figura 12).1. Oprima el botón de modo (a) para cambiar del modo estándar al mo...
Page 35 - Pliegue y despliegue de la manija
33 FUNCIONAMIENTO Pliegue y despliegue de la manija NOTA: al plegar o desplegar la manija, si es necesario, ajuste las perillas de aletas de modo que las palancas del asa queden suficientemente ajustadas como para sostener la manija superior en la posición de funcionamiento pero suficientemente floj...
Page 36 - CUIDADO DEL PRODUCTO
34 CUIDADO DEL PRODUCTO ADVERTENCIA Antes de realizar tareas de mantenimiento, reparación o inspección en el soplador de nieve, desengrane el asa de control de la barrena. Pare el motor y retire la llave de seguridad para evitar un encendido accidental. Solución de Problemas LA BATERÍA NO CARGA 1. E...
Page 37 - REEMPLAZO DE LA PLACA DE RASPADO; Eliminación de la Batería; EL SELLO RBRC®; Servicio; REEMPLAZO DE LA CORREA DE TRANSMISIÓN DE LA
35 CUIDADO DEL PRODUCTO REEMPLAZO DE LA PLACA DE RASPADO NOTA: la placa de raspado está adosada al fondo de la caja de la barrena y sujeta a desgaste. Se la debe controlar periódicamente.1. Asegúrese de que el soplador de nieve esté apagado y de que se haya extraído la llave de seguridad. 2. Retire ...
Page 38 - Piezas de repuesto; Aditamentos y accesorios; Garantía limitada de tres años; GARANTÍA DE DEVOLUCIÓN DE DINERO DE 90 DÍAS
36 CUIDADO DEL PRODUCTO AMÉRICA LATINA: esta garantía no se aplica a los productos vendidos en América Latina. Para los productos vendidos en América Latina, consulte la información sobre la garantía específica del país que se incluye en el embalaje, llame a la empresa local o consulte el sitio web ...
Page 39 - Définitions : Symboles et mots d'alerte de sécurité
37 AVERTISSEMENT! Veuillez lire tous les avertissements de sécurité et toutes les instructions. Le non-respect des avertissements et des instructions peut entraîner une secousse électrique, un incendie et/ou des blessures graves. REMARQUE : Ce manuel de l'opérateur couvre plusieurs modèles. Les cara...
Page 40 - PRATIQUES D'UTILISATION SÉCURITAIRES; FORMATION; AVERTISSEMENT; RESPECTER L'AVERTISSEMENT; DANGER
38 PRATIQUES D'UTILISATION SÉCURITAIRES FORMATION 1. Veuillez lire, assimiler et respecter toutes les instructions qui figurent sur la machine et dans le(s) manuel(s) avant de tenter de l’assembler et de l’utiliser. Conservez le présent manuel dans un endroit sûr pour consultation régulière et ultér...
Page 41 - NETTOYAGE D'UNE GOULOTTE D'ÉJECTION OBSTRUÉE; NE MODIFIEZ PAS LA VITESSE DE LA SOUFFLEUSE À NEIGE
39 PRATIQUES D'UTILISATION SÉCURITAIRES 14. N'utilisez jamais la machine à des vitesses de transport élevées sur des surfaces glissantes. Regardez au sol et derrière vous et soyez prudent(e) lorsque vous reculez. 15. Après avoir heurté un corps étranger ou si la machine commence à vibrer anormalemen...
Page 43 - TAILLE MINIMALE DES FILS DES RALLONGES POUR; Longueur du
41 PRATIQUES D'UTILISATION SÉCURITAIRES 8. Une rallonge doit avoir un calibre de fil adéquat (AWG ou American Wire Gauge) pour des raisons de sécurité. Plus le calibre du fil est petit, plus la capacité du câble est grande, c'est-à-dire que le calibre 16 a une plus grande capacité que le calibre 18....
Page 44 - ÉLIMINATION DES BATTERIES ENDOMMAGÉES OU USÉES; À propos des sceaux de batterie Call2Recycle
42 PRATIQUES D'UTILISATION SÉCURITAIRES ÉLIMINATION DES BATTERIES ENDOMMAGÉES OU USÉES AVERTISSEMENT Le matériau toxique et corrosif suivant est utilisé dans la batterie de cet appareil :LITHIUM-ION, une substance toxique. AVERTISSEMENT Pour prévenir la contamination de l'environnement, contactez vo...
Page 45 - SYMBOLES DE SÉCURITÉ; Symbole; AVERTISSEMENT — OBJET JETÉ/ENCHEVÊTREMENT :
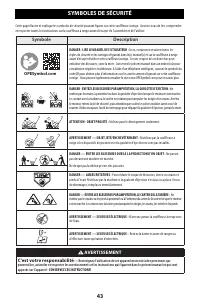
43 SYMBOLES DE SÉCURITÉ Cette page illustre et explique les symboles de sécurité pouvant figurer sur cette souffleuse à neige. Assurez-vous de lire, comprendre et respecter toutes les instructions sur la souffleuse à neige avant d'essayer de l'assembler et de l'utiliser. Symbole Description OPESymbo...
Page 46 - BATTERIES ET CHARGEURS; La durée de vie la plus longue et les meilleures performances; Recharge d’une batterie; Recharge en cours
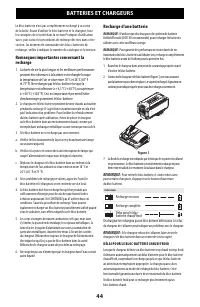
44 BATTERIES ET CHARGEURS Le bloc-batterie n'est pas complètement rechargé à sa sortie de la boîte. Avant d'utiliser le bloc-batterie et le chargeur, lisez les consignes de sécurité dans la section Pratiques d'utilisation sûres, puis suivez les procédures de recharge décrites dans cette section. Au ...
Page 47 - Entretien de la batterie et du chargeur de batterie; RECOMMANDATIONS POUR LE REMISAGE; INSTRUCTIONS DE NETTOYAGE DU BLOC-BATTERIE; Transport
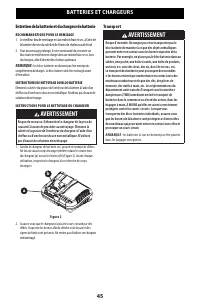
45 BATTERIES ET CHARGEURS Entretien de la batterie et du chargeur de batterie RECOMMANDATIONS POUR LE REMISAGE 1. Le meilleur lieu de remisage est un endroit frais et sec, à l'abri de la lumière directe du soleil et de l'excès de chaleur ou de froid. 2. Pour un remisage prolongé, il est recommandé d...
Page 48 - ASSEMBLAGE; Vue d’ensemble
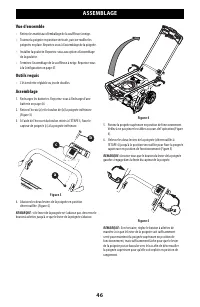
46 ASSEMBLAGE Vue d’ensemble • Retirez les matériaux d'emballage de la souffleuse à neige. • Tournez la poignée en position verticale, puis verrouillez les poignées en place. Reportez-vous à l’assemblage de la poignée. • Installez la goulotte. Reportez-vous aux options d’assemblage de la goulotte. •...
Page 49 - Assemblage de la goulotte; Configuration; VÉRIFICATION DU NIVEAU DE CHARGE DE LA BATTERIE; INSTALLATION DE LA BATTERIE
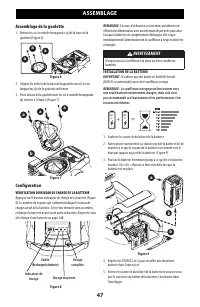
47 ASSEMBLAGE Assemblage de la goulotte 1. Retirez les vis à rondelle hexagonale (a) de la base de la goulotte (Figure 6). a a a Figure 6 2. Alignez les orifices de la base de la goulotte avec les trois languettes (b) de la goulotte inférieure. 3. Fixez la base de la goulotte avec les vis à rondelle...
Page 50 - UTILISATION; Caractéristiques du modèle; CARACTÉRISTIQUES
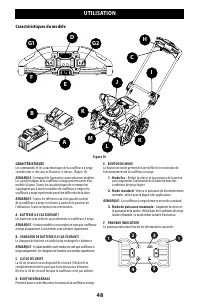
48 UTILISATION Caractéristiques du modèle D G1 G2 E F A B C H L J I M K K Figure 10 CARACTÉRISTIQUES Les commandes et les caractéristiques de la souffleuse à neige sont décrites ci-dessous et illustrées ci-dessus. (Figure 10). REMARQUE : Ce manuel de l'opérateur couvre plusieurs modèles. Les caracté...
Page 51 - Indicateur de mode de puissance maximale -; Utilisation de la souffleuse à neige; MISE EN MARCHE DE LA SOUFFLEUSE À NEIGE; EMBRAYAGE DE LA TARIÈRE
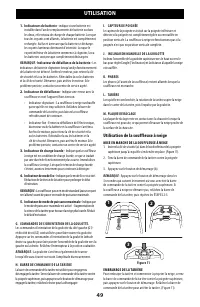
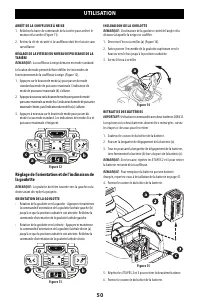
49 UTILISATION 1. Indicateurs de batterie - indique si une batterie est installée dans l'un des emplacements de batterie ou dans les deux, et le niveau de charge de chaque batterie. Lorsque tous les voyants sont allumés, la batterie est complètement rechargée. Au fur et à mesure que la batterie se d...
Page 52 - ARRÊT DE LA SOUFFLEUSE À NEIGE
50 UTILISATION ARRÊT DE LA SOUFFLEUSE À NEIGE 1. Relâchez la barre de commande de la tarière pour arrêter le moteur et la tarière (Figure 11). 2. Retirez la clé de sécurité si la souffleuse doit être laissée sans surveillance. RÉGLAGE DE LA VITESSE/DU NIVEAU DE PUISSANCE DE LA TARIÈRE REMARQUE : La ...
Page 53 - Pliage et dépliage de la poignée
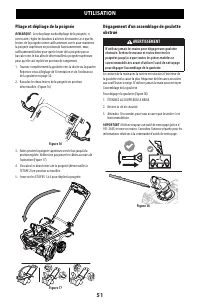
51 UTILISATION Pliage et dépliage de la poignée REMARQUE : Lors du pliage ou du dépliage de la poignée, si nécessaire, réglez les boutons à ailettes de manière à ce que les leviers de la poignée soient suffisamment serrés pour maintenir la poignée supérieure en position de fonctionnement, mais suffi...
Page 54 - ENTRETIEN DU PRODUIT
52 ENTRETIEN DU PRODUIT AVERTISSEMENT Avant de procéder à l'entretien, à la réparation ou à l'inspection de la souffleuse à neige, désengagez la barre de commande de la tarière. Arrêtez le moteur, puis retirez la clé de sécurité pour éviter tout démarrage accidentel. Diagnostic de pannes LA BATTERIE...
Page 55 - REMPLACEMENT DE LA PLAQUE DE RÂCLAGE.; Mise au rebut de la batterie; LE SCEAU RBRC®; Entretien
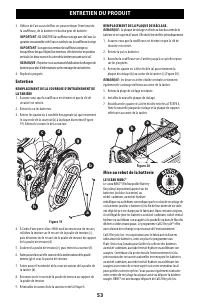
53 ENTRETIEN DU PRODUIT REMPLACEMENT DE LA PLAQUE DE RÂCLAGE. REMARQUE : La plaque de râclage est fixée au bas du carter de la tarièere et est sujette à l'usure. Elle doit être vérifiée périodiquement.1. Assurez-vous que la souffleuse est éteinte et que la clé de sécurité est retirée. 2. Retirez la ...
Page 56 - Pièces de rechange; SERVICE GRATUIIT PENDANT UN AN
54 ENTRETIEN DU PRODUIT AMÉRIQUE LATINE : Cette garantie ne s'applique pas aux produits vendus en Amérique latine. Pour les produits vendus en Amérique latine, consultez les informations de garantie spécifiques au pays contenues dans l'emballage, appelez la société locale ou consultez le site Web po...