Page 3 - The definitions below describe the level of severity for each; WALT; General Power Tool Safety Warnings
1 English Definitions: Safety Guidelines The definitions below describe the level of severity for each signal word. Please read the manual and pay attention to these symbols. DANGER: Indicates an imminently hazardous situation which, if not avoided, will result in death or serious injury . WARNING: ...
Page 4 - English; ) BATTERY TOOL USE AND CARE
2 English b) Do not use the power tool if the switch does not turn it on and off. Any power tool that cannot be controlled with the switch is dangerous and must be repaired. c) Disconnect the plug from the power source and/or the battery pack from the power tool before making any adjustments, changi...
Page 6 - WARNING: ALWAYS wear proper personal hearing protection
4 English WARNING: ALWAYS wear proper personal hearing protection that conforms to ANSI S12.6 (S3.19) during use. Under some conditions and duration of use, noise from this product may contribute to hearing loss. WARNING: ALWAYS use eye protection. All users and bystanders must wear eye protection t...
Page 7 - When ordering replacement battery packs, be sure to include the; READ ALL INSTRUCTIONS
5 English blow, been dropped, run over or damaged in any way (e.g., pierced with a nail, hit with a hammer, stepped on). Damaged battery packs should be returned to the service center for recycling. WARNING: Fire hazard. Do not store or carry the battery pack so that metal objects can contact expose...
Page 8 - The RBRC
6 English NOTICE: Under certain conditions, with the charger plugged into the power supply, the charger can be shorted by foreign material. Foreign materials of a conductive nature, such as, but not limited to, grinding dust, metal chips, steel wool, aluminum foil or any buildup of metallic particle...
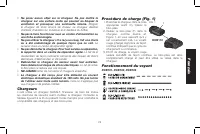
Page 9 - Indicator Light Operation; PACK CHARGING
7 English • The charger is designed to operate on standard 120V household electrical power. Do not attempt to use it on any other voltage. This does not apply to the vehicular charger. Chargers Your tool uses a D e WALT charger. Be sure to read all safety instructions before using your charger. Cons...
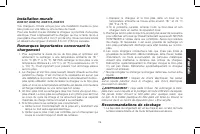
Page 10 - LEAVING THE BATTERY PACK IN THE CHARGER; Wall Mounting; Charge Indicators
8 English Once the battery has reached an optimum temperature, the yellow light will turn off and the charger will automatically resume the charging procedure. This feature ensures maximum battery life. LEAVING THE BATTERY PACK IN THE CHARGER The charger and battery pack can be left connected with t...
Page 11 - Shock hazard. Don’t allow any liquid to get inside the; Storage Recommendations; Never modify the power tool or any part of it. Damage
9 English there is no battery pack in the cavity. Unplug the charger before attempting to clean. 7. Do not freeze or immerse the charger in water or any other liquid. WARNING: Shock hazard. Don’t allow any liquid to get inside the charger. Electric shock may result. WARNING: Burn hazard. Do not subm...
Page 12 - To reduce the risk of personal injury,; VARIABLE SPEED TRIGGER SWITCH
10 English Side Handle (Fig. 2) WARNING: To reduce the risk of personal injury, ALWAYS operate the tool with the side handle (A) properly installed. Failure to do so may result in the side handle slipping during tool operation and subsequent loss of control. Hold tool with both hands to maximize con...
Page 13 - Do not change to drill or hammerdrill mode with a chisel; To select forward rotation,
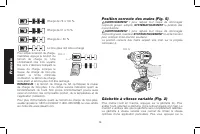
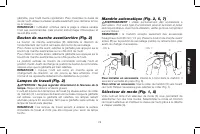
11 English Mode Selector (Fig. 4) CAUTION: Do not change to drill or hammerdrill mode with a chisel bit in the chuck. Personal injury and damage to tool may result. CAUTION: Never change the mode while the unit is running. For straight drilling, rotate the mode selector (D) until the arrow points to...
Page 14 - OPERATION
12 English WARNING: To reduce the risk of personal injury, ALWAYS operate the tool with the side handle properly installed and securely tightened. Failure to do so may result in the side handle slipping during tool operation and subsequent loss of control. Hold tool with both hands to maximize contr...
Page 15 - ALWAYS; To insert bit; Proper Hand Position; To reduce the risk of serious personal injury, ALWAYS
13 English NOTE: The fuel gauge is only an indication of the charge left on the battery pack. It does not indicate tool functionality and is subject to variation based on product components, temperature and end-user application.For more information regarding fuel gauge battery packs, please contact ...
Page 16 - . Keep the motor running when pulling the bit back out of a drilled
14 English WARNING: To reduce the risk of serious personal injury, ALWAYS hold securely in anticipation of a sudden reaction. Proper hand position requires one hand on the side handle, with the other hand on the main handle. FIG. 10 Drilling (Fig. 4) WARNING: To reduce the risk of personal injury, A...
Page 17 - DRILLING IN WOOD; MAINTENANCE; WARNING: To reduce the risk of serious personal injury, turn; Cleaning; CHARGER CLEANING INSTRUCTIONS
15 English NOTE: Large (5/16" to 1/2" [7.9 mm to 12.7 mm]) holes in steel can be made easier if a pilot hole (5/32" to 3/16" [4 mm to 4.8 mm]) is drilled first. DRILLING IN WOOD An SDS Plus to round shank adaptor chuck is required. Ensure that tool is in drill-only mode. Start drilli...
Page 18 - Since accessories, other than those offered by; MAXIMUM RECOMMENDED CAPACITIES; Repairs; CONFIRMATION OF OWNERSHIP:; Three Year Limited Warranty; YEARS FREE SERVICE
16 English Accessories WARNING: Since accessories, other than those offered by D e WALT , have not been tested with this product, use of such accessories with this tool could be hazardous. To reduce the risk of injury, only D e WALT recommended accessories should be used with this product. The D2530...
Page 19 - YEARS FREE SERVICE ON D; 0 DAY MONEY BACK GUARANTEE; FREE WARNING LABEL REPLACEMENT:; XXX
17 English 3 YEARS FREE SERVICE ON D e WALT BATTERY PACKS DCB200, DCB204, DCB204BT, DCB205 D e WALT BATTERY PACKS Product warranty voided if the battery pack is tampered with in any way. D e WALT is not responsible for any injury caused by tampering and may prosecute warranty fraud to the fullest ex...
Page 20 - Français; ) SÉCURITÉ DU LIEU DE TRAVAIL
Français 18 Définitions : lignes directrices en matière de sécurité Les définitions ci-dessous décrivent le niveau de danger pour chaque mot-indicateur employé. Lire le mode d’emploi et porter une attention particulière à ces symboles. DANGER : indique une situation dangereuse imminente qui, si elle...
Page 21 - ) UTILISATION ET ENTRETIEN D’UN OUTIL ÉLECTRIQUE
Français 19 l’interrupteur ou brancher un outil électrique dont l’interrupteur est à la position de marche risque de provoquer un accident. d) Retirer toute clé de réglage ou clé avant de démarrer l’outil. Une clé ou une clé de réglage attachée à une partie pivotante de l’outil électrique peut provo...
Page 22 - ) UTILISATION ET ENTRETIEN DU BLOC-PILES
Français 20 entre les deux bornes. Le court-circuit des bornes du bloc- piles risque de provoquer des brûlures ou un incendie. d) En cas d’utilisation abusive, le liquide peut gicler hors du bloc-piles; éviter tout contact avec ce liquide. Si un contact accidentel se produit, laver à grande eau. Si ...
Page 24 - Pour commander un bloc-piles de rechange, s’assurer d’inclure son
Français 22 V ................... volts A ....................... ampèresHz ................. hertz W ...................... wattsmin ............... minutes ou AC .......... courant alternatif ou DC ... courant continu ou AC/DC ... courant alternatif ................. classe I fabrication ou contin...
Page 25 - CONSIGNES DE SÉCURITÉ PROPRES AUX PILES AU; LIRE TOUTES LES CONSIGNES
Français 23 AVERTISSEMENT : risques d’incendie. Au moment de ranger ou transporter le bloc-piles, s’assurer qu’aucun objet métallique n’entre en contact avec les bornes à découvert du bloc-piles. Par exemple, éviter de placer un bloc-piles dans un tablier, une poche, une boîte à outils ou un tiroir,...
Page 26 - Le sceau SRPRC
Français 24 AVERTISSEMENT : risques de chocs électriques. Ne laisser aucun liquide pénétrer dans le chargeur, des chocs électriques pourraient en résulter. ATTENTION : risques de brûlure. Pour réduire tout risque de dommages corporels, ne recharger que des blocs-piles rechargeables D e WALT . Tout ...
Page 28 - FONCTION DE SUSPENSION DE CHARGE CONTRE LE; Fonctionnement du voyant
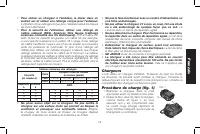
Français 26 le bloc-piles initial est endommagé et doit être retourné dans un centre de réparation ou tout autre site de récupération pour y être recyclé. Si l’on obtient le même résultat avec le nouveau bloc-piles, faites vérifier le chargeur et le bloc-piles chez un centre de réparation agréé. FON...
Page 29 - BLOCS-PILES DÉFECTUEUX; Installation murale
Français 27 2. Le chargeur et son bloc-piles peuvent devenir chauds au toucher pendant la charge. C’est normal et ne représente en aucun cas une défaillance du produit. Pour faciliter le refroidissement du bloc- piles après utilisation, éviter de laisser le chargeur ou le bloc-piles dans un local où...
Page 31 - GÂCHETTE À VITESSE VARIABLE; pour réduire le risque de blessures corporelles,
Français 29 GÂCHETTE À VITESSE VARIABLE La gâchette à vitesse variable vous permet de choisir la vitesse optimale à une application particulière. Plus vous appuyez sur la gâchette, plus l’outil tourne rapidement. Pour maximiser la durée de vie de l’outil, utilisez la vitesse variable seulement pour ...
Page 32 - Pour sélectionner la marche avant,; pour prévenir tout risque de dommages corporels ou
Français 30 REMARQUE : le sélecteur de mode (D) doit se trouver en mode de perçage, mode de perforateur ou mode de burinage en tout temps. Il n’existe pas de positions de fonctionnement intermédiaire. Bouton de commhnde marche avant/ marche arrière (fig. 2, 5) Le bouton de marche avant/arrière (C) d...
Page 33 - FONCTIONNEMENT
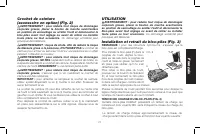
Français 31 Installation et retrait du bloc-piles (fig. 7) AVERTISSEMENT : pour réduire tout risque de dommages corporels, ne jamais appuyer sur le bouton de libération du bloc-piles sans retirer le bloc-piles. Le fait d’appuyer sur le bouton de libération du bloc-piles sans retirer le bloc-piles p...
Page 34 - AVERTISSEMENT
Français 32 Le témoin de charge indique approximativement le niveau de charge restant dans le bloc-piles en fonction des voyants suivants : Chargé de 75 à 100 % Chargé de 51 à 74 % Chargé de < 50 % Le bloc-piles doit être rechargé Pour activer le témoin de charge, M FIG. 8 maintenez appuyé le bou...
Page 35 - TOUJOURS
Français 33 AVERTISSEMENT : pour réduire tout risque de dommages corporels graves, maintenir SYSTÉMATIQUEMENT l’outil fermement pour anticiper toute réaction soudaine de l’outil La position correcte des mains requiert une main sur la poignée latérale et l’autre sur la poignée principale. FIG. 10 Pe...
Page 36 - PERÇAGE DU MÉTAL; ENTRETIEN; AVERTISSEMENT : pour réduire les risques de blessures,
Français 34 et accélérer en appuyant davantage sur la détente lorsque le trou est assez profond pour percer sans que le foret n’en déborde. PERÇAGE DU MÉTAL Un adaptateur de mandrin à tige ronde SDS Plus est nécessaire. Assurez-vous que l’outil est en mode perçage seulement. Commencez à percer à une...
Page 37 - INSTRUCTION DE NETTOYAGE DU CHARGEUR; Accessoires; CAPACITÉS MAXIMALES RECOMMANDÉES; Réparations; RÉPARATIONS SOUS GARANTIE:
Français 35 Nettoyage AVERTISSEMENT : expulser tout débris ou poussière des orifices d’aération à l’aide d’un jet d’air sec au moins une fois par semaine. Pour réduire tout risque de lésions oculaires, porter systématiquement une protection oculaire agréée ANSI Z87.1 et une protection respiratoire a...
Page 39 - Español; Las siguientes definiciones describen el nivel de gravedad; ) SEGURIDAD EN EL ÁREA DE TRABAJO
Español 37 Definiciones: Normas de seguridad Las siguientes definiciones describen el nivel de gravedad de cada palabra de señal. Lea el manual y preste atención a estos símbolos. PELIGRO: Indica una situación de peligro inminente que, si no se evita, provocará la muerte o lesiones graves . ADVERTEN...
Page 40 - ) USO Y MANTENIMIENTO DE LA HERRAMIENTA
Español 38 d) Retire la clavija de ajuste o la llave de tuercas antes de encender la herramienta eléctrica. Una llave de tuercas o una clavija de ajuste que quede conectada a una pieza giratoria de la herramienta eléctrica puede provocar lesiones personales. e) No se estire. Conserve el equilibrio y...
Page 41 - ) USO Y MANTENIMIENTO DE LA HERRAMIENTA CON
Español 39 c) Cuando no utilice el paquete de baterías, manténgalo lejos de otros objetos metálicos como sujetapapeles, monedas, llaves, clavos, tornillos u otros objetos metálicos pequeños que puedan realizar una conexión desde un terminal al otro. Los cortocircuitos en los terminales de la batería...
Page 43 - manual para ver la compatibilidad entre cargadores y unidades
Español 41 • La etiqueta de su herramienta puede incluir los siguientes símbo- los. A continuación se indican los símbolos y sus definiciones: V ...................voltios A ..................... amperiosHz .................hertz W .................... vatiosmin ...............minutos o AC ............
Page 44 - INSTRUCCIONES DE SEGURIDAD ESPECÍFICAS PARA; La unidad de batería no viene completamente cargada de fábrica.; LEA TODAS LAS INSTRUCCIONES
Español 42 o un cargador que haya sido golpeado, dejado caer, atropellado o dañado en cualquier forma (por ejemplo, perforado por un clavo, golpeado con un martillo, pisado). Lleve sus unidades de batería dañadas al centro de servicio para que sean recicladas. ADVERTENCIA: Peligro de incendio. No gu...
Page 45 - El sello RBRC
Español 43 Instrucciones importantes de seguridad para todos los cargadores de baterías GUARDE ESTAS INSTRUCCIONES: Este manual contiene instrucciones de seguridad y operación importantes para los cargadores de baterías.• Antes de usar el cargador, lea todas las instrucciones y advertencias que se e...
Page 47 - RETARDO POR UNIDAD CALIENTE/FRÍA; Cargadores; Operación de la luz indicadora
Español 45 DCB107, DCB112, DCB113, DCB115 Indicadores de carga Este cargador ha sido diseñado para detectar ciertos problemas que pudieran surgir. Estos problemas se indican mediante una luz roja intermitente rápida. Si esto ocurre, vuelva a colocar la unidad de batería en el cargador. Si el problem...
Page 48 - PERMANENCIA DE LA UNIDAD DE BATERÍA EN EL
Español 46 NOTA: Esto también puede significar que hay un problema con el cargador. Montaje en la pared DCB107, DCB112, DCB113, DCB115 Estos cargadores están diseñados para montarse en la pared o colocarse en posición vertical sobre una mesa o superficie de trabajo.Si se monta en la pared, ubicar el...
Page 50 - Para reducir el riesgo de lesiones personales,; INTERRUPTOR DE GATILLO DE VELOCIDAD VARIABLE
Español 48 Mango lateral (Fig. 2) ADVERTENCIA: Para reducir el riesgo de lesiones personales, opere SIEMPRE la herramienta con el mango lateral (A) montado correctamente. Si no lo hace, el mango lateral se le puede resbalar durante la operación de la herramienta y puede perder el control en consecue...
Page 51 - No cambie a modalidad de taladro o taladro percutor
Español 49 J FIG. 3 Selector de modos (Fig. 4) ATENCIÓN: No cambie a modalidad de taladro o taladro percutor con una broca de cincel en el portabrocas. Pueden producirse lesiones corporales y daño a la herramienta. ATENCIÓN: Nunca cambie el modo mientras la unidad esté funcionando. Para taladrar en ...
Page 52 - Para seleccionar la rotación de avance,
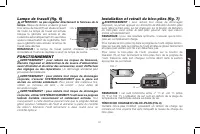
Español 50 Luz de trabajo (Fig. 6) ATENCIÓN: No mire fijamente hacia la luz de trabajo. Podrían producirse lesiones oculares graves. Existe una luz de trabajo (F) ubicada en la FIG. 6 F parte frontal de la herramienta. La luz de trabajo se activa cuando se oprime el interruptor de gatillo, y se apag...
Page 53 - UNIDADES DE ALIMENTACIÓN CON INDICADOR DE CARGA; Cómo instalar y retirar la unidad de; Para reducir el riesgo de lesiones, nunca
Español 51 UNIDADES DE ALIMENTACIÓN CON INDICADOR DE CARGA (FIG. 8) Algunas unidades de alimentación D e WALT incluyen un indicador de carga que consiste de tres luces LED verdes que indican el nivel de carga que queda en la unidad de alimentación. El indicador de carga es una indicación de niveles ...
Page 54 - Shocks – Control de vibración activa; SIEMPRE; Para insertar una broca
Español 52 ADVERTENCIA: Para reducir el riesgo de lesión corporal grave, sujete SIEMPRE bien en caso de que haya una reacción repentina. Para tener una posición adecuada de las manos, ponga una mano en la empuñadura lateral y la otra en la empuñadura principal. FIG. 10 Taladrado (Fig. 4) ADVERTENCIA...
Page 55 - ADVERTENCIA
Español 53 lubricante para corte cuando taladre en metales. Las excepciones son el hierro colado y el latón, que se deben taladrar en seco. Para MAMPOSTERÍA, tal como ladrillos, cemento, bloques de hormigón, etc., utilice brocas con puntas de carburo indicadas para el taladrado por percusión. 3. Apl...
Page 56 - ADVERTENCIA: Para reducir el riesgo de lesiones personales; Limpieza; INSTRUCCIONES DE LIMPIEZA DEL CARGADOR; Accesorios
Español 54 se sobrecalentará la herramienta y el índice de taladrado será menor también. 3. Taladree en forma recta, manteniendo la broca en un ángulo recto en relación con la pieza. No ejerza presión lateral en la broca mientras taladree pues la broca podría atorarse y disminuir la velocidad de tal...
Page 57 - Registro en línea; SAN LUIS POTOSI, SLP
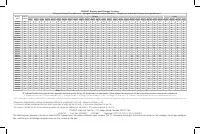
Español 55 CAPACIDADES MÁXIMAS RECOMENDADAS Velocidad de eje 0–1 100 min -1 Martilleo de velocidad 0–4 600 min -1 Brocas, Taladrado en Mampostería 25,4 mm (1") Reparaciones El cargador y las unidades de batería no pueden ser reparados.Para asegurar la SEGURIDAD y la CONFIABILIDAD del producto, l...
Page 59 - GARANTÍA DE REEMBOLSO DE SU DINERO POR 90 DÍAS; REEMPLAZO GRATUITO DE LAS ETIQUETAS DE
Español 57 GARANTÍA DE REEMBOLSO DE SU DINERO POR 90 DÍAS Si no está completamente satisfecho con el desempeño de su máquina herramienta, láser o clavadora D e WALT , cualquiera sea el motivo, podrá devolverlo hasta 90 días de la fecha de compra con su recibo y obtener el reembolso completo de su di...
Page 61 - INSTRUCTIVO DE OPERACIÓN, CENTROS DE SERVICIO Y PÓLIZA DE
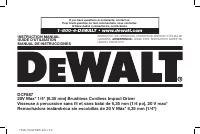
DCF887 20V Max* 1/4" (6.35 mm) Brushless Cordless Impact Driver Visseuse à percussion sans fil et sans balai de 6,35 mm (1/4 po), 20 V max* Remachadora inalámbrica sin escobillas de 20 V Máx* 6,35 mm (1/4") INSTRUCTION MANUAL GUIDE D'UTILISATION MANUAL DE INSTRUCCIONES INSTRUCTIVO DE OPERACI...
Page 66 - then follow charging procedures outlined.
4 English The battery pack is not fully charged out of the carton. Before using the battery pack and charger, read the safety instructions below and then follow charging procedures outlined. READ ALL INSTRUCTIONS • Do not charge or use the battery pack in explosive atmospheres, such as in the presen...
Page 69 - Disconnect the charger from the outlet before attempting; Chargers
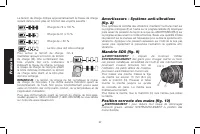
7 English Indicator Light Operation DCB101, DCB102, DCB103 PACK CHARGING PACK CHARGED x HOT/COLD DELAY PROBLEM PACK OR CHARGER DCB107, DCB112, DCB113, DCB115 PACK CHARGING PACK CHARGED HOT/COLD DELAY Charge Indicators This charger is designed to detect certain problems that can arise. Problems are i...
Page 72 - INTENDED USE
10 English WARNING: To reduce the risk of serious personal injury, ensure the screw holding the belt hook is secure. IMPORTANT: When attaching or replacing the belt hook, use only the screw (I) that is provided. Be sure to securely tighten the screw.The belt hook (H) can be be attached to either sid...
Page 74 - Use only impact accessories. Non-impact accessories; To install an accessory,; Serious eye injury could
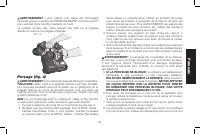
12 English Quick-Release Chuck (Fig. 2, 6, 7) WARNING: Use only impact accessories. Non-impact accessories may break and cause a hazardous condition. Inspect accessory prior to use to ensure that it con tains no cracks. NOTE: The chuck accepts 1/4" (6.35 mm) hex accessories. Place the forward/re...
Page 75 - Mode; WARNING: To reduce the risk of serious personal injury,
13 English mode will work as a screwdriver in light applications, before hesitating as the screw head reaches the work piece, and then (if required) start a slow controlled impact to ensure the head ends perfectly flush. NOTE: This mode is for light duty screwdriving applications. If the tool will n...
Page 76 - Accessories
14 English Cleaning WARNING: Blow dirt and dust out of all air vents with clean, dry air at least once a week. To minimize the risk of eye injury, always wear ANSI Z87.1 approved eye protection when performing this. WARNING: Never use solvents or other harsh chemicals for cleaning the non-metallic p...
Page 78 - mot-indicateur employé. Lire le mode d’emploi et porter une
Français 16 Définitions : lignes directrices en matière de sécurité Les définitions ci-dessous décrivent le niveau de danger pour chaque mot-indicateur employé. Lire le mode d’emploi et porter une attention particulière à ces symboles. DANGER : indique une situation dangereuse imminente qui, si ell...
Page 84 - Calibres minimaux des rallonges; Non
Français 22 • Pour utiliser un chargeur à l’extérieur, le placer dans un endroit sec et utiliser une rallonge conçue pour l’extérieur. L’utilisation d’une rallonge conçue pour l’extérieur réduit les risques de chocs électriques. • Pour la sécurité de l’utilisateur, utiliser une rallonge de calibre a...
Page 86 - LAISSER LE BLOC-PILES DANS LE CHARGEUR; Voyants de charge
Français 24 DCB107, DCB112, DCB113, DCB115 Ces chargeurs ont une fonctionnalité de délai chaud/froid. Lorsque le chargeur détecte qu’une batterie est trop chaude ou trop froide, un délai se met automatiquement en marche, arrêtant temporairement la charge. Le voyant rouge continuera de clignoter mais...
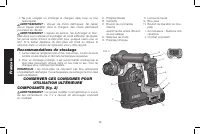
Page 88 - USAGE PRÉVU; CONSERVER CES CONSIGNES POUR; ne jamais modifier l’outil électrique ni aucun
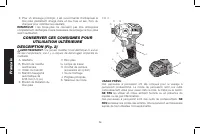
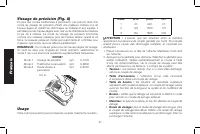
Français 26 FIG. 2 H I B A G E F G C D J K USAGE PRÉVU Ces perceuses à percussion ont été conçues pour le vissage à percussion professionnel. Le mode de percussion rend ces outils particulièrement utiles pour visser dans le bois, le métal ou le béton. NE PAS les utiliser en milieu ambiant humide ou ...
Page 89 - Crochet de ceinture
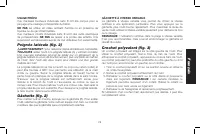
Français 27 UTILISATION AVERTISSEMENT : pour réduire tout risque de dommages corporels graves, placer le bouton de marche avant/arrière en position de verrouillage ou arrêter l’outil et déconnecter le bloc-piles avant tout réglage ou avant de retirer ou installer toute pièce ou tout accessoire. Un ...
Page 90 - SYSTÉMATIQUEMENT
Français 28 Position correcte des mains (Fig. 5) AVERTISSEMENT : pour réduire tout risque de dommages corporels graves, adopter SYSTÉMATIQUEMENT la position des mains illustrée. AVERTISSEMENT : pour réduire tout risque de dommages corporels graves, maintenir SYSTÉMATIQUEMENT l’outil fermement pour...
Page 91 - utiliser exclusivement des accessoires à; Pour installer un accessoire; ATTENTION : Ne pas regarder directement le faisceau de la
Français 29 Mandrin automatique (Fig. 2, 6, 7) AVERTISSEMENT : utiliser exclusivement des accessoires à percussion. Tout autre type d’accessoires pourrait se briser et poser des risques sérieux. Avant toute utilisation, vérifier qu’ils ne comportent aucune fissure. REMARQUE : le mandrin accepte seu...
Page 92 - REMARQUE; Usage
Français 30 Vissage de précision (Fig. 8) En plus des modes traditionnels à percussion, cet outil est doté d’un mode de vissage de précision offrant une meilleure maîtrise lors de travaux légers en évitant les dommages au matériel et aux agrafes. Il est idéal pour les travaux légers avec des vis de ...
Page 93 - AVERTISSEMENT : pour réduire tout risque de dommages; Nettoyage
Français 31 MAINTENANCE AVERTISSEMENT : pour réduire tout risque de dommages corporels graves, placer le bouton de marche avant/arrière en position de verrouillage ou arrêter l’outil et déconnecter le bloc-piles avant tout réglage ou avant de retirer ou installer toute pièce ou tout accessoire. Un ...
Page 95 - Las siguientes definiciones describen el nivel de gravedad de
Español 33 Definiciones: Normas de seguridad Las siguientes definiciones describen el nivel de gravedad de cada palabra de señal. Lea el manual y preste atención a estos símbolos. PELIGRO: Indica una situación de peligro inminente que, si no se evita, provocará la muerte o lesiones graves . ADVERTEN...
Page 97 - Normas específicas de seguridad
Español 35 5) USO Y MANTENIMIENTO DE LA HERRAMIENTA CON BATERÍAS a) Recargue solamente con el cargador especificado por el fabricante. Un cargador adecuado para un tipo de paquete de baterías puede originar riesgo de incendio si se utiliza con otro paquete de baterías. b) Utilice herramientas eléctr...
Page 99 - manual para ver la compatibilidad entre cargadores y unidades de
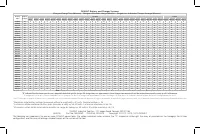
Español 37 Instrucciones de seguridad importantes para todas las unidades de batería Cuando solicite unidades de batería de repuesto, no olvide indicar el número de catálogo y el voltaje. Consulte la tabla al final de este manual para ver la compatibilidad entre cargadores y unidades de batería.La u...
Page 101 - medio ambiente y a conservar recursos naturales. También puede; Instrucciones importantes de seguridad
Español 39 • Estos cargadores no fueron diseñados para ser utilizados para más que cargar las baterías recargables D e WALT. Cualquier otro uso puede producir riesgo de incendios, descargas eléctricas o electrocución. • No exponga el cargador a la lluvia o a la nieve. • Tire del enchufe y no del cab...
Page 104 - UNIDADES DE BATERÍA DEFECTUOSAS:; Montaje en la pared
Español 42 2. Puede que el cargador y la unidad de batería se calienten ligeramente durante el proceso de carga. Esto es normal y no representa ningún problema. Para facilitar el enfriamiento de la unidad de batería después del uso, evite colocar el cargador o la unidad de batería en un lugar cálido...
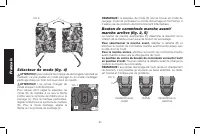
Page 106 - USO DEBIDO; Gancho para cinturón
Español 44 IMPORTANTE: Al añadir o reemplazar el gancho para cinturón, utilice solamente el tornillo (I) que se suministra. Cerciórese de apretar firmemente el tornillo.El gancho para cinturón (H) puede ser adosado a cualquier lado de la herramienta utilizando solamente el tornillo (I) provisto, par...
Page 108 - ATENCIÓN: No mire fijamente hacia la luz de trabajo.; Porta brocas de liberación rápida
Español 46 Luces de trabajo (Fig. 2) ATENCIÓN: No mire fijamente hacia la luz de trabajo. Podrían producirse lesiones oculares graves. Hay tres luces de trabajo (G) ubicadas alrededor del cuello del portabrocas (C). Las luces de trabajo están activadas cuando el interruptor de gatillo está apretado....
Page 109 - Para instalar un accesorio,
Español 47 K FIG. 8 Uso Su herramienta de impacto puede generar el máximo par de torsión siguiente: Mode Lbs-pie Lbs-pulg. Nm 1 20 240 27 2 125 1500 170 3 152 1825 205 ATENCIÓN: Asegúrese que el sujetador y/o el sistema tolerarán el nivel de par de apriete generado por la herramienta. Un par de apri...
Page 110 - algún accesorio, póngase en contacto con D; MANTENIMIENTO; ADVERTENCIA: Para reducir el riesgo de lesiones corporales
Español 48 ADVERTENCIA: Nunca utilice solventes ni otros químicos abrasivos para limpiar las piezas no metálicas de la herramienta. Estos productos químicos pueden debilitar los materiales plásticos utilizados en estas piezas. Utilice un paño humedecido sólo con agua y jabón neutro. Nunca permita qu...
Page 111 - PARA REPARACIÓN Y SERVICIO DE SUS HERRAMIENTAS; Póliza de Garantía
Español 49 Reparaciones El cargador y las unidades de batería no pueden ser reparados. El cargador y la unidad de batería no contienen piezas reparables. Para asegurar la SEGURIDAD y la CONFIABILIDAD del producto, las reparaciones, el mantenimiento y los ajustes deben ser realizados en un centro de ...