Page 6 - I M P O R T A N T S A F E G U A R D S; should be done by authorized service personnel only!; SAVE THESE INSTRUCTIONS; THIS APPLIANCE IS FOR HOUSEHOLD USE ONLY; SHORT CORD INSTRUCTIONS
5 I M P O R T A N T S A F E G U A R D S When using electrical appliances, basic safety precautions should always be followed, including the following. • Read all instructions carefully. • Make sure the voltage of your electrical system corresponds to the voltage shown on the bottom of the machine. •...
Page 8 - OK; Directly selected beverages:
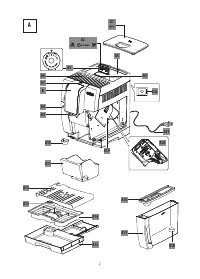
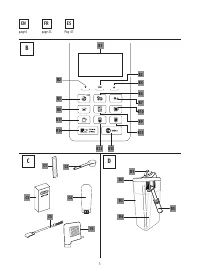
7 A19. Infuser door A20. InfuserA21. Power cord A22. Main switch 3.2 Description of the touch screen (page 3 - B ) A number of buttons on the panel have a dual function. This is indicated in brackets in the description. B1. Display: guides the user in using the appliance. The current selection is at...
Page 9 - TURNING THE MACHINE ON
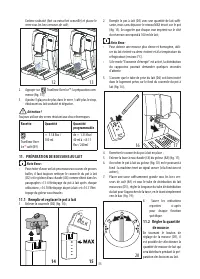
8 1. Plug the machine into the mains socket and press the main switch (fig. 1). Make sure the main switch (A22) at the back of the appliance is pressed (fig. 2); 2 1 The following messages will show on the display (B1):2. "Language": press the selection arrow (B2) until the re- quired langua...
Page 12 - mable
11 2) After a few seconds, hot water is delivered first from the coffee spouts, then from the hot water spout (if inserted). A progress bar is displayed and fills gradually as rinsing proceeds; 3) To interrupt, press the arrow corresponding to "STOP" (B4). Please note! • If the appliance is ...
Page 13 - Temporarily varying the coffee aroma; Making coffee using pre-ground coffee; Quantity
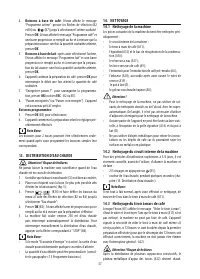
12 Double Espresso+ ≃ 120 ml from ≃ 80 to ≃ 180ml + Coffee ≃ 180 ml from ≃ 100 to ≃ 240ml + 2 Espresso ≃ 40 ml x 2 cups -- + 2 Lungo ≃ 120 ml x 2 cups -- + 2 Ristretto ≃ 30 ml x 2 cups -- + 5. Preparation begins. A progress bar appears on the display (B1) and gradually fills as preparation proceeds....
Page 14 - TRUEBREW OVER ICETM COFFEE; MILK
13 Beverages with coffee selectable from the (B14)Lungo ≃ 120 ml Ristretto ≃ 30 ml Coffee ≃ 180 ml 5. Preparation begins. The beverage selected appears on the display together with a progress bar which gradually fills as preparation proceeds. Important! Making LONG coffee : Halfway through preparati...
Page 15 - Cleaning the milk container after use; ESC”
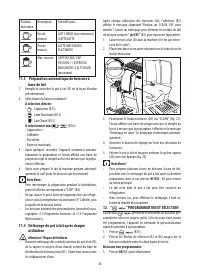
14 5. Remove the hot water spout (C6) from the connection noz- zle (A8) (fig. 17); 6. Attach the container to the connection nozzle and push as far as it will go (fig. 18). The machine emits a beep (if enabled); 16 18 19 7. Place a sufficiently large cup under the coffee spouts (A9) and frothed milk...
Page 17 - Cleaning the inside of the coffee machine; Cleaning the water tank; drip tray and
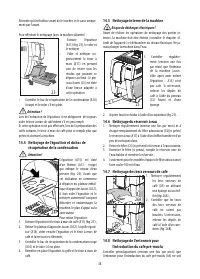
16 and cleaned otherwise the water may overflow the edge and damage the appliance, the surface it rests on or the surrounding area.To remove the drip tray:1. Remove the drip tray and the coffee grounds container (A11) (fig. 23); 2. Remove the cup tray (A12) and drip tray grille (A14), then empty the...
Page 18 - Cleaning the milk container
17 14.7 Cleaning the coffee spouts 1. Clean the coffee spouts (A9) regularly with a sponge or cloth (fig. 26A); 2. Check that the holes in the coffee spouts are not blocked. If necessary, remove coffee deposits with a toothpick (fig. 26B). 14.8 Cleaning the pre-ground coffee funnel Check regularly (...
Page 19 - Cleaning the hot water nozzle
18 5. Rinse inside the froth adjustment dial housing with run- ning water (fig. 33); 6. Check that the intake tube and milk spout are not clogged with milk residues; 7. Put back in place the dial (in correspondence to the word "INSERT"), spout and milk intake tube; 8. Place the lid back on t...
Page 20 - SETTING WATER HARDNESS; WATER SOFTENER FILTER
19 22. "Descale complete": press OK ; 23. "Fill tank": empty the container used to collect the rinse water, remove the water tank and fill with fresh water up to the MAX level, then put back in the appliance. Descaling is complete. Please note! • If the descaling cycle is not complet...
Page 22 - DISPLAYED MESSAGES
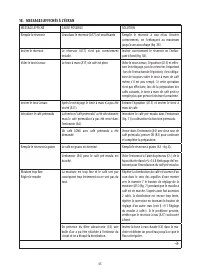
21 18. DISPLAYED MESSAGES DISPLAYED MESSAGE POSSIBLE CAUSE REMEDY Fill tank Insufficient water in the tank (A17). Fill the tank with water and/or insert it correct-ly, pushing it as far as it will go until it clicks into place (fig. 3B). Insert tank The tank (A17) is not correctly in place. Insert t...
Page 23 - ECO
22 DISPLAYED MESSAGE POSSIBLE CAUSE REMEDY Insert milk container The milk container (D) is not inserted correctly. Insert the milk container as far as it will go (fig. 18). Insert infuser assembly The infuser (A20) has not been replaced after cleaning. Insert the infuser as described in section “14....
Page 26 - ” PROGRAMMATION ET SÉLECTION .
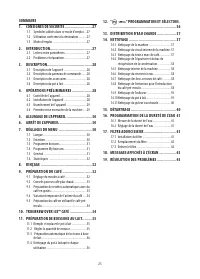
25 SOMMAIRE1. CONSIGNES DE SÉCURITÉ .......................... 27 1.1 Symboles utilisés dans ce mode d'emploi ...271.2 Utilisation conforme à la destination...........271.3 Mode d'emploi ............................................27 2. INTRODUCTION ........................................ 27 2.1 Le...
Page 27 - A V E R T I S S E M E N T S I M P O R T A N T S; d’assistance autorisé.; CONSERVEZ CES INSTRUCTIONS; INSTRUCTIONS POUR LE CORDON COURT
26 A V E R T I S S E M E N T S I M P O R T A N T S Lors de l’utilisation des appareils électriques, vous devez toujours respecter des précautions de base, et notam- ment les suivantes. • Lisez attentivement toutes les instructions. • Assurez-vous que la tension de votre système électrique correspond...
Page 28 - Utilisation conforme à la destination
27 1. CONSIGNES DE SÉCURITÉ1.1 Symboles utilisés dans ce mode d'emploi Les consignes importantes sont accompagnées de ces symboles. Il est absolument nécessaire de respecter ces consignes. Danger ! Le non-respect peut être, ou est, la cause de blessures par dé-charge électrique avec un risque pour l...
Page 29 - Description du panneau de commande; Boisson a sélection directe:; Description des accessoires
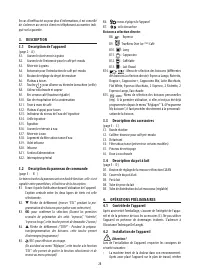
28 En cas d'inefficacité ou pour plus d'informations, il est conseillé de s'adresser au service client en téléphonant au numéro indi-qué sur la garantie. 3. DESCRIPTION3.1 Description de l'appareil (page 2 - A ) A1. Couvercle du réservoir à grains A2. Couvercle de l'entonnoir pour le café pré-mouluA...
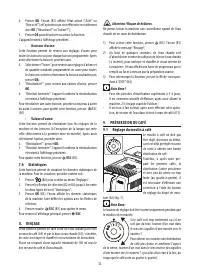
Page 30 - Première mise en marche de la machine
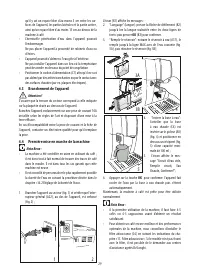
29 qu'il y ait un espace libre d'au moins 3 cm entre les sur- faces de l'appareil, les parties latérales et la partie arrière, ainsi qu'un espace libre d'au moins 15 cm au-dessus de la machine à café. • L’éventuelle pénétration d’eau dans l'appareil pourrait l’endommager. Ne pas placer l'appareil à ...
Page 35 - Variation temporaire de l'arôme du café; Préparation du café en utilisant le café; Quantité; TRUEBREW OVER ICETM CAFÈ
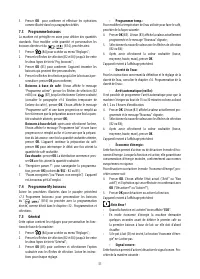
34 Une fois la préparation terminée, l'appareil est prêt pour une nouvelle utilisation. Nota Bene : • Pendant l’utilisation, l’écran affiche certains messages (Remplir le réservoir, vider le tiroir à marc, etc.) dont la fonction est indiquée dans le chapitre «18. Messages affi-chés à l’écran». • Pou...
Page 36 - PRÉPARATION DE BOISSONS AU LAIT; Régler la quantité
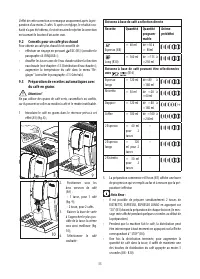
35 l’arôme souhaité (fort ou extra fort conseillè) et placez le verre sous les becs verseurs de café; 13 12 2. Appuyer sur TrueBrew Over Ice™: la préparation com- mence (fig. 13); 3. Ajoutez 3 glaçons de plus dans le verre / café plus le sirop, édulcorant ou lait souhaité et dégustez. Attention ! To...
Page 37 - À sélectionner avec; ” PROGRAMMATION ET SÉLECTION; Boissons non programmées:
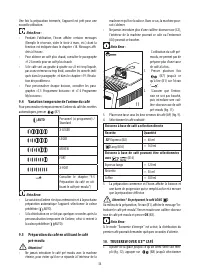
36 Position du bouton Description Conseillé pour... Pas de mousse LAIT CHAUD (non mousseux) /CAFFELATTE Peu de mousse LATTE MACCHIATO/FLAT WHITE Max. mousse CAPPUCCINO/ CAP- PUCCINO+ / ESPRESSO MACCHIATO / LAIT CHAUD (mousseux) 11.3 Préparation automatique de boissons à base de lait 1. Remplir et ac...
Page 40 - Nettoyage du pot à lait
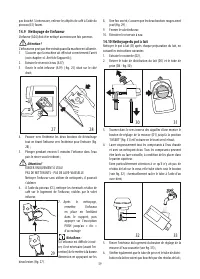
39 pas bouché. Si nécessaire, enlever les dépôts de café à l'aide du pinceau (C5) fourni. 14.9 Nettoyage de l'infuseur L’infuseur (A20) doit être nettoyé au moins une fois par mois. Attention ! L'infuseur ne peut pas être extrait quand la machine est allumée. 1. S'assurer que la machine ait effectué...
Page 41 - Nettoyage du gicleur eau chaude
40 7. Remonter le bouton en l’insérant au niveau de "INSERT", le tube de distribution et le tube de prise de lait ; 8. Remettre le couvercle du pot à lait en place (D3). 14.11 Nettoyage du gicleur eau chaude Nettoyer le gicleur (A8) après chaque préparation de lait à l’aide d’une éponge, en ...
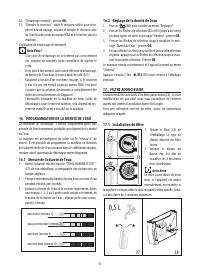
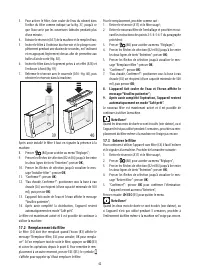
Page 42 - FILTRE ADOUCISSEUR
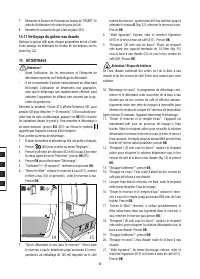
41 22. “Détartrage terminé”: presser OK ; 23. “Remplir le réservoir”: vider le récipient utilisé pour récu- pérer l'eau de rinçage, extraire et remplir le réservoir avec de l'eau fraiche jusqu'au niveau MAX et le réinsérer dans la machine. L'opération de détartrage est terminée. Nota Bene ! • Si le ...
Page 46 - RÉSOLUTION DES PROBLÈMES
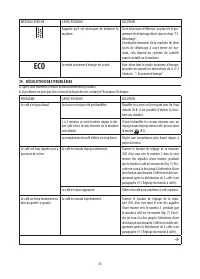
45 MESSAGE AFFICHÉ CAUSE POSSIBLE SOLUTION Rappelle qu'il est nécessaire de détartrer la machine. Il est nécessaire d'effectuer au plus tôt le pro-gramme de détartrage décrit dans le chap. “15. Détartrage".L’éventuelle demande de la machine de deux cycles de détartrage à court terme est nor-male...
Page 49 - I N S T R U C C I O N E S I M P O R T A N T E E S; CONSERVE ESTAS INSTRUCCIONES; ESTE APARATO ESTÁ DESTINADO ÚNICAMENTE PARA EL USO DOMÉSTICO; INSTRUCCIONES CABLE CORTO DE ALIMENTACIÓN
48 I N S T R U C C I O N E S I M P O R T A N T E E S El uso de casi cualquier aparato eléctrico implica la observación de algunas reglas ¡Importantees, entre las que se incluyen las siguientes. • Lea atentamente las instrucciones. • Asegúrese de que la tensión (voltaje) de su instalación eléctrica c...
Page 51 - Descripción del panel de control; Bebidas de selección directa:; Descripción de los accesorios
50 Si estas resultaran ser ineficaces o para otras aclaraciones, se aconseja contactar el centro de asistencia a la clientela llamando por teléfono al número indicado en la hoja adjunta "Asistencia clientes". Si su país no está entre aquellos incluidos en la hoja, llame por teléfono al númer...
Page 53 - ENCENDIDO DEL APARATO; APAGADO DEL APARATO; PROGRAMACIONES DEL MENÚ; • Idioma
52 Nota Bene: • Cuando utilice por primera vez la cafetera, será necesario preparar 4-5 cafés o 4-5 capuchinos antes de obtener bue-nos resultados. • Durante la preparación de los primeros 5-6 capuchinos, es normal sentir un ruido de agua hirviendo: • Para disfrutar más del café y obtener mejores pr...
Page 56 - Cantidad Cantidad
55 Nota Bene: El regulador se debe girar sola-mente cuando el molinillo de café está funcionando. Si el café sale de-masiado l e n t a -mente o no sale, gire el regulador en sentido horario una posición hacia el número 7.Para obtener, en cambio, un suministro de café más denso y me-jorar el aspecto ...
Page 57 - Variación temporal del aroma del café; Preparación del café con café premolido; Cantidad
56 • Mientras la cafetera prepara el café, se puede interrumpir su salida en cualquier momento pulsando la flecha de se-lección correspondiente a "STOP" (B4). • En cuanto termina la salida, si se quiere aumentar la canti- dad de café en la taza, es suficiente mantener presionado (no más de 3...
Page 58 - TRUEBREW OVER ICETM CAFÉ; Receta; PREPARACIÓN DE BEBIDAS CON LECHE
57 10. TRUEBREW OVER ICE™ CAFÉ 1. Agregue hielo hasta que se llene medio vaso (fig. 12), presione el selector de aroma (B8) (se recomienda fuerte o extra fuerte) y coloque el vaso debajo de surtidor de café; 13 12 2. Luego, presione el botón TrueBrew Over Ice™ (B9) para preparar el café (fig. 13); 3...
Page 59 - De selección directa:; Limpieza del recipiente de la leche después
58 16 18 19 7. Coloque una taza lo suficientemente grande bajo las bo- quillas del surtidor de café (A9) y bajo el tubo de salida de la leche montada (D5); regule la longitud del tubo de salida de leche, para acercarlo a la taza, tirando de él sim-plemente hacia abajo (fig. 19). 8. Siga las indicaci...
Page 61 - Limpieza de la bandeja recogegotas y
60 - el embudo para echar el café premolido (A4);- el grupo infusor (A20), accesible después de haber abierto la portezuela de servicio (A19), - el recipiente de la leche (D);- la boquilla agua caliente/vapor (A8); ¡Atención! • Para limpiar la cafetera no use disolventes, detergentes abrasivos ni al...
Page 64 - PROGRAMACIÓN DE LA DUREZA DEL AGUA
63 9. “Recipiente 1,8l vacío bajo los surtidores”: Ponga bajo el surtidor de agua caliente (C6) y bajo el surtidor de café (A9) un recipiente con una capacidad mínima de 1,8 litros (fig.35). Pulse OK . ¡Atención! Peligro de quemaduras Del surtidor de agua caliente y del surtidor de café sale agua ca...
Page 69 - SOLUCIÓN DE LOS PROBLEMAS
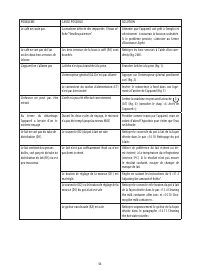
68 19. SOLUCIÓN DE LOS PROBLEMAS A continuación, se enumeran algunos posibles funcionamientos incorrectos. Si no puede resolverse el problema en el modo descrito, póngase en contacto con la asistencia técnica. PROBLEMA POSIBLE CAUSA SOLUCIÓN El café no está caliente. Las tazas no se han precalentado...