Page 3 - Contents
v Contents Precautionary Measures . . . . . . . . . . . . . . . . . . . . . . . . . . . . . . . . . . . . . . . . . . . . . . . 1 Recommended Tools . . . . . . . . . . . . . . . . . . . . . . . . . . . . . . . . . . . . . . . . . . . . . . . . . 9 Screw Identification and Tightening . . . . . . . . ...
Page 4 - Figures
vi Latch Assembly Removal . . . . . . . . . . . . . . . . . . . . . . . . . . . . . . . . . . . . . . . . . . . . . 46 Display Assembly and Display Assembly Component Removal . . . . . . . . . . . . . . . . 47 Display Assembly Component Removal . . . . . . . . . . . . . . . . . . . . . . . . . . . ....
Page 5 - Tables
vii Figure 38. Display Assembly Removal . . . . . . . . . . . . . . . . . . . . . . . . . . . . . . . . . 47 Figure 39. Front Bezel Removal . . . . . . . . . . . . . . . . . . . . . . . . . . . . . . . . . . . . . . 48 Figure 40. Base Assembly Components. . . . . . . . . . . . . . . . . . . . . . . ...
Page 8 - Exploded View of Palmrest Assembly
x Figure 1. AC Adapter . . . . . . . . . . . . . . . . . . . . . . . . . . . . . . . . . . . . . . . . . . . . . 2 Figure 2. Port Replicator . . . . . . . . . . . . . . . . . . . . . . . . . . . . . . . . . . . . . . . . . . . 3 Figure 3. Battery Compartment . . . . . . . . . . . . . . . . . . . . ....
Page 9 - Removing and Replacing Parts; Precautionary Measures; Turn off the computer and any attached peripherals.
support.dell.com Removing and Replacing Parts 1 Removing and Replacing Parts NOTICE: Only a certified service technician should perform the procedures for removing and replacing parts. The warranty on the computer becomes void if anyone other than a certified technician performs these procedures. Un...
Page 10 - Figure 1. AC Adapter
2 Dell Inspiron 7500 — Removing and Replacing Parts Precautionar y measures include disconnecting the computer from the AC adapter and port replicator and removing the main battery, PC Cards, hard-disk drive, memor y module cover, memor y modules, and devices in the media bay. To take these precauti...
Page 11 - Figure 2. Port Replicator
support.dell.com Removing and Replacing Parts 3 Figure 2. Port Replicator 5. Remove the main batter y from the batter y compartment (see Figure 3). Unlock the latch lock on the bottom of the computer by flipping it toward the back of the computer. Slide the latch release in the direction of the arro...
Page 12 - Figure 3. Battery Compartment
4 Dell Inspiron 7500 — Removing and Replacing Parts Figure 3. Battery Compartment 6. Remove PC Cards (see Figure 4). NOTICE: Use the PC Card configuration utility on the taskbar to select and stop a card before removing it from the computer. If you do not remove the card in the configuration utility...
Page 13 - Figure 4. PC Card Removal
support.dell.com Removing and Replacing Parts 5 Figure 4. PC Card Removal 7. Remove the hard-disk drive assembly (see Figure 5). Loosen the two captive screws that secure the hard-disk drive into the bottom of the computer. The front edge of the cover pops up slightly. Slide the hard-disk drive towa...
Page 14 - Figure 6. Memory Module Covers
6 Dell Inspiron 7500 — Removing and Replacing Parts 8. Remove the memory module covers (see Figure 6). Slide the memor y module cover as far as it will go in the direction of the arrow, and then remove the cover. Figure 6. Memory Module Covers To replace a cover, place it over the opening, leaving a...
Page 15 - Figure 7. Memory Modules
support.dell.com Removing and Replacing Parts 7 Figure 7. Memory Modules 1 Slot 1 2 Memor y module 3 Slot 2
Page 16 - Figure 8. Video Card Removal
8 Dell Inspiron 7500 — Removing and Replacing Parts 10. Remove the video card (see Figure 8). Remove the two 3-mm screws securing the video card. Gently pull the video card off of the connectors on the bottom of the system board by lifting it at the notches located between the screws. Do not rock th...
Page 17 - Figure 9. Media Bay Module Removal; Recommended Tools
support.dell.com Removing and Replacing Parts 9 11. If present, remove the module from the MegaBay™ (see Figure 9). Unlock the latch lock by flipping it toward the back of the computer. Slide the latch release in the direction of the arrow. Keep holding the latch release with one hand while pulling ...
Page 18 - Screw Identification and Tightening
10 Dell Inspiron 7500 — Removing and Replacing Parts Most of the procedures require the use of one or more of the following tools: • Small flat-blade screwdriver • Number 1 Phillips-head screwdriver • Antistatic grounding strap • Dental pick • Small scribe or nylon flat blade • Nut drivers (5 mm and...
Page 19 - Table 1. Screw Identification and Location
support.dell.com Removing and Replacing Parts 11 Table 1. Screw Identification and Location Hard-disk drive Combo module Keyboard LCD panel (15-inch) XGA 4X K-head M3x3L 2X K-head, M2x2.5L3X K-head, M2.5x3L8X K-head M2x3L 4X pan head, M2.5x20L 1X 0143E SCR, M2.5x.45P+3FP-ZK 2X 7043E SCR, M2.5x.45+10...
Page 20 - Exploded View of Computer; Figure 10. Computer Components
12 Dell Inspiron 7500 — Removing and Replacing Parts Exploded View of Computer Figure 10. Computer Components 1 Hard-disk drive 2 Batter y 3 Combo module 4 Thermal shield 5 Keyboard 6 Display assembly 7 Hinge covers
Page 21 - Exploded View of 15-Inch XGA Display; Figure 11. 15-Inch XGA Display Components
support.dell.com Removing and Replacing Parts 13 Exploded View of 15-Inch XGA Display Assembly Figure 11. 15-Inch XGA Display Components 1 LCD panel 5 Hinges (2) 2 CCFL cable 6 Inverter board 3 Carrier tray 7 Front bezel 4 Back cover
Page 22 - Assembly
14 Dell Inspiron 7500 — Removing and Replacing Parts Exploded View of 15-Inch SXGA+ Display Assembly Figure 12. 15-Inch SXGA+ Display Components 1 LCD panel 5 Back cover 2 CCFL cable 6 Hinges (2) 3 Carrier tray 7 Inverter board 4 Display locking tab 8 Front bezel
Page 24 - Hard-Disk Drive Disassembly
16 Dell Inspiron 7500 — Removing and Replacing Parts Hard-Disk Drive Disassembly The hard-disk drive (see Figure 13) resides in a carrier that mounts in the hard-disk drive compartment in the bottom of the computer. Four screws secure the drive inside the carrier. Figure 14. Hard-Disk Drive Componen...
Page 25 - Combo Module Disassembly
support.dell.com Removing and Replacing Parts 17 2. Remove the four 3-mm screws securing the hard-disk drive inside the carrier. 3. Remove the hard-disk drive from the carrier. Turn the carrier over with one hand and let the drive fall out of the carrier into your other hand. 4. Remove the metal car...
Page 26 - Figure 15. Combo Module Components
18 Dell Inspiron 7500 — Removing and Replacing Parts Figure 15. Combo Module Components To remove the CD-ROM drive or DVD-ROM drive (see Figure 14) from the plastic car-rier, perform the following steps: 1. Remove the combo module. 2. Remove the two 3-mm screws from the L-shaped bracket. 1 3-mm scre...
Page 27 - Figure 16. Side Mounting Bracket Removal
support.dell.com Removing and Replacing Parts 19 3. Remove the bracket. 4. Remove the two 3-mm screws from the side of the plastic carrier. 5. Remove the two 3-mm screws from the bottom of the plastic carrier. 6. Disconnect the flex cable from the CD-ROM/DVD-ROM drive connector. 7. Remove the CD-ROM...
Page 29 - Keyboard Removal; Figure 17. Keyboard Components
support.dell.com Removing and Replacing Parts 21 Keyboard Removal Figure 17. Keyboard Components To remove the keyboard (see Figure 16), perform the following steps: 1. Turn the computer over and remove the four 20-mm screws from the bottom of the computer. 2. Turn the computer back over and open th...
Page 30 - ZIF Connectors; Figure 18. ZIF Connector Release
22 Dell Inspiron 7500 — Removing and Replacing Parts 3. Insert a small flat-blade screwdriver or scribe along the right top of the keyboard, just above the row of function keys. Working from right to left, free the keyboard by pr ying it toward the front of the unit. When free, lift the top of the k...
Page 31 - Thermal Shield and Internal Modem
support.dell.com Removing and Replacing Parts 23 To disconnect a cable from a ZIF connector, perform the following steps: 1. Insert a small flat-blade screwdriver or dental pick under the movable part of the connector. For most ZIFs, carefully pry up one end of the movable part of the connector and ...
Page 32 - Figure 19. Thermal Shield/Internal Modem Components
24 Dell Inspiron 7500 — Removing and Replacing Parts Figure 19. Thermal Shield/Internal Modem Components This procedure assumes that you have removed the keyboard. To remove the thermal shield, perform the following steps: 1. Remove the right hinge cover. 15-Inch XGA and 15-Inch SXGA+ LCD Panels a. ...
Page 34 - Heat Exchanger/Fan Removal; Figure 20. Heat Exchanger/Fan Components
26 Dell Inspiron 7500 — Removing and Replacing Parts Heat Exchanger/Fan Removal Figure 20. Heat Exchanger/Fan Components To remove the heat exchanger/fan (see Figure 19), perform the following steps: 1. Remove the two 5-mm screws securing the heat exchanger. 2. Disconnect the fan cable from connecto...
Page 35 - Processor Board Removal; Figure 21. Processor Board Components
support.dell.com Removing and Replacing Parts 27 3. Lift the heat exchanger and rotate it upward. 4. Slide the heat exchanger/fan toward the front of the computer until the fan is completely clear of the overhanging palmrest plastic. 5. Lift the heat exchanger/fan out at an angle. 6. Inspect the two...
Page 36 - LCD Removal; Figure 22. LCD Components
28 Dell Inspiron 7500 — Removing and Replacing Parts This procedure assumes that you have removed the heat exchanger/fan. To remove the processor board (see Figure 20), perform the following steps: 1. Remove the three 5-mm screws securing the processor board to the system board. 2. Gently pull the p...
Page 38 - Palmrest Component Assembly; Figure 23. Exploded View of Palmrest Assembly
30 Dell Inspiron 7500 — Removing and Replacing Parts Palmrest Component Assembly Figure 23. Exploded View of Palmrest Assembly 1 Display latch 2 Touch pad 3 Touch pad bracket 4 Right speaker 5 Hard-disk drive heat shield 6 Touch pad button board
Page 40 - Palmrest Assembly Removal; Figure 24. Palmrest Assembly Components
32 Dell Inspiron 7500 — Removing and Replacing Parts Palmrest Assembly Removal Figure 24. Palmrest Assembly Components 1 LED cable 2 6-mm screws (4) 3 LED connector 4 DC-DC board 5 Battery bay
Page 42 - Palmrest Assembly Component Removal; IR Board Removal; Figure 25. IR Board Components
34 Dell Inspiron 7500 — Removing and Replacing Parts When replacing the palmrest assembly, orient the assembly in its original position on the base assembly and press firmly near each tab until the palmrest assembly snaps into place. Start at the front to align those tabs first. Make sure that all t...
Page 43 - Touch Pad Assembly Removal; Figure 26. Touch Pad
support.dell.com Removing and Replacing Parts 35 Touch Pad Assembly Removal Figure 26. Touch Pad Figure 27. Touch Pad Assembly Components 1 Touch pad bracket 2 4-mm screws (4)
Page 45 - Hard-Disk Drive Heat Shield Removal; Figure 28. Hard-Disk Drive Heat Shield Components
support.dell.com Removing and Replacing Parts 37 Hard-Disk Drive Heat Shield Removal Figure 28. Hard-Disk Drive Heat Shield Components This procedure assumes that you have removed the palmrest assembly from the base assembly. To remove the hard-disk drive heat shield (see Figure 27), perform the fol...
Page 46 - Speaker Removal; Figure 29. Speaker Components
38 Dell Inspiron 7500 — Removing and Replacing Parts Speaker Removal Figure 29. Speaker Components This procedure assumes that you have removed the palmrest assembly from the base assembly and that you have removed the hard-disk drive heat shield and touch pad assembly. To remove the speakers (see F...
Page 47 - PC Card Heat Sink Removal; Figure 30. PC Card Heat Sink Components
support.dell.com Removing and Replacing Parts 39 4. Remove the speaker wire harness. 5. Remove the two 4-mm screws securing the right speaker cover. 6. Remove the right speaker cover, speaker, and speaker cable. The display latch is no longer secured by the speaker covers. Be careful not to lose the...
Page 49 - Hinge Saddle Removal; Figure 32. Hinge Saddle Components
support.dell.com Removing and Replacing Parts 41 Hinge Saddle Removal Figure 32. Hinge Saddle Components 1 4-mm screws 2 4-mm screws 3 6-mm screw (1) 4 20-mm screws (2) 5 10-mm screws 6 Right hinge saddle 7 LED cable 8 Plastic frame 9 Left hinge saddle
Page 51 - System Board Removal; Figure 34. System Board Components
support.dell.com Removing and Replacing Parts 43 To remove the RJ-11 card (see Figure 32), perform the following these steps: 1. Remove the 4-mm screw securing the RJ-11 card to the system board. 2. Lift the card off the system board. System Board Removal Figure 34. System Board Components This proc...
Page 52 - PC Card Cage Removal; Figure 35. PC Card Cage Components
44 Dell Inspiron 7500 — Removing and Replacing Parts PC Card Cage Removal Figure 35. PC Card Cage Components This procedure assumes that you have removed the system board from the plastic case. To remove the PC Card cage (see Figure 34), perform the following steps: 1. Remove the 4-mm screw securing...
Page 53 - Audio Card and Audio Thermal Shield; Figure 36. Audio Card/Thermal Shield Components
support.dell.com Removing and Replacing Parts 45 4. Gently pull the card cage off of connector UP9 on the system board. Do not rock the cage to remove it, because this may damage the connectors. Replace the PC Card cage if it is damaged. Audio Card and Audio Thermal Shield Removal Figure 36. Audio C...
Page 54 - Latch Assembly Removal; Figure 37. Latch Assembly Components
46 Dell Inspiron 7500 — Removing and Replacing Parts Latch Assembly Removal Figure 37. Latch Assembly Components To remove the latch assembly (see Figure 36), perform the following steps: 1. Disconnect the LED cable from connector JP2 on the LED board. 2. Remove the 4-mm screw securing the LED board...
Page 55 - Display Assembly and Display Assembly; Figure 38. Display Assembly Removal
support.dell.com Removing and Replacing Parts 47 7. Remove each spring and latch. Be careful not to lose the small springs. Display Assembly and Display Assembly Component Removal Figure 38. Display Assembly Removal 1 LCD wire harness 2 Connector JP3 3 Hinge saddles (2) 4 Hinges (2) 5 6-mm screws (4...
Page 56 - Display Assembly Component Removal; Figure 39. Front Bezel Removal
48 Dell Inspiron 7500 — Removing and Replacing Parts This procedure assumes that you have removed the keyboard and thermal shield. The following procedure applies to all LCD displays (15-inch XGA, 15-inch SXGA+, and 15.4-inch SXGA). 1. Remove the left hinge cover (see Figure 37). Remove the two Phil...
Page 57 - 5-Inch LCD Panel Removal
support.dell.com Removing and Replacing Parts 49 2. Remove the four 6-mm screws from the front bezel. 3. Unsnap the front bezel from the back cover and remove it from the assembly. Carefully insert your fingers between the LCD panel and the bezel. Roll the plas-tic up slightly to insert your fingers...
Page 59 - Exploded View of Base Assembly; Figure 40. Base Assembly Components
support.dell.com Removing and Replacing Parts 51 Exploded View of Base Assembly Figure 40. Base Assembly Components 1 DC-DC board 2 Heat exchanger/fan 3 Right hinge saddle extension
Page 61 - Dell Information Development; Postscript Imaging Specs; Continued on Back
For questions or problems with files contact: Donna Moore - Graphic Development Dell Computer Corporation (512) 728-3439 Dell Information Development Postscript Imaging Specs JOB TITLE: Dell Inspiron 7500 Removig and Replacig Partss:\systems\sydney\parts LANGUAGES: English PART NUMBER: 679DC Rev. A0...


 Dell Inspiron 4150 User Manual
 Dell Inspiron 5000 User Manual
 Dell Inspiron 5000e Quick Guide
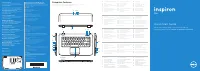 Dell Inspiron 5523 User Manual
 Dell Inspiron 5721 User Manual
 Dell Inspiron 8000 User Manual
 Dell Inspiron 8100 User Manual
 Dell Inspiron 8200 User Manual
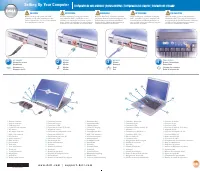 Dell Inspiron 8500 User Manual
 Dell Inspiron 8600 User Manual
 Dell Inspiron 9100 User Manual