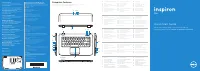
Page 3 - A Tour of Your Computer; Front View
A Tour of Your Computer: Dell Inspiron 8200 Back to Contents Page A Tour of Your Computer Dell™ Inspiron™ 8200 Front View Left Side View Right Side View Back View Bottom View Front View file:///F|/Service%20Manuals/Dell/Inspiron/8200/tour.htm (1 of 18) [2/28/2004 7:40:13 AM]
Page 8 - Left Side View
A Tour of Your Computer: Dell Inspiron 8200 Power Button— Press the power button to turn on the computer or to enter or exit standby or hibernate mode. If the computer stops responding, press and hold the power button until the computer turns off completely (which may take about 4 seconds). NOTICE: ...
Page 11 - Right Side View
A Tour of Your Computer: Dell Inspiron 8200 Connects the computer to a network. The light on the right flashes amber to indicate network activity. The light on the left turns red/orange when the computer is connected to a 100-Mbps network; the light turns green for a 10- Mbps network or a wireless c...
Page 15 - Back View
A Tour of Your Computer: Dell Inspiron 8200 CAUTION: Do not block, push objects into, or allow dust to accumulate in the air vents. Doing so can damage the computer or cause a fire. Back View NOTICE: To avoid damaging the computer, wait 5 seconds after turning off the computer before you disconnect ...
Page 18 - Bottom View
A Tour of Your Computer: Dell Inspiron 8200 Connects serial devices, such as a mouse or handheld device. USB Connector Connects USB devices, such as a mouse, keyboard, or printer. Bottom View file:///F|/Service%20Manuals/Dell/Inspiron/8200/tour.htm (16 of 18) [2/28/2004 7:40:13 AM]
Page 21 - Solving Problems; Accessing Help
Solving Problems: Dell Inspiron 8200 Back to Contents Page Solving Problems Dell™ Inspiron™ 8200 Accessing Help Power Problems Start-Up Error Messages Video and Display Problems Sound and Speaker Problems Printer Problems Modem and Internet Connection Problems Scanner Problems Touch Pad or Mouse Pro...
Page 22 - Power Problems
Solving Problems: Dell Inspiron 8200 To access the Tell Me How help file 1. Click the Start button and then click Help and Support . 2. Click User and system guides and then click User's guides . 3. Click Tell Me How . To access help 1. Click the Start button and then click Help and Support . 2. Typ...
Page 23 - Ensuring Sufficient Power for Your Computer
Solving Problems: Dell Inspiron 8200 Check the battery status light— If the battery status light flashes orange or is a steady orange, the battery charge is low or depleted. Connect the computer to an electrical outlet. If the battery status light flashes green and orange, the battery is too hot to ...
Page 24 - Docking Power Considerations; Docking While the Computer Is Running
Solving Problems: Dell Inspiron 8200 batteries may cause you to receive a WARNING or a SYSTEM CONFIGURATION ERROR message similar to the following: WARNING: 70 Watt AC adapter detected. System will not be capable of running in full performance without a 90 Watt AC adapter. NOTICE: Do not use an AC a...
Page 25 - Start-Up Error Messages; Video and Display Problems; If the display is blank
Solving Problems: Dell Inspiron 8200 Start-Up Error Messages Operating system not found— Contact Dell for technical assistance (see "Contacting Dell" in the Dell Owner's Manual that came with your computer). Insert bootable media— The operating system is trying to boot to a nonbootable flopp...
Page 27 - If the display is difficult to read; If only part of the display is readable
Solving Problems: Dell Inspiron 8200 Switch the video image— If your computer is attached to an external monitor, press to switch the video image to the display. If the display is difficult to read Adjust the brightness— See the Tell Me How help file for instructions on adjusting the brightness. To ...
Page 28 - Sound and Speaker Problems; If you have a problem with integrated speakers; If you have a problem with external speakers
Solving Problems: Dell Inspiron 8200 Connect an external monitor 1. Turn off your computer and connect an external monitor to the computer. 2. Turn on the computer and the monitor and adjust the monitor brightness and contrast controls. If the external monitor works, the computer display or video co...
Page 29 - Printer Problems
Solving Problems: Dell Inspiron 8200 Test the electrical outlet— Ensure that the electrical outlet is working by testing it with another device, such as a lamp. Ensure that the speakers are turned on— See the setup diagram supplied with the speakers. Adjust the Windows volume control— Double-click t...
Page 30 - Modem and Internet Connection Problems
Solving Problems: Dell Inspiron 8200 Verify that Windows® recognizes the printer 1. Click the Start button. 2. Click Control Panel . 3. Click Printers and Other Hardware . 4. Click View installed printers or fax printers . If the printer model is listed, right-click the printer icon. 5. Click Proper...
Page 32 - Scanner Problems; Touch Pad or Mouse Problems
Solving Problems: Dell Inspiron 8200 Verify that the modem is communicating with Windows 1. Click the Start button and click Control Panel . 2. Click Printers and Other Hardware. 3. Click Phone and Modem Options . 4. Click the Modems tab. 5. Click the COM port for your modem. 6. Click Properties , c...
Page 33 - External Keyboard Problems
Solving Problems: Dell Inspiron 8200 Check the touch pad settings 1. Click the Start button, click Control Panel , and then click Printers and Other Hardware . 2. Click Mouse . 3. Try adjusting the settings. Check the mouse cable— Shut down the computer. Disconnect the mouse cable and check it for d...
Page 34 - Unexpected Characters
Solving Problems: Dell Inspiron 8200 Check the keyboard cable— Shut down the computer. Disconnect the keyboard cable and check it for damage. For PS/2 cables, check the cable connector for bent or broken pins. Firmly reconnect the cable. If you are using a keyboard extension cable, disconnect it and...
Page 35 - Drive Problems; If you cannot save a file to a floppy disk drive
Solving Problems: Dell Inspiron 8200 Disable the numeric keypad— Press to disable the numeric keypad if numbers are displayed instead of letters. Verify that the numbers lock light is not lit. Drive Problems HINT: For information on saving files to a floppy disk, see the Tell Me How help file. To ac...
Page 38 - tray
Solving Problems: Dell Inspiron 8200 Check the drive for errors If the drive is a fixed optical drive: 1. Remove the hard drive and floppy drive. 2. Insert the Drivers and Utilities CD for your computer and turn on the computer. 3. Verify that the light is blinking, indicating normal operation. If y...
Page 39 - If you have problems with a hard drive; PC Card Problems
Solving Problems: Dell Inspiron 8200 Exit all other open programs— Exiting all other open programs before writing to the CD-RW may alleviate the problem. If you have problems with a hard drive Allow the computer to cool before turning it on— A hot hard drive may prevent the operating system from sta...
Page 40 - Network Problems; Error Messages
Solving Problems: Dell Inspiron 8200 Network Problems Check the network cable connector— Ensure that the network cable connector is firmly connected to the connector on the computer and the network wall jack. Check the network lights on the network connector— A green or red-orange status light indic...
Page 42 - General Program Problems; A program crashes; A program stops responding; A solid blue screen appears
Solving Problems: Dell Inspiron 8200 General Program Problems A program crashes HINT: Software usually includes installation instructions in its documentation or on a floppy disk or CD. See the software documentation— Many software manufacturers maintain websites with information that may help you s...
Page 43 - Error messages appear; Resolving Other Technical Problems
Solving Problems: Dell Inspiron 8200 Error messages appear Review "Error Messages"— Look up the message and take the appropriate action. See " Check the drive for errors " and the software documentation. E-Mail Problems Ensure that you are connected to the Internet— With the Outlook ...
Page 44 - If Your Computer Gets Wet
Solving Problems: Dell Inspiron 8200 If Your Computer Gets Wet CAUTION: Perform this procedure only after you are certain that it is safe to do so. If the computer is connected to an electrical outlet, Dell recommends that you turn off AC power at the circuit breaker before attempting to remove the ...
Page 45 - If You Drop or Damage Your Computer
Solving Problems: Dell Inspiron 8200 11. Replace the memory module(s), the memory module cover, and the screw(s). 12. Replace the hard drive. 13. Replace the module bay device and any PC Cards you removed. 14. Replace the battery. 15. Turn on the computer and verify that it is working properly. If t...
Page 47 - Using Dell Diagnostics; When to Use the Dell Diagnostics; Features of the Dell Diagnostics
Using Dell Diagnostics: Dell Inspiron 8200 Back to Contents Page Using Dell Diagnostics Dell™ Inspiron™ 8200 When to Use the Dell Diagnostics Features of the Dell Diagnostics Starting the Dell Diagnostics Advanced Testing Confirming the System Configuration Information When to Use the Dell Diagnosti...
Page 48 - Starting the Dell Diagnostics
Using Dell Diagnostics: Dell Inspiron 8200 by yourself, the diagnostic tests can provide you with important information you will need when talking to Dell's service and support personnel. If you are experiencing a problem with your computer, Dell recommends that you perform the checks in " Solvi...
Page 50 - Diagnostics Menu
Using Dell Diagnostics: Dell Inspiron 8200 12. Remove the CD from the CD, CD-RW, or DVD drive. When you start the diagnostics, the Dell logo screen appears, followed by a message telling you that the diagnostics is loading. After the diagnostics loads, the Diagnostics Menu appears. To select an opti...
Page 51 - Advanced Testing; Advanced Testing Main Screen; Advanced Testing Help Menu
Using Dell Diagnostics: Dell Inspiron 8200 To check a particular area of your computer, select Extended Tests from the Test One Device option, or select the Advanced Testing option to customize your test(s). Advanced Testing When you select Advanced Testing from the Diagnostics Menu , the following ...
Page 52 - Advanced Testing Help Categories
Using Dell Diagnostics: Dell Inspiron 8200 2. Highlight the Help category and press , or press the key that corresponds to the highlighted letter in the category you choose. Advanced Testing Help Categories Help Category Description Menu Provides descriptions of the main menu screen area, the Device...
Page 53 - Confirming the System Configuration
Using Dell Diagnostics: Dell Inspiron 8200 Test Provides a thorough explanation of the test procedure of each highlighted test group subtest. An example of the Diskette subtest floppy drive Seek Test is as follows: Diskette Drive A - floppy drive Seek Test This test verifies the drive's ability to p...
Page 56 - Manually Reinstalling Drivers for Windows XP
Reinstalling Drivers and Utilities: Dell Inspiron 8200 the CD, it might prompt you to install setup files. Click OK , and follow the instructions on the screen to continue. 3. From the Language pull-down menu in the toolbar, select your preferred language for the driver or utility (if available). A ...
Page 57 - Using Windows XP Device Driver Rollback
Reinstalling Drivers and Utilities: Dell Inspiron 8200 the Start button, point to Settings , and click Control Panel . 2. Click the Start button and right-click My Computer . 3. Click Properties . 4. Click the Hardware tab and click Device Manager . 5. Double-click the type of device for which you a...
Page 58 - Resolving Software and Hardware
Reinstalling Drivers and Utilities: Dell Inspiron 8200 6. Click Roll Back Driver . Resolving Software and Hardware Incompatibilities In the Microsoft® Windows® XP operating system, IRQ conflicts occur if a device either is not detected during the operating system setup or is detected but incorrectly...
Page 59 - Using Microsoft® Windows® System
Reinstalling Drivers and Utilities: Dell Inspiron 8200 You can also use the Windows XP Hardware Troubleshooter. To use the troubleshooter, click the Start button and click Help and Support . Type hardware troubleshooter in the Search field, and then click the arrow to start the search. Click Hardwar...
Page 60 - Creating a Restore Point; Using the System Restore Wizard; Manually Creating a Restore Point
Reinstalling Drivers and Utilities: Dell Inspiron 8200 1. Click the Start button and click Control Panel . 2. Click the Performance and Maintenance . 3. Click System . 4. Click the System Restore tab. 5. Ensure that Turn off System Restore is not checked. Creating a Restore Point Using the System Re...
Page 61 - Restoring the Computer to an Earlier Operating
Reinstalling Drivers and Utilities: Dell Inspiron 8200 Restoring the Computer to an Earlier Operating State If problems occur after installing a device driver, first try using Device Driver Rollback (see " Using Windows XP Device Driver Rollback "). If Device Driver Rollback does not resolve...
Page 62 - Undoing the Last System Restore
Reinstalling Drivers and Utilities: Dell Inspiron 8200 To change the restore point, you can either repeat the steps using a different restore point, or you can undo the restoration. Undoing the Last System Restore NOTICE: Save and close all open files and exit all open programs. Do not alter, open, ...
Page 63 - Reinstalling Microsoft® Windows® XP
Reinstalling Microsoft Windows XP: Dell Inspiron 8200 Back to Contents Page Reinstalling Microsoft® Windows® XP Dell™ Inspiron™ 8200 Before reinstalling the Windows XP operating system to correct a problem, try correcting the problem by using Windows System Restore (see " Using Microsoft® Window...
Page 65 - Enabling Hibernate Mode
Reinstalling Microsoft Windows XP: Dell Inspiron 8200 17. Reinstall the appropriate drivers (see " Reinstalling Drivers and Utilities "). 18. Reinstall your virus protection software. Enabling Hibernate Mode 1. Click the Start button, point to Settings , and then click Control Panel . 2. Dou...
Page 66 - System Setup Program; System Setup Overview
System Setup Program: Dell Inspiron 8200 Back to Contents Page System Setup Program Dell™ Inspiron™ 8200 System Setup Overview Viewing the System Setup Screens System Setup Screens Commonly Used Options System Setup Overview HINT: Your operating system may automatically configure most of the options...
Page 67 - Viewing the System Setup Screens
System Setup Program: Dell Inspiron 8200 NOTICE: Unless you are an expert computer user or are directed to do so by Dell technical support, do not change the settings for this program. Certain changes might make your computer work incorrectly. Viewing the System Setup Screens 1. Turn on (or restart)...
Page 68 - Commonly Used Options; Changing Printer Modes; Changing COM Ports
System Setup Program: Dell Inspiron 8200 The screens display such information as: ● System configuration ● Boot (start-up) configuration and docking-device configuration settings ● Basic device configuration settings ● Battery charge status ● Power management settings ● System security and hard-driv...
Page 70 - Specifications
Specifications: Dell Inspiron 8200 Back to Contents Page Specifications Dell™ Inspiron™ 8200 System Information PC Card Memory Ports and Connectors Communications Video Audio Display Keyboard Touch Pad Track Stick Battery AC Adapter Physical Environmental System Information System chip set Intel® 84...
Page 79 - Power Management; Management Tips; Standby Mode
Power Management: Dell Inspiron 8200 Back to Contents Page Power Management Dell™ Inspiron™ 8200 Management Tips Power Management Modes Power Options Properties Management Tips ● Connect the Dell™ computer to an electrical outlet when possible because the battery life expectancy is largely determine...
Page 80 - Hibernate Mode
Power Management: Dell Inspiron 8200 To enter standby mode: ● C lick the Start button, click Turn off computer , and then click Stand by . or ● Depending on how you set the power management options on the Advanced tab , use one of the following methods: ❍ Press the power button. ❍ Close the display....
Page 81 - Power Options Properties; Power Schemes Tab
Power Management: Dell Inspiron 8200 ● Press . HINT: Some PC Cards may not operate correctly after the computer exits hibernate mode. Remove and reinsert the card, or simply restart (reboot) your computer. To exit hibernate mode, press the power button. The computer may take a short time to exit hib...
Page 82 - Alarms Tab
Power Management: Dell Inspiron 8200 ● Presentation ● Minimal Power Management ● Max Battery Windows XP controls the performance level of the processor depending on the power scheme you select. You do not need to make any further adjustments to set the performance level. Each preset power scheme has...
Page 83 - Hibernate Tab
Power Management: Dell Inspiron 8200 ❍ Activate hibernate mode. ❍ Shut down Windows and turn off the computer. ❍ Choose no action ( None or Do nothing ). To program these functions, click an option from the corresponding pull-down menu, and then click OK . Hibernate Tab The Hibernate tab lets you en...
Page 84 - Pin Assignments for I/O Connectors; Serial Connector
Pin Assignments for I/O Connectors: Dell Inspiron 8200 Back to Contents Page Pin Assignments for I/O Connectors Dell™ Inspiron™ 8200 USB Connector Pin Signal 1 VCC 2 -Data 3 +Data 4 Ground Serial Connector file:///F|/Service%20Manuals/Dell/Inspiron/8200/pinouts.htm (1 of 10) [2/28/2004 7:40:21 AM]
Page 85 - Parallel Connector
Pin Assignments for I/O Connectors: Dell Inspiron 8200 Pin Signal Pin Signal 1 DCD 6 DSR 2 RXDA 7 RTS 3 TXDA 8 CTS 4 DTR 9 RI 5 GND Parallel Connector Pin Signal Pin Signal file:///F|/Service%20Manuals/Dell/Inspiron/8200/pinouts.htm (2 of 10) [2/28/2004 7:40:21 AM]
Page 88 - Docking Connector
Pin Assignments for I/O Connectors: Dell Inspiron 8200 S-Video Pin Signal 1 GND 2 GND 3 DLUMA-L 4 DCRMA-L Composite Video Pin Signal 5 SPDIF 6 DCMPS-L 7 SPGND Docking Connector file:///F|/Service%20Manuals/Dell/Inspiron/8200/pinouts.htm (5 of 10) [2/28/2004 7:40:21 AM]
Page 94 - Removing and Replacing Parts
Removing and Replacing Parts: Dell Inspiron 8200 Back to Contents Page Removing and Replacing Parts Dell™ Inspiron™ 8200 Before You Begin System Components Hard Drive and Fixed Optical Drive System Upgrades Keyboard Display Microprocessor Thermal-Cooling Assembly Microprocessor Module Video Graphics...
Page 95 - Microprocessor Thermal-Cooling
Microprocessor Thermal-Cooling Assembly: Dell Inspiron 8200 Back to Contents Page Microprocessor Thermal-Cooling Assembly Dell™ Inspiron™ 8200 NOTICE: Disconnect the computer and attached devices from electrical outlets and remove any installed batteries. NOTICE: To avoid ESD, ground yourself by usi...
Page 96 - Removing the Microprocessor Thermal-Cooling
Microprocessor Thermal-Cooling Assembly: Dell Inspiron 8200 2 microprocessor retaining clip Removing the Microprocessor Thermal-Cooling Assembly 1. Follow the instructions in " Preparing to Work Inside the Computer ." 2. Remove the keyboard. 3. Remove the hinge cover . 4. Insert a non-marrin...
Page 98 - Before You Begin
Before You Begin: Dell Inspiron 8200 Back to Contents Page Before You Begin Dell™ Inspiron™ 8200 Preparing to Work Inside the Computer Recommended Tools Computer Orientation Screw Identification Preparing to Work Inside the Computer CAUTION: Only a certified service technician should perform repairs...
Page 99 - Recommended Tools
Before You Begin: Dell Inspiron 8200 5. Disconnect the computer from the electrical outlet. 6. To avoid possible damage to the system board, wait 10 to 20 seconds and then disconnect any attached devices. 7. Disconnect all other external cables from the computer. 8. Remove any installed PC Cards or ...
Page 100 - Computer Orientation
Before You Begin: Dell Inspiron 8200 Computer Orientation Screw Identification When you are removing and replacing components, photocopy the placemat as a tool to lay out and keep track of the component screws. The placemat provides the number of screws and the sizes. file:///F|/Service%20Manuals/De...
Page 104 - System Components
System Components: Dell Inspiron 8200 Back to Contents Page System Components Dell™ Inspiron™ 8200 NOTICE: Unless otherwise noted, each procedure in this document assumes that a part can be replaced by performing the removal procedure in reverse order. file:///F|/Service%20Manuals/Dell/Inspiron/8200...
Page 106 - Hard Drive and Fixed Optical Drive; Hard Drive
Hard Drive and Fixed Optical Drive: Dell Inspiron 8200 Back to Contents Page Hard Drive and Fixed Optical Drive Dell™ Inspiron™ 8200 Hard Drive Fixed Optical Drive NOTICE: Only a certified service technician should perform repairs on your computer. Damage due to servicing that is not authorized by D...
Page 107 - Removing the Hard Drive; Replacing the Hard Drive
Hard Drive and Fixed Optical Drive: Dell Inspiron 8200 1 bottom of computer 2 M3 x 5-mm screw 3 hard drive door Removing the Hard Drive 1. Follow the instructions in " Preparing to Work Inside the Computer ." 2. Remove the M3 x 5-mm screw. 3. Pull the hard drive out. Replacing the Hard Drive...
Page 108 - Fixed Optical Drive
Hard Drive and Fixed Optical Drive: Dell Inspiron 8200 2. Push down on the drive until it snaps into place. 3. Replace the M3 x 5-mm screw in the hard drive door. Fixed Optical Drive NOTICE: Disconnect the computer and attached devices from the electrical outlet and remove any installed batteries. N...
Page 109 - Removing the Fixed Optical Drive
Hard Drive and Fixed Optical Drive: Dell Inspiron 8200 Removing the Fixed Optical Drive 1. Follow the instructions in " Preparing to Work Inside the Computer ." 2. Loosen the captive screw on the bottom of the computer. 3. Turn the computer over (to keep the captive screw from interfering wi...
Page 110 - System Upgrades; Memory Modules; Removing the Memory Module/Modem Cover
System Upgrades: Dell Inspiron 8200 Back to Contents Page System Upgrades Dell™ Inspiron™ 8200 Memory Modules Modem Daughter Card Mini PCI Card Memory Modules NOTICE: Disconnect the computer and any attached devices from electrical outlets and remove any installed batteries. NOTICE: To avoid ESD, gr...
Page 112 - Removing the Memory Modules
System Upgrades: Dell Inspiron 8200 1 DIMM B 2 memory module sockets (2) 3 DIMM A socket 4 modem daughter card 5 metal tabs (2 per socket) Removing the Memory Modules 1. Remove the memory module/modem cover . 2. To release a memory module from its socket, spread apart the tabs at each side of the mo...
Page 113 - Replacing the Memory Modules; Modem Daughter Card; Removing the Modem Daughter Card
System Upgrades: Dell Inspiron 8200 Replacing the Memory Modules 1. If you only have one memory module, install it in the socket labeled "DIMM A." Install a second memory module in the socket labeled "DIMM B." HINT: Memory modules are keyed to fit into their sockets in only one direc...
Page 114 - Replacing the Modem Daughter Card
System Upgrades: Dell Inspiron 8200 1 modem daughter card 2 M2 x 3-mm screw 3. Remove the M2 x 3-mm screw that secures the modem daughter card to the system board. 4. Use the pull tab to pull the modem daughter card straight up out of its connector. NOTICE: Do not pull on the modem cable. Pull the c...
Page 115 - Mini PCI Card; Mini PCI Card Cover
System Upgrades: Dell Inspiron 8200 2. Use the screw and boss holes at opposite corners of the modem daughter card to align the card, and press the card into its connector on the system board. 3. Install the M2 x 3-mm screw that secures the card to the system board. 4. Replace the memory module/mode...
Page 116 - Removing the Mini PCI Card; Replacing the Mini PCI Card
System Upgrades: Dell Inspiron 8200 1 M2.5 x 20-mm screw Removing the Mini PCI Card 1. Follow the instructions in " Preparing to Work Inside the Computer ." 2. Remove the M2.5 x 20-mm screw and then remove the Mini PCI card cover. 3. To release the Mini PCI card, spread the metal securing ta...
Page 119 - Keyboard
Keyboard: Dell Inspiron 8200 Back to Contents Page Keyboard Dell™ Inspiron™ 8200 NOTICE: Disconnect the computer and attached devices from electrical outlets and remove any installed batteries. NOTICE: To avoid ESD, ground yourself by using a wrist grounding strap or by periodically touching unpaint...
Page 120 - Removing the Keyboard
Keyboard: Dell Inspiron 8200 1 M2.5 x 20-mm screws (4) Removing the Keyboard 1. Follow the instructions in " Preparing to Work Inside the Computer ." 2. Turn the computer over and remove the four M2.5 x 20-mm screws (three labeled "circle K" and one labeled "circle K/M"). 3. ...
Page 122 - Replacing the Keyboard
Keyboard: Dell Inspiron 8200 1 keyboard cable 2 keyboard interface connector 3 system board 7. Disconnect the keyboard cable and lay the keyboard aside. Replacing the Keyboard 1. While bracing the keyboard upright on its left end, connect the keyboard cable to the keyboard interface connector on the...
Page 124 - Display Overview
Display: Dell Inspiron 8200 Back to Contents Page Display Dell™ Inspiron™ 8200 Display Overview Hinge Cover Display Assembly Display Bezel Display Panel Display Latch Display Overview NOTICE: Disconnect the computer and attached devices from electrical outlets and remove any installed batteries. NOT...
Page 126 - Hinge Cover; Display Assembly
Display: Dell Inspiron 8200 Hinge Cover 1 hinge cover 1. Follow the instructions in " Preparing to Work Inside the Computer ." 2. Use a nonmarring plastic scribe to loosen the hinge cover at the back and at each side of the computer. 3. Open the computer and use the scribe to pry between the...
Page 130 - Display Bezel; Removing the Display Panel
Display: Dell Inspiron 8200 1 M2.5 x 4-mm screws (6) 8 M2 x 3-mm screws (6) 2 rubber screw covers (4) 9 top cover 3 display bezel 10 hinge cover 4 plastic tabs (6) 11 display flex cable 5 M2.5 x 4-mm screw 12 display panel 6 flex-cable mounting bracket 13 plastic screw covers (2) 7 display latch Dis...
Page 132 - Replacing the Display Panel; Display Latch
Display: Dell Inspiron 8200 1 ZIF connector 2 standard connector Replacing the Display Panel HINT: Use a magnetic screwdriver to reassemble the display panel in the display. 1. Connect the flex cable to the two connectors on the back of the display panel. 2. Place the display panel in the top cover,...
Page 134 - Microprocessor Module; Removing the Microprocessor Module
Microprocessor Module: Dell Inspiron 8200 Back to Contents Page Microprocessor Module Dell™ Inspiron™ 8200 NOTICE: Disconnect the computer and attached devices from electrical outlets and remove any installed batteries. NOTICE: To avoid ESD, ground yourself by using a wrist grounding strap or by per...
Page 136 - Replacing the Microprocessor Module
Microprocessor Module: Dell Inspiron 8200 1 cam screw 2 perpendicular screwdriver 3 processor die (do not touch) a. Loosen the cam screw that secures the microprocessor module. The location of the screw and the rotation direction may vary with the socket manufacturer; look for small icons indicating...
Page 139 - Video Graphics Board; Removing the Video Graphics Board
Video Graphics Board: Dell Inspiron 8200 Back to Contents Page Video Graphics Board Dell™ Inspiron™ 8200 NOTICE: Disconnect the computer and attached devices from electrical outlets and remove any installed batteries. NOTICE: To avoid ESD, ground yourself by using a wrist grounding strap or by perio...
Page 140 - Replacing the Video Graphics Board
Video Graphics Board: Dell Inspiron 8200 NOTE: The video graphics board may have a flexible shield attached to it with an adhesive. The shield prevents electromagnetic interference with other electronic devices, such as cellular phones. Do not exchange or reuse the shield. Newer versions of the boar...
Page 141 - Palm Rest
Palm Rest: Dell Inspiron 8200 Back to Contents Page Palm Rest Dell™ Inspiron™ 8200 NOTICE: Disconnect the computer and attached devices from electrical outlets and remove any installed batteries. NOTICE: To avoid ESD, ground yourself by using a wrist grounding strap or by periodically touching unpai...
Page 142 - Removing the Palm Rest
Palm Rest: Dell Inspiron 8200 NOTICE: The reserve battery provides power to the computer's time RTC and NVRAM when the computer is turned off. Removing the palm rest disconnects the reserve battery and causes the computer to lose the date and time information as well as all user-specified parameters...
Page 144 - Replacing the Palm Rest
Palm Rest: Dell Inspiron 8200 Replacing the Palm Rest When replacing the palm rest screws, install the two screws at the back corners of the computer first to help align the palm rest correctly. Back to Contents Page file:///F|/Service%20Manuals/Dell/Inspiron/8200/palmrest.htm (4 of 4) [2/28/2004 7:...
Page 145 - Reserve Battery
Reserve Battery: Dell Inspiron 8200 Back to Contents Page Reserve Battery Dell™ Inspiron™ 8200 NOTICE: Disconnect the computer and attached devices from electrical outlets and remove any installed batteries. NOTICE: To avoid ESD, ground yourself by using a wrist grounding strap or by periodically to...
Page 146 - Removing the Reserve Battery
Reserve Battery: Dell Inspiron 8200 NOTICE: The reserve battery provides power to the computer's RTC and NVRAM when the computer is turned off. Removing the battery causes the computer to lose the date and time information as well as all user-specified parameters in NVRAM. If possible, copy the info...
Page 147 - Replacing the Reserve Battery
Reserve Battery: Dell Inspiron 8200 1 M2.5 x 4-mm screws (4) 2 palm rest bracket 3 palm-rest flex cable 7. Remove the four M2.5 x 4-mm screws that secure the palm rest bracket. 8. While supporting the palm-rest flex cable, lift out the palm rest bracket and turn it over. 9. Disconnect the reserve ba...
Page 148 - System Board
System Board: Dell Inspiron 8200 Back to Contents Page System Board Dell™ Inspiron™ 8200 NOTICE: Disconnect the computer and attached devices from electrical outlets and remove any installed batteries. NOTICE: To avoid ESD, ground yourself by using a wrist grounding strap or by periodically touching...
Page 149 - Removing the System Board
System Board: Dell Inspiron 8200 2 system board 3 network connector 4 modem connector 5 network cable cover 6 M2.5 x 20-mm screw The BIOS chip on the system board contains the service tag sequence, which is also visible on a bar code label on the bottom of the computer. The replacement kit for the s...
Page 153 - Battery and Module Bay Latches
Battery and Module Bay Latches: Dell Inspiron 8200 Back to Contents Page Battery and Module Bay Latches Dell™ Inspiron™ 8200 NOTICE: Disconnect the computer and attached devices from electrical outlets and remove any installed batteries. NOTICE: To avoid ESD, ground yourself by using a wrist groundi...
Page 154 - Removing and Replacing the Battery and Module
Battery and Module Bay Latches: Dell Inspiron 8200 1 wear ribs (2 on underside) 2 bumps 3 slider 4 spring 5 bottom case 6 latch housing (2) 7 latch buttons (2) 8 location of snap tabs (2) Removing and Replacing the Battery and Module Bay Latches 1. Follow the instructions in " Preparing to Work ...
Page 156 - Battery Charger Board; Removing the Battery Charger Board
Battery Charger Board: Dell Inspiron 8200 Back to Contents Page Battery Charger Board Dell™ Inspiron™ 8200 NOTICE: Disconnect the computer and attached devices from electrical outlets and remove any installed batteries. NOTICE: To avoid ESD, ground yourself by using a wrist grounding strap or by per...
Page 157 - Replacing the Battery Charger Board
Battery Charger Board: Dell Inspiron 8200 4. Remove the display assembly . 5. Remove the palm rest . 6. Remove the video graphics board . 7. Lift the battery charger board out of the system board connector. Replacing the Battery Charger Board Align the screw holes on the battery charger board with t...
Page 158 - LED Board
LED Board: Dell Inspiron 8200 Back to Contents Page LED Board Dell™ Inspiron™ 8200 NOTICE: Disconnect the computer and attached devices from electrical outlets and remove any installed batteries. NOTICE: To avoid ESD, ground yourself by using a wrist grounding strap or by periodically touching unpai...
Page 159 - Removing the LED Board; Replacing the LED Board
LED Board: Dell Inspiron 8200 Removing the LED Board 1. Follow the instructions in " Preparing to Work Inside the Computer ." 2. Remove the hinge cover . 3. Remove the two M2 x 4-mm screws. 4. Lift the LED board away from its connector. Replacing the LED Board 1. Align the two screw holes wi...
Page 160 - Fan; Removing the Fan
Fan: Dell Inspiron 8200 Back to Contents Page Fan Dell™ Inspiron™ 8200 NOTICE: Disconnect the computer and attached devices from electrical outlets and remove any installed batteries. NOTICE: To avoid ESD, ground yourself by using a wrist grounding strap or by periodically touching unpainted metal o...


 Dell Inspiron 5523 User Manual
 Dell Inspiron 5721 User Manual
 Dell Inspiron 7500 User Manual
 Dell Inspiron 8000 User Manual
 Dell Inspiron 8100 User Manual
 Dell Inspiron 8500 User Manual
 Dell Inspiron 8600 User Manual
 Dell Inspiron 9100 User Manual
 Dell Inspiron M101Z User Manual
 Dell Inspiron M301Z User Manual