Page 5 - Safety information
Safety information Connect the power cord to a properly grounded electrical outlet that is near the product and easily accessible. Do not place or use this product near water or wet locations. CAUTION—POTENTIAL INJURY: This product uses a laser. Use of controls or adjustments or performance of proce...
Page 7 - Learning about the printer; Finding information about the printer
Learning about the printer Finding information about the printer What are you looking for? Find it here Initial setup instructions: • Connecting the printer • Installing the printer software Setup documentation—The setup documentation camewith the printer. Additional setup and instructions for using...
Page 8 - Selecting a location for the printer
What are you looking for? Find it here • Software and Drivers—Certified drivers for my printer andinstallers for Dell printer software • Readme files—Last ‑ minute technical changes, or advanced technical reference materials for experienced users ortechnicians Software and Documentation CD • Supplie...
Page 9 - Printer configurations
1 Right side 30 cm (12 in.) 2 Front 51 cm (20 in.) 3 Left side 20 cm (8 in.) 4 Rear 20 cm (8 in.) 5 Top 30 cm (12 in.) Printer configurations CAUTION—POTENTIAL INJURY: To reduce the risk of equipment instability, load each tray separately. Keep all other trays closed until needed. You can configure ...
Page 11 - Using the printer control panel
Using the printer control panel Use the To 1 Menus button Open the menus. Notes: • The menus are available only when the printer is in the Ready state. • Pressing the button while navigating within the menus returns the printer control panelto the top ‑ level menu screen. 2 Display View printing opt...
Page 12 - Using the Embedded Web Server
Understanding the colors of the indicator and Sleep buttonlights The colors of the indicator and Sleep button lights on the printer control panel signify a certain printer status or condition. Indicator light color and its corresponding printer status Indicator light Printer status Off The printer i...
Page 14 - Installing internal options; Available internal options; Accessing the controller board
Additional printer setup Installing internal options CAUTION—SHOCK HAZARD: If you are accessing the controller board or installing optional hardware or memory devices sometime after setting up the printer, then turn the printer off, and unplug the power cordfrom the electrical outlet before continui...
Page 15 - Installing a memory card
2 1 1 Memory card connector 2 Option card connector Installing a memory card CAUTION—SHOCK HAZARD: If you are accessing the controller board or installing optional hardware or memory devices sometime after setting up the printer, then turn the printer off, and unplug the power cordfrom the electrica...
Page 17 - Installing an optional card
Installing an optional card CAUTION—SHOCK HAZARD: If you are accessing the controller board or installing optional hardware or memory devices sometime after setting up the printer, then turn the printer off, and unplug the power cordfrom the electrical outlet before continuing. If you have other dev...
Page 19 - Installing hardware options; Installing an optional tray
Installing hardware options Installing an optional tray CAUTION—SHOCK HAZARD: If you are accessing the controller board or installing optional hardware or memory devices sometime after setting up the printer, then turn the printer off, and unplug the power cordfrom the electrical outlet before conti...
Page 20 - Attaching cables
7 Align the printer with the tray, and then slowly lower the printer into place. 8 Connect the power cord to the printer, then to a properly grounded electrical outlet, and then turn on the printer. Note: When the printer software and any hardware options are installed, you may need to manually add ...
Page 21 - Setting up the printer software; Installing the printer software
1 2 3 4 5 6 7 Use the To 1 USB port * Attach an optional wireless network adapter. 2 USB printer port Connect the printer to a computer. 3 Ethernet port * Connect the printer to a network. 4 Parallel port * Connect the printer to a computer. 5 Power switch Turn on or turn off the printer. 6 Printer ...
Page 22 - Using the Internet; Installing the Local Printer Settings Utility
c Press Enter , or click OK . 3 Click Install , and then follow the instructions on the computer screen. For Macintosh users 1 Close all open applications. 2 Insert the Software and Documentation CD. If the installation dialog does not appear after a minute, then click the CD icon on the desktop. 3 ...
Page 23 - Networking; Preparing to set up the printer on an Ethernet network
4 Click the Configuration tab. 5 Do either of the following: • Click Update Now ‑ Ask Printer . • Under Configuration Options, manually add any installed hardware options. 6 Click Apply . For Macintosh users 1 From the Apple menu, navigate to either of the following: • System Preferences > Print ...
Page 25 - Preparing to set up the printer on a wireless network
a From the Apple menu, navigate to: System Preferences > Print & Fax b Click + , and then navigate to: AppleTalk > select your printer > Add Preparing to set up the printer on a wireless network Notes: • Make sure your wireless network adapter is installed in your printer and working pr...
Page 26 - Using the Wireless Setup Utility (Windows only)
Connecting the printer to a wireless network using Wi ‑ Fi Protected Setup Before connecting the printer to a wireless network, make sure that: • The access point (wireless router) is Wi ‑ Fi Protected Setup (WPS) certified or WPS ‑ compatible. For more information, see the documentation that came w...
Page 27 - Using the Wireless Setup Assistant (Macintosh only)
3 Double ‑ click the downloaded software installer package. 4 Follow the instructions on the computer screen. Launching the Wireless Setup Utility Notes: • Make sure the printer is turned on. • Make sure a wireless network adapter installed in your printer is attached and working properly. 1 Click o...
Page 28 - Verifying printer setup; Printing a menu settings page
Connecting the printer to a wireless network using the Embedded Web Server Before you begin, make sure that: • Your printer is connected temporarily to an Ethernet network. • A wireless network adapter is installed in your printer and working properly. For more information, see theinstruction sheet ...
Page 29 - Printing a network setup page
Printing a network setup page If the printer is connected to a network, then print a network setup page to verify the network connection. This pagealso provides important information that aids network printing configuration. 1 From the printer control panel, navigate to: > Reports > > Netwo...
Page 30 - Loading paper and specialty media; Setting the paper size and type; Specify the paper height and width
Loading paper and specialty media The selection and handling of paper and specialty media can affect how reliably documents print. For more information,see “Avoiding jams” on page 102 and “Storing paper” on page 46. Setting the paper size and type 1 From the printer control panel, navigate to: > ...
Page 36 - Loading the multipurpose feeder
Loading the multipurpose feeder Use the multipurpose feeder when printing on different paper sizes and types or specialty media, such as card stock,transparencies, and envelopes. You can also use it for single ‑ page print jobs on letterhead. 1 Open the multipurpose feeder. 1 2 a Pull the multipurpo...
Page 39 - Linking and unlinking trays
• Load envelopes with the flap on the left side facedown. Warning—Potential Damage: Never use envelopes with stamps, clasps, snaps, windows, coated linings, or self ‑ stick adhesives. These envelopes may severely damage the printer. 5 From the printer control panel, set the paper size and type in th...
Page 40 - Configuring a custom paper type name; Configuring a custom paper type
Using the printer settings on the computer Depending on your operating system, access the Paper menu using the Local Printer Settings Utility or PrinterSettings. Note: You can also specify the paper size and type for the tray using the printer control panel. For more information, see “Setting the pa...
Page 41 - Assigning a custom paper type
Using the printer settings on the computer Depending on your operating system, access the Custom menu using the Local Printer Settings Utility or PrinterSettings. Assigning a custom paper type Using the Embedded Web Server 1 Open a Web browser, and then type the printer IP address in the address fie...
Page 42 - Paper and specialty media guide; Paper guidelines; Paper characteristics; Weight
Paper and specialty media guide Paper guidelines Selecting the correct paper or specialty media reduces printing problems. For the best print quality, try a sample of thepaper or specialty media before buying large quantities. Paper characteristics The following paper characteristics affect print qu...
Page 43 - Fiber content; Unacceptable paper; Selecting preprinted forms and letterhead
For 60–90 ‑ g/m 2 (16–24 ‑ lb) bond paper, grain long paper is recommended. Fiber content Most high ‑ quality xerographic paper is made from 100% chemically treated pulped wood. This content provides the paper with a high degree of stability resulting in fewer paper feeding problems and better print...
Page 44 - Using recycled paper and other office papers; Using specialty media; Tips on using card stock
Use papers printed with heat ‑ resistant inks designed for use in xerographic copiers. The ink must be able to withstand temperatures up to 230°C (446°F) without melting or releasing hazardous emissions. Use inks that are not affected bythe resin in toner. Inks that are oxidation ‑ set or oil ‑ base...
Page 46 - Storing paper
• If zone coating of the adhesive is not possible, then remove a 2 ‑ mm (0.06 ‑ inch) strip on the leading and driver edge, and then use a non ‑ oozing adhesive. • Portrait orientation is recommended, especially when printing bar codes. Tips on using letterhead • Use letterhead designed specifically...
Page 47 - Supported paper sizes, types, and weights; Supported paper sizes
Supported paper sizes, types, and weights For information on card stock and labels, see the Card Stock & Label Guide . Supported paper sizes Note: For an unlisted paper size, select the closest larger listed size. For information on card stock and labels, see the Card Stock & Label Guide . P...
Page 48 - Supported paper types and weights
Paper size Standard tray Optional 550 ‑ sheet tray Multipurpose feeder Duplex mode 9 Envelope 98 x 225 mm (3.9 x 8.9 in.) X X X 10 Envelope 105 x 241 mm (4.1 x 9.5 in.) X X X DL Envelope 110 x 220 mm (4.3 x 8.7 in.) X X X C5 Envelope 162 x 229 mm (6.4 x 9 in.) X X X B5 Envelope 176 x 250 mm (6.9 x 9...
Page 50 - Printing; Printing a document; Adjusting toner darkness
Printing This chapter covers printing, printer reports, and job cancelation. Selection and handling of paper and specialty mediacan affect how reliably documents print. For more information, see “Avoiding jams” on page 102 and “Storing paper”on page 46. Printing a document Printing a document 1 From...
Page 51 - Printing information pages; Printing a font sample list; Canceling a print job; Canceling a print job from the printer control panel
• If you are using a proxy server, then temporarily disable it to load the Web page correctly. 2 Click Settings > Print Settings > Quality Menu > Toner Darkness . 3 Adjust the toner darkness setting. 4 Click Submit . Using the printer settings on the computer Depending on your operating sys...
Page 52 - Canceling a print job from the computer
Canceling a print job from the computer For Windows users 1 Open the printers folder. a Click , or click Start and then click Run . b In the Start Search or Run dialog, type control printers . c Press Enter , or click OK . 2 Double ‑ click the printer icon. 3 Select the print job you want to cancel....
Page 53 - Understanding the printer menus; Menus list; Paper menu; Default Source menu
Understanding the printer menus Menus list Paper Menu Reports Network/Ports 3 Default Source Paper Size/Type Configure MP Substitute Size Paper Texture Paper Weight Paper Loading Custom TypesUniversal Setup Menu Settings Page Device Statistics Network Setup Page 1 Profiles List Print Fonts Print Dir...
Page 57 - Paper Texture menu
Configure MP menu Use To Configure MP CassetteManualFirst Determine when the printer selects paper from the multipurpose feeder. Notes: • Cassette is the factory default setting. Cassette configures themultipurpose feeder as the default paper source. • Manual sets the multipurpose feeder only for ma...
Page 59 - Paper Weight menu
Paper Weight menu Use To Plain Weight LightNormalHeavy Specify the relative weight of the plain paper loaded. Note: Normal is the factory default setting. Card Stock Weight LightNormalHeavy Specify the relative weight of the card stock loaded. Note: Normal is the factory default setting. Transparenc...
Page 60 - Paper Loading menu
Use To Colored Weight LightNormalHeavy Specify the relative weight of the colored paper loaded. Note: Normal is the factory default setting. Light Weight Light Specify that the weight of the paper loaded is light. Heavy Weight Heavy Specify that the weight of the paper loaded is heavy. Cotton/Rough ...
Page 61 - Custom Types menu
Use To Light Loading DuplexOff Determine and set two ‑ sided printing for all print jobs that specify Light as the paper type. Heavy Loading DuplexOff Determine and set two ‑ sided printing for all print jobs that specify Heavy as the paper type. Custom [x] Loading DuplexOff Determine and set two ‑ ...
Page 62 - Universal Setup menu; Reports menu
Universal Setup menu Use To Units of Measure InchesMillimeters Identify the units of measure. Notes: • Inches is the US factory default setting. • Millimeters is the international factory default setting. Portrait Width 3–8.5 inches76–216 mm Set the portrait width. Notes: • If the width exceeds the ...
Page 63 - Active NIC menu
Use To Network Setup Page Print a report containing information about the network printer settings, such asthe TCP/IP address information. Note: This menu item appears only in network printers or in printers connected to print servers. Profiles List Print a list of profiles stored in the printer. No...
Page 65 - Network Card menu
Network Card menu To access the menu, navigate to either of the following: • Network/Ports > Standard Network > Standard Network Setup > Network Card • Network/Ports > Network [x] > Network [x] Setup > Network Card Use To View Card Status ConnectedDisconnected View the connection s...
Page 66 - IPv6 menu
Use To Enable AutoIP YesNo Specify the Zero Configuration Networking setting. Note: Yes is the factory default setting. Enable FTP/TFTP YesNo Enable the built-in FTP server, which lets you send files to the printer using File TransferProtocol. Note: Yes is the factory default setting. Enable HTTP Se...
Page 67 - Wireless menu; AppleTalk menu
Use To Set Hostname * Set the host name. Note: The host name is limited to 15 characters, and accepts US ‑ ASCII, alphanumeric characters and hyphen only. View Address * View the current IPv6 addresses. View Router Address * View the current router address. Enable DHCPv6 OnOff Enable DHCPv6 in the p...
Page 68 - Standard USB menu
Use To Activate YesNo Enable or disable AppleTalk support. Note: Yes is the factory default setting. View Name Show the assigned AppleTalk name. Note: The name can be changed only from the Embedded Web Server. View Address Show the assigned AppleTalk address. Note: The address can be changed only fr...
Page 69 - SMTP Setup menu
Use To USB Buffer DisabledAuto3K to [maximum size allowed] Set the size of the USB input buffer. Notes: • Auto is the factory default setting. • Disabled turns off job buffering. • The USB buffer size value can be changed in 1-KB increments. • The maximum size allowed depends on the amount of memory...
Page 70 - Security menu; Security Audit Log menu
Use To Use SSL DisabledNegotiateRequired Set the printer to use SSL for increased security when connecting to theSMTP server. Notes: • Disabled is the factory default setting. • When the Negotiate setting is used, the SMTP server determines ifSSL will be used. SMTP Server Authentication No authentic...
Page 71 - Set Date and Time menu
Use To Configure Log Enable Audit YesNo Enable Remote Syslog NoYes Remote Syslog Facility 0–23 Severity of events to log 0–7 Specify how and whether or not audit logs are created. Notes: • Enable Audit determines if events are recorded in the secure audit log andremote syslog. No is the factory defa...
Page 72 - Settings menu; General Settings menu
Settings menu General Settings menu Use To Display Language EnglishFrancaisDeutschItalianoEspanolDanskNorskNederlandsSvenskaPortugueseSuomiRussianPolskiGreekMagyarTurkceCeskySimplified ChineseTraditional ChineseKoreanJapanese Set the language of the text appearing on the printer display. Note: Not a...
Page 75 - Print Settings; Setup menu
Use To Press Sleep Button Do nothingSleepHibernate Determine how the printer, while in idle state, reacts to a shortpress of the Sleep button. Note: Sleep is the factory default setting. Press and Hold Sleep Button Do nothingSleepHibernate Determine how the printer, while in idle state, reacts to a ...
Page 77 - Finishing menu
Finishing menu Use To Sides (Duplex) 1 sided2 sided Specify whether two ‑ sided (duplex) printing is set as the default for all print jobs. Notes: • “1 sided” is the factory default setting. • You can set two ‑ sided printing from the software program. For Windows users: 1 Click File > Print . 2 ...
Page 78 - Quality menu
Use To Paper Saver Off2 ‑ Up 3 ‑ Up 4 ‑ Up 6 ‑ Up 9 ‑ Up 12 ‑ Up 16 ‑ Up Print multiple ‑ page images on one side of a paper. Notes: • Off is the factory default setting. • The number selected is the number of page images that will print per side. Paper Saver Ordering HorizontalReverse HorizontalRev...
Page 79 - Utilities menu
Use To Enhance Fine Lines OnOff Enable a print mode preferable for files such as architectural drawings, maps, electricalcircuit diagrams, and flow charts. Notes: • Off is the factory default setting. • You can set this option from the printer software. For Windows users, click File > Print , and...
Page 83 - Saving money and the environment; Saving paper and toner; Conserving supplies; Use both sides of the paper; Place multiple pages on one sheet of paper; Saving energy; Using Eco
Saving money and the environment Saving paper and toner Studies show that as much as 80% of the carbon footprint of a printer is related to paper usage. You can significantlyreduce your carbon footprint by using recycled paper and the following printing suggestions, such as printing on bothsides of ...
Page 84 - Adjusting Sleep mode; Using Hibernate mode
Use To Off Use the factory default settings for all settings associated with Eco ‑ Mode. This setting supports the performance specifications for your printer. Energy Reduce energy use, especially when the printer is idle. • Printer engine motors do not start until a document is ready to print. You ...
Page 85 - Setting Hibernate Timeout
Notes: • View the printer IP address in the TCP/IP section in the Network/Ports menu. The IP address appears as foursets of numbers separated by periods, such as 123.123.123.123. • If your are using a proxy server, then temporarily disable it to load the Web page correctly. 2 Click Settings > Gen...
Page 86 - Using Schedule Power Modes; Recycling; Recycling Dell products
Using the printer settings on the computer Depending on your operating system, access the Hibernate Timeout menu using the Local Printer Settings Utilityor Print Settings. Using Schedule Power Modes Schedule Power Modes lets the user schedule when the printer goes into a reduced power state or into ...
Page 87 - Securing the printer; Using the security lock feature
Securing the printer Using the security lock feature The printer is equipped with a security lock feature. Attach a security lock compatible with most laptop computers inthe location shown to secure the printer in place. Statement of Volatility Your printer contains various types of memory that can ...
Page 88 - Finding printer security information
Erasing volatile memory The volatile memory (RAM) installed in your printer requires a power source to retain information. To erase the buffereddata, simply turn off the printer. Erasing non ‑ volatile memory 1 Turn off the printer. 2 From the printer control panel, hold down and the right arrow but...
Page 89 - Maintaining the printer; Cleaning the printer
Maintaining the printer Periodically, certain tasks are required to maintain the optimum performance of your printer. Warning—Potential Damage: Failure to replace parts and supplies when directed, may cause damage to your printer or prevent the printer from performing optimally. Cleaning the printer...
Page 90 - Ordering supplies using the Supplies Ordering Utility; Storing supplies
Estimated number of remaining pages The estimated number of remaining pages is based on the recent printing history of the printer. Its accuracy mayvary significantly and is dependent on many factors, such as actual document content, print quality settings, andother printer settings. The accuracy of...
Page 91 - Replacing supplies; Replacing the toner cartridge
Do not expose supplies to: • Direct sunlight • Temperatures above 35°C (95°F) • High humidity above 80% • Salty air • Corrosive gases • Heavy dust Replacing supplies Replacing the toner cartridge 1 Press the button on the right side of the printer, and then open the front door. 2 Pull the toner cart...
Page 93 - Replacing the imaging unit
Replacing the imaging unit 1 Press the button on the right side of the printer, and then open the front door. 2 Pull the toner cartridge out using the handle. 3 Lift the blue handle, and then pull the imaging unit out of the printer. Maintaining the printer 93
Page 95 - Moving the printer; Before moving the printer
7 Insert the toner cartridge into the printer by aligning the side rails of the cartridge with the arrows on the side railsinside the printer. 8 Close the front door. Moving the printer Before moving the printer CAUTION—POTENTIAL INJURY: Before moving the printer, follow these guidelines to avoid pe...
Page 96 - Moving the printer to another location; Shipping the printer
• Make sure your fingers are not under the printer when you set it down. • Before setting up the printer, make sure there is adequate clearance around it. Use only the power cord provided with this product or the manufacturer's authorized replacement. Warning—Potential Damage: Damage to the printer ...
Page 97 - Managing the printer; Managing printer messages; Disabling Status Messenger; Accessing Status Monitor Center
Managing the printer Managing printer messages Use the Status Messenger application to view error messages requiring your intervention on your printer. When thereis an error, a bubble appears telling you what the error is, and points you to the appropriate recovery information. If you installed Stat...
Page 98 - Viewing reports
• If you are using a proxy server, then temporarily disable it to load the Web page correctly. 2 Press Enter to open the Web page of your printer. 3 Click Applications > Remote Operator Panel > Launch VNC Applet . Note: VNC Applet requires a Java plug ‑ in to launch. 4 Click Click here to cont...
Page 99 - Modifying confidential print settings
Notification Description Off The normal printer behavior for all supplies occurs. E ‑ mail Only The printer generates an e-mail when the supply condition is reached. The status of thesupply will appear on the menus page and status page. Warning The printer displays the warning message and generates ...
Page 102 - Clearing jams; Avoiding jams; Load paper properly
Clearing jams Carefully select paper and specialty media and load it properly to avoid most jams. If jams do occur, then follow thesteps outlined in this chapter. Note: Jam recovery is set to Auto by default. The printer reprints jammed pages unless the memory required to hold the pages is needed fo...
Page 103 - Use recommended paper; Understanding jam messages and locations
Use recommended paper • Use only recommended paper or specialty media. • Do not load wrinkled, creased, damp, bent, or curled paper. • Flex, fan, and straighten paper before loading it. • Do not use paper that has been cut or trimmed by hand. • Do not mix paper sizes, weights, or types in the same t...
Page 113 - Troubleshooting; Understanding the printer messages
Troubleshooting Understanding the printer messages Bin full. Remove paper. Remove the paper stack from the standard bin. Cannot collate large document [37] Try one or more of the following: • From the printer control panel, press to print the portion of the job already stored and begin collating the...
Page 115 - Close front door
Close front door Close the front door of the printer. Flash memory full [52] Try one or more of the following: • From the printer control panel, press to clear the message and continue printing. • Delete fonts, macros, and other data stored in the flash memory. From the printer control panel, naviga...
Page 119 - Non
Network error, standard port [54] Try one or more of the following: • From the printer control panel, press to clear the message and continue printing. • Unplug the router, then wait for 30 seconds, and then plug it back again. • Turn off the printer, then wait for about 10 seconds, and then turn th...
Page 121 - Solving printer problems
Reinstall missing or unresponsive imaging unit [31.xy] Try one or more of the following: • Check if the imaging unit is missing. If missing, install the imaging unit. For information on installing the imaging unit, see the “Replacing supplies” section of the User’s Guide . • If the imaging unit is i...
Page 122 - Basic printer problems; The printer is not responding
Basic printer problems The printer is not responding Action Yes No Step 1 Make sure the printer is turned on. Is the printer turned on? Go to step 2. Turn on the printer. Step 2 Check if the printer is in Sleep mode or Hibernate mode. Is the printer in Sleep mode or Hibernate mode? Press the Sleep b...
Page 123 - Printer display is blank
Action Yes No Step 8 Check if one end of the printer cable is plugged into a port on the printerand the other to the computer, print server, option, or other networkdevice. Is the printer cable securely attached to the printer and the computer,print server, option, or other network device? Go to ste...
Page 124 - Option problems; Cannot detect internal option
Option problems Cannot detect internal option Action Yes No Step 1 Turn off the printer, then wait for about 10 seconds, and then turn theprinter back on. Does the internal option operate correctly? The problem is solved. Go to step 2. Step 2 Check if the internal option is properly installed in the...
Page 125 - Tray problems
Tray problems Action Yes No Step 1 a Open the tray and do one or more of the following: • Check for paper jams or misfeeds. • Check if the paper size indicators on the paper guides are alignedwith the paper size indicators on the tray. • If you are printing on custom ‑ size paper, then make sure tha...
Page 126 - Paper feed problems; Paper frequently jams; Paper jam message remains after jam is cleared
Paper feed problems Paper frequently jams Action Yes No Step 1 a Pull out the tray, and then do one or more of the following: • Make sure paper lies flat in the tray. • Check if the paper size indicators on the paper guides are alignedwith the paper size indicators on the tray. • Check if the paper ...
Page 127 - Jammed pages are not reprinted; Solving print problems; Printing problems; Print jobs do not print
Jammed pages are not reprinted Action Yes No a Turn on jam recovery. 1 From the printer control panel, navigate to: > Settings > > General Settings > > Print Recovery > > Jam Recovery > 2 Press the arrow buttons until On or Auto appears, and then press . b Resend the pages th...
Page 128 - Printing slows down
Action Yes No Step 4 a Check if the ports (USB, serial, or Ethernet) are working and if thecables are securely connected to the computer and the printer. Note: For more information, see the setup documentation that came with the printer. b Resend the print job. Do the jobs print? The problem is solv...
Page 129 - Print job takes longer than expected; Job prints from the wrong tray or on the wrong paper
Print job takes longer than expected Action Yes No Step 1 Reduce the number and size of fonts, the number and complexity ofimages, and the number of pages in the print job, and then resend theprint job. Does the print job still take long? Go to step 2. The problem is solved. Step 2 Disable the Page ...
Page 130 - Incorrect characters print; Tray linking does not work
Action Yes No Step 3 a Depending on your operating system, open Printing Preferences orthe Print dialog, and then specify the paper type. b Resend the print job. Did the job print from the correct tray or on the correct paper? The problem is solved. Go to step 4. Step 4 a Check if the trays are not ...
Page 131 - Large jobs do not collate; Unexpected page breaks occur
Large jobs do not collate Action Yes No Step 1 a From the Finishing menu on the printer control panel, set Collate to(1,2,3) (1,2,3). b Resend the print job. Did the job print and collate correctly? The problem is solved. Go to step 2. Step 2 a From the printer software, set Collate to (1,2,3) (1,2,...
Page 132 - Print quality problems; Characters have jagged or uneven edges; Printer is printing blank pages
Print quality problems Characters have jagged or uneven edges Action Yes No Step 1 a Print a font sample list to check if the fonts you are using are supportedby the printer. 1 From the printer control panel, navigate to: > Reports > > Print Fonts > 2 Press the arrow buttons until PCL Fo...
Page 133 - Clipped pages or images
Action Yes No Step 1 a Check if there is packing material left on the imaging unit. 1 Remove the toner cartridge, and then the imaging unit. 2 Check if the packing material is properly removed from the imagingunit. Warning—Potential Damage: Do not expose the imaging unit to direct light for more tha...
Page 134 - Shadow images appear on prints
Action Yes No Step 1 a Move the width and length guides in the tray to the correct positionsfor the paper loaded. b Resend the print job. Is the page or image clipped? Go to step 2. The problem is solved. Step 2 From the printer control panel, set the paper size and type in the Papermenu to match th...
Page 135 - Gray background on prints; ABCDE
Action Yes No Step 1 Load paper with the correct paper type and weight in the tray. Is paper with the correct paper type and weight loaded in the tray? Go to step 2. Load paper with thecorrect paper type andweight in the tray. Step 2 From the printer control panel, set the paper type and weight in t...
Page 136 - Incorrect margins on prints; A B C D
Action Yes No Step 2 Reinstall the imaging unit and the toner cartridge. a Remove the toner cartridge. b Remove the imaging unit. Warning—Potential Damage: Do not expose the imaging unit to direct light for more than 10 minutes. Extended exposure to lightcan cause print quality problems. c Install t...
Page 137 - Paper curl
Action Yes No Step 3 a Depending on your operating system, specify the paper size fromPrinting Preferences or from the Print dialog. b Resend the print job. Are the margins correct? The problem is solved. Contact technical support . Paper curl Action Yes No Step 1 Move the width and length guides in...
Page 138 - Print irregularities
Print irregularities ) ) ABCDE ABCDE ABCDE Leading edge Trailing edge Action Yes No Step 1 a Move the width and length guides in the tray to the correct positionsfor the size of the paper loaded in the tray. b Resend the print job. Do print irregularities still appear? Go to step 2. The problem is s...
Page 139 - Repeating defects appear on prints; Print is too dark
Repeating defects appear on prints Action Yes No Step 1 Measure the distance between the defects. Check for a distance between the defects that equals: • 97 mm (3.82 in.) • 47 mm (1.85 in.) • 38 mm (1.5 in.) Is the distance between defects equal to one of the listed measurements? Go to step 2. 1 Che...
Page 141 - Print is too light
Print is too light Action Yes No Step 1 a From the Quality menu on the printer control panel, increase the tonerdarkness. Note: 8 is the factory default setting. b Resend the print job. Is the print still too light? Go to step 2. The problem is solved. Step 2 From the printer control panel, set the ...
Page 142 - Skewed print
Action Yes No Step 6 a Redistribute the toner in the imaging unit. 1 Remove the toner cartridge, and then the imaging unit. 2 Firmly shake the imaging unit. Warning—Potential Damage: Do not expose the imaging unit to direct light for more than 10 minutes. Extended exposure tolight may cause print qu...
Page 143 - Printer is printing solid black pages; Transparency print quality is poor
Printer is printing solid black pages Action Yes No Step 1 a Reinstall the imaging unit. 1 Remove the toner cartridge, and then the imaging unit. Warning—Potential Damage: Do not expose the imaging unit to direct light for more than 10 minutes. Extended exposure tolight may cause print quality probl...
Page 144 - Streaked horizontal lines appear on prints
Streaked horizontal lines appear on prints ABCDEABCDEABCDE Action Yes No Step 1 a Depending on your operating system, specify the tray or feeder fromPrinting Preferences or the Print dialog. b Resend the print job. Do streaked horizontal lines appear on prints? Go to step 2. The problem is solved. S...
Page 145 - Streaked vertical lines appear on prints
Streaked vertical lines appear on prints ABCDEABCDEABCDE Leading edge Trailing edge Action Yes No Step 1 a Depending on your operating system, specify the paper type, texture,and weight from Printing Preferences or from the Print dialog. b Resend the print job. Do streaked vertical lines appear on p...
Page 146 - Horizontal voids appear on prints
Action Yes No Step 5 Replace the imaging unit, and then resend the print job. Do streaked vertical lines appear on prints? Contact technical support or your Dell printer dealer. The problem is solved. Horizontal voids appear on prints Leading edge Trailing edge Action Yes No Step 1 a Make sure your ...
Page 147 - Vertical voids appear on prints
Vertical voids appear on prints Leading edge Trailing edge Action Yes No Step 1 a Make sure your software program is using a correct fill pattern. b Resend the print job. Do vertical voids appear on prints? Go to step 2. The problem is solved. Step 2 a From the printer control panel, set the paper t...
Page 148 - ABC; Uneven print density
Toner specks appear on prints Action Yes No Replace the imaging unit, and then resend the print job. Do toner specks appear on prints? Contact technical support . The problem is solved. Toner rubs off Leading edge Trailing edge ABC DEF Action Yes No Step 1 From the Paper menu on the printer control ...
Page 149 - Embedded Web Server does not open
Embedded Web Server does not open Action Yes No Step 1 a Turn on the printer. b Open a Web browser, and then type the printer IP address. c Press Enter . Does the Embedded Web Server open? The problem is solved. Go to step 2. Step 2 Make sure the printer IP address is correct. a View the printer IP ...
Page 150 - Contacting technical support
Action Yes No Step 5 Temporarily disable the Web proxy servers. Proxy servers may block or restrict you from accessing certain Websites including the Embedded Web Server. Does the Embedded Web Server open? The problem is solved. Contact your system support person. Contacting technical support When y...
Page 151 - Appendix; Dell Technical Support Policy
Appendix Dell Technical Support Policy Technician ‑ assisted technical support requires the cooperation and participation of the customer in the troubleshooting process and provides for restoration of the Operating System, application software and hardware drivers to the originaldefault configuratio...
Page 152 - Warranty and Return Policy
Warranty and Return Policy Dell Inc. (“Dell”) manufactures its hardware products from parts and components that are new or equivalent to newin accordance with industry ‑ standard practices. For information about the Dell warranty for your printer, refer to the Product Information Guide . Appendix 15...
Page 153 - Index
Index A accessing Status Monitor Center 97accessing the controller board 14Active NIC menu 63adjusting Sleep mode 84adjusting toner darkness 50AppleTalk menu 67assigning custom paper types 41attaching cables 20available internal options 14avoiding jams 46avoiding paper jams 102 B Bin full. Remove pa...


 Dell B1260dn User Manual
 Dell B1265dfw User Manual
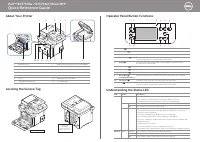 Dell B2375dfw User Manual
 Dell B2375dnf User Manual
 Dell B3460dn Installation Manual
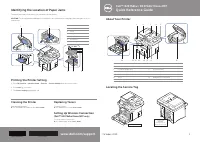 Dell B3465DNF User Manual
 Dell B5460DN Manual
 Dell B5465dnf Troubleshooting Guide