Page 2 - Contacting Dell
1 Dell™ B2375dfw/ B2375dnf Mono MFP User’s Guide Click the links to the left for information on the features, options, and operation of your printer. For information on other documentation included with your printer, see "Finding Information". To order replacement toner cartridges or supplie...
Page 5 - Finding Information
- 4 - Finding Information What Are You Looking For? Find It Here • Drivers for my printer • My User’s Guide Drivers and Documentation CD You can use the Drivers and Documentation CD to install, uninstall, or reinstall drivers and utilities or access your User’s Guide. For details, see "Software&...
Page 7 - Contents
Contents Dell™ B2375dfw/ B2375dnf Mono MFP User’s Guide . . . . . . . . . . . . . . . 1 Contacting Dell . . . . . . . . . . . . . . . . . . . . . . . . . . . . . . . . . . . . . . . . . . . . . . . . 1 Finding Information . . . . . . . . . . . . . . . . . . . . . . . . . . . . . . . . . . . . . . . ...
Page 19 - About
About Unpacking Your Printer About Your Printer Introducing the Screen Internal Fonts Setting up the hardware Installing the Toner Cartridge Loading Paper Making Connections Powering on the Printer Using USB memory device Managing the USB Memory Setting up Address Book Using Favorite Menu (Administr...
Page 20 - Unpacking Your Printer
- 19 - Unpacking Your Printer 1 Select a location for your printer. CAUTION: The printer requires at least two people to lift it safely. • Leave enough room to open the printer tray, covers, doors, and options. It is also important to allow enough space around the printer for proper ventilation. • P...
Page 22 - Front View
About Your Printer These are the main components of your printer. The following illustrations show the standard Dell B2375dfw Mono MFP or Dell B2375dnf Mono MFP and an optional tray 2 attached: Front View DADF (Duplex Automatic document width document input tray Document Feeder) guides operator pane...
Page 23 - Rear View
Rear View LINE EXT EDI OUTPUT 5V 5V output port for IEEE 1284 parallel connectorab extension telephone socket (EXT) a telephone line socket (Line) power switch Network port EDI port USB port power receptacle rear door a If you want to connect the extension phone or answering machine, see "Making...
Page 24 - Operator Panel Button Functions
Operator Panel Button Functions 1 3 2 6 5 7 8 11 4 9 10 Press: To: 1 Home ( ) Go to home screen. 2 Log In/Out ( ) You can Log in or log out. 3 Job Status ( ) Job status shows the jobs currently running and in queue. 4 Info ( ) Gives detailed information about product feature guide machine’s info., r...
Page 26 - Introducing the Screen; Home screen mode
Introducing the Screen Home screen mode The home screen on the control panel allows user-friendly operation of the machine. Once you press the home button( ) on the panel, it shows the home screen. • Scan to Email : You can send a scanned image through your email account. see "Scan to Email"...
Page 29 - All Applications screen mode
All Applications screen mode Press the All Applicatons ( ) from the home screen, it shows the applications screen. • USB : You can connect to USB. • Scan to Fax Server : You can save the scanned image via a Fax Server. • Scan to Network Folder : You can save the scanned image onto a network folder. ...
Page 30 - Editing the Home Screen
Editing the Home Screen You can edit the applictions on the home screen using Edit Mode and favorite function. Edit Mode Touch and hold the home display area (excluding the icon) until Edit Mode appears. NOTE: You need to Log in to use this function. • Add Apps : You can add applications. Press the ...
Page 32 - User Profile; Log In
User Profile Administrator can register 20 users. General user can register himself. Create ID 1 Press My Settings Machine Setup User Profile Add ( ) button from the home screen. 2 Input ID , Password , Confirm Password you want. 3 Press Check ( ) from the screen. Delete ID You can delete your ID on...
Page 33 - Setting the Job Management; Internal Fonts; Printing the PCL Font list
Setting the Job Management 1 Press My Settings Machine Setup Job Management from the home screen.. 2 Set each option as you want. • Stored Print Job : Print jobs currently stored in the RAM disk. • Secure Receive Print : Print secure received jobs currently stored in the RAM disk. Press the home ico...
Page 34 - Setting up the hardware
1 Setting up the hardware This section shows the steps to set up the hardware which is explained in the Placemat. Make sure you read the Placemat and complete the following steps: Select a stable location. Select a level, stable place with adequate space for air circulation. Allow extra space to ope...
Page 35 - Installing the Toner Cartridge
5 Load paper. See "Loading Paper". 6 Make sure that all the cables are connected to the printer. 7 Turn the printer on. NOTE: When you move the printer, do not tilt or turn it upside down. Otherwise, the inside of the printer may be contaminated by toner, which can cause damage to the printe...
Page 38 - Loading Paper
Loading Paper Load up to 250 sheets of plain paper (80 g/m 2 , 20lb bond) in the paper tray. NOTE: Set the paper type and size after loading paper into the paper tray. See "Setting the Paper Type" and "Setting the Paper Size" for the paper used in copying and faxing, or " Paper T...
Page 42 - Making Connections; Connecting the Telephone Line
Making Connections Connecting the Telephone Line RJ11 telephone line socket (Line) To the wall jack 1 Plug one end of a telephone line cord into the RJ11 telephone line socket (FAX) and the other end into an active wall jack. To connect a telephone and/or answering machine to your printer, remove th...
Page 45 - Connecting the Printer Cable
Connecting the Printer Cable Connecting the Printer Locally Local printer refers to a printer connected to your computer using a USB cable. If your printer is attached to a network instead of your computer, skip this step and go on to "Connecting the Printer to the Network". NOTE: USB cables...
Page 47 - Powering on the Printer
Powering on the Printer CAUTION: The fusing area at the rear part of the inside of your printer becomes hot once the printer is powered on. CAUTION: Be careful not to be burned when you access this area. CAUTION: Do not disassemble the printer when it is powered on. If you do, it may give you an ele...
Page 48 - Setting fax setup boot sequence; Using USB memory device; About USB Memory
Setting fax setup boot sequence 1 Set the language. See "Changing the Display Language (Administrator only)". 2 Select the country. See "Selecting Country (Administrator only)". 3 Set the date and time. See "Setting the Time and Date (Administrator only)". 4 When fax setup co...
Page 49 - Direct USB
1 Insert a USB memory key into the USB memory port on the front of your printer. CAUTION: Do not remove the USB memory device while the machine is in operation or writing to or reading from USB memory. The machine warranty does not cover damage caused by user’s misuse. CAUTION: If your USB memory de...
Page 50 - Scan to USB
Scan to USB 1 Insert a USB memory device into the USB memory port on your machine. 2 Load the document(s) face up with top edge in first into the DADF. OR Place a single document face down on the document glass. For details about loading a document, see "Loading an Original Document". 3 Pres...
Page 51 - Changing the Scan Feature Settings
Changing the Scan Feature Settings The following table shows the options you can select. Original Type Original Size Resolution Color Format Duplex Text, Text & Photo, Photo DADF : Letter, A4, A5, JIS B5,Legal, Folio, Oficio, Executive Platten : Letter, A4, A5, JIS B5, Executive, Statement 100, ...
Page 52 - Managing the USB Memory; Deleting an Image File; Printing from a USB memory device
Managing the USB Memory You can delete image files stored in the USB memory. Deleting an Image File To delete an image file that you scanned and saved on your USB memory stick. 1 Insert the USB memory key into the USB memory port on your printer. NOTE: Insert the USB memory key as soon as the pop-up...
Page 53 - Viewing the USB Memory Status
1 Insert the USB memory key into the USB memory port on your printer. NOTE: Insert the USB memory key as soon as the pop-up window appears. OR Press All Applicatons ( ) USB from the home screen. 2 Press Print From USB . 3 Press the up/down arrows to select the folder or file you want. 4 Select the n...
Page 54 - Setting up Address Book; Storing Individual address
Export (Administrator only) 1 Insert the USB memory device into the USB memory port on your machine. NOTE: Insert the USB memory key as soon as the pop-up window appears. OR Press All Applicatons ( ) USB from the home screen. 2 Press Export . 3 Select Setup Data , Address Book and press OK . 4 Selec...
Page 57 - Printing Address Book; Using Favorite Menu; Creating Favorite Menu
4 Setting the option you want and click the Import button. • Decryption – No Decryption : Imports non-decrypted address list. – No Decryption without confidential : Imports non-decrypted address list without confidential. – Decryption : Imports decrypted address list. Printing Address Book You can c...
Page 58 - Email Setup; Setting up the Email
Email Setup (Administrator only) To use email features such as Scan to Email and Fax Forward to email addresses, you first need to configure the SMTP server settings under network settings. See "Network setup (Administrator only)" for network parameters. Setting up the Email 1 Press My Setti...
Page 59 - Menu Overview
Menu Overview Dell™ B2375dfw/ B2375dnf Mono MFP Menu Functions Printing the Printer Setting and Op-panel Menu Setting Access Google Drive Scan to SharePoint Online My Files My Forms My Calendar Machine Setup - 58
Page 62 - Access Google Drive
Printing the Printer Setting and Op-panel Menu Setting NOTE: This will be helpful for the users to maneuver through the op-panel setting and tree in changing the defaults. Printing the Printer Setting 1 Press My Settings Machine Setup Reports Printer Settings from the home screen. 2 Press Start ( ) ...
Page 64 - Scan to SharePoint Online; Scan to SharePoint® Online
Scan to SharePoint Online You can use Scan to SharePoint Online in the machine. You should be registered to the Microsoft office 365 account to use this function. Scan to SharePoint Online follow Microsoft Log in policy. 1 Press Scan to SharePoint Online from the home screen. OR Press All Applicaton...
Page 65 - My Files; Creating a My Files
My Files This feature allows you to use the device shared folder as a My Files . The advantage of this feature is that you can conveniently use the shared folder through your computer’s window. Creating a My Files 1 Open the Windows Explore window from the computer. 2 Enter the printer’s \\[ ip addr...
Page 66 - My Forms; Scanning a Form
My Forms This feature allows you to use scan to My Files , Network Folder , FTP and print from My Files , Network location( HTTP , HTTPS , Network Folder , FTP ) and also manage My Files . Scanning a Form 1 Load the document(s) face up with top edge in first into the DADF. OR Place a single document...
Page 68 - My Calendar
My Calendar You should be registered to the Google Calendar TM account to use this function. My Calendar follow Google Log in policy. 1 Press My Calendar from the home screen. OR Press All Applicatons ( ) My Calendar from the home screen. 2 Enter Email and Password , press the Sign in from the scree...
Page 69 - Machine Setup; Setting the Machine ID (Administrator only)
Machine Setup Setting the Machine ID (Administrator only) You can set the machine ID and fax number which will be printed at the top of each page. If you have installed the fax multi-line kit, you need to select a line first, follow these steps: 1 Press My Settings Machine Setup Initial Setup Machin...
Page 74 - Setting the Security (Administrator only)
Setting the Security (Administrator only) Authentication This feature allows you to choose the authentication method for user authentication. 1 Press My Settings Machine Setup Security Authentication from the home screen. 2 Select the Mode . • Device Mode : Activate device authentication. Device aut...
Page 75 - Setting the Altitude Adjustment (Administrator only)
Setting the Altitude Adjustment (Administrator only) You can choose the altitude of the place where your machine is located. The print quality is affected by atmospheric pressure, which is determined by the height of the machine above sea level. Therefore, it is important to set the right altitude. ...
Page 76 - Checking the Firmware Version (Administrator only); Reports
Checking the Firmware Version (Administrator only) You can check the firmware version used in the machine. 1 Press My Settings Machine Setup Initial Setup Firmware Version from the home screen. 2 You can check the firmware version used in the machine. Reports The following reports are available: Pri...
Page 79 - Software
Software Software Overview Installing Software in Microsoft ® Windows ® Operating System Accessing management tools Firmware Update Utility Using the Dell Supplies Ordering Utility Using the Dell Printer Manager Using Dell Printer Status Using Wireless Setup Utility Uninstalling Software - 78
Page 80 - Software Overview
Software Overview After setting up your printer and connecting it to your computer, you must install the drivers and utilities from the "Installing Software in Microsoft ® Windows ® Operating System" CD included with your printer. If you purchased a Dell TM computer and your printer at the s...
Page 82 - Installing Dell Software for Local Printing
Installing Dell Software for Local Printing A local printer is a printer attached to your computer using a USB cable. If your printer is attached to a network instead of your computer, skip this step and go on to "Installing Dell Software for Network Printing" or attached to a network instea...
Page 85 - Using the Dell Supplies Ordering Utility
1 Using the Dell Supplies Ordering Utility To order replacement toner cartridges or supplies from Dell: NOTE: Availabe for Windows or Mac OS users only. Double-click the Dell Supplies Ordering Utility icon on your desktop. OR From the Start menu, select Programs Dell Printers Dell B2375dfw Mono MFP ...
Page 88 - Advanced settings user interface overview
Advanced settings user interface overview The advanced user interface is intended to be used by the person responsible for managing the network and machines. NOTE: Some menus may not appear in the display depending on options or models. If so, it is not applicable to your machine. Device Settings Yo...
Page 89 - Using Dell Printer Status; Dell Printer Status overview
Using Dell Printer Status The Dell Printer Status is a program that monitors and informs you of the machine status. • The Dell Printer Status window and its contents shown in this user’s guide may differ depending on the machine or operating system in use. • Available for Windows OS users only Dell ...
Page 91 - Using Wireless Setup Utility
Using Wireless Setup Utility This program is for the wireless configuration. NOTE: You can only use SetIP when your printer is connected to a network. 1 Connect the USB cable to your machine. 2 Print the Network Configuration page of the printer to see the current network configuration. 3 From the S...
Page 92 - Uninstalling Software
1 Uninstalling Software You should remove the printer drivers if you are upgrading the software or if your driver installation fails. You can remove the software using the "Installing Software in Microsoft ® Windows ® Operating System" CD or the Windows uninstall option. NOTE: Close all prog...
Page 94 - What is Embedded Web Service; Required web browser
Embedded Web Service This chapter gives you step-by-step instructions for setting up the network environment through Embedded Web Service . Enables you to monitor the status of your network printer without leaving your desk. What is Embedded Web Service If you have connected your machine to a networ...
Page 95 - Information tab
Logging into Embedded Web Service Before configuring options in Embedded Web Service , you need to Log in as an administrator. You can still use Embedded Web Service without Logging in but you won’t have access to Settings tab and Security tab. 1 Click Login on the upper right of the Embedded Web Se...
Page 96 - Address Book tab
Usage Counters You can check the billing information and usage counter of the machine. • Billing Information : Shows the billing information such as machine’s serial number. • Counters : Shows the usage counter information by job types. Current Settings Shows the current settings of the machine and ...
Page 99 - Settings tab
Deleting a group NOTE: You need to Log in as an administrator to manage the address book. See "Logging into Embedded Web Service" 1 From the Embedded Web Service , select the Address Book tab Groups . 2 Check the checkbox(es) of the group(s) you want to delete from the list and click the Del...
Page 105 - Network Settings tab
Email & Fax You can settings for Scan to Email and Fax. – Change Default You can set scan to network folder related settings such as Email Settings-From: , Email Settings-Subject: , Resolution , Color , Format , Duplex , Original Size , Original Type , Darkness , Qualty . Email Notification When...
Page 117 - Security tab
My Files NOTE: All files stored in My Files are not encrypted and can be accessed by all users. • Change Default – Scan to My Files : You can set Resolution , Color , Format , Duplex , Original Size , Original Type and Overwrite . – Print from My Files : You can set Number of Copies , Auto Fit and D...
Page 129 - Maintenance tab
Maintenance tab This tab allows you to maintain your machine by upgrading firmware, managing applications, and setting contact information for sending emails. You can also connect to the Dell website or download manuals and drivers by selecting the Link menu. Firmware Upgrade You can check the firmw...
Page 131 - Paper Handling
Paper Handling Print Media Guidelines Storing Print Media Identifying Print Media Sources and Specifications Selecting an Output Location Loading Print Media in the Paper Tray Using the MPF (Multi purpose feeder) Setting the Paper Size Setting the Paper Type Setting the Paper Margin Setting the Pape...
Page 132 - Print Media Guidelines; Paper
Print Media Guidelines Print media is paper, card stock, transparencies, labels, and envelopes. Your printer provides high quality printing on a variety of print media. Selecting the appropriate print media for your printer helps you to avoid printing problems. This chapter provides information on h...
Page 136 - Transparencies; Envelopes
Transparencies Try a sample of any transparencies you are considering using with the printer before buying large quantities: • Use transparencies designed specifically for laser printers. Transparencies must be able to withstand temperatures of 180°C (356°F) without melting, discoloring, offsetting ...
Page 138 - Labels; Card Stock
Labels Your printer can print on many labels designed for use with laser printers. These labels are supplied in letter size, A4 size, and legal size sheets. Label adhesives, face sheet (printable stock), and topcoats must be able to withstand temperatures of 180°C (356°F) and pressure of 25 pounds p...
Page 139 - Storing Print Media
Storing Print Media Use the following guidelines for proper print media storage. These help avoid print media feeding problems and uneven print quality: • For best results, store print media in an environment where the temperature is approximately 21°C (70°F) and the relative humidity is 40%. • Stor...
Page 143 - Selecting an Output Location
Selecting an Output Location The printer has two output locations; the output tray (face down) and the rear door (face up). Output Tray Rear Cover To use the output tray, ensure that the rear door is closed. To use the rear door, open it. NOTE: If paper coming out of the output tray has problems, su...
Page 145 - Loading Print Media in the Paper Tray
CAUTION: The fuser area inside of the rear door of your printer becomes very hot when in use. Take care when you access this area. Loading Print Media in the Paper Tray You can load approximately 250 sheets of plain paper in the tray 1 or the optional tray 2. If you purchased the optional tray 2, se...
Page 150 - Setting the Paper Tray; Setting the Tray linking
Setting the Paper Tray This feature allows you to select the tray and paper that you want to use for a printing job. Paper size and paper tray are adjusted here. Setting the Tray linking If tray 1 and tray 2 are filled with letter size paper, when tray1 is empty and this option is On , then the mach...
Page 152 - Bypass Mode; Tray Mode
Bypass Mode In this mode the printer pulls the paper from MPF first unless it is closed or empty. MPF gets the highest priority and pulls whatever media is present in the MPF. NOTE: You can use this feature in print and copy job. Tray Mode In this mode the MPF is treated as another paper tray. Inste...
Page 153 - Printing
Printing Printing a Document Opening printing preferences Printing Multiple Pages on One Sheet of the Paper Change Percentage of Your Document Printing Posters Printing Booklets Printing on Both Sides of Paper Using Watermarks Using Overlays - 152
Page 154 - Printing a Document; Canceling a Print Job
Printing a Document The following Printing Preferences window is for Notepad in Windows 7. 1 Open the document you want to print. 2 Select Print from the File menu. 3 Select your machine from the Select Printer list. Windows 7 Ensure that your printer is selected. 4 Select the printer driver that yo...
Page 155 - Opening printing preferences
Opening printing preferences • The Printing Preferences window that appears in this user’s guide may differ depending on the machine in use. • When you select an option in Printing Preferences , you may see a warning mark or . an mark means you can select that certain option but it is not recommende...
Page 156 - Basic Tab
Basic Tab The Basic tab provides options for you to adjust how the document appears on the printed page. The Layout Options section includes advanced printing options, such as Multiple Pages Per Side and Poster Printing . Property Description Orientation Orientation allows you to select the ...
Page 157 - Paper Tab
Property Description Double-Sided Printing Double-Sided Printing allows you to print on both sides of paper. For details, see "Printing on Both Sides of Paper". Paper Tab Use the following options to set the paper handling needs when you access the printer properties. Click the Paper tab t...
Page 160 - Graphic Tab
Graphic Tab Use the following graphic options to adjust the print quality for your specific printing needs. Click the Graphic tab to display the properties shown below. Property Description Quality You can select the printing resolution by choosing from Best or Normal . The higher the sett...
Page 163 - Advanced Tab
Advanced Tab Property Description Watermark You can create a background image of text to print on each page of your document. See "Using Watermarks". Overlay This feature is available only when using the PCL driver. Overlays are often used to take the place of preprinted forms ...
Page 168 - Using Help; Printing Multiple Pages on One Sheet of the Paper
Using Help Click the option you want to know on the Printing Preferences window and press F1 on your keyboard. If you want to search information via a keyword, click the Dell tab in the Printing Preferences window, and enter a keyword in the input line of the Help option. Printing Multiple Pages on ...
Page 170 - Change Percentage of Your Document
Change Percentage of Your Document You can scale your print job on a page. 1 When you change the print settings from your software application, access the printer properties. 2 From the Paper tab. 3 Enter the scaling rate in the Percentage input box. You can also click the or button. 4 Select the pa...
Page 171 - Printing Posters
Printing Posters 2 x 2 s You can print a single-page document onto 4, 9, or 16 sheets of paper, for the purpose of pasting the sheets together to form one poster-size document. 1 When you change the print settings from your software application, access the printer properties. 2 From the Basic tab, s...
Page 173 - Printing Booklets
Printing Booklets 8 9 This printer feature allows you to print your document on both sides of the paper and arranges the pages so that the paper can be folded in half after printing to produce a booklet. 1 When you change the print settings from your software application, access the printer properti...
Page 174 - Printing on Both Sides of Paper
Printing on Both Sides of Paper Your printer prints on both sides of the paper automatically. Before printing, decide on which edge you will be binding your finished document. The binding options are: • Long Edge , which is the conventional layout used in book binding. • Short Edge , which is the ty...
Page 176 - Using Watermarks; Using an Existing Watermark
Using Watermarks The Watermark option allows you to print text over an existing document. For example, you may want to have large gray letters reading “DRAFT” or “CONFIDENTIAL” printed diagonally across the first page or all pages of a document. There are several predefined watermarks that come with...
Page 178 - Using Overlays; Creating a New Page Overlay
Using Overlays What is an Overlay? An overlay is text and/or images stored in the computer hard disk drive (HDD) as a special file format that can be printed on any document. Overlays are often used to take the place of preprinted forms and letterhead paper. Rather than using preprinted letterhead, ...
Page 180 - Using a Page Overlay
5 In the Save As window, type a name of up to eight characters in the File name box. Select the destination path, if necessary. (The default is C:\FormOver ). 6 Click Save . You can see the name in the Overlay List . 7 Click OK or Yes until you complete creating. The file is not printed out; it is s...
Page 182 - Deleting a Page Overlay
1 2 3 4 5 6 Deleting a Page Overlay You can delete page overlays that are no longer used. In the printer properties window, click the Advanced tab. Click Edit... in the Overlay section. Select the overlay you want to delete from the Overlay List box. Click Delete . When a confirming message window a...
Page 183 - Copying
Copying Loading Paper for Copying Selecting the Paper Tray Preparing a Document Loading an Original Document Making Copies Using Copy and Setting Options Changing the Default Settings - 182
Page 184 - Preparing a Document
Loading Paper for Copying The instructions for loading print materials are the same whether you are printing, faxing, or copying. For further details, see "Loading Paper" for loading paper in the paper tray and "Using the MPF (Multi purpose feeder)" for loading paper in the multi pur...
Page 185 - Loading an Original Document
1 • Remove all staples and paper clips before loading documents. • Ensure that any glue, ink or correction fluid on the paper is completely dry before loading documents. • Do not load documents containing different sizes or weights of paper. • Do not load booklets, pamphlets, transparencies or docum...
Page 188 - Number of Copies
Making Copies NOTE: A computer connection is not required for copying. NOTE: Contaminating on the document glass may cause black spots on the printout. For best results, clean the document glass before use. See "Cleaning the scanner". 1 Load the document(s) face up with the top edge in first...
Page 198 - Changing the Default Settings
Changing the Default Settings The copy options, including darkness, image quality, copy size, and the number of copies, can be set to the most frequently used modes. When you copy a document, the default settings are used unless they are changed by using the operator panel. To create your own defaul...
Page 199 - Scanning
Scanning Scanning Overview Scan to Email Scan to PC/Network PC Scan to Network Folder/FTP Server Scan to Fax Server Scan to WSD Email & Fax Scanning from image editing program Scanning using the WIA driver - 198
Page 200 - Scanning Overview
Scanning Overview Scanning with your machine lets you turn pictures and text into digital files that can be stored on your computer. Then you can fax or email the files, upload them to your website, or use them to create projects that you can print. The scanning methods are scan to email, scan to co...
Page 201 - Scan to Email; Setting up an email account
Scan to Email Setting up an email account 1 Access the Embedded Web Service . See "Required web browser" 2 Select Settings Network Settings Outgoing Mail Server(SMTP) . 3 Enter the IP address in dotted decimal notation or as a host name. 4 Enter the server port number, from 1 to 65535. 5 Che...
Page 202 - Scan to PC/Network PC
6 Press Start ( ) from the screen. The printer begins scanning and then sends the Email. Scan to PC/Network PC 1 Load the document(s) face up with top edge in first into the DADF (Duplex Automatic Document Feeder). OR Place a single document face down on the document glass. For details about loading...
Page 203 - Scan to Network Folder/FTP Server; Setting up an Network Folder/FTP server
NOTE: You can use Twain driver to scan quickly in Dell Scan Manager program. Scan to Network Folder/FTP Server Setting up an Network Folder/FTP server 1 Access the Dell Printer Configuration Web Tool . See "Embedded Web Service" 2 Select Address Book Individual Add . 3 Check the box next to ...
Page 204 - Scanning and sending to Network Folder/FTP server
Scanning and sending to Network Folder/FTP server 1 Make sure that your machine is connected to a network. 2 Load the document(s) face up with top edge in first into the DADF. OR Place a single document face down on the document glass. For details about loading a document, see "Loading an Origin...
Page 205 - Scan to Fax Server
Scan to Fax Server Fax server will deliver the fax/Email data to send out the job. The Email is automatically processed by fax server and sent to the given recipient. First, the printer sends the scanned data to the fax server. Then, the fax server uses PSTN to send a fax/Email data to recipient. To...
Page 206 - Scan to WSD; Installing a WSD Printer Driver
Scan to WSD Scans the originals and saves the scanned data on a connected computer if the computer supports the WSD (Web Service for Device) feature. To use the WSD feature, you need to install the WSD printer driver on your computer. For Windows 7, you can install the WSD driver by Control Panel De...
Page 208 - Scanning from image editing program
Scanning from image editing program You can scan and import documents in the image editing software such as Adobe Photoshop, if the software is TWAIN-compliant. Follow the steps below to scan with TWAIN-compliant software: 1 Make sure that the machine is connected to your computer and powered on. 2 ...
Page 209 - Scanning using the WIA driver
Scanning using the WIA driver Your machine supports the Windows Image Acquisition (WIA) driver for scanning images. WIA is one of the standard components provided by Microsoft Windows 7 and works with digital cameras and scanners. Unlike the TWAIN driver, the WIA driver allows you to scan and easily...
Page 210 - Networking
Networking Network setup (Administrator only) Useful network programs Setting IP address Installing driver over the network IPv6 configuration Wireless network setup (Dell B2375dfw only) Using the WPS button (Dell B2375dfw Mono MFP only) Setup using Windows (Dell B2375dfw Mono MFP only) Turning the ...
Page 211 - Network setup
Network setup (Administrator only) NOTE: You can also use this feature from the Dell Printer Configuration Web Tool . Open the Web browser from your networked computer and type the IP address of your machine. When Dell Printer Configuration Web Tool opens, click Settings Network Settings . • Press M...
Page 212 - Useful network programs; Dell Printer Configuration Web Tool
Useful network programs There are several programs available to setup the network settings easily in a network environment. For the network administrator especially, managing several machines on the network is possible. NOTE: Before using the programs below, set the IP address first. Dell Printer Co...
Page 213 - Printing Across a Network; Setting IP address; IPv4 configuration using SetIP
Printing Across a Network Whether the printer is locally connected or network-connected, you need to install the Dell B2375dfw Mono MFP or Dell B2375dnf Mono MFP software on each computer that prints documents using the printer. Setting IP address First, you have to set up an IP address for network ...
Page 214 - Installing driver over the network
Installing driver over the network Configuring Network Parameters on the Operator Panel Item Requirements Network Interface • Ethernet 10/100/1000 Base-TX Wired Lan • 802.11b/g/n Wireless LAN ( Dell B2375dfw Mono MFP only ) Network Operating System • Windows® XP, Windows Server® 2003, Windows Vista®...
Page 217 - IPv6 configuration; From the control panel
• If you install the driver using the supplied software CD, V4 driver is not installed. If you want to use the V4 driver in the Desktop screen, you can download from the Dell website, www.dell.com find your product Support or downloads. • If you want to install Dell’s printer management tools, you n...
Page 219 - Wireless network setup (Dell B2375dfw only); Getting started
Wireless network setup (Dell B2375dfw only) NOTE: Make sure your machine supports wireless networking. Wireless networking may not be available depending on the model. ( Dell B2375dfw Mono MFP only) Getting started Understanding your network type Typically, you can only have one connection between y...
Page 220 - Introducing wireless set up methods
Introducing wireless set up methods You can set wireless settings either from the machine or the computer. Choose the setting method from the below table. NOTE: Some wireless network installation types may not be available depending on the model or country. Set up method Connecting method Descriptio...
Page 223 - Using the menu button
Re-connecting to a network When the wireless function is on, the machine automatically tries to re-connect to the access point (or wireless router) with the previously used wireless connection settings and address. If not successful after two minutes, the wireless connection will be stopped and Wi-F...
Page 228 - Access point via USB cable in Windows
Access point via USB cable in Windows • Items to prepare – Access point – Network-connected computer – Software CD that was provided with your machine – The machine installed with a wireless network interface – USB cable 1 Check whether the USB cable is connected to the machine. 2 Turn on your compu...
Page 233 - Ad hoc via USB cable in Windows
Ad hoc via USB cable in Windows If you do not have an access point (AP), you may still connect the machine wirelessly to your computer by setting up an ad-hoc wireless network by following the simple steps below. • Items to prepare – Network-connected computer – Software CD that was provided with yo...
Page 236 - Using a network cable
9 When the wireless network settings are completed, disconnect the USB cable between the computer and machine. Click Next . NOTE: If the Change PC Network Setting window appears, follow the steps in the window. Click Next if you are finished with the computer’s wireless network settings. If you set ...
Page 238 - Setting the Wi-Fi Direct for mobile printing; Setting up Wi-Fi Direct
Setting the Wi-Fi Direct for mobile printing Wi-Fi Direct is an easy-to-setup peer-to-peer connection method between the Wi-Fi Direct certified printer and a mobile device that provides a secure connection and better throughput than ad hoc mode. With Wi-Fi Direct, you can connect your printer to a W...
Page 239 - Setting up the mobile device
From the machine (Machines with a display screen) • Select My Settings Machine Setup Network Setup Wi-Fi Wi-Fi Direct from the touch screen. • On/Off : Select On to enable. From the network-connected computer If your printer is using a network cable or a wireless access point, you can enable and con...
Page 240 - Troubleshooting for wireless network
Troubleshooting for wireless network Problems during setup or driver installation Connecting Failure - Verify Wireless Network Name • The machine is unable to find the network name (SSID) you have selected or entered. Check the network name (SSID) on your access point and try connecting again. • You...
Page 241 - Other problems
If the computer’s network information is as shown below: • IP address: 169.254.133.42 • Subnet Mask: 255.255.0.0 Then the machine’s network information should be as below: • IP address: 169.254.133.43 • Subnet Mask: 255.255.0.0 (Use the computer’s subnet mask.) • Gateway: 169.254.133.1 Other problem...
Page 243 - Mobile Printing; AndroidTM OS
Mobile Printing The Dell B2375dfw Mono MFP and Dell B2375dnf Mono MFP support printing from a variety of mobile devices. Android™ OS • Download the Dell Mobile Print app for free from Google Play™. Easy to use and navigate, the Dell Mobile Print app enables direct printing of photos, documents, web ...
Page 244 - Setting up AirPrint
AirPrint NOTE: Only AirPrint certified machines can use the AirPrint feature. Check the box your machine came in for the AirPrint certified mark. AirPrint allows you to wirelessly print directly from an iPhone, iPad, and iPod touch running the latest version of iOS. Setting up AirPrint Bonjour(mDNS)...
Page 245 - Google Cloud PrintTM; Registering your Google account to the printer
Google Cloud Print™ Google Cloud Print™ is a service that allows you to print to a printer using your smart phone, tablet, or any other web-connected devices. Just register your Google account with the printer, and you are ready to use the Google Cloud Print™ service. You can print your document or ...
Page 246 - Printing with Google Cloud PrintTM
Printing with Google Cloud Print™ The printing procedure varies depending on the application or the device you are using. You can see the application list that supports Google Cloud Print™ service. NOTE: Make sure the printer is turned on and connected to a wired or wireless network that has access ...
Page 247 - Faxing
Faxing Setting the Printer ID Setting up the Fax System Sending a Fax Receiving a Fax Automatic Dialing Other Ways to Fax Additional Features - 246
Page 248 - Changing the Fax Setup Options
Setting the Printer ID In most countries, you are required by law to indicate your fax number on any fax you send. The printer ID, containing your telephone number and name or company name, will be printed at the top of each page sent from your printer. 1 Press My Settings Machine Setup Initial Setu...
Page 249 - Testing Fax line connection
Testing Fax line connection 1 Press My Settings Maintenance Fax Line Test from the home screen. 2 Press Check ( ) from the screen. The printer display the test result. If the fax line connection test has failed, check the telephone line cord connection or contact your telephone service provider. NOT...
Page 250 - Sending a Fax; Adjusting the Document Darkness
Sending a Fax Adjusting the Document Darkness Use the darkness setting to fax your documents lighter or darker. 1 Press Fax from the home screen. 2 Press the Setting ( ) from the screen. 3 Press the left/right arrows to select Darkness . 4 Select the darkness level(-5 ~ 5) you want. • 1 : works well...
Page 252 - Speed Dial Fax
Speed Dial Fax 1 Load the document(s) face up with top edge in first into the DADF (Duplex Automatic Document Feeder). OR Place a single document face down on the document glass. For details about loading a document, see "Loading an Original Document". 2 Press Speed Dial Fax from the home sc...
Page 256 - Receiving a Fax; About Receiving Modes; Loading Paper for Receiving Faxes; Receiving Automatically in the Ans/Fax Mode; Receiving Manually Using an Extension Telephone
Receiving a Fax About Receiving Modes NOTE: To use the Ans/Fax mode, attach an answering machine to the extension telephone socket ( ) on the back of your printer. When the memory is full, the printer can no longer receive any incoming fax. Secure free memory to resume by canceling printing received...
Page 257 - Receiving Faxes Using the DRPD Mode
The printer receives the document. Press the buttons slowly in sequence. If you still hear the fax tone from the remote printer, try pressing *9* once again. *9* is the remote receive code preset at the factory. The first and the last asterisks are fixed, but you can change the middle number to what...
Page 258 - Receiving Faxes in the Memory; Automatic Dialing; Speed Dialing
Receiving Faxes in the Memory Since your printer is a multi-tasking device, it can receive faxes while performing other tasks. If you receive a fax while you are copying, printing, or run out of paper or toner, your printer stores incoming faxes in the memory. As soon as you finish copying, printing...
Page 261 - Other Ways to Fax; Sending a fax in the computer
Other Ways to Fax Sending a fax in the computer You can send a fax from your computer without going to the machine. To send a fax from your computer, the Network PC Fax program must be installed. This program will be installed when you installed the printer driver. 1 Open the document to be sent. 2 ...
Page 262 - Fax Forward to Email addresses; Additional Features
10 Press Start ( ) from the screen. When the document is loaded on the document glass, the display asks if you want to send another page. Select Yes to add more documents or No to begin sending the fax immediately. Fax Forward to Email addresses You can set the printer to forward all outgoing or inc...
Page 263 - Using the Secure Receiving Mode (Administrator only)
Once Toll Save mode is activated, your printer stores all of the documents to be faxed into its memory and sends them at the programmed time. To turn Toll Save mode off, follow steps 1 in "Toll Save Mode (Administrator only)" and then press the left/right arrows until Off displays. Using the...
Page 264 - Using Advanced Fax Settings
Using Advanced Fax Settings Your printer has various user-selectable setting options for sending or receiving faxes. These options are preset at the factory, but you may need to change them. To find out how the options are currently set, print the System Data list. For details about printing the lis...
Page 268 - Mac
Mac Installing Software for Mac Printing Scanning Wireless network setup - 267
Page 269 - Install the printer driver
Your printer supports Mac systems with a built-in USB interface or network interface card. When you print a file from a Mac computer, you can use the PostScript driver by installing the PPD file. Installing Software for Mac The Drivers and Documentation CD that came with your printer provides you wi...
Page 273 - Wireless network setup; Access point via USB cable in Mac
Scanning You can scan documents using Image Capture . Mac OS offers Image Capture . 1 Make sure that the machine is connected to your computer and powered on. 2 Load the document(s) face up into the DADF. OR Place a single document face down on the document glass. For details about loading a documen...
Page 275 - Ad hoc via USB cable in Mac
NOTE: After completing the wireless network connection, you need to install a machine driver to print from an application. See "Installing Software for Mac" Ad hoc via USB cable in Mac If you do not have an access point (AP), you may still connect the machine wirelessly to your computer by s...
Page 278 - Linux
Linux Getting Started Installing the MFP Driver Installing driver over the network Printing a Document Printing Files Scanning a Document - 277
Page 279 - System Requirements; Installing the MFP Driver
Getting Started The supplied Drivers and Documentation CD provides you with Dell's MFP driver package for using your printer with a Linux computer. Dell's MFP driver package contains printer and scanner drivers, providing the ability to print documents and scan images. The package also delivers powe...
Page 280 - Reinstalling the MFP Driver
NOTE: You must log in as a super user (root) to install the printer software. If you are not a super user, ask your system administrator. 3 From the Dell website, download the Unified Linux Driver package to your computer. 4 Right-click the Unified Linux Driver package and extract the package. 5 Dou...
Page 281 - Install the Linux driver and add network printer
Installing driver over the network You need to download Linux software packages from the Dell website to install the printer software (http://www.dell.com find your product Support or Downloads). Install the Linux driver and add network printer 1 Make sure that the machine is connected to your netwo...
Page 282 - Using the Unified Driver Configurator; Opening Unified Driver Configurator
Using the Unified Driver Configurator The Unified Driver Configurator is a tool primarily intended for configuring machine devices. You need to install Unified Linux Driver to use Unified Driver Configurator , see "Installing the MFP Driver". After installing the MFP driver, the Unified Driv...
Page 283 - Printers Configuration
Printers Configuration Printers configuration has the two tabs; Printers and Classes . Printers Tab You can see the current system’s printer configuration by clicking on the printer icon button on the left side of the Unified Driver Configurator window. Switches to Printer configuration. Shows the s...
Page 285 - MFP Ports Configuration
MFP Ports Configuration In this window, you can view the list of available MFP ports, check the status of each port and release a port that is stalled in busy state when its owner is terminated for any reason. Switches to MPF ports configuration. Shows the port type, device connected to the port and...
Page 286 - Printing from Applications; Printing Files
Printing a Document Printing from Applications There are a lot of Linux applications that you are allowed to print from using Common UNIX Printing System (CUPS). You can print on your machine from any such application. 1 Open the document to print. 2 Open the File menu and click Page Setup ( Print S...
Page 287 - Configuring Printer Properties
Configuring Printer Properties Using the Printer Properties window provided by the Printers configuration , you can change the various properties for your machine as a printer. 1 Open the Unified Driver Configurator . If necessary, switch to Printers configuration. 2 Select your printer on the avail...
Page 288 - Scanning a Document
Scanning a Document 1 Make sure that the machine is connected to your computer and powered on. 2 Double-click the Unified Driver Configurator on your desktop. 3 Click the button to switch to Scanners Configuration . 4 Select the scanner on the list. Click your scanner. 5 Click Properties . 6 Load th...
Page 290 - Editing an image with Image Manager
Editing an image with Image Manager The Image Manager window provides you with menu commands and tools to edit your scanned image. Use these tools to edit the image. - 289
Page 291 - Unix
Unix Installing driver over the network Uninstalling the printer driver Setting up the printer Printing a Document Changing the machine settings - 290
Page 292 - Install the Unix driver and add network printer
NOTE: The commands are marked with “”, when typing the commands, do not type “”. To use the UNIX printer driver, you have to install the UNIX printer driver package first, then setup the printer. Installing driver over the network To use the UNIX printer driver, you have to install the UNIX printer ...
Page 294 - General tab
9 Check the Collate option to receive copies already sorted. 10 Check the Reverse Order option to receive copies in the reverse order. 11 Check the Make Default option to set this printer as default. 12 Click OK to add the printer. 13 Select the option you want. 14 Scan and save your scanned image. ...
Page 296 - Maintenance
Maintenance Clearing the printer NVRAM Backing up Data Cleaning Your Printer Maintaining the Toner Cartridge Replacement Parts Ordering Supplies - 295
Page 297 - Clearing the printer NVRAM
Clearing the printer NVRAM CAUTION: Before clearing the memory, make sure that all fax jobs have been completed, or you will lose those jobs. You can selectively clear information stored in your printer’s memory. 1 Press My Settings Machine Setup from the home screen. 2 Scroll to select Restore Opti...
Page 298 - Backing up Data
Backing up Data Date in the printer's memory can be accidentally erased due to power failure or storage failure. Backup helps you protect your Email/Fax List entries and the system settings by storing them as backup files on a USB memory key. NOTE: In case of the phonebook, you can save the phoneboo...
Page 299 - Cleaning Your Printer; Cleaning the Exterior
Cleaning Your Printer To maintain the print quality, follow the cleaning procedures below, each time the toner cartridge is replaced or if print quality problems occur. NOTE: Do not touch the transfer roller located under the toner cartridge when cleaning inside the printer. Oil from your fingers ma...
Page 301 - Cleaning the scanner
Cleaning the scanner Keeping the scanner and DADF glass clean ensure the highest quality copies, scans, and sent faxes. Dell recommends cleaning the scanner at the start of each day and during the day, as needed. NOTE: If there are lines present on copied or faxed documents, check your scanner and D...
Page 302 - Maintaining the Toner Cartridge; Storing the Toner Cartridge
Maintaining the Toner Cartridge Storing the Toner Cartridge Store the toner cartridge in the original packaging until you are ready to install it. Do not store the toner cartridge in: • Temperatures greater than 40°C (104°F) • An environment with extreme changes in humidity or temperature • Direct s...
Page 304 - Replacing the Toner Cartridge
Replacing the Toner Cartridge When the toner eventually runs out, only blank pages print when a print job or copy job are sent. The toner-related message saying that the toner is empty may appear on the display. In that case the incoming faxes are only saved in the memory and not printed. At this st...
Page 305 - Cleaning the Drum
CAUTION: D o n o t t o u c h t h e g r e e n u n d e r s i d e o f t h e toner cartridge. Use the handle on the cartridge to avoid touching this area. 5 Holding the toner cartridge by the handle and slowly insert the cartridge into the opening in the printer. 6 Tabs on the sides of the cartridge and...
Page 306 - Replacement Parts
Replacement Parts From time to time, you needs to replace the rollers and fuser unit to maintain top performance and to avoid print quality problems and paper feed problems resulting from worn parts. The following items should be replaced after you have printed the specified number of pages. Item Yi...
Page 307 - Ordering Supplies
Ordering Supplies You can order supplies using the Dell Toner Management System or the Dell Printer Configuration Web Tool . If your printer is connected to a network, type your printer’s IP address in your Web browser and click the toner supplies link. 1 Double-click the Dell 2375dfw Mono MFP Toner...
Page 308 - Troubleshooting
Troubleshooting Clearing Jams in the DADF Clearing Jams in the Paper Tray Clearing LCD Error Messages Solving Problems - 307
Page 312 - Clearing Jams in the Paper Tray
2 If you cannot see the paper or cannot pull the jammed paper out, open the document cover. 3 Remove the document from the feed area by carefully pulling it gently to the right. 4 Close the document cover. Then load the documents back into the DADF. Clearing Jams in the Paper Tray When a paper jam o...
Page 315 - MPF Jam
4 Pull the paper straight up and out. 5 Insert the trays back into the printer. Printing automatically resumes. MPF Jam 1 If the paper is not feeding properly, pull the paper out of the printer. 2 Open and close the front cover to resume printing. - 314
Page 316 - Fuser Area Jam
1 Fuser Area Jam NOTICE: The fuser area is hot. Take care when removing paper from the printer. Open the front cover and lightly pull the toner cartridge straight out. 2 Remove the paper by gently pulling it straight out. 3 Replace the toner cartridge and close the front cover. Printing automaticall...
Page 317 - Paper Exit Jam
1 Paper Exit Jam Open and close the front cover. The jammed paper automatically exits the printer. If the paper does not exit, go to the next step. 2 Gently pull the paper out of the output tray. 3 If you cannot see the paper in the output tray or the paper does not move when pulled, open the rear d...
Page 320 - Duplex Jam
1 Duplex Jam Duplex Jam 0 Pull the duplex unit out of the printer. 2 Remove the jammed paper from the duplex unit. If the paper does not come out with the duplex unit, remove the paper from the bottom of the printer. - 319
Page 322 - Tips for Avoiding Paper Jams; Clearing LCD Error Messages
Tips for Avoiding Paper Jams By selecting the correct paper types, most paper jams can be avoided. When a paper jam occurs, follow the steps outlined in "Clearing Jams in the Paper Tray". • Follow the procedures in "Loading Print Media in the Paper Tray". Ensure that the adjustable g...
Page 326 - Solving Problems; Paper Feeding Problems
Display message Meaning Suggested solutions Door Open The front cover or rear cover is not securely latched. Close the cover until it locks into place. Fax Memory Low The memory is almost full. No more fax data can be received. Print or remove the received fax data in the memory. Fax Memory Empty Fa...
Page 328 - Printing Problems
Printing Problems Condition Possible cause Suggested solutions The printer does not print. The printer is not receiving power. Check the power cord connections. Check the power switch and the power source. The printer is not Select Dell B2375dfw Mono MFP or Dell selected as the B2375dnf Mono MFP as ...
Page 331 - Printing Quality Problems; Bb
Printing Quality Problems The inside of the printer may be dirty or improper paper loading may reduce the print quality. See the table below to clear the problem. Condition Suggested solutions Light or faded print If a vertical white streak or faded area appears on the page: • The toner supply is lo...
Page 334 - AaBbCc
Condition Suggested solutions Page skew AaBbCc AaBbCc AaBbCc AaBbCc AaBbCc • Ensure that the paper is loaded properly. • Check the paper type and quality. See "Identifying Print Media Sources and Specifications". • Ensure that the paper or other material is loaded correctly and the guides ar...
Page 336 - Fax Problems
Fax Problems Condition Suggested solutions Receiving fax calls are not being answered by the printer • Receive Mode set to Tel mode. (manual receive mode) • The rings-to-answer setting might not be set correctly. (Under Ans/Fax mode, set the Ring to Answer to a digit greater than the Ring to Answer ...
Page 339 - Copying Problems
Condition Suggested solutions The document stops feeding in the middle of faxing. The maximum length of a page that you can load is 381 mm (15 inches). Faxing of a longer page stops at 381 mm (15 inches). Voice calls are not received by the extension telephone or answering machine that is connected ...
Page 340 - Scanning Problems
Condition Suggested solutions Fewer copies from the toner cartridge than expected prints out. • Your originals may contain pictures, solids or heavy lines. For example, your originals may be forms, newsletters, books or other documents that use more toner. • The document cover may be left open while...
Page 341 - Global address problems
Condition Suggested solutions Message appears on • There may be a copying or printing job in progress. When the your computer screen: current job is complete, try the job again. • “Device can't be set • The selected port is currently being used. Restart your to the H/W mode computer and try again. y...
Page 342 - Common Windows Problems
Condition Suggested solutions LDAP Server Not Found... It could be a wrong IP address setup or Server is not working correctly. Administrator can suspect the physical condition, device (client) configuration and server status. In case of device configuration, administrator should check IP address or...
Page 343 - Common Linux Problems
Common Linux Problems Condition Suggested solutions The printer doesn’t print. • Check if the printer driver is installed in your system. Open MFP configurator and switch to the Printers tab in Printers configuration window to look at the list of available printers. Ensure that your printer is displ...
Page 346 - Common Mac Problems
Condition Suggested solutions I encounter error “Unable to open MFP port device file!” when printing a document. Avoid changing print job parameters (via SLPR utility, for example) while a print job is in progress. Known versions of CUPS server break the print job whenever print options are changed ...
Page 349 - Installing Printer Accessories; Installing an Optional Tray 2
Installing Printer Accessories Never remove the control board while the printer is plugged in. To avoid the possibility of an electrical shock, always disconnect the power cord when installing or removing ANY internal or external printer option. The control board is sensitive to static electricity. ...
Page 353 - Specifications
Specifications General Specifications Dell technical support policy Contacting Dell Warranty and return policy - 352
Page 355 - China only; ѝ ഭ 㜭 ᭸ ḷ 䇶; Dell technical support policy
c See the rating label on the machine for the correct voltage (V), frequency (hertz) and of current (A) for your machine. China only ѝ ഭ 㜭 ᭸ ḷ 䇶 ර ਧ 㜭᭸ㅹ㓗 ި ර 㜭 㙇 ˄N:gK˅ 'HOO%GQI ᦞഭᇦḷ߶*% Dell technical support policy Technician-assisted technical support requires the cooperation and participation of...
Page 356 - Warranty and return policy
Contacting Dell You can access Dell Support at www.dell.com/support. Select your region on the WELCOME TO DELL SUPPORT page, and fill in the requested details to access help tools and information. You can contact Dell electronically using the following addresses: World Wide Web – www.dell.com/ – www...
Page 357 - Index
C Index A Address Book, use , 53 automatic redialing , 254 B booklet printing , 172 cartridge installing , 34 ordering , 306 redistributing , 301 replacing , 303 cleaning drum , 304 exterior , 298 interior , 298 scanner , 300 collation, special copy , 190, 197 component location , 21 copying canceli...


 Dell B1260dn User Manual
 Dell B1265dfw User Manual
 Dell B2360D User Manual
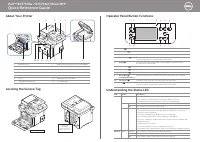 Dell B2375dfw User Manual
 Dell B3460dn Installation Manual
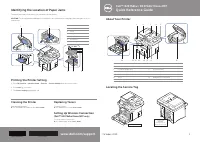 Dell B3465DNF User Manual
 Dell B5460DN Manual
 Dell B5465dnf Troubleshooting Guide
 Dell BELL81818BLK Manual