Page 2 - Thank you for selecting this Yamaha subwoofer system.; CAUTION: Read this before operating your unit.
i En Thank you for selecting this Yamaha subwoofer system. Please read the following operating precautions before use. Yamaha will not be held responsible for any damage and/or injury caused by not following the cautions below.1 To assure the finest performance, please read this manual carefully. Ke...
Page 3 - Eng; Table of contents; Getting started; Features; • This subwoofer system employs Advanced; Supplied accessories
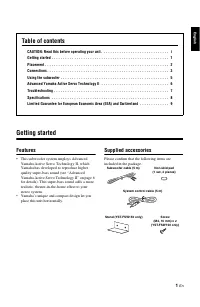
1 En Eng lish Table of contents CAUTION: Read this before operating your unit. . . . . . . . . . . . . . . . . . . . . . . . . . . . . . i Getting started . . . . . . . . . . . . . . . . . . . . . . . . . . . . . . . . . . . . . . . . . . . . . . . . . . . . 1Placement . . . . . . . . . . . . . . . ...
Page 4 - Placement
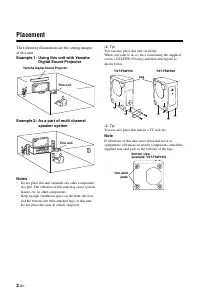
2 En Placement The following illustrations are the setting images of this unit. Example 1: Using this unit with Yamaha Digital Sound Projector Example 2: As a part of multi channel speaker system Notes • Do not place this unit on/under any other components in a pile. The vibration of this unit may c...
Page 5 - Connections; Basic connection example; jack
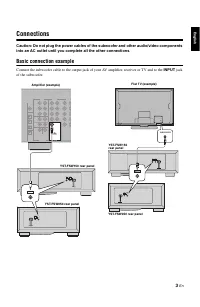
3 En Eng lish Connections Caution: Do not plug the power cables of the subwoofer and other audio/video components into an AC outlet until you complete all the other connections . Basic connection example Connect the subwoofer cable to the output jack of your AV amplifier, receiver or TV and to the I...
Page 6 - VOLTAGE SELECTOR; ON; ) of this unit can be controlled with; Notes
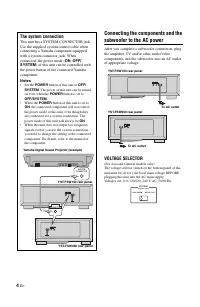
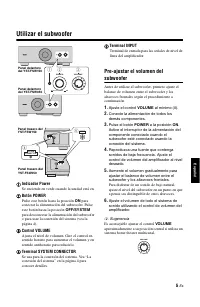
4 En Connecting the components and the subwoofer to the AC power After you complete a subwoofer connection, plug the amplifier, TV and/or other audio/video components, and the subwoofer into an AC outlet of appropriate voltage. VOLTAGE SELECTOR (For Asia and General models only)The voltage selector ...
Page 7 - Using the subwoofer; Power indicator; VOLUME control; Set the; Press the; POWER; VOLUME
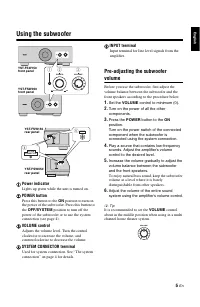
5 En Eng lish Using the subwoofer 1 Power indicator Lights up green while the unit is turned on. 2 POWER button Press this button to the ON position to turn on the power of the subwoofer. Press this button to the OFF/SYSTEM position to turn off the power of the subwoofer or to use the system connect...
Page 8 - Advanced Yamaha Active Servo Technology II
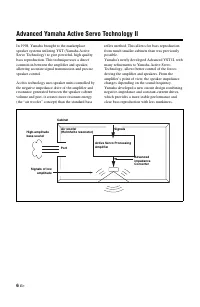
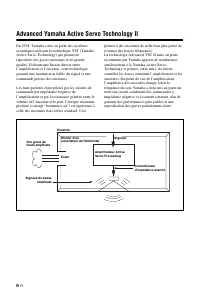
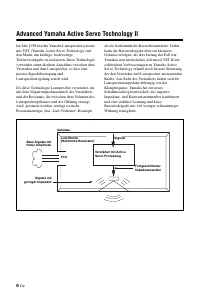
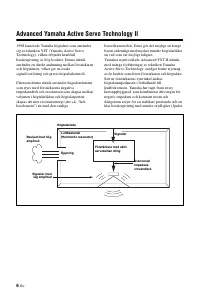
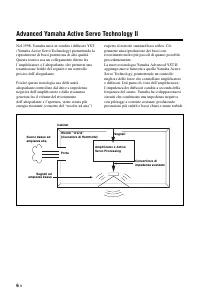
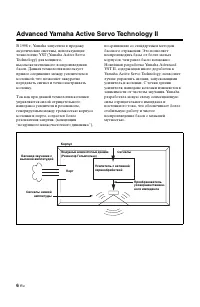
6 En Advanced Yamaha Active Servo Technology II In 1998, Yamaha brought to the marketplace speaker systems utilizing YST (Yamaha Active Servo Technology) to give powerful, high quality bass reproduction. This technique uses a direct connection between the amplifier and speaker, allowing accurate sig...
Page 9 - Troubleshooting; Problem
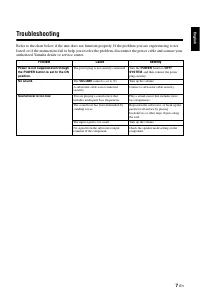
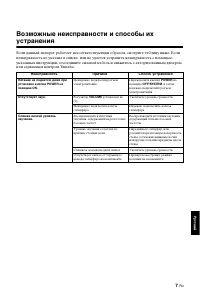
7 En Eng lish Troubleshooting Refer to the chart below if the unit does not function properly. If the problem you are experiencing is not listed, or if the instructions fail to help you resolve the problem, disconnect the power cable and contact your authorized Yamaha dealer or service center. Probl...
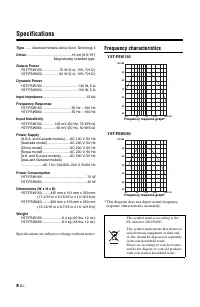
Page 10 - Specifications; Specifications are subject to change without notice.; Frequency characteristics; * This diagram does not depict actual frequency
8 En Specifications Type ....... Advanced Yamaha Active Servo Technology II Driver ..............................................16 cm (6-5/16”) Magnetically shielded type Output Power YST-FSW150 ................. 75 W (5 Ω, 10% T.H.D.) YST-FSW050 ................. 50 W (5 Ω, 10% T.H.D.) Dynamic Pow...
Page 12 - ATTENTION: Tenir compte des précautions ci-dessous
i Fr Nous vous remercions d’avoir porté votre choix sur ce subwoofer de Yamaha. Tenir compte des précautions ci-dessous avant de faire fonctionner l’appareil. Yamaha ne saurait être tenue pour responsable de tout dommage et/ou blessure dûs à un non-respect des mises en garde ci-dessous.1 Pour garant...
Page 13 - is; Table des matières; Pour commencer; Description; • Ce système de subwoofer intègre l’Advanced; Accessoires fournis
1 Fr F rança is Table des matières ATTENTION: Tenir compte des précautions ci-dessous avant de faire fonctionner l’appareil. . . . . . . . . . . . . . . . . . . . . . . . . . . . . . . . . . . . . . . . . . . . . . . . . . . . . . . . i Pour commencer . . . . . . . . . . . . . . . . . . . . . . . . ...
Page 14 - Installation; Conseil
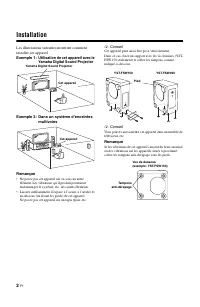
2 Fr Installation Les illustrations suivantes montrent comment installer cet appareil. Exemple 1: Utilisation de cet appareil avec le Yamaha Digital Sound Projector Exemple 2: Dans un système d’enceintes multivoies Remarque • Ne posez pas cet appareil sur ou sous un autre élément. Les vibrations qu’...
Page 15 - Connexions; Exemple typique de connexions
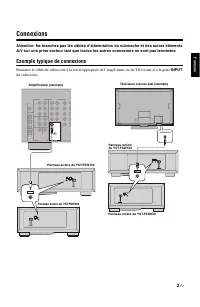
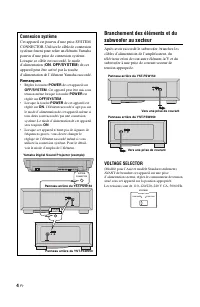
3 Fr F rança is Connexions Attention: Ne branchez pas les câbles d’alimentation du subwoofer et des autres éléments A/V sur une prise secteur tant que toutes les autres connexions ne sont pas terminées . Exemple typique de connexions Branchez le câble du subwoofer à la sortie appropriée de l’ampli-t...
Page 17 - Utilisation du subwoofer; Témoin d’alimentation; et mettre le subwoofer sous; Commande VOLUME; Balance préalable du subwoofer; Réglez la commande; au; en position; plus ou moins dans la position centrale
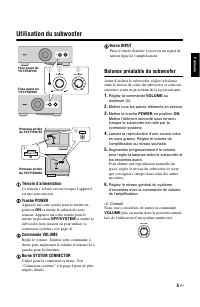
5 Fr F rança is Utilisation du subwoofer 1 Témoin d’alimentation Ce témoin s’éclaire en vert lorsque l’appareil est mis sous tension. 2 Touche POWER Appuyez sur cette touche pour le mettre en position ON et mettre le subwoofer sous tension. Appuyez sur cette touche pour le mettre en position OFF/SYS...
Page 19 - Dépannage; Problème
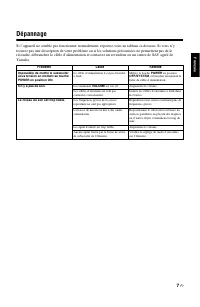
7 Fr F rança is Dépannage Si l’appareil ne semble pas fonctionner normalement, reportez-vous au tableau ci-dessous. Si vous n’y trouvez pas une description de votre problème ou si les solutions préconisées ne permettent pas de le résoudre, débranchez le câble d’alimentation et contactez un revendeur...
Page 20 - Fiche technique; Réponse en fréquences; * Ce graphique ne présente pas les caractéristiques
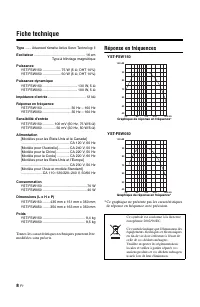
8 Fr Fiche technique Type ....... Advanced Yamaha Active Servo Technology II Excitateur ..................................................... 16 cm Type à blindage magnétique Puissance YST-FSW150 ................... 75 W (5 Ω, DHT 10%) YST-FSW050 ................... 50 W (5 Ω, DHT 10%) Puissance dyn...
Page 22 - Vielen Dank für den Kauf des Subwoofer-Systems von Yamaha.; ZUR BEACHTUNG: Bitte lesen Sie diese Bedienungsanleitung
i De Vielen Dank für den Kauf des Subwoofer-Systems von Yamaha. Bitte lesen Sie sich die folgenden Sicherheitshinweise vor der Inbetriebnahme durch. Yamaha kann für etwaige Schäden und/oder Verletzungen, die durch eine Nichtbeachtung der folgenden Sicherheitshinweise entstehen, nicht haftbar gemacht...
Page 23 - Inhalt; Erste Schritte; Merkmale; • Dieser Subwoofer verwendet Advanced; Lieferumfang
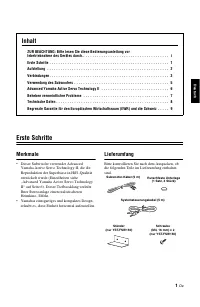
1 De Deutsc h Inhalt ZUR BEACHTUNG: Bitte lesen Sie diese Bedienungsanleitung vor Inbetriebnahme des Gerätes durch. . . . . . . . . . . . . . . . . . . . . . . . . . . . . . . . . . . . . . . i Erste Schritte . . . . . . . . . . . . . . . . . . . . . . . . . . . . . . . . . . . . . . . . . . . . . ....
Page 24 - Aufstellung; Beispiel 1: Verwendung dieses Geräts mit; Tipp; Hinweis
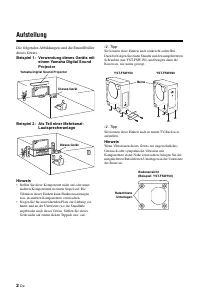
2 De Aufstellung Die folgenden Abbildungen sind die Einstellbilder dieses Geräts. Beispiel 1: Verwendung dieses Geräts mit einem Yamaha Digital Sound Projector Beispiel 2: Als Teil einer Mehrkanal- Lautsprecheranlage Hinweis • Stellen Sie diese Komponente nicht auf oder unter anderen Komponenten in ...
Page 25 - Verbindungen; Grundlegendes Anschlussbeispiel
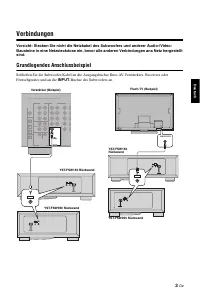
3 De Deutsc h Verbindungen Vorsicht: Stecken Sie nicht die Netzkabel des Subwoofers und anderer Audio-/Video-Bausteine in eine Netzsteckdose ein, bevor alle anderen Verbindungen ans Netz hergestellt sind . Grundlegendes Anschlussbeispiel Schließen Sie die Subwoofer-Kabel an die Ausgangsbuchse Ihres ...
Page 26 - ) dieses Geräts mit dem; Hinweise
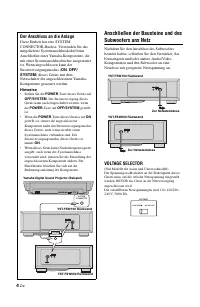
4 De Anschließen der Bausteine und des Subwoofers ans Netz Nachdem Sie den Anschluss des Subwoofers beendet haben, schließen Sie den Verstärker, das Fernsehgerät und/oder andere Audio/Video- Komponenten und den Subwoofer an eine Netzdose mit geeigneter Netzspannung an. VOLTAGE SELECTOR (Nur Modelle ...
Page 27 - Verwendung des Subwoofers; Netzanzeige; Drücken Sie diese Taste in Stellung; SYSTEM CONNECTOR-Buchse; Stellen Sie den; Drücken Sie die
5 De Deutsc h Verwendung des Subwoofers 1 Netzanzeige Leuchtet grün auf, während das Gerät eingeschaltet ist. 2 POWER-Taste Drücken Sie diese Taste in Stellung ON , um den Subwoofer einzuschalten. Drücken Sie diese Taste in Stellung OFF/SYSTEM , um den Subwoofer auszuschalten oder den Systemanschlus...
Page 29 - Beheben vermeintlicher Probleme
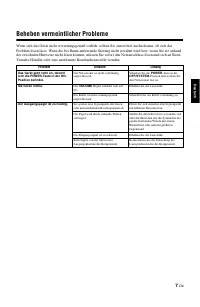
7 De Deutsc h Beheben vermeintlicher Probleme Wenn sich das Gerät nicht erwartungsgemäß verhält, sollten Sie zuerst hier nachschauen, ob sich das Problem lösen lässt. Wenn die bei Ihnen auftretende Störung nicht erwähnt wird bzw. wenn Sie sie anhand der erwähnten Hinweise nicht lösen können, müssen ...
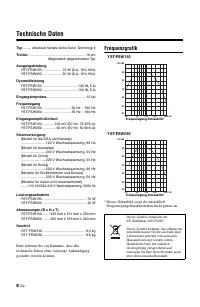
Page 30 - Technische Daten; Frequenzgrafik; * Dieses Schaubild zeigt die tatsächlich
8 De Technische Daten Typ .......... Advanced Yamaha Active Servo Technology II Treiber ........................................................... 16 cm Magnetisch abgeschirmter Typ Ausgangsleistung YST-FSW150 .................... 75 W (5 Ω, 10% Klirr) YST-FSW050 .................... 50 W (5 Ω, 10%...
Page 32 - Tack för att du valt detta Yamaha-subwoofersystem.; FÖRSIKTIGT: Läs dessa anvisningar innan du börjar; OBSERVERA
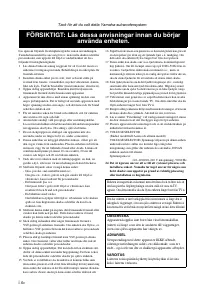
i Sv Tack för att du valt detta Yamaha-subwoofersystem. Läs igenom följande försiktighetsåtgärder innan användningen. Yamaha kan inte hållas ansvarig för ev. materiella skador och/eller personskador som uppstår till följd av underlåtenhet att läsa följande försiktighetsåtgärder.1 Läs denna bruksanvi...
Page 33 - Innehåll; Förberedelse; Egenskaper; • Denna lågbashögtalare använder sig av den; Medföljande tillbehör
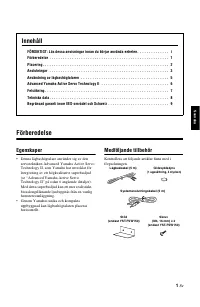
1 Sv Svenska Innehåll FÖRSIKTIGT: Läs dessa anvisningar innan du börjar använda enheten. . . . . . . . . . . . . . i Förberedelse . . . . . . . . . . . . . . . . . . . . . . . . . . . . . . . . . . . . . . . . . . . . . . . . . . . . . 1Placering . . . . . . . . . . . . . . . . . . . . . . . . . . ....
Page 34 - Placering; Exempel 1: Användning av; Tips; Anmärkning
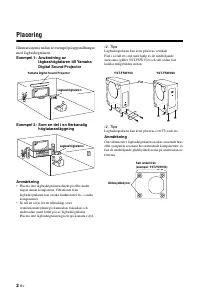
2 Sv Placering Illustrationerna nedan är exempel på uppställningar med lågbashögtalaren. Exempel 1: Användning av lågbashögtalaren till Yamaha Digital Sound Projector Exempel 2: Som en del i en flerkanalig högtalaranläggning Anmärkning • Placera inte lågbashögtalaren direkt på eller under någon anna...
Page 35 - Anslutningar; Grundläggande anslutningsexempel; på lågbashögtalaren.
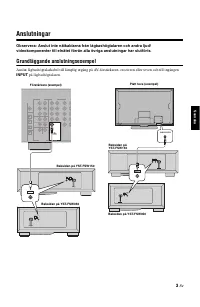
3 Sv Svenska Anslutningar Observera: Anslut inte nätkablarna från lågbashögtalaren och andra ljud/videokomponenter till elnätet förrän alla övriga anslutningar har slutförts . Grundläggande anslutningsexempel Anslut lågbashögtalarkabel till lämplig utgång på AV-förstärkaren, receivern eller teven oc...
Page 36 - ) på lågbashögtalaren styras med; Anmärkningar
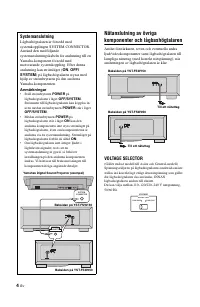
4 Sv Nätanslutning av övriga komponenter och lågbashögtalaren Anslut förstärkaren, teven och eventuella andra ljud/videokomponenter samt lågbashögtalaren till lämpliga nätuttag (med korrekt nätspänning), när anslutningen av lågbashögtalaren är klar. VOLTAGE SELECTOR (Gäller endast modell till Asien ...
Page 37 - Användning av lågbashögtalaren; Strömindikator; Lyser grön medan lågbashögtalaren är på.; för att slå på; SYSTEM CONNECTOR-kontakt; Förinställning av lågbasvolym; Ställ volymreglaget; på; i läget; ungefär i mittläget.
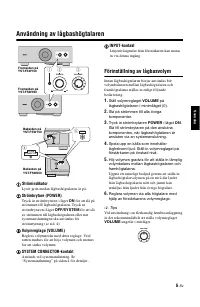
5 Sv Svenska Användning av lågbashögtalaren 1 Strömindikator Lyser grön medan lågbashögtalaren är på. 2 Strömbrytare (POWER) Tryck in strömbrytaren i läget ON för att slå på strömmen till lågbashögtalaren. Tryck ut strömbrytaren i läget OFF/SYSTEM för att slå av strömmen till lågbashögtalaren eller ...
Page 39 - Felsökning
7 Sv Svenska Felsökning Gå igenom felsökningstabellen nedan, om högtalarna inte tycks fungera som de ska. Koppla loss nätkabeln och kontakta en auktoriserad Yamaha-handlare eller en auktoriserad Yamaha-verkstad, om aktuellt problem inte finns med i tabellen eller om det inte kan lösas med hjälp av d...
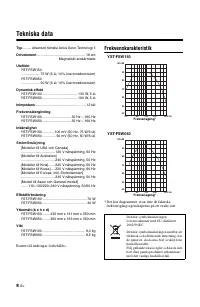
Page 40 - Tekniska data; Rätten till ändringar förbehålles.; Frekvenskarakteristik; * Det här diagrammet visar inte de faktiska
8 Sv Tekniska data Typ .......... Advanced Yamaha Active Servo Technology II Drivelement .................................................. 16 cm Magnetiskt avskärmade Uteffekt YST-FSW150 ................... 75 W (5 Ω, 10% övertonsdistorsion) YST-FSW050 ................... 50 W (5 Ω, 10% övertonsdis...
Page 41 - Begränsad garanti inom EES-området och Schweiz
9 Sv Svenska Begränsad garanti inom EES-området och Schweiz Tack för att du har valt en produkt från Yamaha. Var god kontakta återförsäljaren av produkten, om din Yamaha-produkt av någon oförutsedd anledning kräver garantiservice. Var god kontakta Yamahas representantkontor i ditt land, om något pro...
Page 42 - AVVERTENZA: Prima di cominciare ad usare
i It Grazie per aver scelto questo sistema di altoparlanti subwoofer Yamaha. Leggere le seguenti precauzioni di impiego prima dell’uso. Yamaha non sarà ritenuta responsabile per eventuali danni e/o lesioni dovuti all’inosservanza delle precauzioni indicate qui sotto.1 Per ottenere le migliori presta...
Page 43 - Indice; Per cominciare; Caratteristiche; • Questo sistema subwoofer impiega la Advanced; Accessori in dotazione
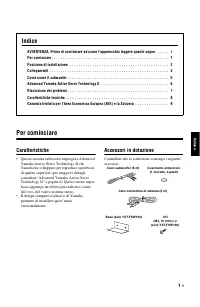
1 It Italian o Indice AVVERTENZA: Prima di cominciare ad usare l’apparecchio leggere quanto segue. . . . . . i Per cominciare . . . . . . . . . . . . . . . . . . . . . . . . . . . . . . . . . . . . . . . . . . . . . . . . . . . . 1Posizione di installazione . . . . . . . . . . . . . . . . . . . . . ...
Page 44 - Posizione di installazione; Suggerimento
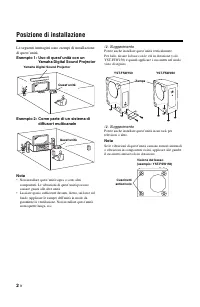
2 It Posizione di installazione Le seguenti immagini sono esempi di installazione di quest’unità. Esempio 1: Uso di quest’unità con un Yamaha Digital Sound Projector Esempio 2: Come parte di un sistema di diffusori multicanale Nota • Non installare quest’unità sopra o sotto altri componenti. Le vibr...
Page 45 - Collegamenti; Esempio di collegamento base
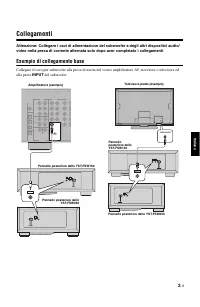
3 It Italian o Collegamenti Attenzione: Collegare i cavi di alimentazione del subwoofer e degli altri dispositivi audio/video nella presa di corrente alternata solo dopo aver completato i collegamenti . Esempio di collegamento base Collegare il cavo per subwoofer alla presa di uscita del vostro ampl...
Page 46 - ) di quest’unità può venire; Note
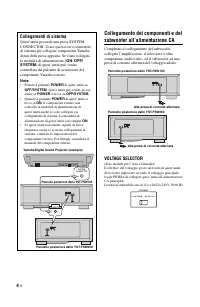
4 It Collegamento dei componenti e del subwoofer all’alimentazione CA Completato il collegamento del subwoofer, collegate l’amplificatore, il televisore o altro componente audio/video, ed il subwoofer ad una presa di corrente alternata del voltaggio adatto. VOLTAGE SELECTOR (Solo modelli per l’Asia ...
Page 47 - Come usare il subwoofer; Indicatore accensione/spegnimento; per accendere il subwoofer.; Controllo VOLUME
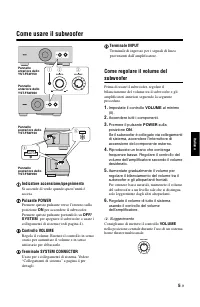
5 It Italian o Come usare il subwoofer 1 Indicatore accensione/spegnimento Si accende di verde quando quest’unità è accesa. 2 Pulsante POWER Premere questo pulsante verso l’interno sulla posizione ON per accendere il subwoofer. Premere questo pulsante portandolo su OFF/ SYSTEM per spegnere il subwoo...
Page 49 - Risoluzione dei problemi; Problema
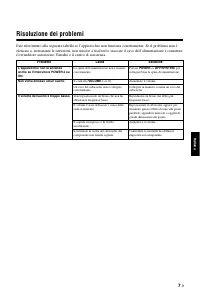
7 It Italian o Risoluzione dei problemi Fate riferimento alla seguente tabella se l’apparecchio non funziona correttamente. Se il problema non è elencato o, nonostante le istruzioni, non riuscite a risolverlo, staccate il cavo dell’alimentazione e contattate il rivenditore autorizzato Yamaha o il ce...
Page 50 - Caratteristiche tecniche; Caratteristiche delle frequenze; * Questo grafico non illustra con precisione le
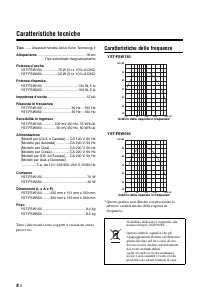
8 It Caratteristiche tecniche Tipo ........ Advanced Yamaha Active Servo Technology II Altoparlante ................................................. 16 cm Tipo schermato magneticamente Potenza d’uscita YST-FSW150 ................75 W (5 Ω, 10% di DAC) YST-FSW050 ................50 W (5 Ω, 10% di DA...
Page 51 - Garanzia limitata per l’Area Economica Europea (AEE) e la Svizzera
9 It Italian o Garanzia limitata per l’Area Economica Europea (AEE) e la Svizzera Vi ringraziamo per aver scelto un prodotto Yamaha. Nel caso raro in cui il vostro prodotto abbia bisogno di riparazioni in garanzia, entrare in contatto con il negozio in cui era stato acquistato. Se si avessero diffic...
Page 52 - PRECAUCIÓN: Leer este manual de instrucciones antes
i Es Gracias por haber seleccionado un sistema de altavoces de ultragraves Yamaha. Lea las siguientes precauciones de funcionamiento antes de iniciar el uso del aparato. Yamaha no se responsabilizará de cualquier daño y/o lesión causada por no seguir las precauciones que aparecen a continuación.1 Le...
Page 53 - Español; Índice; Primeros pasos; Características; • Este sistema de subwoofer emplea Advanced; Accesorios incluidos
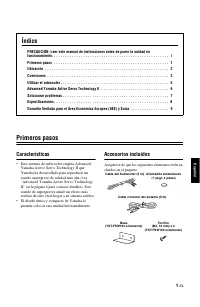
1 Es Español Índice PRECAUCIÓN: Leer este manual de instrucciones antes de poner la unidad en funcionamiento. . . . . . . . . . . . . . . . . . . . . . . . . . . . . . . . . . . . . . . . . . . . . . . . . . . . i Primeros pasos . . . . . . . . . . . . . . . . . . . . . . . . . . . . . . . . . . . ....
Page 54 - Ubicación; Ejemplo 1: Utilizando esta unidad con un; Sugerencia; Nota
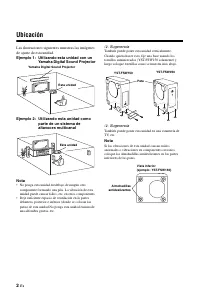
2 Es Ubicación Las ilustraciones siguientes muestras las imágenes de ajuste de esta unidad. Ejemplo 1: Utilizando esta unidad con un Yamaha Digital Sound Projector Ejemplo 2: Utilizando esta unidad como parte de un sistema de altavoces multicanal Nota • No ponga esta unidad en/debajo de ningún otro ...
Page 55 - Conexiones; Ejemplo básico de conexión; del altavoz de subgraves.
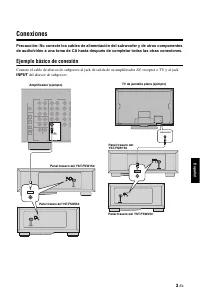
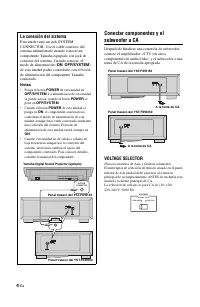
3 Es Español Conexiones Precaución: No conecte los cables de alimentación del subwoofer y de otros componentes de audio/vídeo a una toma de CA hasta después de completar todas las otras conexiones . Ejemplo básico de conexión Conecte el cable de altavoz de subgraves al jack de salida de su amplifica...
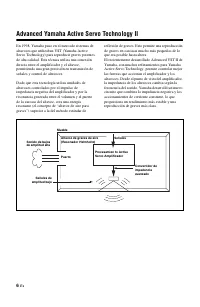
Page 57 - Utilizar el subwoofer; Indicador Power; Se enciende en verde cuando la unidad está en.; Botón POWER; Pulse este botón hasta la posición; para; Control VOLUME; Ajuste el control; Pulse el botón; a la posición
5 Es Español Utilizar el subwoofer 1 Indicador Power Se enciende en verde cuando la unidad está en. 2 Botón POWER Pulse este botón hasta la posición ON para conectar la alimentación del subwoofer. Pulse este botón hasta la posición OFF/SYSTEM para desconectar la alimentación del subwoofer o para usa...
Page 59 - Solucionar problemas
7 Es Español Solucionar problemas Consulte la tabla a continuación si la unidad no funciona correctamente. Si el problema que ocurre no aparece en la lista o si las instrucciones no sirven para resolver el problema, desconecte el cable de alimentación y contacte con un distribuidor autorizado o con ...
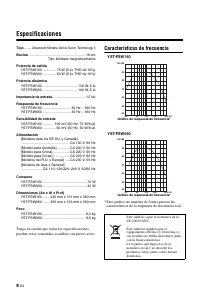
Page 60 - Especificaciones; Características de frecuencia; * Este gráfico no muestra de forma precisa las
8 Es Especificaciones Tipo ........ Advanced Yamaha Active Servo Technology II Bocina .......................................................... 16 cm Tipo blindado magnéticamente Potencia de salida YST-FSW150 .............. 75 W (5 Ω, THD de 10%) YST-FSW050 .............. 50 W (5 Ω, THD de 10%) Pot...
Page 61 - Garantía limitada para el Área Económica Europea (AEE) y Suiza
9 Es Español Garantía limitada para el Área Económica Europea (AEE) y Suiza Gracias por haber elegido un producto Yamaha. En el caso poco probable de que su producto Yamaha necesite el servicio que concede la garantía, póngase en contacto por favor con el concesionario a quien adquirió el producto. ...
Page 62 - Dank u voor het kiezen van dit Yamaha subwoofersysteem.; LET OP: Lees eerst deze aanwijzingen alvorens het
i Nl Dank u voor het kiezen van dit Yamaha subwoofersysteem. Lees a.u.b. voor het in gebruik nemen de volgende voorzorgsmaatregelen door. Yamaha is niet aansprakelijk voor schade en/of letsels die zijn veroorzaakt doordat onderstaande voorzorgsmaatregelen niet in acht zijn genomen.1 Lees deze handle...
Page 63 - Nederlands; Inhoud; Van start; Kenmerken; • Dit subwoofersysteem maakt gebruik van; Bijgeleverd toebehoren
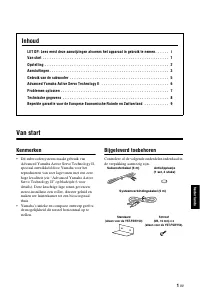
1 Nl Nederlands Inhoud LET OP: Lees eerst deze aanwijzingen alvorens het apparaat in gebruik te nemen. . . . . . i Van start . . . . . . . . . . . . . . . . . . . . . . . . . . . . . . . . . . . . . . . . . . . . . . . . . . . . . . . . 1Opstelling . . . . . . . . . . . . . . . . . . . . . . . . . ....
Page 64 - Opstelling
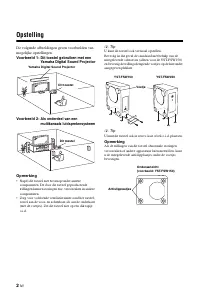
2 Nl Opstelling De volgende afbeeldingen geven voorbeelden van mogelijke opstellingen. Voorbeeld 1: Dit toestel gebruiken met een Yamaha Digital Sound Projector Voorbeeld 2: Als onderdeel van een multikanaals luidsprekersysteem Opmerking • Stapel dit toestel niet bovenop/onder andere componenten. De...
Page 65 - Aansluitingen; Voorbeeld van de basisaansluitingen; aansluiting van de subwoofer.
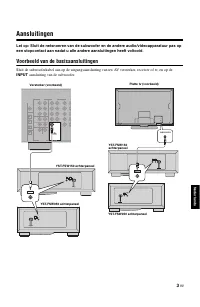
3 Nl Nederlands Aansluitingen Let op: Sluit de netsnoeren van de subwoofer en de andere audio/videoapparatuur pas op een stopcontact aan nadat u alle andere aansluitingen heeft voltooid . Voorbeeld van de basisaansluitingen Sluit de subwooferkabel aan op de uitgangsaansluiting van uw AV versterker, ...
Page 66 - van de aangesloten Yamaha component.; Opmerkingen
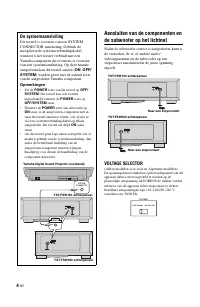
4 Nl Aansluiten van de componenten en de subwoofer op het lichtnet Nadat de subwoofer correct is aangesloten, kunt u de versterker, de tv, of andere audio/videoapparatuur en de subwoofer op een stopcontact aansluiten dat de juiste spanning afgeeft. VOLTAGE SELECTOR (Alleen modellen voor Azië en Alge...
Page 67 - Gebruik van de subwoofer; Spanningsindicator; VOLUME regeling; Draai de; regelaar in de; toets in de
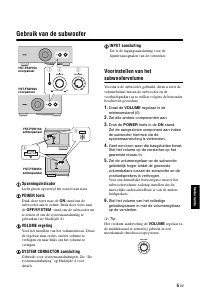
5 Nl Nederlands Gebruik van de subwoofer 1 Spanningsindicator Licht groen op terwijl het toestel aan staat. 2 POWER toets Druk deze toets naar de ON stand om de subwoofer aan te zetten. Druk deze toets naar de OFF/SYSTEM stand om de subwoofer uit te zetten of om de systeemaansluiting te gebruiken (z...
Page 69 - Problemen oplossen; Probleem
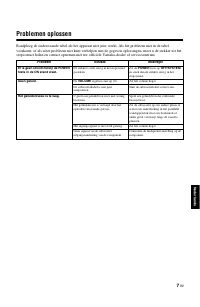
7 Nl Nederlands Problemen oplossen Raadpleeg de onderstaande tabel als het apparaat niet juist werkt. Als het probleem niet in de tabel voorkomt, of als u het probleem niet kunt verhelpen met de gegeven oplossingen, moet u de stekker uit het stopcontact halen en contact opnemen met uw officiële Yama...
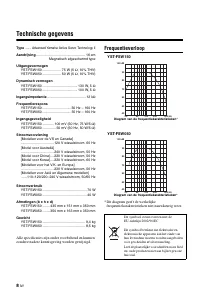
Page 70 - Technische gegevens; Frequentieverloop; * Dit diagram geeft de werkelijke
8 Nl Technische gegevens Type ....... Advanced Yamaha Active Servo Technology II Aandrijving ................................................... 16 cm Magnetisch afgeschermd type Uitgangsvermogen YST-FSW150 ................... 75 W (5 Ω, 10% THV) YST-FSW050 ................... 50 W (5 Ω, 10% THV) Dy...
Page 72 - Благодарим вас за выбор данной системы сабвуфера Yamaha.; ПРЕДУПРЕЖДЕНИЕ: Внимательно изучите зто
i Ru Благодарим вас за выбор данной системы сабвуфера Yamaha. Перед использованием, пожалуйста, изучите следующие меры предосторожности по использованию. Yamaha не будет нести ответственность за любой ущерб и/или травму по причине игнорирования предостережений ниже.1 Для обеспечения наилучшего резул...
Page 73 - Русс; Содержание; Подготовка к эксплуатации; Описание
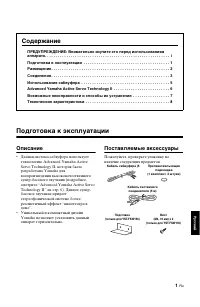
1 Ru Русс кий Содержание ПРЕДУПРЕЖДЕНИЕ: Внимательно изучите это перед использованием аппарата. . . . . . . . . . . . . . . . . . . . . . . . . . . . . . . . . . . . . . . . . . . . . . . . . . . . . . . . . . i Подготовка к эксплуатации . . . . . . . . . . . . . . . . . . . . . . . . . . . . . . . ...
Page 74 - Размещение; Пример 1: Использование данного; Совет; Примечание
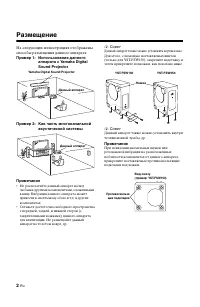
2 Ru Размещение На следующих иллюстрациях отображены способы размещения данного аппарата. Пример 1: Использование данного аппарата с Yamaha Digital Sound Projector Пример 2: Как часть многоканальной акустической системы Примечание • Не располагайте данный аппарат на/под любыми другими компонентами, ...
Page 75 - Соединения; Пример основного соединения
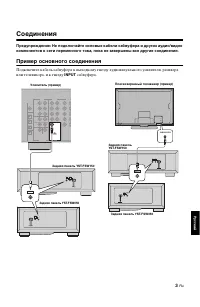
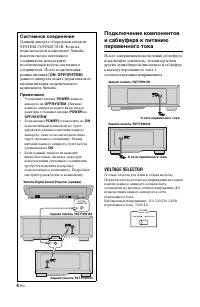
3 Ru Русс кий Соединения Предупреждение: Не подключайте силовые кабели сабвуфера и других аудио/видео компонентов к сети переменного тока, пока не завершены все другие соединения . Пример основного соединения Подключите кабель сабвуфера к выходному гнезду аудиовизуального усилителя, ресивера или тел...
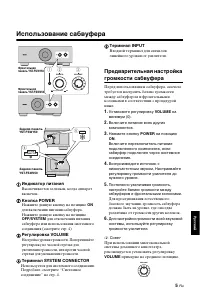
Page 77 - Использование сабвуфера; Индикатор питания; Нажмите данную кнопку на позицию; для отключения питания; Регулировка VOLUME; Установите регулировку; на; на позицию; примерно на среднюю позицию.
5 Ru Русс кий Использование сабвуфера 1 Индикатор питания Высвечивается зеленым, когда аппарат включен. 2 Кнопка POWER Нажмите данную кнопку на позицию ON для включения питания сабвуфера. Нажмите данную кнопку на позицию OFF/SYSTEM для отключения питания сабвуфера или использования системного соедин...
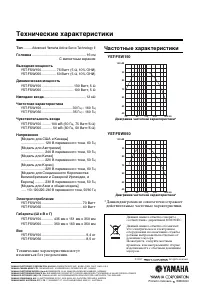
Page 80 - Технические характеристики; Частотные характеристики; * Данная диаграмма не совсем точно отражает
YAMAHA ELECTRONICS CORPORATION, USA 6660 ORANGETHORPE AVE., BUENA PARK, CALIF. 90620, U.S.A. YAMAHA CANADA MUSIC LTD. 135 MILNER AVE., SCARBOROUGH, ONTARIO M1S 3R1, CANADA YAMAHA ELECTRONIK EUROPA G.m.b.H. SIEMENSSTR. 22-34, 25462 RELLINGEN BEI HAMBURG, GERMANY YAMAHA ELECTRONIQUE FRANCE S.A. RUE AM...


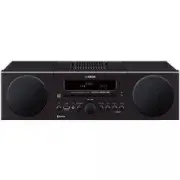 Yamaha MCR-B043 Black
User Manual
Yamaha MCR-B043 Black
User Manual
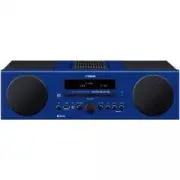 Yamaha MCR-B043 Blue
User Manual
Yamaha MCR-B043 Blue
User Manual
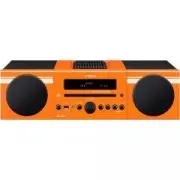 Yamaha MCR-B043 Orange
User Manual
Yamaha MCR-B043 Orange
User Manual
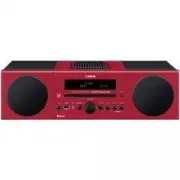 Yamaha MCR-B043 Red
User Manual
Yamaha MCR-B043 Red
User Manual
 Yamaha MCR-B043 White
User Manual
Yamaha MCR-B043 White
User Manual
 Yamaha NS-B210_NS-C210
User Manual
Yamaha NS-B210_NS-C210
User Manual
 Yamaha NS-B310_NS-C310
User Manual
Yamaha NS-B310_NS-C310
User Manual
 Yamaha NS-C700
User Manual
Yamaha NS-C700
User Manual
 Yamaha NS-F150_NS-F140
User Manual
Yamaha NS-F150_NS-F140
User Manual
 Yamaha NS-F210
User Manual
Yamaha NS-F210
User Manual
 Yamaha NS-F700
User Manual
Yamaha NS-F700
User Manual
 Yamaha NS-P280
User Manual
Yamaha NS-P280
User Manual
 Yamaha NS-P380
User Manual
Yamaha NS-P380
User Manual
 Yamaha NS-PA150_NS-P150
User Manual
Yamaha NS-PA150_NS-P150
User Manual
 Yamaha NS-SW210
User Manual
Yamaha NS-SW210
User Manual
 Yamaha NS-SW310
User Manual
Yamaha NS-SW310
User Manual