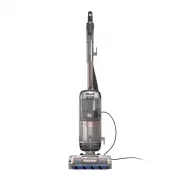
Page 2 - WARNING; IMPORTANT SAFETY INSTRUCTIONS; FOR HOUSEHOLD USE ONLY; SAVE THESE INSTRUCTIONS; s h a r k c l e a n . c o m
READ ALL INSTRUCTIONS BEFORE USING THIS VACUUM1. Inspect power cord and plug for any damage before use. DO NOT use vacuum cleaner with a damaged cord or plug. Turn off all controls before plugging in or unplugging the vacuum cleaner. Store your vacuum cleaner with the power cord secured around the t...
Page 3 - ASSEMBLY
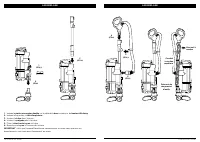
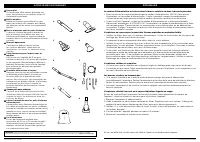
s h a r k c l e a n . c o m s h a r k c l e a n . c o m ASSEMBLY ASSEMBLY (Click) 3 (Click) 4 6 (Click) 5 (Click) (Click) 2 (Click) 1 1. Insert Double Accessory Holder into the side of Pod above the Lift-Away Button. 2. Place pod onto Floor Nozzle Post . 3. Insert Wand into pod. 4. Insert Handle int...
Page 4 - CLEANING MODES; POWER /SURFACE SWITCH; SETTINGS
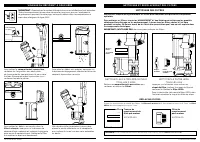
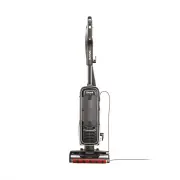
s h a r k c l e a n . c o m s h a r k c l e a n . c o m UPRIGHT NOTE: All accessories are compatible with both the wand and the handle. WHOLE-HOME CLEANING CLEANING MODES To engage brushroll, turn power on, then step on floor nozzle and tilt handle back. Select surface setting: O Off I Hard Floor Fo...
Page 5 - FPO; EMPTYING THE DUST CUP; CLEAN HEPA FILTER; CLEANING AND REPLACING THE FILTERS; REPLACING FILTERS
FPO s h a r k c l e a n . c o m s h a r k c l e a n . c o m EMPTYING THE DUST CUP To remove Dust Cup , lift tabs on both sides of dust cup handle. Tilt dust cup, then lift to remove. To reinstall, place bottom of dust cup into pod and then tilt until it clicks into place. To empty debris into trash,...
Page 6 - NOZZLE MAINTENANCE; MAINTENANCE; SELF-CLEANING BRUSHROLL; CORD MAINTENANCE; CHECKING FOR BLOCKAGES
Clean off any debris on the brushroll. To clear debris and blockages from the nozzle hose, open the locks on the bottom of the nozzle. With a coin, turn the locks counterclockwise to open, then lift the cover. NOZZLE MAINTENANCE MAINTENANCE DEBRIS WR APPED AROUND BRUSHROLL SELF-CLEANING BRUSHROLL If...
Page 7 - AVAILABLE ACCESSORIES
Power cord caught in brushroll or floor nozzle.• To minimize the risk of power cord damage, DO NOT run the vacuum over the power cord. If this occurs, immediately shut off power to the vacuum and remove the cord from the brushroll or nozzle. • Inspect power cord and plug for any damage before use. D...
Page 9 - AVERTISSEMENT; toujours suivre les précautions de base suivantes :; CONSIGNES DE SÉCURITÉ IMPORTANTES; POUR USAGE DOMESTIQUE SEULEMENT; CONSERVEZ CES INSTRUCTIONS
s h a r k c l e a n . c o m s h a r k c l e a n . c o m LISEZ TOUTES LES INSTRUCTIONS AVANT D'UTILISER CET ASPIRATEUR1. Inspectez le cordon d’alimentation et la fiche pour déceler d’éventuels dommages avant l’utilisation. N’UTILISEZ PAS l’aspirateur si le cordon d’alimentation ou la fiche sont endom...
Page 10 - ASSEMBLAGE; Crochet
s h a r k c l e a n . c o m s h a r k c l e a n . c o m ASSEMBLAGE ASSEMBLAGE (Clic) 3 (Clic) 4 6 (Clic) 5 (Clic) (Clic) 2 (Clic) 1 1. Insérez le porte-accessoires double sur le côté de la base , au-dessus du bouton Lift-Away. 2. Insérez la base dans la tête d’aspirateur. 3. Insérez le tube dans la ...
Page 11 - NETTOYAGE DOMESTIQUE COMPLET; VOYANT INDICATEUR DE LA BROSSE ROTATIVE
s h a r k c l e a n . c o m s h a r k c l e a n . c o m VERTICAL REMARQUE : Tous les accessoires sont compatibles avec le tube et la poignée Pour activer la brosse rotative, mettez l’aspirateur sous tension, posez le pied sur la tête d’aspirateur et inclinez la poignée vers l’arrière. La commande d’...
Page 12 - NETTOYEZ LE FILTRE HEPA; NETTOYAGE ET REMPLACEMENT DES FILTRES; IMPORTANT : N’UTILISEZ PAS; VIDANGE DU RÉCIPIENT À POUSSIÈRE
s h a r k c l e a n . c o m s h a r k c l e a n . c o m FPO Pour retirer le compartiment à poussière, soulevez les languettes des deux côtés de la poignée du compartiment à poussière. Inclinez le compartiment à poussière, puis soulevez-le pour le retirer. Afin de réinstaller le récipient à poussière...
Page 13 - ENTRETIEN DE LA BUSE; ENTRETIEN; BROSSE ROTATIVE AUTONETTOYANTE; ENTRETIEN DU CORDON
s h a r k c l e a n . c o m s h a r k c l e a n . c o m Nettoyez tous les débris sur la brosse rotative. Pour éliminer les débris et les obstructions dans la tête d’aspirateur, ouvrez les verrous situés au bas de la tête d’aspirateur. À l’aide d’une pièce de monnaie, tournez les verrous dans le sens...
Page 14 - ACCESSOIRES DISPONIBLES
s h a r k c l e a n . c o m s h a r k c l e a n . c o m Le cordon d’alimentation est coincé dans la brosse rotative ou dans la buse de plancher.• Pour minimiser le risque d’endommager le cordon d’alimentation, NE PAS faire passer l’aspirateur sur le cordon d’alimentation. Si cela se produit, coupez ...
Page 15 - CARACTÉRISTIQUES TECHNIQUES
s h a r k c l e a n . c o m s h a r k c l e a n . c o m GARANTIE LIMITÉE DE CINQ (5) ANS La garantie limitée de cinq (5) ans s’applique aux achats effectués auprès de détaillants autorisés de SharkNinja Operating LLC. La garantie s’applique uniquement au premier propriétaire et au produit original e...
Page 16 - LEA TODAS LAS INSTRUCCIONES ANTES; ADVERTENCIA; utilizar un aparato eléctrico:; INSTRUCCIONES IMPORTANTES DE SEGURIDAD; SOLO PARA USO DOMÉSTICO; CONSERVE ESTAS INSTRUCCIONES
s h a r k c l e a n . c o m s h a r k c l e a n . c o m LEA TODAS LAS INSTRUCCIONES ANTES DE USAR ESTA VACÍO1. Revise que el enchufe y el cable de alimentación no estén dañados antes de usar. NO use la aspiradora si tiene el enchufe o el cable dañados. Apague todos los controles antes de enchufar o ...
Page 17 - ENSAMBLADO
s h a r k c l e a n . c o m s h a r k c l e a n . c o m ENSAMBLADO ENSAMBLADO (Clic) 3 (Clic) 4 6 (Clic) 5 (Clic) (Clic) 2 (Clic) 1 1. Inserte el soporte de accesorio doble en el lado del receptáculo por encima del botón Lift-Away. 2. Coloque el receptáculo sobre el poste de la boquilla de piso. 3. ...
Page 18 - LUZ INDICADORA DEL CEPILLO GIRATORIO
s h a r k c l e a n . c o m s h a r k c l e a n . c o m VERTICAL Para enganchar el cepillo giratorio, encienda la aspiradora, pise la boquilla de piso e incline el mango hacia atrás. El control de succión ofrece una succión variable según sus necesidades. Deslice hacia MIN (Mínimo) para reducir la s...
Page 19 - LIMPIE EL FILTRO HEPA; FILTROS DE REPUESTO; LIMPIEZA DE TODO EL HOGAR
s h a r k c l e a n . c o m s h a r k c l e a n . c o m FPO Se puede retirar el recipiente para el polvo levantando las lengüetas de ambos lados del mango del recipiente para el polvo. A continuación, inclínelo y levántelo para retirarlo. Para eliminar la suciedad guardada en la rejilla para pelusas...
Page 20 - CÓMO VERIFICAR SI HAY OBSTRUCCIONES; MANTENIMIENTO; CEPILLO GIRATORIO DE AUTO-LIMPIEZA; NO; MANTENIMIENTO DEL CABLE
s h a r k c l e a n . c o m s h a r k c l e a n . c o m Limpie todos los residuos en el cepillo giratorio. Para limpiar los residuos y obstrucciones de la manguera de la boquilla, abra los seguros que se encuentran en la parte inferior de la boquilla. Con una moneda, gire las trabas hacia la izquier...
Page 21 - ACCESORIOS DISPONIBLES; boquilla de piso para obtener más información.; SOLUCIÓN DE PROBLEMAS
s h a r k c l e a n . c o m s h a r k c l e a n . c o m ACCESORIOS DISPONIBLES A Herramienta para grietas Esta delgada herramienta es excelente para limpiar espacios reducidos, entre los cojines del sofá y áreas de difícil acceso. Una herramienta para grietas más larga ya está disponible en sharkacc...
Page 23 - LEA ATENTAMENTE Y GUARDE COMO REFERENCIA PARA EL FUTURO.
PLEASE READ CAREFULLY AND KEEP FOR FUTURE REFERENCE. This Owner's Guide is designed to help you get a complete understanding of your new Shark® Rotator® Lift-Away® ADV Upright Vacuum. SharkNinja Operating LLC US: Needham, MA 02494 CAN: Ville St-Laurent, QC H4S 1A71-800-798-7398 sharkclean.comIllustr...