Page 2 - THANK YOU; registeryourshark.com
1 1-800-798-7398 THANK YOU for purchasing the Shark ® Rocket ® Complete with DuoClean ™ PLEASE READ CAREFULLY AND KEEP FOR FUTURE REFERENCE. This Owner’s Guide is designed to help you get a complete understanding of your new Shark Rocket Complete with DuoClean. If you have any questions, please call...
Page 3 - CONTENTS; Getting To Know Your Shark; Maintaining the
2 s h a r k c l e a n . c o m ENGLISH CONTENTS Important Safety Instructions . . . . . . . . . . . . . . . . . . . . . . . . . . . 3 Getting To Know Your Shark ® Rocket ® Complete with DuoClean ™ . . . . . . . . . . . . . . . . . . . . . . . . . . . . . . . . . . . . . . . . 5 Assembling Your Vacuum...
Page 4 - GENERAL USE; tool; IMPORTANT SAFETY INSTRUCTIONS; FOR HOUSEHOLD USE ONLY; WARNING
3 1-800-798-7398 THE MOTORIZED FLOOR NOZZLE, WAND, AND HANDHELD VACUUM CONTAIN ELECTRICAL CONNECTIONS: • These are not serviceable parts.• Do not use to vacuum any liquids.• Do not immerse in water when cleaning.• If handheld vacuum/wand is damaged, discontinue use. 1 Inspect power cord and plug for...
Page 5 - GENERAL CLEANING; SAVE THESE INSTRUCTIONS; PLEASE READ CAREFULLY BEFORE USE
4 s h a r k c l e a n . c o m ENGLISH 21 DO NOT use if airflow is restricted; if the air paths or the motorized floor nozzle become blocked, turn the vacuum cleaner off and unplug from electrical outlet. Remove all obstructions before you turn on the unit again. 22 Keep nozzle away from hair, face, ...
Page 6 - MAIN UNIT
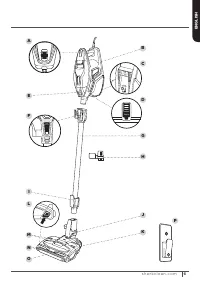
5 1-800-798-7398 GETTING TO KNOW YOUR SHARK ® ROCKET ® COMPLETE WITH DUOCLEAN ™ WELCOME! Congratulations on your purchase. Use this Owner’s Guide to learn about your new vacuum’s great features. From assembly to use to maintenance, you will find it all in here. MAIN UNIT A Power Switch B Handheld Va...
Page 8 - ASSEMBLING YOUR VACUUM; Insert the wand into the motorized floor nozzle connector
7 1-800-798-7398 ASSEMBLING YOUR VACUUM 1 Insert the wand into the motorized floor nozzle connector until you hear a click. STEP 1 DID YOU KNOW? The motorized floor nozzle and handheld vacuum have LED lights that illuminate the floor surface being cleaned. The lights turn on automatically in either ...
Page 9 - Insert the handheld vacuum into the top of; OR
8 s h a r k c l e a n . c o m ENGLISH 2 Insert the handheld vacuum into the top of the wand until you hear a click. 3 This vacuum comes with a detachable clip to store up to 2 accessories on board. Snap clip onto the wand. Store one accessory on top holder and one accessory on bottom holder. STEP 2 ...
Page 10 - Before; Solid Red
9 1-800-798-7398 USING THE MOTORIZED FLOOR NOZZLE WARNING: This vacuum does not stand up on its own, so when taking a break from cleaning, rest it against a piece of stable furniture or lay it flat on the floor. Using for an application where the unit lacks stability may result in personal injury. N...
Page 11 - CHOOSING THE; The Soft Roller traps fine dust and large particles,
10 s h a r k c l e a n . c o m ENGLISH CHOOSING THE APPROPRIATE SETTING The Shark ® Rocket ® Complete with DuoClean ™ has a 2-speed power slider switch on the handle. Slide the power switch to appropriate speed setting (I or II) and start cleaning. Bare Floor, Area Rugs (I) – The brushroll and the S...
Page 12 - USING YOUR VACUUM
11 1-800-798-7398 NOTE: Both power settings provide the same suction power. TIP: You can attach the handheld vacuum directly to the motorized floor nozzle for convenient stair cleaning. USING YOUR VACUUM IN ABOVE-FLOOR MODE STEP 1 STEP 2 For Long-Reach Cleaning: 1 Stand the vacuum upright. Step on t...
Page 14 - If your unit came; STORAGE; OPTION 1
13 1-800-798-7398 TIP: If your unit came with an accessory bag, you can hang the bag on the wall mount with the vacuum. STORAGE 1 Press the Wand Release button on the top of the wand to release the handheld vacuum. There is a catch on the bottom of the handheld vacuum. Hang it from the hook located ...
Page 15 - holes; OPTION 2
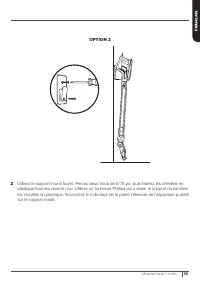
14 s h a r k c l e a n . c o m ENGLISH 2 Use the wall mount that is included. Drill two 5/16" holes into the wall and insert the provided plastic anchors into the holes. Using a Phillips-head screwdriver, screw the wall mount into the plastic anchors. Hook the catch on the bottom of the handheld...
Page 16 - ACCESSORIES; Clean in between; Upholstery Tool; Perfect for grabbing pet; Dusting Brush; Great for dusting a multitude
15 1-800-798-7398 ACCESSORIES A 12" Crevice Tool Clean in between tight spaces or reach baseboards and ceilings with this slim crevice tool. C Upholstery Tool Perfect for grabbing pet hair and lint from furniture and other upholstered surfaces. Ideal for: pet hair, dusting, large particle pickup...
Page 18 - MAINTAINING YOUR VACUUM
17 1-800-798-7398 WARNING: Hand wash filters with water only to prevent damage from cleaning chemicals. Allow ALL filters to dry completely before replacing in the vacuum to prevent liquid from being drawn into electric parts. CAUTION: Turn power off and unplug before servicing. IMPORTANT: Clean the...
Page 19 - Access the Post-Motor filter under the
18 s h a r k c l e a n . c o m ENGLISH CLEANING THE FILTERS1 Access the Pre-Motor foam and felt filters by lifting the latch on the top of the handheld vacuum. Remove and rinse the filters with water. Tap loose dirt off filters between washes as needed. Once completely dry, insert the felt filter fi...
Page 20 - Press down on the two; MAINTAINING
19 1-800-798-7398 MAINTAINING YOUR VACUUM - CONT. 1 Press down on the two buttons on the floor nozzle to pop up the brushroll garage lid. 2 Lift the brushroll out by the tab on the left side. To remove any string, hair or debris that may be wrapped around the brushroll, use the onboard hair removal ...
Page 22 - Vacuum is not picking up debris. No suction or light suction.; Vacuum lifts area rugs.
21 1-800-798-7398 TROUBLESHOOTING GUIDE Vacuum is not picking up debris. No suction or light suction. (Refer to Maintenance section for more information.) • Check filters to see if they need cleaning. Follow instructions for rinsing and completely air-drying the filters before reinserting in the vac...
Page 23 - LIMITED WARRANTY
22 s h a r k c l e a n . c o m ENGLISH FIVE (5) YEAR LIMITED WARRANTY The 5-Year Limited Warranty applies to purchases made from authorized retailers of SharkNinja Operating LLC . Warranty coverage applies to the original owner and to the original product only and is not transferable.SharkNinja warr...
Page 24 - MERCI
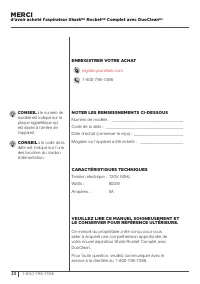
23 1-800-798-7398 MERCI d’avoir acheté l’aspirateur Shark MD Rocket MD Complet avec DuoClean MC VEUILLEZ LIRE CE MANUEL SOIGNEUSEMENT ET LE CONSERVER POUR RÉFÉRENCE ULTÉRIEURE. Ce manuel du propriétaire a été conçu pour vous aider à acquérir une compréhension approfondie de votre nouvel aspirateur S...
Page 25 - TABLE DES MATIÈRES; Apprendre à connaître l’aspirateur Shark; Rocket; Complet avec DuoClean
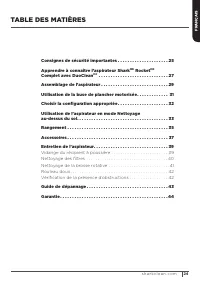
24 s h a r k c l e a n . c o m FR AN Ç AIS TABLE DES MATIÈRES Consignes de sécurité importantes . . . . . . . . . . . . . . . . . . . . . 25 Apprendre à connaître l’aspirateur Shark MD Rocket MD Complet avec DuoClean MC . . . . . . . . . . . . . . . . . . . . . . . . . . . . . 27 Assemblage de l’asp...
Page 26 - EMPLOI GÉNÉRAL; CONSIGNES DE SÉCURITÉ IMPORTANTES; POUR USAGE DOMESTIQUE SEULEMENT; AVERTISSEMENT
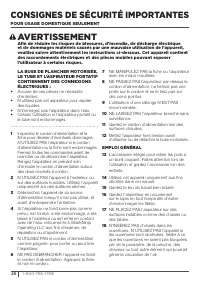
25 1-800-798-7398 LA BUSE DE PLANCHER MOTORISÉE, LE TUBE ET L’ASPIRATEUR PORTATIF CONTIENNENT DES CONNEXIONS ÉLECTRIQUES : • Aucune de ces pièces ne nécessite d’entretien. • N’utilisez pas cet aspirateur pour aspirer des liquides. • N’immergez pas l’aspirateur dans l’eau. • Cessez l’utilisation si l...
Page 27 - FICHE POLARISÉE; CONSERVER CES INSTRUCTIONS; VEUILLEZ LIRE LES DIRECTIVES ATTENTIVEMENT AVANT L’UTILISATION.
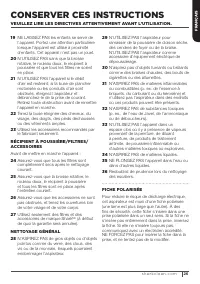
26 s h a r k c l e a n . c o m FR AN Ç AIS 19 NE LAISSEZ PAS les enfants se servir de l’appareil. Portez une attention particulière lorsque l’appareil est utilisé à proximité d’enfants. Cet appareil n’est pas un jouet. 20 N’UTILISEZ PAS sans que la brosse rotative, le rouleau doux, le récipient à po...
Page 28 - ROCKET; COMPLET AVEC DUOCLEAN; UNITÉ PRINCIPALE
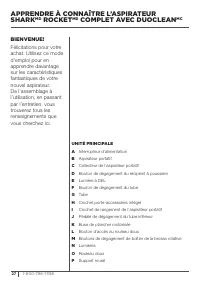
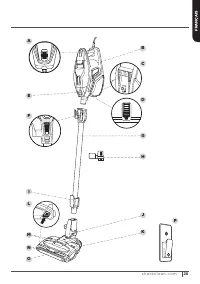
27 1-800-798-7398 APPRENDRE À CONNAÎTRE L’ASPIRATEUR SHARK MD ROCKET MD COMPLET AVEC DUOCLEAN MC BIENVENUE! Félicitations pour votre achat. Utilisez ce mode d’emploi pour en apprendre davantage sur les caractéristiques fantastiques de votre nouvel aspirateur. De l’assemblage à l’utilisation, en pass...
Page 30 - ASSEMBLAGE DE L’ASPIRATEUR; Insérez le tube dans la buse de plancher motorisée jusqu’à; ÉTAPE 1
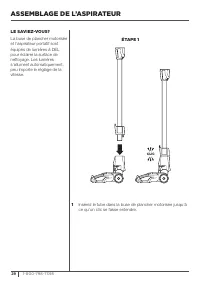
29 1-800-798-7398 ASSEMBLAGE DE L’ASPIRATEUR 1 Insérez le tube dans la buse de plancher motorisée jusqu’à ce qu’un clic se fasse entendre. ÉTAPE 1 LE SAVIEZ-VOUS? La buse de plancher motorisée et l’aspirateur portatif sont équipés de lumières à DEL pour éclairer la surface de nettoyage. Les lumières...
Page 31 - Insérez l’aspirateur portatif dans la; ÉTAPE 2; OU
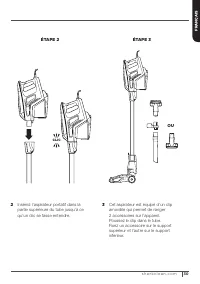
30 s h a r k c l e a n . c o m FR AN Ç AIS 2 Insérez l’aspirateur portatif dans la partie supérieure du tube jusqu’à ce qu’un clic se fasse entendre. 3 Cet aspirateur est équipé d’un clip amovible qui permet de ranger 2 accessoires sur l’appareil. Poussez le clip dans le tube. Fixez un accessoire su...
Page 32 - veuillez; Rouge fixe
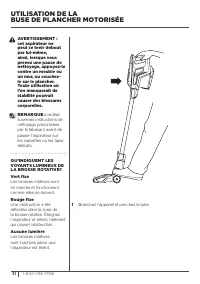
31 1-800-798-7398 UTILISATION DE LA BUSE DE PLANCHER MOTORISÉE AVERTISSEMENT : cet aspirateur ne peut se tenir debout par lui-même, ainsi, lorsque vous prenez une pause de nettoyage, appuyez-le contre un meuble ou un mur, ou couchez-le sur le plancher. Toute utilisation où l’on manquerait de stabili...
Page 33 - CHOISIR LA; Le rouleau doux piège la poussière fine et
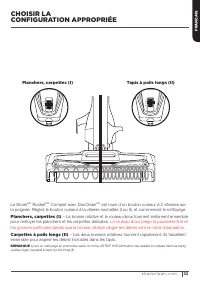
32 s h a r k c l e a n . c o m FR AN Ç AIS ll l 0 ll l 0 CHOISIR LA CONFIGURATION APPROPRIÉE Le Shark MD Rocket MD Complet avec DuoClean MC est muni d’un bouton curseur à 2 vitesses sur la poignée. Réglez le bouton curseur à la vitesse souhaitée (I ou II), et commencez le nettoyage. Planchers, carpe...
Page 34 - les deux; UTILISATION DE L’ASPIRATEUR
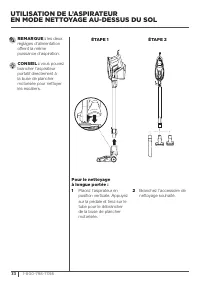
33 1-800-798-7398 Wand Release REMARQUE : les deux réglages d’alimentation offrent la même puissance d’aspiration. CONSEIL : vous pouvez brancher l’aspirateur portatif directement à la buse de plancher motorisée pour nettoyer les escaliers. UTILISATION DE L’ASPIRATEUR EN MODE NETTOYAGE AU-DESSUS DU ...
Page 36 - si votre; RANGEMENT
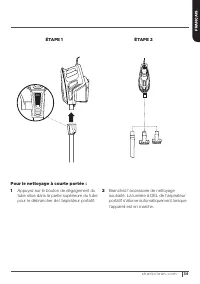
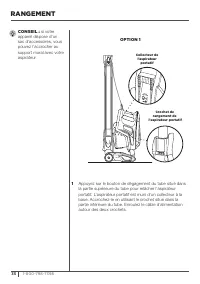
35 1-800-798-7398 CONSEIL : si votre appareil dispose d’un sac d’accessoires, vous pouvez l’accrocher au support mural avec votre aspirateur. RANGEMENT 1 Appuyez sur le bouton de dégagement du tube situé dans la partie supérieure du tube pour relâcher l’aspirateur portatif. L’aspirateur portatif est...
Page 38 - ACCESSOIRES; Tuyère de 12 po; Utilisez la tuyère à; Accessoire pour; Idéal pour retirer les poils; Brosse à épousseter; Idéal pour épousseter une
37 1-800-798-7398 ACCESSOIRES A Tuyère de 12 po Utilisez la tuyère à épousseter pour nettoyer les espaces restreints, les plinthes et les plafonds. C Accessoire pour meuble en tissu Idéal pour retirer les poils d’animaux et la charpie des meubles et d’autres surfaces rembourrées. Idéal pour : les po...
Page 40 - ENTRETIEN DE L’ASPIRATEUR
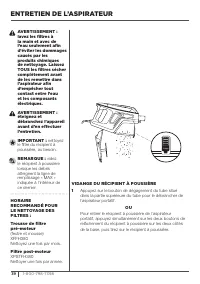
39 1-800-798-7398 Empty AVERTISSEMENT : lavez les filtres à la main et avec de l’eau seulement afin d’éviter les dommages causés par les produits chimiques de nettoyage. Laissez TOUS les filtres sécher complètement avant de les remettre dans l’aspirateur afin d’empêcher tout contact entre l’eau et l...
Page 41 - Le filtre post-moteur se trouve sous la
40 s h a r k c l e a n . c o m FR AN Ç AIS Empty Dust Cup Release Clean Filter NETTOYAGE DES FILTRES1 Pour accéder à la mousse du filtre pré-moteur, et aux filtres en feutre, levez le loquet qui se trouve sur l’aspirateur portatif. Retirez et rincez les filtres avec de l’eau. Tapotez les filtres ent...
Page 42 - Appuyez sur les deux; Pour réinstaller la brosse
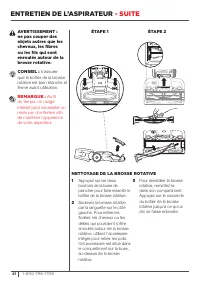
41 1-800-798-7398 ENTRETIEN DE L’ASPIRATEUR - SUITE 1 Appuyez sur les deux boutons de la buse de plancher pour faire ressortir le boîtier de la brosse rotative. 2 Soulevez la brosse rotative par la languette sur le côté gauche. Pour retirer les ficelles, les cheveux ou les débris qui pourraient s’êt...
Page 44 - L’aspirateur soulève les carpettes.
43 1-800-798-7398 GUIDE DE DÉPANNAGE L’aspirateur ne ramasse pas la poussière. L’aspirateur ne ramasse pas la poussière ou ne l’aspire que légèrement. (Consulter la section d’entretien pour plus de renseignements.) • Vérifiez les filtres pour voir s’ils doivent être nettoyés. Suivez les instructions...
Page 45 - GARANTIE LIMITÉE DE
44 s h a r k c l e a n . c o m FR AN Ç AIS GARANTIE LIMITÉE DE CINQ (5) ANS La garantie limitée de 5 ans s’applique aux achats effectués auprès de détaillants autorisés de SharkNinja Operating LLC . La garantie s’applique uniquement au premier propriétaire et au produit original et n’est pas transfé...
Page 46 - GRACIAS
45 1-800-798-7398 GRACIAS por comprar la aspiradora Shark ® Rocket ® Completo con DuoClean ™ LEA ESTAS INSTRUCCIONES DETENIDAMENTE Y CONSÉRVELAS PARA REFERENCIA FUTURA. Este Manual del propietario está diseñado para ayudarlo a comprender en profundidad su nueva Shark Rocket Completo with DuoClean. S...
Page 47 - ÍNDICE; Nociones básicas sobre su Shark
46 s h a r k c l e a n . c o m ESP A Ñ OL ÍNDICE Instrucciones importantes de seguridad . . . . . . . . . . . . . . . . 47 Nociones básicas sobre su Shark ® Rocket ® Completo con DuoClean ™ . . . . . . . . . . . . . . . . . . . . . . . . . . . . . . 49 Cómo armar su aspiradora . . . . . . . . . . . ...
Page 48 - USO GENERAL; INSTRUCCIONES IMPORTANTES DE SEGURIDAD; PARA USO DOMÉSTICO ÚNICAMENTE; ADVERTENCIA
47 1-800-798-7398 LA BOQUILLA DE PISO MOTORIZADA, EL VÁSTAGO Y LA ASPIRADORA PORTÁTIL CONTIENEN CONEXIONES ELÉCTRICAS: • Estas no son piezas reparables. • No las utilice para aspirar ningún líquido. • No las sumerja en agua para limpiarlas. • Si la aspiradora portátil/el vástago están dañados, suspe...
Page 49 - ENCHUFE POLARIZADO; CONSERVE ESTAS INSTRUCCIONES; LÉALAS CUIDADOSAMENTE ANTES DEL USO
48 s h a r k c l e a n . c o m ESP A Ñ OL 19 NO permita que los niños usen el aparato. Es necesario prestar mucha atención cuando se use cerca de los niños. Este aparato no es un juguete. 20 NO use la aspiradora sin que el cepillo giratorio, el rodillo suave, el recipiente para el polvo y todos los ...
Page 50 - UNIDAD PRINCIPAL
49 1-800-798-7398 NOCIONES BÁSICAS SOBRE SU SHARK ® ROCKET ® COMPLETO CON DUOCLEAN ™ ¡BIENVENIDO! Felicitaciones por su compra. Use este manual de instrucciones para conocer las excelentes características de su nueva aspiradora. Desde el ensamblaje hasta el uso y el mantenimiento, encontrará todo aq...
Page 52 - CÓMO ARMAR SU ASPIRADORA; Inserte el vástago en el conector de la boquilla de piso
51 1-800-798-7398 CÓMO ARMAR SU ASPIRADORA 1 Inserte el vástago en el conector de la boquilla de piso motorizada hasta que escuche un clic. PASO 1 ¿SABÍA QUE...? La boquilla de piso motorizada y la aspiradora portátil tienen luces LED que iluminan la superficie del piso que se desea limpiar. Las luc...
Page 53 - Inserte la aspiradora portátil en la
52 s h a r k c l e a n . c o m ESP A Ñ OL 2 Inserte la aspiradora portátil en la parte superior del vástago hasta que escuche un clic. 3 Esta aspiradora se proporciona con un broche desmontable que permite almacenar hasta dos accesorios en la aspiradora. Coloque el broche al vástago. Almacene un acc...
Page 54 - Antes de pasar la; Rojo continuo
53 1-800-798-7398 CÓMO USAR LA BOQUILLA DE PISO MOTORIZADA ADVERTENCIA: Esta aspiradora no posee autonomía de sostén, por lo que, cuando deje de utilizarla por un momento, apóyela contra un mueble o una pared, o bien recuéstela en el piso. El uso en un lugar en el que la unidad no tenga estabilidad ...
Page 55 - SELECCIÓN DE LA; El
54 s h a r k c l e a n . c o m ESP A Ñ OL ll l 0 ll l 0 SELECCIÓN DE LA CONFIGURACIÓN APROPIADA La aspiradora Shark ® Rocket ® Completo con DuoClean ™ tiene un interruptor deslizante de dos velocidades en el mango. Deslice el interruptor hasta la configuración de velocidad adecuada (I o II) y comien...
Page 56 - Ambas; CÓMO USAR SU ASPIRADORA
55 1-800-798-7398 Wand Release NOTA: Ambas configuraciones de potencia proporcionan la misma potencia de succión. CONSEJO: Puede acoplar la aspiradora portátil directamente a la boquilla de piso motorizada para limpiar con comodidad las escaleras. CÓMO USAR SU ASPIRADORA EN MODO “POR ENCIMA DEL PISO...
Page 58 - Si la unidad; ALMACENAMIENTO; OPCIÓN 1
57 1-800-798-7398 CONSEJO: Si la unidad vino con una bolsa de accesorios, puede colgarla en el montaje para pared junto con la aspiradora. ALMACENAMIENTO 1 Presione el botón Wand Release (Liberación del vástago) que se encuentra en la parte superior del vástago para liberar la aspiradora portátil. E...
Page 59 - OPCIÓN 2
58 s h a r k c l e a n . c o m ESP A Ñ OL 2 Utilice el montaje para pared incluido. Realice dos perforaciones de 5/16 pulgadas e inserte en la pared los tarugos de plástico proporcionados. Con un destornillador Phillips, atornille el montaje para pared en los tarugos de plástico. Coloque el enganche...
Page 60 - ACCESORIOS; Herramienta para; Es perfecta para recolectar; Cepillo para polvo; Es excelente para limpiar
59 1-800-798-7398 ACCESORIOS A Herramienta para grietas de 12 pulgadas Limpie entre espacios reducidos o alcance zócalos y techos gracias a esta delgada herramienta para grietas. C Herramienta para tapizado Es perfecta para recolectar el pelo de las mascotas y las pelusas de los muebles y de otras s...
Page 62 - Limpie; MANTENIMIENTO DE LA ASPIRADORA
61 1-800-798-7398 Empty ADVERTENCIA: Lave los filtros a mano únicamente con agua para evitar los daños causados por los productos químicos de limpieza. Deje secar por completo TODOS los filtros antes de volver a colocarlos en la aspiradora a fin de evitar que penetre líquido en las piezas eléctricas...
Page 63 - Acceda al filtro posterior al motor, que; Filtro posterior
62 s h a r k c l e a n . c o m ESP A Ñ OL Empty Dust Cup Release Clean Filter CÓMO LIMPIAR LOS FILTROS1 Para acceder a los filtros de espuma y de fieltro anteriores al motor, levante el recipiente para el polvo que se encuentra en la parte superior de la aspiradora portátil. Retire y enjuague con ag...
Page 64 - Presione los dos botones
63 1-800-798-7398 MANTENIMIENTO DE LA ASPIRADORA - CONT. 1 Presione los dos botones en la boquilla de piso para levantar el compartimiento del cepillo giratorio. 2 Levante el cepillo giratorio de la aleta del lado izquierdo. Para retirar cualquier hilo, pelo o residuo que pueda estar enredado en el ...
Page 66 - La aspiradora levanta los tapetes pequeños.
65 1-800-798-7398 GUÍA DE SOLUCIÓN DE PROBLEMAS La aspiradora no recoge residuos. No hay succión, o la succión es leve. (Consulte la sección Mantenimiento para obtener más información). • Revise los filtros para controlar si es necesario limpiarlos. Siga las instrucciones para enjuagar y dejar secar...
Page 67 - GARANTÍA LIMITADA DE
66 s h a r k c l e a n . c o m ESP A Ñ OL GARANTÍA LIMITADA DE CINCO (5) AÑOS La garantía limitada de cinco años se aplica a las compras realizadas a los vendedores minoristas autorizados de SharkNinja Operating LLC . La cobertura de garantía se aplica solo al propietario original y al producto orig...