Honeywell T6 PRO Z-WAVE PROGRAMMABLE THERMOSTAT - Manuals
Honeywell T6 PRO Z-WAVE PROGRAMMABLE THERMOSTAT – Manual, User Manual in PDF format online.
Manuals:
Manual Honeywell T6 PRO Z-WAVE PROGRAMMABLE THERMOSTAT


Summary
2 Read and save these instructions. Introduction The T6 Pro Z-Wave Programmable Thermostat is a Z-Wave Plus certified thermostat capable of controlling up to three heat and two cool stages of heat pump, (incl. dual fuel heat pump systems) and up to two heat and two cool stages of conventional system...
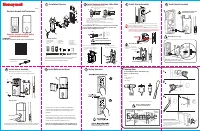
3 UWP Mounting System installation 1. Open package to find the UWP. See Figure 1. 2. Position the UWP on the wall. Level and mark hole positions. See Figure 2. Drill holes at marked positions, and then lightly tap supplied wall anchors into wall using a hammer. ‒ Drill 7/32” holes for drywall. 3. Pu...
4 Wiring UWP Push down on the tabs to put the wires into the inner holes of their corresponding termi nals on the UWP (one wire per terminal) until they are firmly in place. Gently tug on the wires to verify they are secure. If you need to release the wires again, push down the terminal tabs on the ...
User Manual Honeywell T6 PRO Z-WAVE PROGRAMMABLE THERMOSTAT


Summary
2 Table of contents Thermostat features ................................................................................................................ 3Thermostat overview ............................................................................................................... 4Basic thermos...
3 Thermostat features The Honeywell T6 Pro Z-Wave Programmable Thermostat is a Z-Wave Plus certified thermostat designed to work with any Z-Wave compliant controller or gateway for easy programming and automation to deliver energy savings and comfort at the same time. The thermostat can be operated ...
4 Mode Touch to select system mode: • Auto (if enabled) • Heat • Cool • Off • Em Heat (Emergency Heat if installed and configured) Menu Touch to program a schedule and see other customizable options. Fan Touch to select fan mode: • Auto • On • Circulate Desired temperature Shows desired indoor tempe...
Honeywell Manuals
-
 Honeywell DT8050A
Installation Manual
Honeywell DT8050A
Installation Manual
-
 Honeywell DT8050
Manual
Honeywell DT8050
Manual
-
Honeywell DT8050
User Manual
-
 Honeywell TPFIT25WK
User Manual
Honeywell TPFIT25WK
User Manual
-
Honeywell TPFIT32WK
User Manual
-
 Honeywell 24DX47
User Manual
Honeywell 24DX47
User Manual
-
 Honeywell TPFIT50PWK
User Manual
Honeywell TPFIT50PWK
User Manual
-
 Honeywell TPFIT50WK
User Manual
Honeywell TPFIT50WK
User Manual
-
Honeywell TPFIT50AWK
User Manual
-
Honeywell TPFIT50APWK
User Manual
-
 Honeywell 00010
User Manual
Honeywell 00010
User Manual
-
 Honeywell TP70AWKNR
User Manual
Honeywell TP70AWKNR
User Manual
-
 Honeywell PC42E-T
User Manual
Honeywell PC42E-T
User Manual
-
 Honeywell H3UF*
User Manual
Honeywell H3UF*
User Manual
-
Honeywell TP70PWKNR
User Manual
-
 Honeywell HPA3100B
User Manual
Honeywell HPA3100B
User Manual
-
 Honeywell PM65
User Manual
Honeywell PM65
User Manual
-
 Honeywell E3539N
User Manual
Honeywell E3539N
User Manual
-
Honeywell HDS24SS
User Manual
-
 Honeywell 8635214
User Manual
Honeywell 8635214
User Manual