Page 3 - PERSONALIZZARE LA QUANTITÀ DI ACQUA
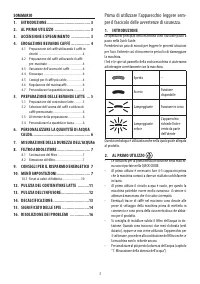
3 SOMMARIO1. INTRODUZIONE ....................................... 32. AL PRIMO UTILIZZO ................................ 33. ACCENSIONE E SPEGNIMENTO ................. 34. EROGAZIONE BEVANDE CAFFÈ ................. 4 4.1 Preparazione del caffè utilizzando il caffè in chicchi ...........................
Page 4 - Long; x 5 sec
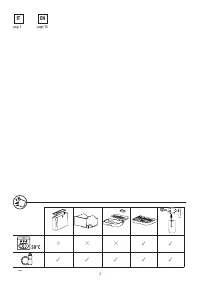
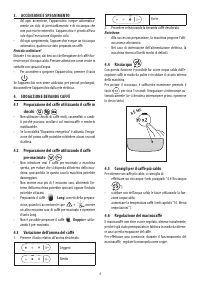
4 3. ACCENSIONE E SPEGNIMENTO • Ad ogni accensione, l’apparecchio esegue automatica- mente un ciclo di preriscaldamento e di risciacquo che non può essere interrotto. L’apparecchio è pronto all’uso solo dopo l’esecuzione di questo ciclo. • Ad ogni spegnimento, l’apparecchio esegue un risciacquo auto...
Page 5 - Per aprire il coperchio del contenitore latte:
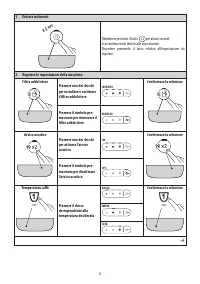
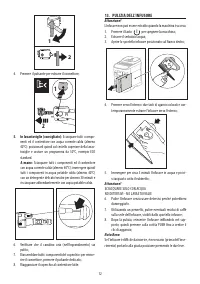
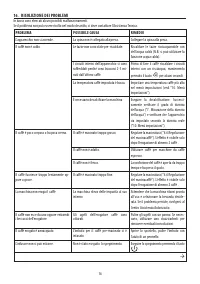
5 Se il caffè esce troppo lentamente o non esce affatto. L’effetto di questa correzione si avverte solo dopo l’erogazione di almeno 2 caffè successivi. Girare di uno scatto verso il numero 7 Per un’erogazione del caffè più corposa e migliorare l’aspetto della crema L’effetto di questa correzione si ...
Page 7 - FILTRO ADDOLCITORE
7 3. Estrarre la striscia dall’acqua e scuoterla leggermente. Dopo circa un minuto si formano 1, 2, 3 oppure 4 qua-dratini di colore rosso, a seconda della durezza dell’acqua ogni quadratino corrisponde a 1 livello. Total Hardness Test Livello durezza 1 Bassa 2 Media 3 Media/Alta 4 Alta Vedi istruzi...
Page 8 - Mantenere premuto il tasto
8 1. Entrare nel menù: x 5 sec Mantenere premuto il tasto per alcuni secondi: si accendonoi tasti relativi alle impostazioni.Procedere premendo il tasto relativo all’impostazione da regolare. 2. Regolare le impostazioni della macchina: Filtro addolcitore Premere uno dei chicchi per installare o sost...
Page 10 - Reset ai valori di fabbrica; BEEP; PULIZIA DELL‘APPARECCHIO; Componente
10 10.1 Reset ai valori di fabbrica Verificare che la macchina sia in stand-by (spenta, ma collegata alla rete elettrica). Mantenere premuti per 5 secondi i tasti relativi alle bevande 1 , 2 e : ritornano ai valori di fabbrica tutte le impostazioni e anche le quantità delle bevande. 1 2 x 5 sec La m...
Page 11 - PULIZIA DEL CONTENITORE LATTE
11 Componente Frequenza Procedura Componenti vaschetta raccogligocce La vaschetta raccogligocce è provvista di un indicatore galleggiante di colore rosso) del livello dell’acqua contenuta.Prima che questo indicatore cominci a sporgere dal vassoio poggiatazze, è ne-cessario svuotare la vaschetta e pu...
Page 12 - PULIZIA DELL’INFUSORE
12 1 2 4. Premere il pulsante per estrarre il connettore; 2 1 5. In lavastoviglie (consigliato): Sciacquare tutti i compo- nenti ed il contenitore con acqua corrente calda (almeno 40°C): posizionarli quindi sul cestello superiore della lavas-toviglie e avviare un programma da 50°C, esempio ECO stand...
Page 13 - DECALCIFICAZIONE; decalcificante
13 9. Una volta inserito, assicurarsi che i due tasti colorati siano scattati verso l’esterno; PUSH 10. Chiudere lo sportello infusore;11. Reinserire il serbatoio acqua. 14. DECALCIFICAZIONE Per completare correttamente il ciclo di decalcificazione fare molta attenzione alle quantità richieste nel s...
Page 14 - SIGNIFICATO DELLE SPIE; Spia
14 • E’ normale che, dopo aver eseguito il ciclo di decalcifica- zione, ci sia dell’acqua nel contenitore dei fondi di caffè. • L’apparecchio richiede un terzo risciacquo, nel caso in cui il serbatoio acqua non sia stato riempito fino al livello MAX: questo per garantire non ci sia soluzione decalci...
Page 16 - RISOLUZIONE DEI PROBLEMI; PROBLEMA
16 16. RISOLUZIONE DEI PROBLEMI In basso sono elencati alcuni possibili malfunzionamenti. Se il problema non può essere risolto nel modo descritto, si deve contattare l’Assistenza Tecnica. PROBLEMA POSSIBILE CAUSA RIMEDIO L’apparecchio non si accende. La spina non è collegata alla presa. Collegare l...
Page 19 - Making coffee using pre-ground coffee; LONG; Varying the coffee aroma; Tips for a hotter coffee
19 ed. The appliance is not ready for use until the cycle has been completed. • Whenever the machine is turned off after being used to make coffee, it performs an automatic rinse cycle. Danger of scalding! During rinsing, a little hot water flows from the coffee spouts. Take care to avoid contact wi...
Page 20 - To open the milk container lid:
20 4.7 Customising the quantity in the cup 1. Press the button relative to the beverage being pro- grammed and hold for a few seconds: the programming menu is accessed when the indicator switches to fast blink. Delivery begins; 2. Once the cup is filled to the desired level, press the bev- erage but...
Page 22 - Removing the filter; TIPS FOR ENERGY SAVING
22 8.2 Removing the filter If you want to use the appliance without the filter, you must remove it and notify the appliance of its removal. 1. Extract the water tank and exhausted filter; 2. See instructions in section “10. Settings menu” to set the machine. Please note! After two months (see date i...
Page 24 - Press the; Reset default values; Press the buttons corresponding to beverages
24 Water hardness 3 Press the symbol corresponding to the level to set LEVEL 1 Confirm selection 3 LEVEL 2 LEVEL 3 LEVEL 4 Auto-off 4 Press the symbol corresponding to the time to set 15 MINUTES Confirm selection 4 30 MINUTES 1 HOUR 3 HOURS 3. Exit the menu: Press the button: The machine is ready fo...
Page 25 - CLEANING THE MACHINE; Component
25 The machine emits a long beep and all the indicator lights flash to confirm the reset BEEP 11. CLEANING THE MACHINE Important! • Do not use solvents, abrasive detergents or alcohol to clean the coffee machine. With De’Longhi superautomatic coffee machines, no chemical products are required for cl...
Page 26 - CLEANING THE MILK CONTAINER
26 Component Frequency Procedure Inside of the machine Check periodically (about once a month) that the inside of the appliance (accessi-ble by removing the drip tray) is not dirty. Switch the machine off and disconnect from the power supply. Never immerse the machine in water. • Remove coffee depos...
Page 27 - CLEANING THE INFUSER
27 By hand: Rinse all components and the container with hot running water (at least 40°C), then immerse all the compo-nents in hot tap water (at least 40°C) with a mild/neutral washing-up liquid for at least 30 minutes. Rinse thoroughly with hot tap water. 6. Make sure the air groove (in enlargement...
Page 28 - EXPLANATION OF INDICATOR LIGHTS; Light
28 14. DESCALING To complete the descaling cycle correctly, pay close atten-tion to the quantities required in the water tank for each step: Step 1: Descaling action + Step 2: First rinse Step 3: Second rinse • Before use, read the instructions and the labelling on the descaler pack. • Use De’Longhi...
Page 31 - TROUBLESHOOTING; PROBLEM
31 16. TROUBLESHOOTING Below is a list of some possible malfunctions. If the problem cannot be resolved as described, contact customer services. PROBLEM POSSIBLE CAUSE REMEDY The appliance does not come on. It is not plugged into the mains socket. Plug into the mains socket. The coffee is not hot. T...