DeLonghi EC260BK - User Manual
DeLonghi EC260BK Coffee Machine – User Manual, read for free online in PDF format. We hope this helps you resolve any issues you may have. If you have further questions, please contact us through the contact form.


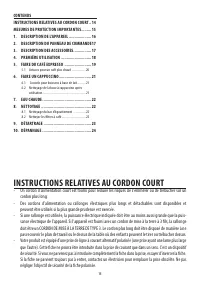
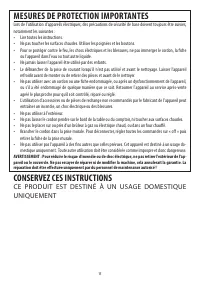
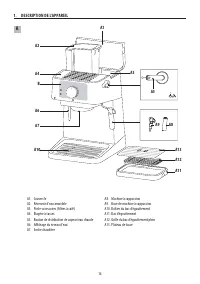
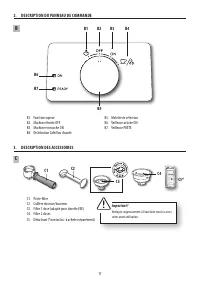
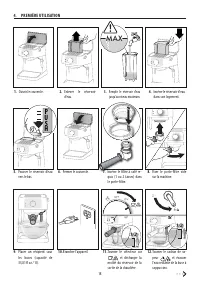
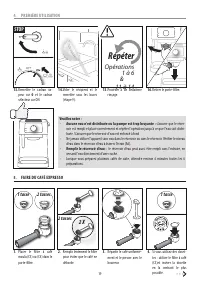
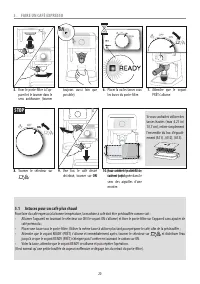
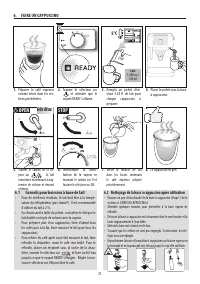
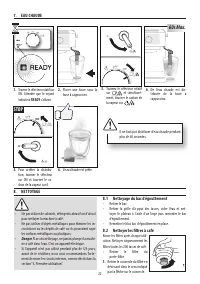


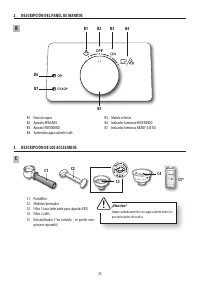


Table of Contents:
- Page 3 – IMPORTANT SAFEGUARDS; water or other liquid.; authorized service personnel only!; SAVE THESE INSTRUCTIONS; THIS PRODUCT IS FOR HOUSEHOLD USE ONLY; SHORT CORD INSTRUCTIONS
- Page 4 – DESCRIPTION OF THE APPLIANCE
- Page 6 – MAX
- Page 7 – STOP; Repeat; MAKE ESPRESSO COFFEE
- Page 8 – Tips for a hotter coffee
- Page 9 – Tips for milk beverages
- Page 10 – Cleaning the drip tray
- Page 14 – INSTRUCTIONS RELATIVES AU CORDON COURT; peuvent être utilisés si la plus grande prudence est exercée.
- Page 15 – MESURES DE PROTECTION IMPORTANTES; entraîner un incendie, un choc électrique ou des blessures.; CONSERVEZ CES INSTRUCTIONS; CE PRODUIT EST DESTINÉ À UN USAGE DOMESTIQUE
- Page 16 – DESCRIPTION DE L’APPAREIL
- Page 18 – PREMIÈRE UTILISATION
- Page 19 – Répéter; Opérations; FAIRE DU CAFÉ EXPRESSO; tasse
- Page 20 – FAIRE UN CAFÉ EXPRESSO; Astuces pour un café plus chaud
- Page 21 – FAIRE UN CAPPUCCINO; Conseils pour boissons à base de lait
- Page 22 – Nettoyage du bac d’égouttement
- Page 26 – INSTRUCCIONES CABLE CORTO; con un cable más largo.
- Page 27 – ADVERTENCIAS DE SEGURIDAD; rato en agua o cualquier otro líquido.; GUARDE ESTAS INSTRUCCIONES; ESTE PRODUCTO ESTÁ DESTINADO EXCLUSIVAMENTE AL
- Page 28 – DESCRIPCIÓN DEL APARATO
- Page 31 – Repetir; pasos de 1 a 6; PREPARAR CAFÉ ESPRESSO; tazas
- Page 32 – Consejos para un café más caliente
- Page 33 – PREPARAR CAPUCHINO; Consejos para bebidas a base de leche
- Page 34 – Limpieza de la bandeja de goteo
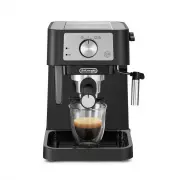
EC260 - 265
ESPRESSO MAKER
Instructions for use. Keep these instructions
Visit www.delonghi.com for a list of service
centers near you.
ELECTRIC CHARACTERISTICS
120 V~ 60 Hz 1100 W
MACHINE À CAFÉ
Mode d’emploi . Conservez cette notice
Visitez www.delonghi.com pour y voir une
liste des centres de réparation proches de
chez vous.
CARACTÉRISTIQUES ÉLECTRIQUES
120 V~ 60 Hz 1100 W
CAFETERA
Repase y guarde estas instrucciones.
Lea cuidadosamente este instructivo antes de
usar su aparato.
Visite www.delonghi.com para ver la lista de
centros de servicios cercanos a usted.
CARACTERISTICAS ELECTRICAS:
120 V~ 60 Hz 1100 W
"Loading the manual" means you need to wait until the file loads and becomes available for online reading. Some manuals are very large, and the time they take to appear depends on your internet speed.
Summary
3 IMPORTANT SAFEGUARDS When using electrical appliances, basic safety precautions should always be followed, including the following:• Read all instructions.• Do not touch hot surfaces. Use handles and knobs.• To protect against fire, electrical shock and personal injury, do not immerse cord, plug o...
4 A11 A1 A A2 A3 A4 A6 A7 B A5 A9 A8 A10 A12 A13 1. DESCRIPTION OF THE APPLIANCE A1. LidA2. Removable water tankA3. Accessories holder (coffee filters)A4. Cup shelfA5. Steam/hot water delivery knobA6. Water level display A7. Boiler outlet A8. Cappuccino makerA9. Cappuccino maker nozzleA10. Drip tray...
6 4. FIRST USE 1/2 MAX P U S H 1/2 1. Open the lid. 2. Remove the water tank. 3. Fill the water tank up to the max level. 4. Insert the water tank in its housing. 5. Push the water tank down. 6. Close the lid. 7. Insert the required coffee filter (1 or 2 cups) in the portafilter. 8. Attach the empty...