Canon BF-9S- Manuals
Canon BF-9S– User Manual, Manual in PDF format online.
Manuals:
User Manual Canon BF-9S
Summary
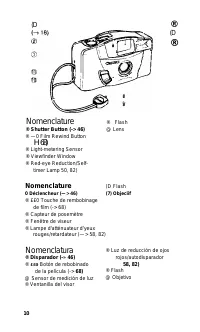
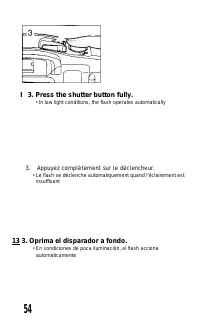
(D ® (D ® Nomenclature ® Shutter Button (-> 46) ® —0 Film Rewind Button H 68) ® Light-metering Sensor ® Viewfinder Window ® Red-eye Reduction/Self- timer Lamp 50, 82) ® Flash @ Lens Nomenclature 0 Déclencheur (—> 46) ® ££0 Touche de rembobinage de film (-> 68) ® Capteur de posemètre ® Fenêt...
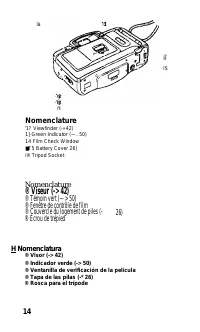
là iî IS f7i Nomenclature '1? Viewfinder (-»42) 1} Green Indicator (—. 50) 14 Film Check Window ■T5 Battery Cover 26) i® Tripod Socket Nomenclature ® Viseur (-> 42) ® Témoin vert (—> 50) ® Fenêtre de contrôle de film ® Couvercle du logement de piles (- ® Écrou de trépied 26) Н Nomenclatura ® V...
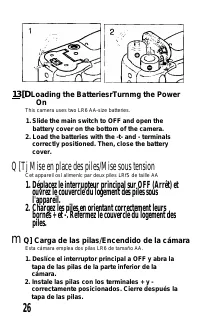
Thank you for purchasing this Canon product. Before taking pictures, please read these instructions carefully for a fhorough understanding of how the camera operates. Table of Contents Handling Precautions......... Conventions....................... Nomenciature ............. .. Table of Contents .....
13 [D Loading the BatteriesrTurnmg the Power On This camera uses two LR6 AA-size batteries. 1. Slide the main switch to OFF and open the battery cover on the bottom of the camera. 2. Load the batteries with the -t- and - terminals correctly positioned. Then, close the battery cover. Q [Tj Mise en pl...
3. Slide the main switch to ON and check the batteries. • Check that the icon appears on the LCD panel when you turn the camera on. «Î 1 (lit) The battery is fully charged <~ii (lit) Prepare new batteries, (blinking) Fit the new batteries. 3. Déplacez le interrupteur principal sur OIN (Marche) et...
B » ' Always check the batteries before taking any pictures. (-> 28) ' Do not use nickel-cadmium or lithium batteries •When replacing the batteries, be sure to replace both batteries at the same time with new ones. • Always remove the batteries from the camera if you will not be using it for a lo...
»Long-life alkaline batteries are recommended.»If the camera does not work after new batteries have been loaded, remove the batteries, then insert them again. • Utiiis.e^ des piles alcalines longue durée. • Si t'appareil ne fonciionne pas quand des piles neuves sont insérées, retirez les piles et re...
13 [H Loading the Film Use DX-coded ISO 100, 200 or 400 film. The camera automatically detects the film speed and selects the correct setting. 1. Open the back cover. 2. Load a new film. • Pull the film tip across until it reaches the tilm tip position mark. Q U] Chargement du film Utiliser, des fil...
3. Close the back cover. • The film will automatically advance to the first picture on the roll 4. “1” is displayed in the frame counter. • If the trame counter shows a blinking "0", the film did not load correctly Load the film again. 3. Refermez le couvercle arrière. • Le film va avancer a...
B o • If you insert the batteries after loading the film, turn on the main switch, and press the shutter button once. The film will automatically advance to the first frame. ■ This camera is designed to be used with negative film only. Therefore, slide film cannot be used. ■a o ' Si vous insérez les...
[3] Holding the Camera/Viewfinder To take sharp pictures, hold the camera firmly so that it does not move. • Hold the camera with both hands and brace your elbows lightly against your body. • Rest the camera against your forehead, look through the viewfirtder and then slowly and gently press the shu...
B o • When you hold the camera, take care to keep your fingers, your hair and the strap away from the lens, light-metering sensor and flash. • Hold the camera still until you hear the sound of the film winding on, indicating that the camera has finished taking the picture. ' Quand vous tenez l’appar...
[I] Shutter Button Action The shutter button has a two-step action. The first step sets the exposure, whiie the second step reieases the shutter. Be sure to press the shutter button siowiy and gentiy. [ 4 ] Déclencheur Le déclencheur procède en deux tempsPremièrement, il règle l’exposition et deuxiè...
i Green Indicator When you press the shutter button down halfway, the indicator lights to show whether the camera is ready to shoot. 0 Témoin vert Lorsque vous appuyez à mi-course sur le déclencheur, le témoin s'allume pour indiquer si l'appareil photo est prêt à la prise de vue. m 0 Indicador verde...
l E Taking Pictures (Fully Automatic) Sliding the main switch to the ON position turns the camera on and sets the mode to fully automatic (Auto Flash)Stand at least 1.5 m (4.9 ft.) from the subject to be taken. 1. Look in the viewfinder to compose your picture. 2. Press the shutter button haifway an...
Flash Distance Range (with color print film) ISO 100 ISO 400 1 5 to 3.0 m (4.9 to 9 8 ft ) 1 5 to 60 m (4.9 to 19 6 ft) When the camera is not being used, always turn off the main switch and cióse the lens cover to protect the lens against dirt and dust. Plage de distance de flash (film couleur) 100...
Red-eye Reduction Function People in photographs taken with a flash in dark, or low light conditions often appear to have glowing red eyes This phenomenon is called “red-eye” and occurs when the light of the flash is reflected off the subject’s retina. For flash photography, in dark, or low light co...
[S Removing the Film The film rewinds automatically when it reaches the end. The frame counter counts down as the film rewinds and the frame counter shows "0" when the film is fully rewound [U Rembobinage du film Le film se rembobine automatiquement quand il atteint la fin de la pellicule. L...
1. Check that the frame counter has returned to “ 0 ”. 2. Open the back cover.3. Remove the film. 1. Vérifiez que le compteur de vues est revenu sur “0” 2. Ouvrez le couvercle arrière. 3. Retirez le film. B 1. Verifique que el contador de exposiciones haya regresado a “0”. 2. Abra el respaldo. 3. Ex...
Reverse-winding the film in mid-roll • Press the so button. ^ Exposures taken after those indicated on the film roll " may be cut off. Rembobinage du film à mi-course • Appuyez sur la louche sQ . O Les vues excédant le nombre de poses du film ne sont [ toujours imprimées sur la pellicule. n Rebo...
0 E] ^ Flash ON (Forced Flash) Mode In this mode, the flash fires regardless of the light conditions when the picture is taken. Use this setting for fill-in flash in daylight or to soften the outline of your subject Press the % button until the the LCD panel. i icon appears on El ^ Mode de flash act...
Q S # “Blitz EIN” (Blitz bei jeder Aufnahme) In dieser Betriebsart wird der Blitz ohne Berücksichtigung des Umlichts bei jeder Aufnahme gezündet. Verwenden Sie diese Einstellung zum Aufhellen von Motiven bei Tageslicht, oder um die Konturen des Motivs weicher erscheinen zu lassen. Drücken Sie die ^ ...
[B Flash OFF (Suppressed Flash) Mode In this mode, the flash does not fire regardless of how dark conditions are when the picture is taken. Use this mode for sunset shots, for places where flash use is prohibited, or for available-light photography. Mode de flash débrayé (flash supprimé) Dans ce mod...
Press the * button until the ® icon appears on the LCD panel. Appuyez sur la touche V jusqu’à ce que le pictogramme ® apparaisse sur le panneau LCD. |a Oprima el botón i hasta que aparezca el icono ® ^ en el panel de LCD. 78
2. Look in the viewfinder to compose your picture.3. The green indicator lights up when the shutter button is pressed and the self-timer starts. • The red-eye reduction lamp starts flashing and the shutter is released after approximately 10 seconds. • To cancel the self-timer, press the S button. 2....
m 2. Blicken Sie in den Sucher und wählen Sie den gewünschten Bildausschnitt. 3. Wenn Sie nun den Auslöser drücken, leuchtet die grüne Anzeigelampe, und der Selbstauslöser läuft an. • Die Lampe für "Rote-Augen" Effektreduzierrjng beginnt zu blinken, und der Verschluß wird 10 Sekunden spater ...
REC ' .VI .S 'nn injn UU lUCU V___________ _ } MODE ^ SELECT SET 13 m Imprinting the Date and Time Press the MODE button to select the date and time to be imprinted on the photograph. Each time the button is pressed, the selection changes as shown above.The selected date and time display is imprinte...
' 0£3 13 го líís юго'оо Q m Datuin/Uhrzeit-Einblendung Wählen Sie mit der MODE -Taste das Datum/Uhrzeit-Format, das in die Aufnahme eingeblendel werden soll. Das Format wechselt bei wiederholtem Drücken der Taste nach dem oben dargestellten Schema. Datum und Uhrzeit werden danach beim Fotografieren ...
• Use the projection on the strap fixture to press the buttons. ►When the shutter is released, the imprinting confirmation mark (f) flashes to indicate that the date or time has been imprinted. ► If the background of the imprinting position is bright or includes an orange or white subject, the figur...
T’JJím H3 Setting the Date The camera has a built-in automatic calendar that runs until the year 2049, so there is no need to set the date each time pictures are taken. However, the procedure below describes how to correct the date when you are traveling overseas or have replaced the date battery. 1...
2. Press the SELECT button. ■ Press until the digit to be corrected blinks. 3. Press the SET button. • Correct the digit. 4. Press the SELECT button until all digits stop blinking. • When all the digits are lit, no longer blinking, the setting is complete 2. Appuyez sur la touche SELECT. • Appuyez s...
2. Drücken Sie die SELECT-Taste. • Drücken Sie die Taste, bis die zu korrigierenden Anzeigeslellen auf dem Display blinken. 3. Drücken Sie die SET-Taste, • Stellen Sie den richtigen Wert ein 4. Drücken Sie abschließend die SELECT-Taste, bis keine der Anzeigestellen mehr blinkt. • Sobald alle Stellen...
in Setting the Time The camera has a built-in automatic calendar that runs until the year 2049, so there is no need to set the time each time pictures are taken. However, the procedure below describes how to correct the time when you are traveling overseas or have replaced the date battery. m Réglag...
1. Press the MODE button to display the date and time. • Display the time format to be corrected 2. Press the SELECT button. • Press until the digit to be corrected blinks 3. Press the SET button. • Correct the digit. 1. Appuyez sur la touche MODE pour afficher la date et l’heure. • Le format de heu...
1. Drücken Sie die MODE-Taste, bis eine Datum/Uhrzeit-Anzeige auf dem Display erscheint. • Rufen Sie das zu korrigierende Uhrzeit-Format auf 2. Drücken Sie die SELECT-Taste. • Drücken Sie die Taste, bis die zu korrigierenden Anzeigestellen auf dem Display blinken 3. Drücken Sie die SET-Taste. • Stel...
4. Press the SELECT button until all digits stop blinking. • When all the digits are lit, no longer blinking, the setting is complete [H • Pressing the SET button once moves to the next digit. Hold the SET button down to move through the digits in succession. • Use the projection on the strap fixtur...
Replacing the Date Battery When the digits imprinted on photographs become faint regardless of the background, replace the date battery. One CR2025 lithium battery is used to maintain the date. Rempluccment di.’ la pile du dateur Quand les chiiTrcs imprimís sur les phnios deviennent illisibles quel ...
Troubleshooting In case of trouble check the table below before taking you camera to be repaired. Problem Cause Remedy Page The C3 icon •The batteries are •Replace the new 26 blinks on the LCD panel. expired. batteries. The №ii icon is •No battery is loaded. •Load the batteries. 26 not displayed on ...
Q Localización de averías En el caso de que ocurra alguna avería, revise la tabla de abajo antes de llevar su cámara al servicio. Problema Causa Solución Página El icono d3 •Las pilas están •Reemplace las 26 parpadea en el panel de LCD. agotadas. pilas. El icono 4Bii no se visualiza en el •La pila n...
Q Specifications Type; 35mm fully automatic lens-shutter fixed focus camera Image Size: 24 x 36mm Lens: Canon 32 mm f/5.6 Focal Distance: 1.5 m/4.9 ft. to infinity Shutter: Shutter with combinable programs Viewfinder: Inverted Galilean finder Film Loading: Automatic (automatic blank film advance) Fi...
Canon CANON INC. 30-2, Shimomaruko 3-chome, Ohta-ku, Tokyo 146-8501, Japan U.S.A.------------------ CANON U.S.A. INC. For all inquiries concerning this camera, call toll free in the U.S. 1 -800-828-4040 or write to: Customer Relations, Canon U.S.A., Inc. One Canon Plaza, Lake Success, N.Y. 11042*119...
Manual Canon BF-9S
Canon Manuals
-
Canon 6130280
User Manual
-
Canon imageCLASS MF284dw
User Manual
-
Canon imageCLASS MF289dw
User Manual
-
Canon imageCLASS LBP172dw
User Manual
-
Canon 248
User Manual
-
Canon 323
User Manual
-
Canon 323
Installation Manual
-
Canon 323
Manual
-
Canon 250
User Manual
-
Canon 251
User Manual
-
Canon 251
Manual
-
Canon 251
Troubleshooting Guide
-
Canon 6710C002
User Manual
-
Canon K10605
User Manual
-
Canon K10613
User Manual
-
Canon K10608
User Manual
-
Canon K10609
User Manual
-
Canon imageRUNNER C3326i
User Manual
-
Canon imageCLASS MF465dw
User Manual
-
Canon K10617
User Manual