Page 3 - B u s i n e s s I n k j e t W G 7 0 0 0 S e r i e s; Basic Operation; Getting Started
B u s i n e s s I n k j e t W G 7 0 0 0 S e r i e s 3 2 1 4 Please read “Important Safety Instructions” before operating this product. P.39After you finish reading this guide, store it in a safe place for future reference. The information in this document is subject to change without notice. Access ...
Page 4 - Cassette Feeding Unit CF10; Installing the Machine; Items Included with the
EN <BK> <C>, <M>, <Y> ×3 Print Head and Maintenance Cartridge are set in the machine. * WG7250Z/WG7250F Install on a flat level surface, providing a space of 3.94 inches (100 mm) or more around the machine. 23.23” (590 mm) 3.94” (100 mm) 21.06” (535 mm) 22.05 ” (560 mm) 3.94”...
Page 5 - First install the cassette feeding; CAUTION
EN If You Purchased an Optional Cassette Feeding Unit First install the cassette feeding unit (optional). Refer to the manual bundled with the cassette feeding unit for installation steps. CAUTION • Do not hold the machine by its base, as fingers may get caught when placing the machine. Transporting...
Page 6 - After installing the optional
EN Installing the Machine 2 Place the machine. 3 • Remove all 4 stickers. After installing the optional cassette feeding unit, continue with the installation from step 4. 4 • Remove all of the tape. 5 6 • Remove all of the tape. 7 Attach the clamp and power cord, and then affix the power cord with t...
Page 8 - Remove Packing Materials from
EN 1 Press <unlock> on the screen. • Do not open the front cover until the screen appears. 2 3 Remove the Shipping Lock Pin. 4 Pull out the Print Head Locking Rod. 2 1 Raise the lever (blue) in , and pull the rod out completely in the direction indicated at .Do not bend the rod. Installing the...
Page 10 - Next, configure the machine to send; Install the Ink tanks
EN Installing the Machine • Turn until tank clicks. • Install all four ink tanks in the correct slots. 5 NOTE • Filling begins, and takes about 40-70 minutes to complete. • Time required for filling depends on your environment. • Do not turn off the machine while ink is filling. • If filling is inte...
Page 11 - Sending Data to Canon
EN Configure the Machine to Send Data In this survey, we will not send your personal information. For this reason, from the information that is sent to us, we are unable to identify specific customers. We are therefore unable to respond to requests to disclose any sent information. After you agree t...
Page 12 - To connect via wireless LAN; Before starting the configuration; Choosing a connection method; Connecting to a Computer; • By DHCP: Proceed with the following
EN Installing the Machine To connect via wireless LAN 1 Press <Yes> on the connection method screen. 2 Check that your computer and wireless router are properly connected. 3 Check the network settings on the computer. 4 Take note of the network name (SSID) and password (network key). • Check t...
Page 13 - Next, adjust the margins of the Cassette
EN 5 Press <OK>. • From the screen below, follow these instructions to enter your network's name (SSID) and password (network key). 6 Press <SSID Settings>. 7 Press <Select Access Point>. 8 Select the network name (SSID), and press <Next>. 1. Enter a password (network key), a...
Page 14 - Adjust the margins of the; To connect via USB
EN Installing the Machine 1 Pull out paper drawer 3 and check the margin adjustment values. 3 +X.X - X.X 4 2 Enter the values for <Left Margin for Drawer 3> and <Left Margin for Drawer 4> you checked at step 1 from the screen. 3 Place the paper drawer back into the machine. CAUTION Be ca...
Page 16 - Installing the Software; Next, configuring Fax Settings; If Using a Fixed IP Address; Network connection settings
EN Installing the Machine Installing the Software Next, configuring Fax Settings (WG7250Z/WG7250F) P.15 • The procedures described here are for Windows. For more details on the software installation procedure, see the driver's manual. • If connecting by USB, do not connect until instructions to do s...
Page 17 - Configuring Fax Settings; Your machine is now ready to use.
EN For details "Drivers" and "Configuring Initial Settings for Fax Functions" in the Online Manual Configuring Fax Settings (WG7250Z/WG7250F) 4 Set the reception mode. Answer the questions on how you will use the fax function to select the best settings. 5 Connect to a telephone line...
Page 18 - On the platen glass; Placing Originals
EN Basic Operation On the platen glass Place originals face down. Place in the corner. Suitable for scanning books, magazines, and newspaper clippings. In the feeder Place originals face up. Adjust the slide guides. Suitable for scanning multi page documents. Machine Operation Panel ([Energy Saver] ...
Page 19 - Scanning; Types of scan; Copying; Useful copy settings; Useful fax functions
EN Scanning 1. Place the original.2. Press , and select <Scan>. 3. Select the type of scan, and enter any necessary information.4. Press <B&W Start> or <Color Start>. Types of scan ■ Store in USB memory device ■ Send by email ■ Send to file server To scan from a computer ■ WG S...
Page 20 - Loading Paper in the Paper
EN In the following, the operations that are common to paper drawers 1 and 2 are described using drawer 2 as an example. 1 2 Slide the light blue knobs to adjust the positions of the paper guides. Align the protrusion to the appropriate paper size marking. 3 First fan the paper stack well and then l...
Page 21 - If the paper size/type setting does not; Loading Paper in the Multi
EN 1 2 Adjust the position of the paper guides. Align the paper guides to the paper size markings. Tray extension NOTE Pull out the tray extension when loading large-sized paper. 3 Fan the paper stack well, align the edges on a flat surface, and then load it. Make sure that this line is not exceeded...
Page 22 - Ink Tank; Maintenance Cartridge; Paper Jams Have Occurred; If a Problem Has Occurred
EN Check the following.• Is the power turned on?• Is the machine in sleep mode? If both the display and are not lit, press the power switch. Power switch (ON) • Is the power cord connected correctly? If the problem persists, see the Online Manual. When paper is jammed, a screen, similar to the one b...
Page 24 - Printing/Checking a Nozzle; Check 3
EN If a Problem Has Occurred Printing/Checking a Nozzle Check Pattern Check 3 Is the document feed scanning area dirty? Clean the document feed scanning area. P.25 “Cleaning the Document Feed Scanning Areas” You can print out a nozzle check pattern to check print head clogging and color misalignment...
Page 26 - Aligning the Print Head
EN If a Problem Has Occurred Adjust the position of the print head to correct misaligned colors, etc. Prepare the following paper.Plain paper (you can also use recycled paper)Size: Any of A3, 11x17, LTR, or A4Number of sheets: 1 • A3 or 11x17 is recommended.• Prepare paper that is white and clean on...
Page 27 - If streaks still appear
EN Cleaning the Document Feed Scanning Areas Clean according to the steps on the labels on the feeder and inside of the platen glass. Labels Use the supplied glass cleaning sheet when cleaning the document feed scanning areas. Only use the glass cleaning sheet for cleaning the document feed scanning...
Page 28 - Glossary; Network Connection
IP address With a TCP/IP connection, an assigned number for identifying devices on a network. IP addresses exist in IPv4 and IPv6 formats. Subnet mask A number for subdividing a network when using an IPv4 IP address. The range of IP addresses assigned to devices can be limited by the user. Gateway a...
Page 29 - Network connection example
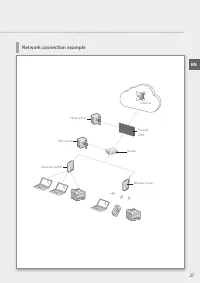
Network connection example Proxy server DNS server Network switch Firewall/UTM Router Wireless router Internet EN 27
Page 30 - Step 1 Check the network environment; Connecting to a Network with a Fixed IP Address
Step 1 Check the network environment Before connecting to a network with a fixed IP address, you must check the network environment. Refer to the following list, and check necessary information beforehand. Required items Notes When connecting to a network with a fixed IP address (IPv4) IP address (t...
Page 31 - Step 2 Connect to a wired LAN/wireless LAN; Connecting by wired LAN
Step 2 Connect to a wired LAN/wireless LAN Connecting by wired LAN The machine does not come with a LAN cable. Please have one ready. 1 In the Home screen, press <Menu>. 2 Select <Preferences> <Network> <Select Wired/ Wireless LAN>. Contact the network administrator for the s...
Page 32 - Connecting by wireless LAN; To connect to a wireless LAN manually by selecting an access point
Connecting by wireless LAN Do not connect the LAN cable to the machine. To connect to a wireless LAN manually by selecting an access point The “SSID (network name)” and “network key (password)” are required. The required information can be checked beforehand with the list P.28 or by contacting the n...
Page 36 - Step 3 Set a fixed IP address; Setting an IPv4 address
Step 3 Set a fixed IP address Setting an IPv4 address An IPv4 address can be set with “Auto Acquire” to assign an address automatically using DHCP, or with “Manually Acquire” allowing you to enter information yourself. To set a fixed IP address, use “Manually Acquire”. • When setting a fixed IP addr...
Page 38 - Setting the DNS
Setting the DNS The DNS (Domain Name System) is information for matching host names with IP addresses. If the IP address is being obtained automatically, the required DNS information is set automatically. If you are entering the IP address manually, you must also enter the DNS information manually. ...
Page 40 - Step 4 Check the connection; Checking that the machine has connected correctly
Step 4 Check the connection Checking that the machine has connected correctly Entering the IP address directly on a PC on the same network as the machine displays the remote UI screen. The machine has connected to the network correctly if the remote UI screen is displayed. 1 Start up the web browser...
Page 41 - Installation; Handling; Appendix
EN Important Safety Instructions This chapter describes important safety instructions for the prevention of injury to users of this machine and others, and damage to property. Read this chapter before using the machine, and follow the instructions to use the machine properly. Do not perform any oper...
Page 42 - Maintenance; WARNING
EN • When moving this machine, be sure to turn OFF the power of this machine, and then unplug the power plug and interface cables. Failure to do so may damage the power cord or interface cables, resulting in a fire or electrical shock. • When plugging or unplugging a USB cable when the power plug is...
Page 43 - Other Precautions; Notice; Caution for each safety standard
EN with Class B limits in Subpart B of Part 15 of the FCC Rules.Do not make any changes or modifications to the equipment unless otherwise specified in the manual. If such changes or modifications should be made, you could be required to stop operation of the equipment. FCC ID:TLZ-NM383 Changes or m...
Page 44 - About This Manual
EN ## are the REN without a decimal point (e.g., 03 is a REN of 0.3).A plug and jack used to connect this equipment to the premises wiring and telephone network must comply with the applicable FCC Part 68 rules and requirements adopted by the ACTA. A compliant telephone cord and modular plug is prov...
Page 45 - Third Party Software
EN • Google Chrome, Android are either registered trademarks or trademarks of Google Inc. Third Party Software This Canon product (the “PRODUCT”) includes third-party software modules. Use and distribution of these software modules, including any updates of such software modules (collectively,the “S...
Page 47 - Funcionamiento básico; Página2; Conexión de red; Guía de inicio
B u s i n e s s I n k j e t W G 7 0 0 0 S e r i e s 3 2 1 4 Por favor, lea las "Instrucciones de seguridad importantes" antes de usar este producto. Página39Cuando haya terminado de leer esta guía, guárdela en un lugar seguro para poder consultarla en el futuro. La información de este docume...
Page 48 - Instalación del equipo; Elementos incluidos con
ES <BK> <C>, <M>, <Y> ×3 El Cabezal de impresión y el Cartucho de mantenimiento están colocados en el equipo. * WG7250Z/WG7250F Instale sobre una superficie plana y nivelada, dejando un espacio de al menos 3,94 pulgadas (100 mm) alrededor del equipo. 23,23” (590 mm) 3,94” (10...
Page 49 - Instale en primer lugar la unidad; ATENCIÓN
ES Si adquirió una Unidad de Alimentación por Casete opcional Instale en primer lugar la unidad de alimentación por casete (opcional). Consulte el manual que se incluye con la unidad de alimentación por casete para los pasos de la instalación. ATENCIÓN • No sujete el equipo por su base, ya que podrí...
Page 50 - Lado; Después de instalar la unidad de
ES Instalación del equipo Lado delantero Lado delantero 2 Coloque el equipo. 3 • Retire las 4 pegatinas. Después de instalar la unidad de alimentación por casete opcional, continúe con la instalación desde el paso 4. 4 • Retire toda la cinta. 5 6 • Retire toda la cinta. 7 Acople la abrazadera y el c...
Page 52 - Extracción del material de
ES 1 Pulse <Desbloquear (Unlock)> en la pantalla. • No abra la tapa frontal hasta que no aparezca la pantalla. 2 3 Retire el pasador de bloqueo de transporte. 4 Extraiga el eje de bloqueo de cabezal de impresión. 2 1 Levante la palanca (azul) en y tire de la varilla completamente hacia fuera e...
Page 53 - A continuación, coloque los depósitos de
ES 5 Guarde el eje de bloqueo de cabezal de impresión. • Ponga la parte de la palanca azul hacia usted y, a continuación, presione la varilla hacia la izquierda y engánchela. • Coloque el extremo derecho en el enganche. • Después de colocar los dos extremos, gire la palanca azul hacia abajo para blo...
Page 54 - A continuación, configure el equipo para; Instalación de los depósitos de
ES Instalación del equipo • Gire el depósito hasta que escuche un clic. • Instale los cuatro depósitos de tinta en las ranuras correctas. 5 NOTA • Comenzará el llenado, que tardará entre 40 y 70 minutos en completarse. • El tiempo requerido para el llenado variará en función de su entorno. • No apag...
Page 55 - Envío de datos a Canon
ES Configure el equipo para enviar datos En esta encuesta no se enviará su información personal. Por ello, a partir de la información que se nos envía no podemos identificar a clientes específicos. Por lo tanto, no podemos responder a ninguna petición para revelar la información recopilada. Una vez ...
Page 56 - Para conectar a través de una red LAN; Antes de iniciar la configuración; Selección de un método de conexión; Conexión a un ordenador
ES Instalación del equipo Para conectar a través de una red LAN inalámbrica 1 Pulse <Sí (Yes)> en la pantalla del método de conexión. 2 Compruebe que su ordenador y el router inalámbrico están conectados correctamente. 3 Verifique la configuración de la red en el ordenador. 4 Anote el nombre d...
Page 57 - A continuación, ajuste los márgenes del Casete
ES 5 Pulse <Aceptar (OK)>. • En la pantalla que se presenta a continuación, siga las instrucciones para introducir el nombre de red (SSID) y la contraseña (clave de red). 6 Pulse <Opciones de SSID (SSID Settings)>. 7 Pulse <Seleccionar punto de acceso (Select Access Point)>. 8 Sele...
Page 58 - Ajuste los márgenes de la Unidad de; Para conectar a través de USB; A continuación, ajuste los márgenes del
ES Instalación del equipo 1 Extraiga el casete 3 y compruebe los valores de ajuste de los márgenes. 3 +X.X - X.X 4 2 Introduzca los valores para <Margen izquierdo para el casete 3 (Left Margin for Drawer 3)> y <Margen izquierdo para el casete 4 (Left Margin for Drawer 4)> que comprobó en...
Page 59 - A continuación, lleve a cabo la
ES Imprima y compruebe el patrón de prueba de inyector 3 Pulse <Iniciar (Start)> e imprima un patrón. 4 Si el resultado impreso fuera correcto, pulse <A> para completar la comprobación de los inyectores. Si aparecieran rayas o irregularidades en el resultado impreso, pulse <B> para...
Page 60 - Instalación del software; A continuación, configure las opciones; Si utiliza una dirección IP fija; Configuración de conexión de
ES Instalación del equipo Instalación del software A continuación, configure las opciones de fax (WG7250Z/WG7250F) Página15 • Los procedimientos descritos aquí son para Windows. Para obtener más información sobre el procedimiento de instalación del software, consulte el manual del controlador. • Si...
Page 61 - Configuración de las opciones; Habrá finalizado la configuración.
ES Para obtener más información, consulte "Controladores" y "Configuración de las opciones iniciales para las funciones de fax" en el Manual en línea Configuración de las opciones de fax (WG7250Z/WG7250F) 4 Establezca el modo de recepción. Responda a las preguntas acerca de cómo util...
Page 62 - En la pletina de vidrio; Colocación de originales
ES Funcionamiento básico En la pletina de vidrio Coloque los originales boca abajo. Coloque en la esquina. Adecuado para escanear libros, revistas y recortes de prensa. En el alimentador Coloque los originales boca arriba. Ajuste las guías deslizantes. Adecuado para escanear documentos de varias pág...
Page 63 - Escaneado; Tipos de escaneado; Copia; Opciones de copia útiles
ES Escaneado 1. Coloque el original.2. Pulse y seleccione <Lectura (Scan)>. 3. Seleccione el tipo de escaneado e introduzca la información necesaria. 4. Pulse <B/N Iniciar (B&W Start)> o <Color Iniciar (Color Start)>. Tipos de escaneado ■ Almacenar en dispositivo de memoria USB...
Page 64 - Carga de papel en el casete
ES Las operaciones que se indican a continuación que son comunes para los casetes 1 y 2 se describen tomando el casete 2 como ejemplo. 1 2 Deslice los mandos azul claro para ajustar las posiciones de las guías del papel. Haga coincidir la parte que sobresale con la marca correspondiente según el tam...
Page 65 - Si las opciones de tamaño o tipo de papel; Carga de papel en la bandeja
ES 1 2 Ajuste la posición de las guías del papel. Haga coincidir las guías del papel con las marcas del tamaño del papel. Extensión de la bandeja NOTA Cuando cargue papel grande, extraiga la extensión de la bandeja. 3 Airee bien la pila de papel, alinee los bordes sobre una superficie plana y cárgue...
Page 66 - Depósito de tinta; Cartucho de mantenimiento; Se han producido atascos de; Si se ha producido un problema
ES Compruebe lo siguiente. • ¿El equipo está encendido? • ¿Se encuentra el equipo en el modo de reposo? Si tanto la pantalla como no estuvieran iluminados, pulse el interruptor de alimentación. Interruptor de alimentación (ENCENDIDO) • ¿Está correctamente conectado el cable de alimentación? Si el pr...
Page 68 - Impresión/comprobación del; Los resultados de copia no son
ES Si se ha producido un problema Impresión/comprobación del patrón de prueba del inyector Los resultados de copia no son satisfactorios Comprobación 1 ¿Está colocado correctamente el original sobre la pletina de vidrio? Coloque el original con la cara que desea escanear hacia abajo. Página16 "C...
Page 70 - Alineación del cabezal de
ES Si se ha producido un problema Ajuste la posición del cabezal de impresión para corregir colores mal alineados, etc. Prepare el siguiente papel.Papel normal (también podrá utilizar papel reciclado)Tamaño: A3, 11 x 17, LTR o A4Número de hojas: 1 • Se recomienda A3 u 11 x 17. • Prepare una hoja lim...
Page 71 - Si siguen apareciendo rayas
ES Limpieza de las áreas de lectura de alimentación de documentos Para la limpieza, siga los pasos que se indican en las etiquetas situadas sobre el alimentador y dentro de la pletina de vidrio. Etiquetas Utilice la hoja de limpieza del cristal suministrada cuando limpie las áreas de lectura de alim...
Page 72 - Glosario
Dirección IP Con una conexión TCP/IP, un número asignado para identificar dispositivos en una red. Las direcciones IP existen en formatos IPv4 e IPv6. Máscara de subred Un número para subdividir una red cuando se utiliza una dirección IP IPv4. El rango de direcciones IP asignadas a dispositivos pued...
Page 73 - Ejemplo de conexión de red
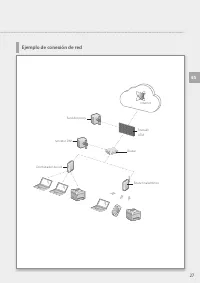
Ejemplo de conexión de red Servidor proxy Servidor DNS Conmutador de red Firewall/UTM Router Router inalámbrico Internet ES 27
Page 74 - Paso 1 Compruebe el entorno de red; Conexión a una red con una dirección IP fija
Paso 1 Compruebe el entorno de red Antes de conectarse a una red con una dirección IP fija, deberá comprobar el entorno de red. Consulte la lista siguiente y verifique la información necesaria de antemano. Elementos necesarios Notas Cuando se conecte a una red con dirección IP fija (IPv4) Dirección ...
Page 75 - Paso 2 Conéctese a una red LAN cableada o inalámbrica; Conexión mediante red LAN cableada
Paso 2 Conéctese a una red LAN cableada o inalámbrica Conexión mediante red LAN cableada El equipo no incluye un cable de LAN. Tenga uno preparado. 1 En la pantalla Inicio, pulse <Menú (Menu)>. 2 Seleccione <Preferencias (Preferences)> <Red (Network)> <Selec. LAN con cable/inalá...
Page 76 - Conexión mediante red LAN inalámbrica
Conexión mediante red LAN inalámbrica No conecte el cable de LAN al equipo. Para conectar a través de una red LAN inalámbrica manualmente seleccionando un punto de acceso Serán necesarios el "SSID (nombre de red)" y la "clave de red (contraseña)". La información requerida podrá compr...
Page 80 - Paso 3 Configure una dirección IP fija; Configuración de una dirección IPv4
Paso 3 Configure una dirección IP fija Configuración de una dirección IPv4 Podrá configurar una dirección IPv4 con "Obtención automática" para asignar una dirección automáticamente utilizando DHCP o con "Obtener manualmente", que le permitirá introducir información por su cuenta. Par...
Page 82 - Configuración de DNS
Configuración de DNS El DNS (Domain Name System, Sistema de nombres de dominios) es información para hacer coincidir nombres de host con direcciones IP. Si la dirección IP se fuera a obtener automáticamente, la información de DNS necesaria se configurará automáticamente. Si fuera a introducir la dir...
Page 84 - Paso 4 Compruebe la conexión; Comprobación de si el equipo está conectado correctamente
Paso 4 Compruebe la conexión Comprobación de si el equipo está conectado correctamente La introducción de la dirección IP directamente en un PC de la misma red que el equipo mostrará la pantalla de la IU remota. El equipo estará conectado correctamente a la red si aparece la pantalla de la IU remota...
Page 85 - Instalación; Apéndice
ES Instrucciones de seguridad importantes En este capítulo se describen instrucciones de seguridad importantes para la prevención de lesiones a los usuarios del equipo u otras personas, así como daños en la propiedad. Antes de utilizar este equipo, lea este capítulo y siga las instrucciones para pod...
Page 87 - ADVERTENCIA
ES Aviso legal • CANON INC. NO OFRECE GARANTÍAS DE NINGÚN TIPO EN RELACIÓN CON ESTE MATERIAL, YA SEAN EXPRESAS O IMPLÍCITAS, EXCEPTO EN LA MEDIDA EN QUE SE DESCRIBE EN ESTE DOCUMENTO, INCLUIDAS, SIN LIMITACIÓN, LAS RESPECTIVAS GARANTÍAS DE PUBLICIDAD, COMERCIABILIDAD, ADECUACIÓN A UN FIN DETERMINADO...
Page 89 - Utilisation de base; Démarrage
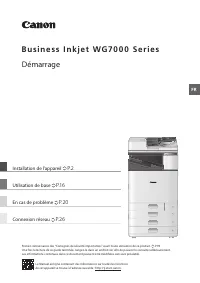
B u s i n e s s I n k j e t W G 7 0 0 0 S e r i e s 3 2 1 4 Prenez connaissance des "Consignes de sécurité importantes" avant toute utilisation de ce produit. P.39Une fois la lecture de ce guide terminée, rangez-le dans un endroit sûr afin de pouvoir le consulter ultérieurement. Les informat...
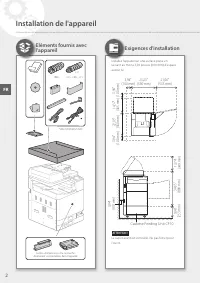
Page 90 - Installation de l'appareil; Eléments fournis avec
FR <BK> <C>, <M>, <Y> × 3 La tête d'impression et la cartouche d'entretien sont installées dans l'appareil. * WG7250Z/WG7250F Installez l'appareil sur une surface plane en laissant au moins 3,94 pouces (100 mm) d'espace autour lui. 23,23” (590 mm) 3,94” (100 mm) 21,06” (535 m...
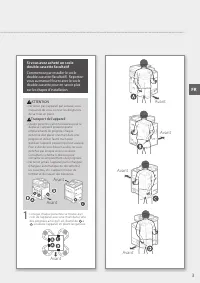
Page 91 - Commencez par installer le socle; ATTENTION
FR Si vous avez acheté un socle double cassette facultatif Commencez par installer le socle double cassette (facultatif ). Reportez- vous au manuel fourni avec le socle double cassette pour en savoir plus sur les étapes d'installation. ATTENTION • Ne tenez pas l'appareil par sa base, vous risqueriez...
Page 92 - Après avoir installé le socle double
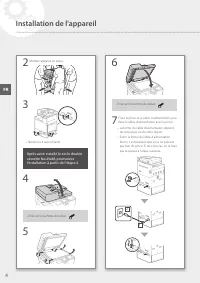
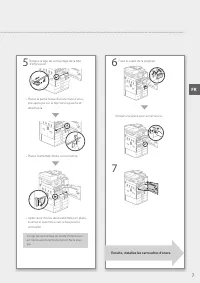
FR Installation de l'appareil 2 Mettez l'appareil en place. 3 • Retirez les 4 autocollants. Après avoir installé le socle double cassette facultatif, poursuivez l'installation à partir de l'étape 4. 4 • Enlevez l'ensemble du ruban. 5 6 • Enlevez l'ensemble du ruban. 7 Fixez la pince et le câble d'al...
Page 94 - Retrait du matériel d'emballage
FR 1 Appuyez sur <déverrouiller> sur l'écran. • N'ouvrez le capot avant avant que l'écran n'apparaisse. 2 3 Retirez la goupille de verrouillage d'expédition. 4 Retirez la tige de verrouillage de la tête d'impression. 2 1 Soulevez le levier (bleu) représenté en , puis sortez complètement la tig...
Page 96 - Installation des cartouches
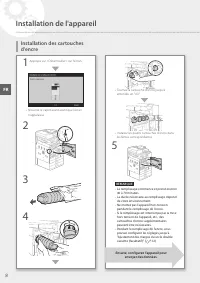
FR Installation de l'appareil • Tournez la cartouche d'encre jusqu'à entendre un "clic". • Installez les quatre cartouches d'encre dans les fentes correspondantes. 5 REMARQUE • Le remplissage commence et prend environ 40 à 70 minutes. • La durée nécessaire au remplissage dépend de votre envi...
Page 97 - Envoi de données à Canon
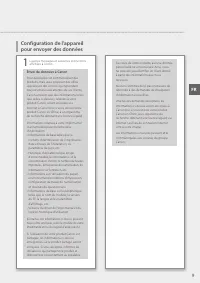
FR Configuration de l'appareil pour envoyer des données Au cours de cette enquête, aucune donnée personnelle ne sera envoyée. Ainsi, nous ne pouvons pas identifier un client donné à partir des informations que nous recevons. Nous ne sommes donc pas en mesure de répondre à des demandes de divulgation...
Page 98 - Connexion par réseau sans fil; Avant de commencer la configuration; Choix d'une méthode de connexion; Connexion à un ordinateur
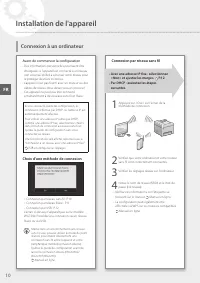
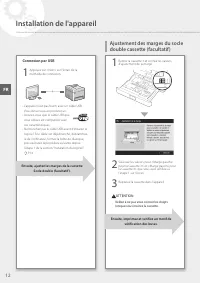
FR Installation de l'appareil Connexion par réseau sans fil 1 Appuyez sur <Oui> sur l'écran de la méthode de connexion. 2 Vérifiez que votre ordinateur et votre routeur sans fil sont correctement connectés. 3 Vérifiez les réglages réseau sur l'ordinateur. 4 Notez le nom de réseau (SSID) et le ...
Page 99 - Ensuite, ajustez les marges de la cassette
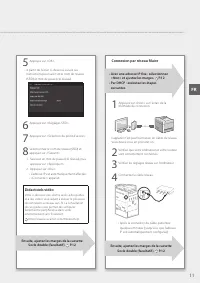
FR 5 Appuyez sur <OK>. • A partir de l'écran ci-dessous, suivez ces instructions pour saisir votre nom de réseau (SSID) et mot de passe (clé réseau). 6 Appuyez sur <Réglages SSID>. 7 Appuyez sur <Sélection du point d'accès>. 8 Sélectionnez le nom de réseau (SSID) et appuyez sur <...
Page 100 - Ajustement des marges du socle; Connexion par USB
FR Installation de l'appareil 1 Retirez la cassette 3 et vérifiez les valeurs d'ajustement de la marge. 3 +X.X - X.X 4 2 Saisissez les valeurs pour <Marge gauche pour la Cassette 3> et <Marge gauche pour la Cassette 4> que vous avez vérifiées à l'étape 1 sur l'écran. 3 Replacez la casset...
Page 101 - Ensuite, passez aux réglages de
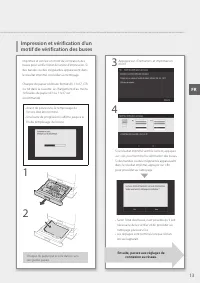
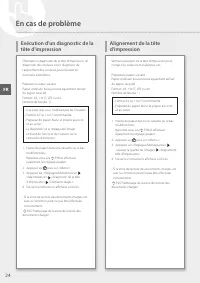
FR Impression et vérification d'un motif de vérification des buses 3 Appuyez sur <Démarrer> et imprimez un motif. 4 Si le résultat imprimé semble correct, appuyez sur <A> pour terminer la vérification des buses.Si des bandes ou des irrégularités apparaissent dans le résultat imprimé, app...
Page 102 - Installation du logiciel; Ensuite, configurez les réglages du fax; Si vous utilisez une adresse IP fixe; Réglages de connexion au
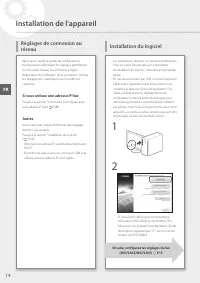
FR Installation de l'appareil Installation du logiciel Ensuite, configurez les réglages du fax (WG7250Z/WG7250F) P.15 • Les procédures décrites ici concernent Windows. Pour en savoir davantage sur la procédure d'installation du logiciel, consultez le manuel du pilote. • En cas de connexion par USB, ...
Page 103 - Configuration des réglages du; La configuration est terminée.
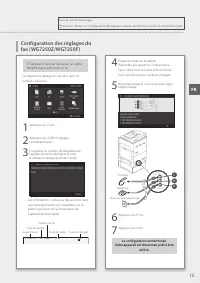
FR Pour en savoir davantage Sections "Pilotes" et "Configuration des réglages initiaux des fonctions du fax" du manuel en ligne Configuration des réglages du fax (WG7250Z/WG7250F) 4 Réglez le mode de réception. Répondez aux questions concernant la façon dont vous utiliserez la foncti...
Page 104 - Sur la vitre; Positionnement des originaux
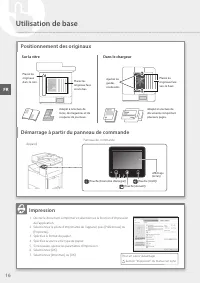
FR Utilisation de base Sur la vitre Placez les originaux face vers le bas. Placez les originaux dans le coin. Adapté à la lecture de livres, de magazines et de coupures de journaux. Dans le chargeur Placez les originaux face vers le haut. Ajustez les guides coulissants. Adapté à la lecture de docume...
Page 105 - Lecture; Types de lecture; Copie; Paramètres de copie utiles; Fonctions de fax utiles
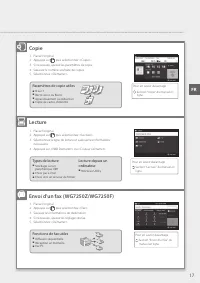
FR Lecture 1. Placez l'original.2. Appuyez sur , puis sélectionnez <Lecture>. 3. Sélectionnez le type de lecture et saisissez les informations nécessaires. 4. Appuyez sur <N&B Démarrer> ou <Couleur Démarrer>. Types de lecture ■ Stockage sur un périphérique USB ■ Envoi par e-mai...
Page 106 - Chargement du papier dans la
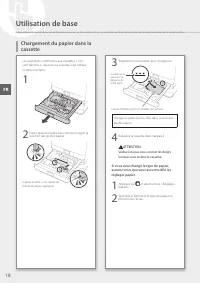
FR Les opérations communes aux cassettes 1 et 2 sont décrites ci-dessous. La cassette 2 est utilisée comme exemple. 1 2 Faites glisser la butée bleu clair pour régler la position des guides papier. Alignez la saillie sur le repère du format de papier approprié. 3 Séparez bien les feuilles, puis char...
Page 107 - Si les réglages de taille/type de papier; Chargement du papier dans le
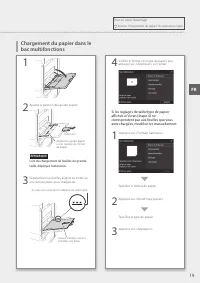
FR 1 2 Ajustez la position des guides papier. Alignez les guides papier sur les repères du format de papier. Extension REMARQUE Lors du chargement de feuilles de grande taille, déployez l'extension. 3 Séparez bien les feuilles, alignez les bords sur une surface plane, puis chargez-les. Assurez-vous ...
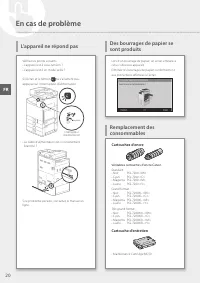
Page 108 - Cartouche d'entretien; Des bourrages de papier se; En cas de problème
FR Vérifiez les points suivants. • L'appareil est-il sous-tension ? • L'appareil est-il en mode veille ? Si l'écran et le témoin ne s'allument pas, appuyez sur l'interrupteur d'alimentation. Interrupteur d'alimentation (MARCHE) • Le câble d'alimentation est-il correctement branché ? Si le problème p...
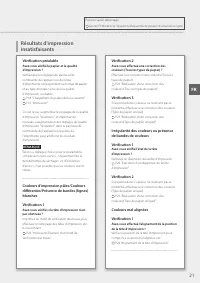
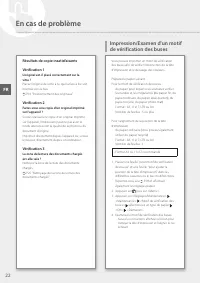
Page 110 - de vérification des buses; Résultats de copie insatisfaisants
FR En cas de problème Impression/Examen d'un motif de vérification des buses Résultats de copie insatisfaisants Vérification 1 L'original est-il placé correctement sur la vitre ? Placez l'original de sorte à ce que la face à lire soit orientée vers le bas. P.16 "Positionnement des originaux"...
Page 112 - Alignement de la tête
FR En cas de problème Vérifiez la position de la tête d'impression pour corriger les couleurs mal alignées, etc. Préparez le papier suivant.Papier ordinaire (vous pouvez également utiliser du papier recyclé)Format : A3, 11x17, LTR ou A4Nombre de feuilles : 1 • Format A3 ou 11x17 recommandé. • Prépar...
Page 113 - Si des bandes apparaissent
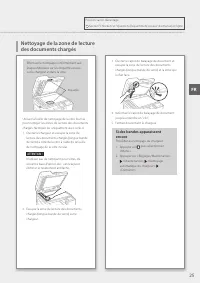
FR Nettoyage de la zone de lecture des documents chargés Effectuez le nettoyage conformément aux étapes indiquées sur les étiquettes situées sur le chargeur et dans la vitre. Etiquettes Utilisez la feuille de nettoyage de la vitre fournie pour nettoyer les zones de lecture des documents chargés. Net...
Page 114 - Glossaire; Connexion réseau
Adresse IP Avec une connexion TCP/IP, numéro affecté aux périphériques d'un réseau permettant leur identification. Les adresses IP existent aux formats IPv4 et IPv6. Masque de sous-réseau Nombre subdivisant un réseau lors de l'utilisation d'une adresse IP IPv4. La plage d'adresses IP affectée aux pé...
Page 115 - Exemple de connexion réseau
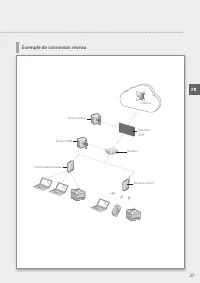
Exemple de connexion réseau Serveur proxy Serveur DNS Commutateur réseau Pare-feu/ UTM Routeur Routeur sans fil Internet FR 27
Page 116 - Etape 1 Vérification de l'environnement réseau; Connexion à un réseau avec une adresse IP fixe
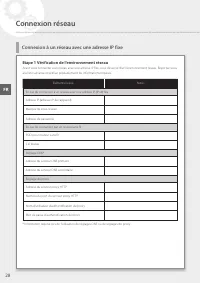
Etape 1 Vérification de l'environnement réseau Avant vous connecter à un réseau avec une adresse IP fixe, vous devez vérifier l'environnement réseau. Reportez-vous à la liste suivante et vérifiez préalablement les informations requises. Eléments requis Notes En cas de connexion à un réseau avec une ...
Page 117 - Etape 2 Connexion à un réseau filaire/sans fil; Connexion par réseau filaire
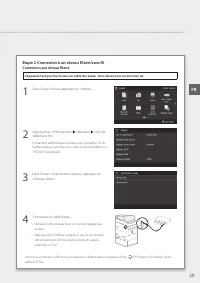
Etape 2 Connexion à un réseau filaire/sans fil Connexion par réseau filaire L'appareil n'est pas fourni avec un câble de réseau. Vous devez vous en procurer un. 1 Dans l'écran Accueil, appuyez sur <Menu>. 2 Sélectionnez <Préférences> <Réseau> <Sél. rés. câblé/sans fil>. Conta...
Page 118 - Connexion par réseau câblé
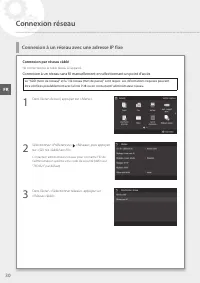
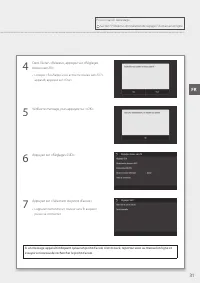
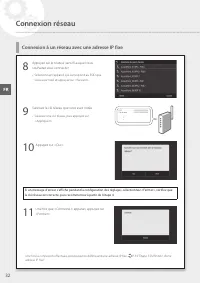
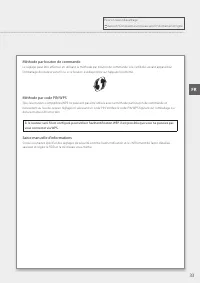
Connexion par réseau câblé Ne connectez pas le câble réseau à l'appareil. Connexion à un réseau sans fil manuellement en sélectionnant un point d'accès Le "SSID (nom de réseau)" et la "clé réseau (mot de passe)" sont requis. Les informations requises peuvent être vérifiées préalablem...
Page 122 - Etape 3 Définition d'une adresse IP fixe; Définition d'une adresse IPv4
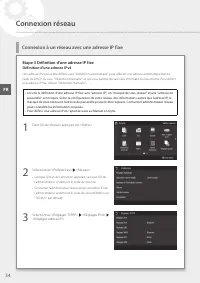
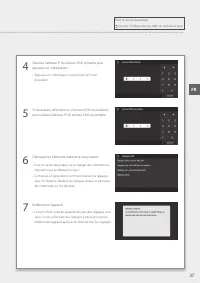
Etape 3 Définition d'une adresse IP fixe Définition d'une adresse IPv4 Une adresse IPv4 peut être définie avec "Obtention automatique" pour affecter une adresse automatiquement à l'aide de DHCP, ou avec "Obtention manuelle" ce qui vous permet de saisir des informations vous-même. Pou...
Page 124 - Réglage du DNS
Réglage du DNS Le DNS (Système de noms de domaine) est l'information permettant de faire correspondre les noms d'hôtes et les adresses IP. Si l'adresse IP est obtenue automatiquement, l'information DNS requise est définie automatiquement. Si vous saisissez l'adresse IP manuellement, vous devez égale...
Page 126 - Etape 4 Vérification de la connexion; Vérification que l'appareil est connecté correctement
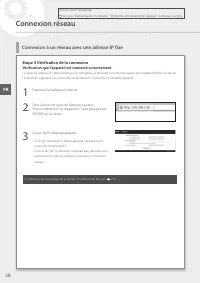
Etape 4 Vérification de la connexion Vérification que l'appareil est connecté correctement La saisie de l'adresse IP directement sur un ordinateur se trouvant sur le même réseau que l'appareil affiche l'écran de l'IU distante. L'appareil s'est connecté correctement si l'écran de l'IU distante appara...
Page 127 - Annexe
FR Consignes de sécurité importantes Ce chapitre décrit des consignes de sécurité importantes pour la prévention des blessures des utilisateurs de cet appareil et autres ainsi que des dommages aux biens. Lisez ce chapitre avant d'utiliser l'appareil et suivez les instructions pour l'utiliser correct...
Page 128 - Manipulation
FR IMPORTANT Raccordement de l'alimentation • Ne branchez pas le câble d'alimentation à un système d'alimentation sans coupure. Cela pourrait provoquer un dysfonctionnement ou endommager l'appareil en cas de panne de courant. • Si vous branchez cet appareil sur une prise secteur à plusieurs entrées,...
Page 129 - AVERTISSEMENT
FR Renonciation • A L'EXCEPTION DE LA GARANTIE CI-INCLUSE, CANON INC. NE FOURNIT AUCUNE AUTRE GARANTIE QUELCONQUE CONCERNANT CE MATERIEL, EXPLICITE OU IMPLICITE, Y COMPRIS MAIS NON LIMITEE A TOUTE GARANTIE DE COMMERCIALISATION, DE VALEUR COMMERCIALE, D'ADEQUATION A UN USAGE PARTICULIER OU DE CONTREF...
Page 130 - Logiciels tiers; A propos du présent
FR reporter aux autres conditions de licence des modules logiciels tiers décrites dans l'annexe du manuel du PRODUIT correspondant. Ce manuel est disponible sur le site Web http://ij.start.canon . En utilisant le PRODUIT, il est considéré que vous acceptez toutes les conditions de licence applicable...