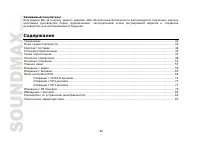
Page 2 - Table of contents
2 Dear customer! Thank you for purchasing our product. For safety, it is strongly recommended to read this manual carefully beforeconnecting, operating and/or adjusting the product and keep the manual for reference in the future. Table of contents Table of contents......................................
Page 3 - Important safeguards
3 Important safeguards Using the device at temperature below -10º may cause the breakage of the device. BEFORE USING PLEASE HEATUP THE PASSENGER COMPARTMENT TO THE RECOMMENDED TEMPERATURE!Read carefully through this manual to familiarize yourself with this high-quality sound system.Disconnect the ve...
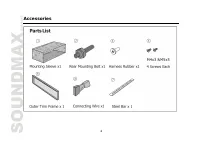
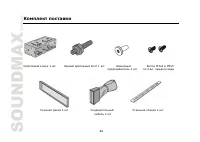
Page 4 - Accessories
Page 5 - Installation/connection
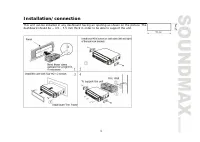
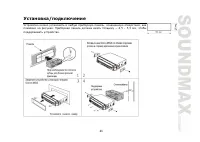
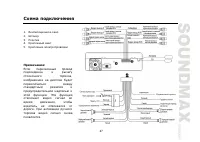
5 Installation/connection This unit can be installed in any dashboard having an opening as shown on the picture. Thedashboard should be ~ 4.5 – 5.5 mm thick in order to be able to support the unit.
Page 7 - Electrical connection
7 Electrical connection Note: For your driving safety, please linkyour Braking signal wire with low powerlevel, and keep it controlled by manualbrake switch. Wire should be high powerlevel and the unit cannot play video disc.
Page 8 - Reversing Signal/Orange
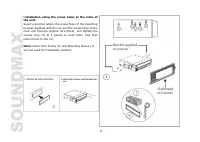
8 Caution: For some car models you may need to modify wiring of the supplied power cord. Contact your authorized cardealer before installing this unit.Using the ISO Connector 1. If your car is equipped with the ISO connector, then connect the ISO connectors as illustrated. 2. For connections without...
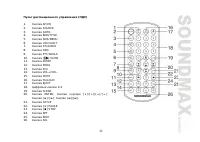
Page 9 - Unit controls; Monitor
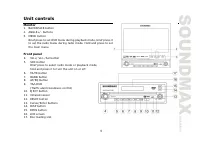
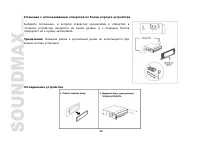
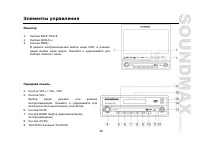
9 Unit controls Monitor 1. BACKSPACE button2. ANGLE+/- buttons3. MENU button Brief press to set DVD menu during playback mode, brief press itto set the radio menu during radio mode. Hold and press to setthe main menu. Front panel 4. Vol+/ Vol -/Sel button5. SRC button Brief press to select radio mod...
Page 10 - Remote control
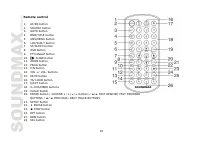
10 Remote control 1. AF/EQ button2. SOURCE button3. GOTO button4. BND/TITLE button5. AMS/MENU button6. LOC/SUB-T button7. ST/AUDIO button8. OSD button9. PTY/ANGLE button10. SLOW button 11. ZOOM button12. PROG button13. P/N button14. VOL +/ VOL- buttons15. MUTE button16. TA/ LOUD button17. EJECT butt...
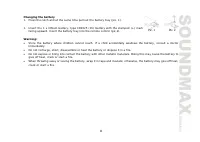
Page 11 - Changing the battery
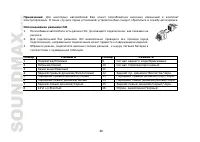
11 Changing the battery 1. Press the catch and at the same time pull out the battery tray (pic. 1). 2. Insert the 1 x lithium battery, type CR2025 (3V) battery with the stamped (+) markfacing upward. Insert the battery tray into the remote control (pic.2). Warning: Store the battery where children c...
Page 12 - General operations
12 General operations Reset the UnitOperating the unit for the first time or after replacing the car battery, you must reset the unit. Remove the front panelat first, and then press RESET button on the panel with a pointed object, (such as a ballpoint pen) to set the unit to initialstate.Note: When ...
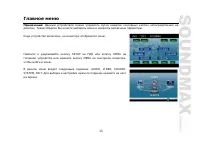
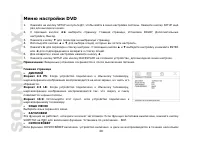
Page 14 - Main menu
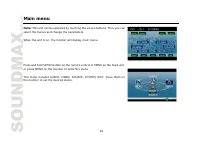
14 Main menu Note: This unit can be operated by touching the screen buttons. Thus you canselect the menus and change the parameters. When the unit is on, the monitor will display main menu. Press and hold SETUP button on the remote control or MENU on the head unit,or press MENU on the monitor to ent...
Page 17 - Clock Adjust; Press CLOCK ADJ to adjust the time.
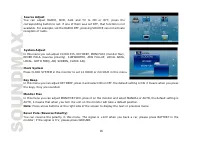
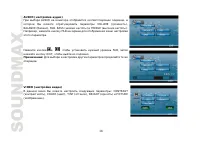
17 SubwooferIn this menu you can adjust SUBWOOFER settings, press it and select ON or OFF, the default setting is ON. AMS FullupIn this menu you can set the modes of AMS. When the setup is ON, the presettable stations are full, New one’s are notallowed. When you select OFF, it will search continuall...
Page 18 - Radio setup
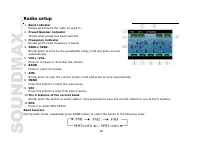
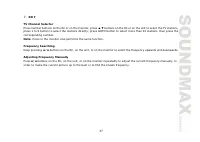
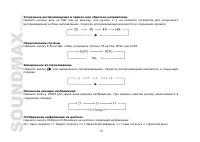
18 Radio setup 1. Band Indicator Shows which band the radio is tuned to. 2. Preset Number Indicator Shows what preset has been selected. 3. Frequency Indicator Shows which radio frequency is tuned. 4. SEEK+/SEEK- Briefly press to tune by the presettable range, hold and press to tuneautomatically. 5....
Page 19 - Manual/Automatic Tuning
19 Manual/Automatic Tuning Manual Tuning: Press / buttons on the remote control, / buttons of the front panel or SEEK-/+ on the monitor continuously to select a station downward or upward respectively.Automatic Tuning: Press and hold / buttons on the remote control, / buttons of the front panel or S...
Page 22 - Disc operations; Discs for playback
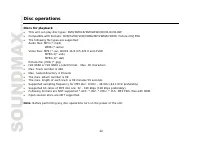
22 Disc operations Discs for playback This unit can play disc types: DVD/DVD±R/DVD±RW/CD/CD-R/CD-RWCompatible with formats: DVD/SVCD/VCD/CDDA/MP3/WMA/HDCD/ Picture-CD/JPEGThe following file types are supported:Audio files: MP3 (*.mp3) WMA (*.wma) Video files: MP4 (*.avi, DIVX3.11/4.0/5.0/6.0 and XVI...
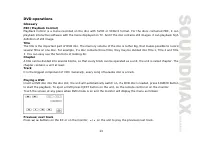
Page 23 - DVD operations; Glossary
23 DVD operations Glossary PBC (PlayBack Control)PlayBack Control is a menu recorded on the disc with SVCD or VCD2.0 format. For the discs contained PBC, it canplayback interactive software with the menu displayed on TV. And if the disc contains still images, it can playback highdefinition of still ...
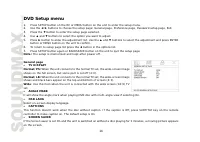
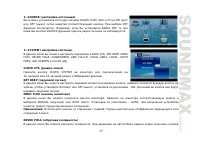
Page 26 - DVD Setup menu
26 DVD Setup menu 1. Press SETUP button on the RC or MENU button on the unit to enter the setup menu. 2. Use the buttons to choose the setup page: General page, Preference page, Password setup page, Exit. 3. Press the button to enter the setup page selected. 4. Use and buttons to select the option y...
Page 28 - Exit
28 Password setup pageThe password option is initialized as locked, and you cannot set the ratings limitor change the password. In order to the Parental feature works, the passwordmode must be turned on. If you want to set the ratings limit, you will need toenter the default password, which is 8888,...
Page 31 - Notes on creating your own CD-R or CD-RW containing MP3 files:
31 PBC SelectorDuring VCD mode, press TITLE button, the PBC playback starts and the menu of entire disc appears on LCD. And thenyou can select your desired track using Cursor or Number Buttons. When a track is playing, you can press MENU toreturn to the video file menu, if you would like to select o...
Page 32 - MP4 Disc operations
32 MP4 Disc operations Note: When playing *.AVI files some sound distortion is possible in case the sound is coded in PCM format. Insert an MP4 (AVI,MPEG4) disc into the disc slot, the unit will automatically switch on, if a disc is loaded, press SOURCEbutton to start the playback.To eject a VCD/CD ...
Page 34 - MP3 Disc operations; Note: Press EJECT button to eject the disc.
34 MP3 Disc operations Playing an MP3 DiscInsert an MP3 disc into the disc slot, the unit will automatically switch on, if an MP3 disc is loaded, press SOURCE to startthe playback. During MP3 playback, the track information displays on LCD. When playing a disc included PIC file, pressSTOP button, th...
Page 35 - MP3 overview
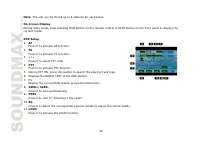
35 Fast rewind/forwardPress / buttons on remote control or on the monitor, / on the unit to perform fast rewind or fast forward. On Screen DisplayPress and hold OSD button on the RC or DISP button on the unit to display the current setup. MP3 overview MP3 is short for MPEG Audio Layer 3 and refers t...
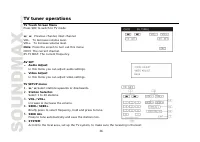
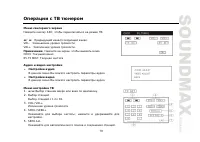
Page 36 - TV tuner operations; AV SET
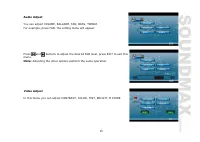
36 TV tuner operations TV Touch Screen MenuPress SRC to switch to TV mode: / Previous channel, Next channel. VOL- To decrease volume level.VOL+ To increase volume level.Note: Press the screen to turn out this menu.CH03: The current channel.65.75 MHZ: The current frequency. AV SET Audio AdjustIn this...
Page 37 - EXIT
37 7. EXIT TV Channel SelectorPress number buttons on the RC or on the monitor, press buttons on the RC or on the unit to select the TV stations, press 1 to 9 button to select the stations directly; press GOTO button to select more than 10 stations, then press thecorresponding number.Note: Press in ...
Page 38 - Handling and cleaning discs; Cleaning; Cleaning discs
38 Handling and cleaning discs Dirty, scratched or warped discs may cause skip ping or noise.Handle the disc only by the edges. To keep clean do not touch its surface.Discs should be stored in their cases after use to avoid scratches. Do not expose discs to direct sunlight, high humidity, high tempe...
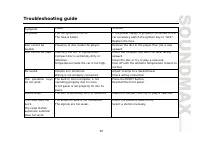
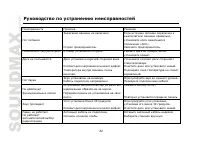
Page 39 - Troubleshooting guide
39 Troubleshooting guide Symptom Cause Solution No power. The car ignition is not on.The fuse is blown. If the power supply is properly connected to thecar accessory switch the ignition key to “ACC”.Replace the fuse. Disc cannot beloaded. Presence of disc inside the player. Remove the disc in the pl...
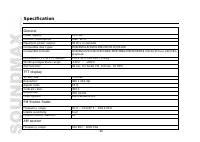
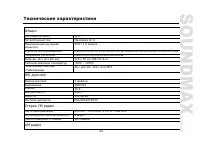
Page 40 - Specification; General
40 Specification General Power supply: 12 V DC Current consumption: max. 10 A Maximum power output: 50 W x 4 channels Compatible disk types: DVD/DVD±R/DVD±RW/CD/CD-R/CD-RW Compatible formats: DVD/DVCD/SVCD/VCD/CDDA/MP3/WMA/HDCD/MPEG4 (DivX)/Picture-CD/JPEGplayback Dimensions (L x W x H)/weight: 178 ...
Page 41 - TV Tuner
41 Preset memory stations: 12 TV Tuner Signal System SECAM/PAL/NTSC Tuning Range 48.25-863.25 (MHz) Specifications are subject to change without notice. Mass and dimension are approximate.
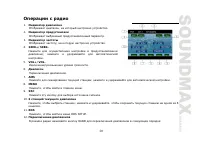
Page 61 - RDS
61 , AMS/MENU AMS , . . 2 AMS/MENU AMS , . (1 – 6). 2 . : 6 . OSD DISP . RDS 1. AF – AF. 2. – TA. 3. / – PTY. 4. PTY – PTY. 5. PTY . 6. RDS. 7. PS – RDS. 8. SEEK+/SEEK- - . 9. PREV – . 10. EQ – , , . 11. LOUD – LOUD. AF/EQ . AF RDS ; .
Page 62 - Traffic Alarm
62 Traffic Alarm TA/LOUD Traffic alarm. AF, «TA» . TP , TP- . «TA» ; . TA , . ( ., DVD, AUX), TA, RDS. , . PTY/ANGLE PTY PTY. PTY, PTY ON; UP/DOWN , PTY CODE . PTY SEARCH. PTY , PTY OFF, . : RDS . RDS , . RDS TA/LOUD .
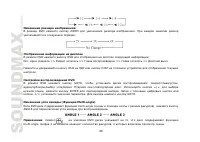
Page 66 - DVD
66 DVD ZOOM . : DVD OSD : . . => => => => .. OSD DISP . DVD DVD GOTO, : . ./ . / , ENTER . / . GOTO. ( Multi-angle) DVD multi-angle ( ), ANGLE . : DVD , multi-angle. 3 , .
Page 67 - MENU
67 ( Multi-audio) DVD . AUDIO . AUDIO 1 => AUDIO 2 : , multi-audio. ( Multi-subtitle) DVD , SUB-T . : Subtitles 1 — Subtitles 2 — Subtitles OFF : . multi-subtitle. MENU 1. DVD AMS/MENU, ; . ENTER . 2. DVD BAND/TITLE, ; . ENTER .
Page 73 - PBC
73 OSD DISP . GOTO; « »: —-:—- . . GOTO, « », . V D GOTO, : . / , ENTER . / . GOTO. VCD AUDIO : PBC VCD, TITLE, PBC . . MENU, , . PBC TITLE. : , PBC 2.0 . VCD/CD PROG; . , , START. ENTER .