Page 2 - Welcome
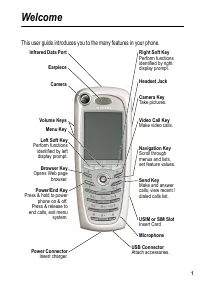
1 Welcome This user guide introduces you to the many features in your phone. Power/End Key Press & hold to power phone on & off. Press & release to end calls, exit menu system. Send Key Make and answer calls, view recent /dialed calls list. Video Call Key Make video calls. Left Soft Key ...
Page 4 - Contents; Menu Map
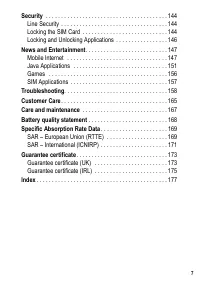
3 Contents Menu Map . . . . . . . . . . . . . . . . . . . . . . . . . . . . . . . . . . . . . . . . . 8 Safety and General Information . . . . . . . . . . . . . . . . . . . . . . . . . . . 10 European Union Directives Conformance Statement . . . . . . . . . . . . . . . . . . . . . . . . . . . . . . ...
Page 9 - Main Menu; Shortcuts
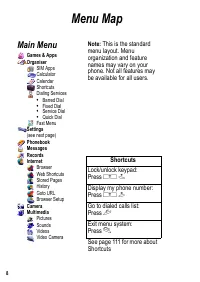
8 Menu Map Main Menu Games & AppsOrganiser SIM AppsCalculatorCalendarShortcutsDialing Services • Barred Dial • Fixed Dial • Service Dial • Quick Dial Fast Menu Settings (see next page) PhonebookMessagesRecordsInternet BrowserWeb ShortcutsStored PagesHistoryGoto URLBrowser Setup CameraMultimedia ...
Page 10 - Settings Menu
9 Settings Menu Personalize Main MenuHome KeysColor StyleGreetingBannerBanner GraphicWallpaperScreen SaverQuick Dial Ring StylesConnection IrDA LinkBluetooth LinkSync Divert Voice CallsFax CallsData CallsCancel AllForward Status In-Call Setup In-Call TimerCall Cost SetupMy Caller IDAnswer OptionsCal...
Page 11 - Information for parents
10 Safety and General Information Safety precautions Information for parents Please read the operating instructions and safety precautions carefully before use.Explain the content and the hazards associated with using the phone to your children. Remember to comply with legal requirements and local r...
Page 12 - Symbol
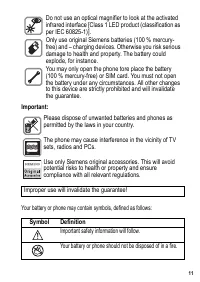
11 Important: Your battery or phone may contain symbols, defined as follows: Do not use an optical magnifier to look at the activated infrared interface [Class 1 LED product (classification as per IEC 60825-1)].Only use original Siemens batteries (100 % mercury-free) and – charging devices. Otherwis...
Page 13 - Declaration of conformity; Phone ID; Lost phone
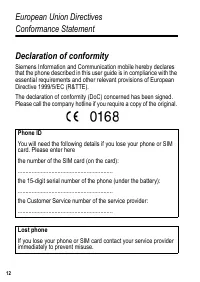
12 European Union Directives Conformance Statement Declaration of conformity Siemens Information and Communication mobile hereby declares that the phone described in this user guide is in compliance with the essential requirements and other relevant provisions of European Directive 1999/5/EC (R&...
Page 14 - Getting Started; About This Guide; Optional Features
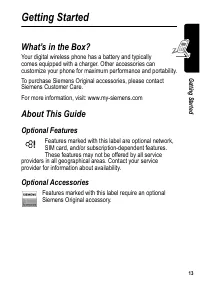
13 G ett ing S ta rte d Getting Started What’s in the Box? Your digital wireless phone has a battery and typically comes equipped with a charger. Other accessories can customize your phone for maximum performance and portability. To purchase Siemens Original accessories, please contact Siemens Custo...
Page 15 - Installing the USIM or SIM Card; Do This
14 G ett ing S ta rt ed Installing the USIM or SIM Card Your USIM (Universal Subscriber Identity Module) contains your phone number, service details, and phonebook/message memory. Your phone can use GSM SIM (Subscriber Identity Module) cards, but not all features will be available. Caution: Do not b...
Page 16 - Installing the Battery
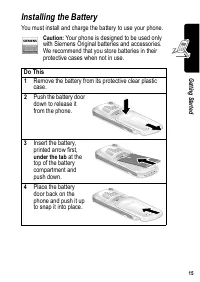
15 G ett ing S ta rte d Installing the Battery You must install and charge the battery to use your phone. Caution: Your phone is designed to be used only with Siemens Original batteries and accessories. We recommend that you store batteries in their protective cases when not in use. Do This 1 Remove...
Page 17 - Charging the Battery
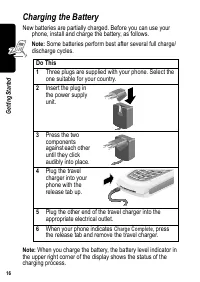
16 G ett ing S ta rt ed Charging the Battery New batteries are partially charged. Before you can use your phone, install and charge the battery, as follows. Note: Some batteries perform best after several full charge/ discharge cycles. Note: When you charge the battery, the battery level indicator i...
Page 18 - Battery Use; Battery Care
17 G ett ing S ta rte d Battery Use Battery performance depends on many factors, including your wireless carrier’s network configuration; signal strength; the temperature at which you operate your phone; the features and/or settings you select and use; and your voice, data, and other application usa...
Page 19 - Turning Your Phone On
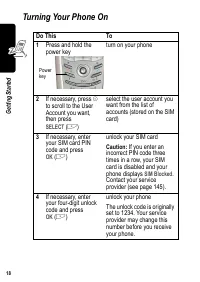
18 G ett ing S ta rt ed Turning Your Phone On Do This To 1 Press and hold the power key turn on your phone 2 If necessary, press S to scroll to the User Account you want, then press SELECT ( + ) select the user account you want from the list of accounts (stored on the SIM card) 3 If necessary, enter...
Page 20 - Adjusting Volume; Making a Call; Press
19 G ett ing S ta rte d Adjusting Volume Press the upper or lower volume keys to: • increase and decrease earpiece or speakerphone volume during a call • increase and decrease the ringer volume setting when the idle display is visible • turn off an incoming call alert Making and Answering Calls This...
Page 21 - Answering a Call; Viewing Your Phone Number
20 G ett ing S ta rt ed Answering a Call To answer a call, your phone must: • be turned on with the phone unlocked • have a SIM card inserted and unlocked • have a network connection with adequate signal strength When you receive a call, your phone rings and/or vibrates and displays an incoming call...
Page 22 - Learning to Use Your Phone; Using the Display
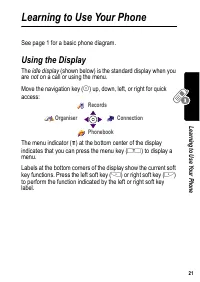
21 Le ar ning t o Use Y our P hone Learning to Use Your Phone See page 1 for a basic phone diagram. Using the Display The idle display (shown below) is the standard display when you are not on a call or using the menu. Move the navigation key ( S ) up, down, left, or right for quick access: The menu...
Page 23 - Gk
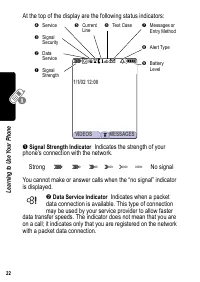
22 Le ar ning t o U se Y our P ho ne At the top of the display are the following status indicators: ➊ Signal Strength Indicator Indicates the strength of your phone’s connection with the network. You cannot make or answer calls when the “no signal” indicator is displayed. ➋ Data Service Indicator In...
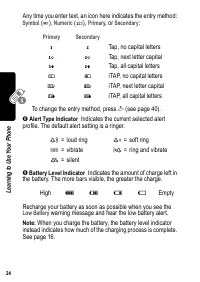
Page 24 - Text Case Indicator
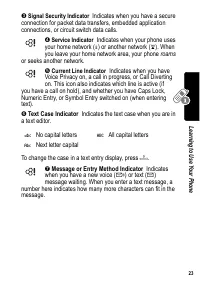
23 Le ar ning t o Use Y our P hone ➌ Signal Security Indicator Indicates when you have a secure connection for packet data transfers, embedded application connections, or circuit switch data calls. ➍ Service Indicator Indicates when your phone uses your home network ( K ) or another network ( k ). W...
Page 26 - Using the Video Call and Browser Keys
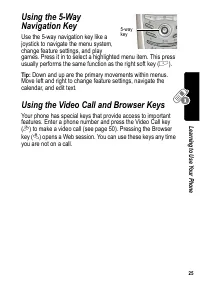
25 Le ar ning t o Use Y our P hone Using the 5-Way Navigation Key Use the 5-way navigation key like a joystick to navigate the menu system, change feature settings, and play games. Press it in to select a highlighted menu item. This press usually performs the same function as the right soft key ( + ...
Page 27 - Using Menus
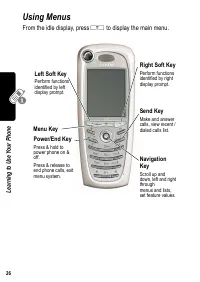
26 Le ar ning t o U se Y our P ho ne Using Menus From the idle display, press M to display the main menu. Right Soft Key Perform functions identified by right display prompt. Menu Key Power/End Key Press & hold to power phone on & off.Press & release to end phone calls, exit menu system....
Page 28 - Selecting a Menu Feature
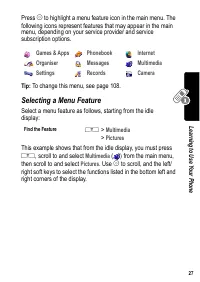
27 Le ar ning t o Use Y our P hone Press S to highlight a menu feature icon in the main menu. The following icons represent features that may appear in the main menu, depending on your service provider and service subscription options. Tip: To change this menu, see page 108. Selecting a Menu Feature...
Page 29 - Selecting a Feature Option
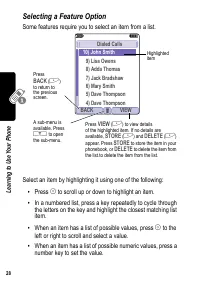
28 Le ar ning t o U se Y our P ho ne Selecting a Feature Option Some features require you to select an item from a list. Select an item by highlighting it using one of the following: • Press S to scroll up or down to highlight an item. • In a numbered list, press a key repeatedly to cycle through th...
Page 30 - Entering and Editing Text
29 Le ar ning t o Use Y our P hone Entering and Editing Text Some features require you to enter information. 031426o 5 9 Entry Details Name:John Smith Category:GeneralNo.:2125551212Type:Work T Store To:PhoneVoice Name: Speed No.:2# DONE CHANGE Press S to scroll downto additionalitems. Press CANCEL (...
Page 31 - Using the Tap Method
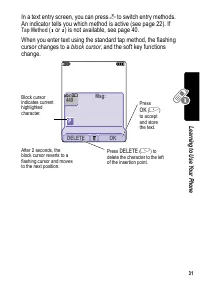
30 Le ar ning t o U se Y our P ho ne The message center lets you compose and send text messages. A flashing cursor shows where text will appear. Using the Tap Method This is the standard entry method for entering text on your phone. Press To 1 A number key (one or more times) select a letter, number...
Page 33 - Character Chart
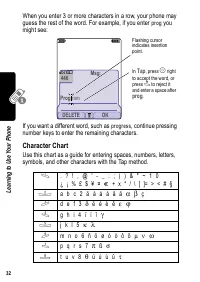
32 Le ar ning t o U se Y our P ho ne When you enter 3 or more characters in a row, your phone may guess the rest of the word. For example, if you enter prog you might see: If you want a different word, such as progress , continue pressing number keys to enter the remaining characters. Character Char...
Page 34 - Tap Method Text Entry Rules
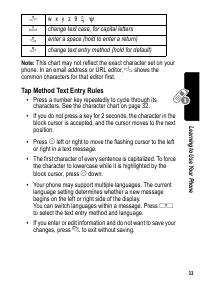
33 Le ar ning t o Use Y our P hone Note: This chart may not reflect the exact character set on your phone. In an email address or URL editor, 1 shows the common characters for that editor first. Tap Method Text Entry Rules • Press a number key repeatedly to cycle through its characters. See the char...
Page 35 - Using iTAPTM Text Entry Method
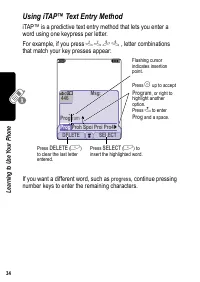
34 Le ar ning t o U se Y our P ho ne Using iTAP™ Text Entry Method iTAP™ is a predictive text entry method that lets you enter a word using one keypress per letter. For example, if you press 7 7 6 4 , letter combinations that match your key presses appear: If you want a different word, such as progr...
Page 36 - Entering Words
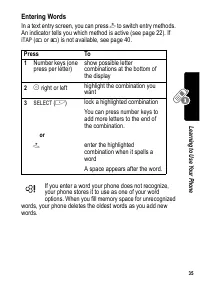
35 Le ar ning t o Use Y our P hone Entering Words In a text entry screen, you can press # to switch entry methods. An indicator tells you which method is active (see page 22). If iTAP ( ô or ü ) is not available, see page 40. If you enter a word your phone does not recognize, your phone stores it to...
Page 37 - Using the Symbol Entry Method
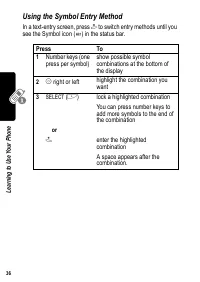
36 Le ar ning t o U se Y our P ho ne Using the Symbol Entry Method In a text-entry screen, press # to switch entry methods until you see the Symbol icon ( å ) in the status bar. Press To 1 Number keys (one press per symbol) show possible symbol combinations at the bottom of the display 2 S right or ...
Page 38 - Symbol Chart; Using the Numeric Method
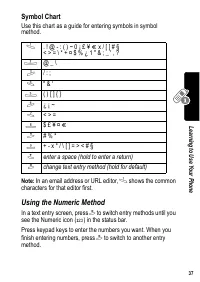
37 Le ar ning t o Use Y our P hone Symbol Chart Use this chart as a guide for entering symbols in symbol method. Note: In an email address or URL editor, 1 shows the common characters for that editor first. Using the Numeric Method In a text entry screen, press # to switch entry methods until you se...
Page 39 - Deleting Letters and Words
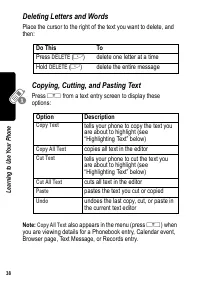
38 Le ar ning t o U se Y our P ho ne Deleting Letters and Words Place the cursor to the right of the text you want to delete, and then: Copying, Cutting, and Pasting Text Press M from a text entry screen to display these options: Note: Copy All Text also appears in the menu (press M ) when you are v...
Page 40 - Highlighting Text
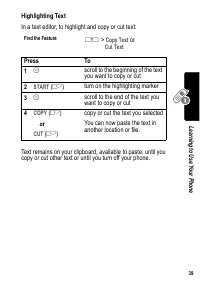
39 Le ar ning t o Use Y our P hone Highlighting Text In a text editor, to highlight and copy or cut text: Text remains on your clipboard, available to paste, until you copy or cut other text or until you turn off your phone. Find the Feature M > Copy Text or Cut Text Press To 1 S scroll to the be...
Page 41 - Choosing a Text Entry Method; Setting Up a Text Entry Method
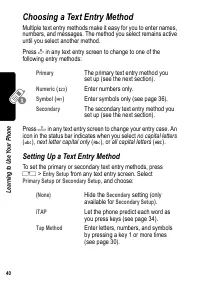
40 Le ar ning t o U se Y our P ho ne Choosing a Text Entry Method Multiple text entry methods make it easy for you to enter names, numbers, and messages. The method you select remains active until you select another method. Press # in any text entry screen to change to one of the following entry met...
Page 42 - Locking and Unlocking Your Phone; Locking Your Phone Manually
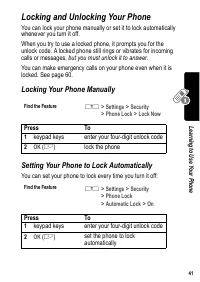
41 Le ar ning t o Use Y our P hone Locking and Unlocking Your Phone You can lock your phone manually or set it to lock automatically whenever you turn it off. When you try to use a locked phone, it prompts you for the unlock code. A locked phone still rings or vibrates for incoming calls or messages...
Page 43 - Unlocking Your Phone; Changing Your Unlock Code
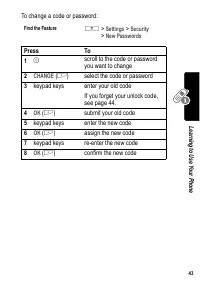
42 Le ar ning t o U se Y our P ho ne Unlocking Your Phone At the Enter Unlock Code prompt: Changing Your Unlock Code Your phone’s four-digit unlock code is originally set to 1234, and the six-digit security code is originally set to 000000. Your service provider may reset these numbers before you re...
Page 45 - If You Forget Your Unlock Code; Locking and Unlocking the Keypad
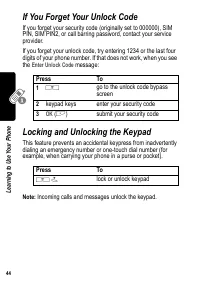
44 Le ar ning t o U se Y our P ho ne If You Forget Your Unlock Code If you forget your security code (originally set to 000000), SIM PIN, SIM PIN2, or call barring password, contact your service provider. If you forget your unlock code, try entering 1234 or the last four digits of your phone number....
Page 46 - Taking and Viewing Pictures; Taking Pictures
45 Le ar ning t o Use Y our P hone Taking and Viewing Pictures You can send pictures, sounds, shortcuts, bookmarks, events, and contacts to a connected computer. See page 134. Taking Pictures You can use your phone’s camera key to take pictures quickly and easily. To store a picture with a phone num...
Page 47 - Downloading Pictures
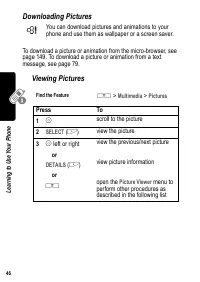
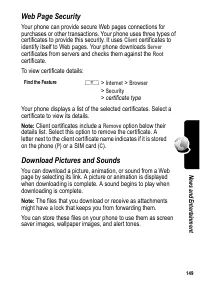
46 Le ar ning t o U se Y our P ho ne Downloading Pictures You can download pictures and animations to your phone and use them as wallpaper or a screen saver. To download a picture or animation from the micro-browser, see page 149. To download a picture or animation from a text message, see page 79. ...
Page 48 - Recording and Viewing Videos; Recording Videos; Option
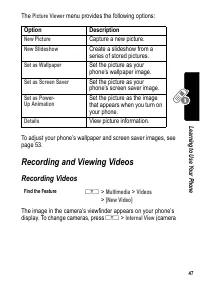
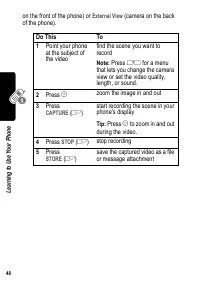
47 Le ar ning t o Use Y our P hone The Picture Viewer menu provides the following options: To adjust your phone’s wallpaper and screen saver images, see page 53. Recording and Viewing Videos Recording Videos The image in the camera’s viewfinder appears on your phone’s display. To change cameras, pre...
Page 50 - Watching Videos
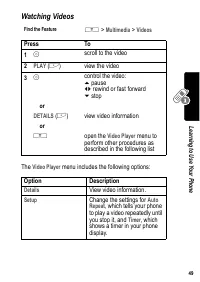
49 Le ar ning t o Use Y our P hone Watching Videos The Video Player menu includes the following options: Find the Feature M > Multimedia > Videos Press To 1 S scroll to the video 2 PLAY ( + ) view the video 3 S control the video: d pause bc rewind or fast forward e stop or DETAILS ( + ) view v...
Page 51 - Making Video Calls; Previewing Video Calls
50 Le ar ning t o U se Y our P ho ne Making Video Calls If you call someone else who has a video phone, you can see each other while you talk. Previewing Video Calls You can preview your phone’s image to see how you look before you make a video call: Press To 1 keypad keys dial the phone number (up ...
Page 52 - Setting Up Video Calls
51 Le ar ning t o Use Y our P hone Setting Up Video Calls To make video calls, your phone uses a video gateway number that you can enter. Note: Your service provider may have already programmed the text message inbox settings for you. Enter the number provided by your service provider. Find the Feat...
Page 53 - Setting Up Your Phone; Storing Your Name and Phone Number; Setting a Ring Style
52 S et ting U p Y ou r P hon e Setting Up Your Phone Storing Your Name and Phone Number To store or edit user name and phone number information on your SIM card: If you do not know your phone number, contact your service provider. To view your phone number from the idle display or during a call, se...
Page 54 - Setting a Wallpaper Image; Setting
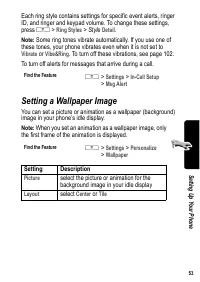
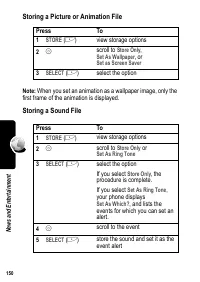
53 S ett ing U p You r P hone Each ring style contains settings for specific event alerts, ringer ID, and ringer and keypad volume. To change these settings, press M > Ring Styles > Style Detail . Note: Some ring tones vibrate automatically. If you use one of these tones, your phone vibrates e...
Page 55 - Setting a Screen Saver Image; Setting Display Color
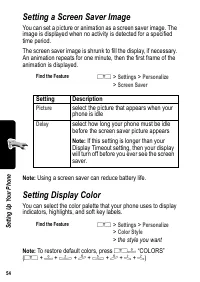
54 S et ting U p Y ou r P hon e Setting a Screen Saver Image You can set a picture or animation as a screen saver image. The image is displayed when no activity is detected for a specified time period. The screen saver image is shrunk to fill the display, if necessary. An animation repeats for one m...
Page 56 - Adjusting Lights on Your Phone; Setting the Display Backlight
55 S ett ing U p You r P hone Adjusting Lights on Your Phone You can adjust the lights that appear in your phone’s display, behind the keypad, and when you receive incoming calls or messages. Setting the Display Backlight You can set the amount of time that the display backlight remains on, or turn ...
Page 57 - Setting Your Display Timeout
56 S et ting U p Y ou r P hon e Setting Your Display Timeout This is a power-saving feature that turns off your phone’s display when it is inactive for a selected idle time. Your display reactivates if you press a key or receive a call. Conserving Battery Power Some networks and phones include a bat...
Page 58 - Calling Features; Changing the Active Line; Redialing a Number
57 C alling Fe atures Calling Features For basic instructions on how to make and answer calls, see page 19. Changing the Active Line Change the active phone line to make and receive calls from your other phone number. Note: This feature is available only for dual-line enabled SIM cards. The active l...
Page 59 - Using Automatic Redial; Incoming Calls
C alling Fe at ur es 58 Using Automatic Redial If you receive a busy signal, your phone displays Call Failed . With automatic redial, your phone automatically redials the number. When the call goes through, your phone rings or vibrates one time, displays the message Redial Successful , and then conn...
Page 60 - Outgoing Calls; Canceling an Incoming Call; Turning Off a Call Alert
59 C alling Fe atures Outgoing Calls You can show or hide your phone number as an ID for the calls that you make. You can override the default caller ID setting when you make a call. While dialing (with digits visible in the display), press M > Hide ID/Show ID Canceling an Incoming Call While the...
Page 61 - Calling an Emergency Number; Dialing International Numbers
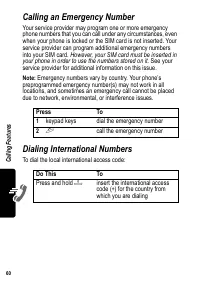
C alling Fe at ur es 60 Calling an Emergency Number Your service provider may program one or more emergency phone numbers that you can call under any circumstances, even when your phone is locked or the SIM card is not inserted. Your service provider can program additional emergency numbers into you...
Page 62 - Viewing Records
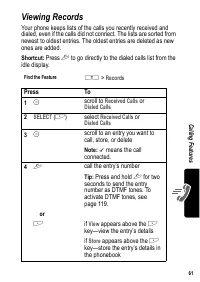
61 C alling Fe atures Viewing Records Your phone keeps lists of the calls you recently received and dialed, even if the calls did not connect. The lists are sorted from newest to oldest entries. The oldest entries are deleted as new ones are added. Shortcut: Press N to go directly to the dialed call...
Page 64 - Returning an Unanswered Call
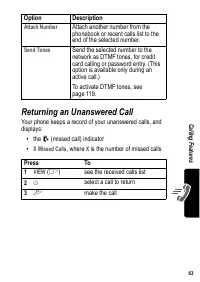
63 C alling Fe atures Returning an Unanswered Call Your phone keeps a record of your unanswered calls, and displays: • the N (missed call) indicator • X Missed Calls , where X is the number of missed calls Attach Number Attach another number from the phonebook or recent calls list to the end of the ...
Page 65 - Using the Notepad; Attaching a Number
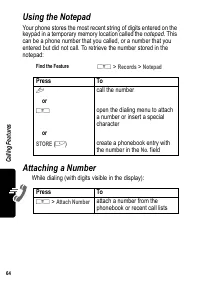
C alling Fe at ur es 64 Using the Notepad Your phone stores the most recent string of digits entered on the keypad in a temporary memory location called the notepad . This can be a phone number that you called, or a number that you entered but did not call. To retrieve the number stored in the notep...
Page 66 - Calling with Speed Dial; Calling with 1-Touch Dial
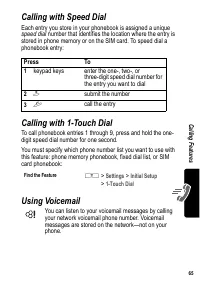
65 C alling Fe atures Calling with Speed Dial Each entry you store in your phonebook is assigned a unique speed dial number that identifies the location where the entry is stored in phone memory or on the SIM card. To speed dial a phonebook entry: Calling with 1-Touch Dial To call phonebook entries ...
Page 67 - Storing Your Voicemail Number
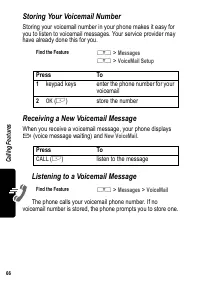
C alling Fe at ur es 66 Storing Your Voicemail Number Storing your voicemail number in your phone makes it easy for you to listen to voicemail messages. Your service provider may have already done this for you. Receiving a New Voicemail Message When you receive a voicemail message, your phone displa...
Page 68 - Using Call Waiting
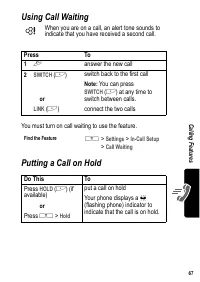
67 C alling Fe atures Using Call Waiting When you are on a call, an alert tone sounds to indicate that you have received a second call. You must turn on call waiting to use the feature. Putting a Call on Hold Press To 1 N answer the new call 2 SWITCH ( + ) or LINK ( + ) switch back to the first call...
Page 69 - Transferring a Call; Announce the Call Transfer
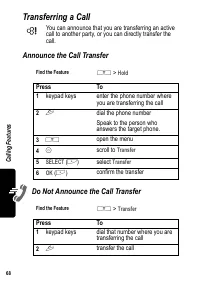
C alling Fe at ur es 68 Transferring a Call You can announce that you are transferring an active call to another party, or you can directly transfer the call. Announce the Call Transfer Do Not Announce the Call Transfer Find the Feature M > Hold Press To 1 keypad keys enter the phone number where...
Page 70 - Messages and Email; Setting Up the Message Inbox; Message Setup Options
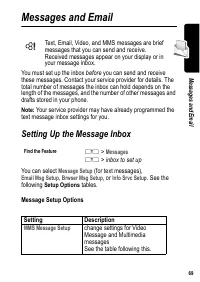
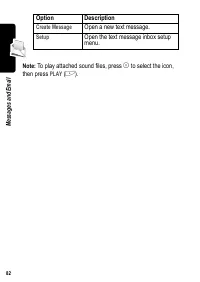
69 M es sa ge s a nd E mail Messages and Email Text, Email, Video, and MMS messages are brief messages that you can send and receive. Received messages appear on your display or in your message inbox. You must set up the inbox before you can send and receive these messages. Contact your service prov...
Page 71 - MMS Msg Setup Options
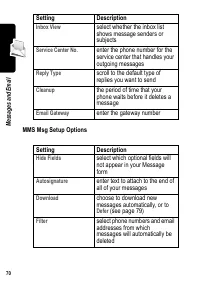
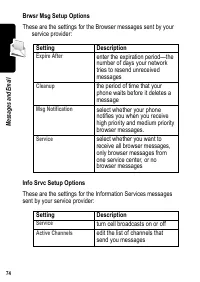
70 M es sa ge s a nd E ma il MMS Msg Setup Options Inbox View select whether the inbox list shows message senders or subjects Service Center No. enter the phone number for the service center that handles your outgoing messages Reply Type scroll to the default type of replies you want to send Cleanup...
Page 72 - Email Msg Setup Options
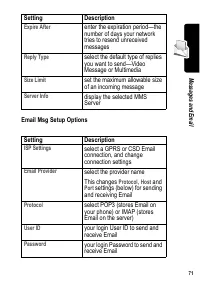
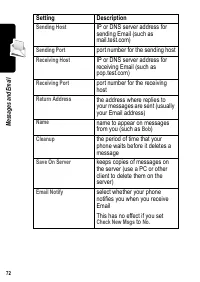
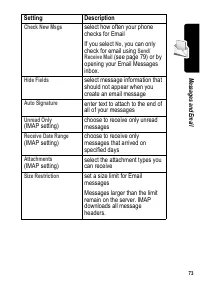
71 M es sa ge s a nd E mail Email Msg Setup Options Expire After enter the expiration period—the number of days your network tries to resend unreceived messages Reply Type select the default type of replies you want to send—Video Message or Multimedia Size Limit set the maximum allowable size of an ...
Page 76 - Creating and Sending Messages
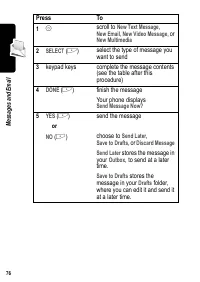
75 M es sa ge s a nd E mail Creating and Sending Messages Note: Your message inbox must be set up before you can send and receive messages. See page 69. You can send a text message to one or more recipients. You can manually enter each recipient’s phone number or email address, or select numbers/add...
Page 78 - Message Contents; Item
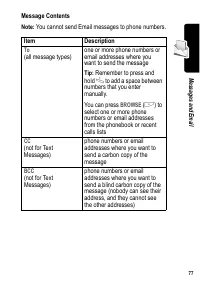
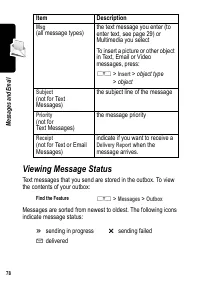
77 M es sa ge s a nd E mail Message Contents Note: You cannot send Email messages to phone numbers. Item Description To (all message types) one or more phone numbers or email addresses where you want to send the message Tip: Remember to press and hold 1 to add a space between numbers that you enter ...
Page 79 - Viewing Message Status
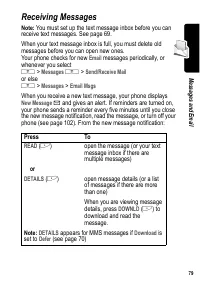
78 M es sa ge s a nd E ma il Viewing Message Status Text messages that you send are stored in the outbox. To view the contents of your outbox: Messages are sorted from newest to oldest. The following icons indicate message status: Msg (all message types) the text message you enter (to enter text, se...
Page 80 - Receiving Messages
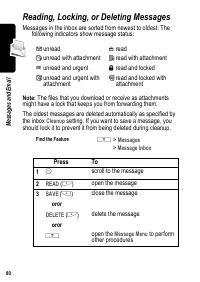
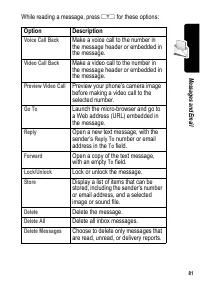
79 M es sa ge s a nd E mail Receiving Messages Note: You must set up the text message inbox before you can receive text messages. See page 69. When your text message inbox is full, you must delete old messages before you can open new ones. Your phone checks for new Email messages periodically, or wh...
Page 84 - Setting Up Your Phonebook; Viewing Entry Details
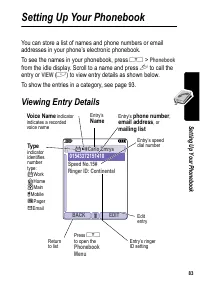
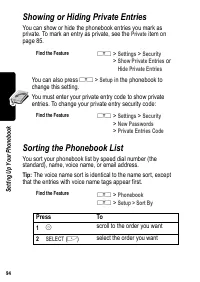
83 S ett ing U p Your P hone book Setting Up Your Phonebook You can store a list of names and phone numbers or email addresses in your phone’s electronic phonebook. To see the names in your phonebook, press M > Phonebook from the idle display. Scroll to a name and press N to call the entry or VIE...
Page 85 - Creating a Phonebook Entry; Enter Information; Phonebook Item
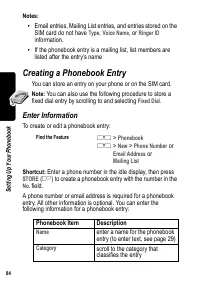
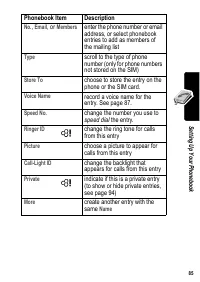
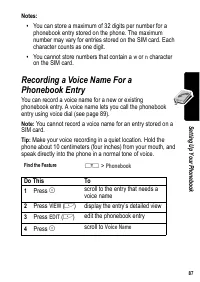
84 S et ting U p Y our P hone bo ok Notes: • Email entries, Mailing List entries, and entries stored on the SIM card do not have Type , Voice Name , or Ringer ID information. • If the phonebook entry is a mailing list, list members are listed after the entry’s name Creating a Phonebook Entry You can...
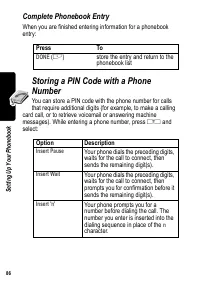
Page 87 - Complete Phonebook Entry
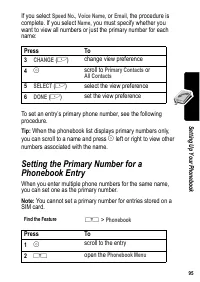
86 S et ting U p Y our P hone bo ok Complete Phonebook Entry When you are finished entering information for a phonebook entry: Storing a PIN Code with a Phone Number You can store a PIN code with the phone number for calls that require additional digits (for example, to make a calling card call, or ...
Page 89 - Dialing a Phonebook Entry; Phonebook List
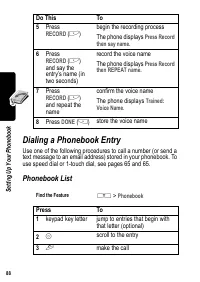
88 S et ting U p Y our P hone bo ok Dialing a Phonebook Entry Use one of the following procedures to call a number (or send a text message to an email address) stored in your phonebook. To use speed dial or 1-touch dial, see pages 65 and 65. Phonebook List 5 Press RECORD ( + ) begin the recording pr...
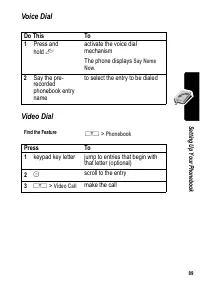
Page 90 - Voice Dial
89 S ett ing U p Your P hone book Voice Dial Video Dial Do This To 1 Press and hold N activate the voice dial mechanism The phone displays Say Name Now . 2 Say the pre-recorded phonebook entry name to select the entry to be dialed Find the Feature M > Phonebook Press To 1 keypad key letter jump t...
Page 91 - Editing a Phonebook Entry; Deleting a Phonebook Entry
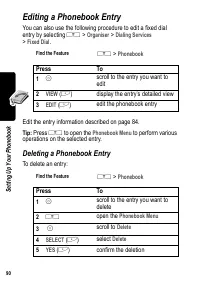
90 S et ting U p Y our P hone bo ok Editing a Phonebook Entry You can also use the following procedure to edit a fixed dial entry by selecting M > Organiser > Dialing Services > Fixed Dial . Edit the entry information described on page 84. Tip: Press M to open the Phonebook Menu to perform ...
Page 92 - Using Phonebook Categories; Create or Edit a Category
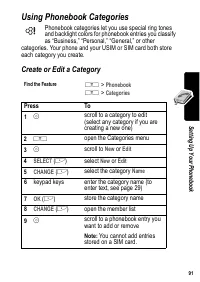
91 S ett ing U p Your P hone book Using Phonebook Categories Phonebook categories let you use special ring tones and backlight colors for phonebook entries you classify as “Business,” “Personal,” “General,” or other categories. Your phone and your USIM or SIM card both store each category you create...
Page 93 - Delete a Category
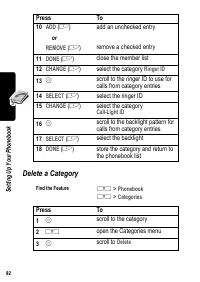
92 S et ting U p Y our P hone bo ok Delete a Category 10 ADD ( + ) or REMOVE ( + ) add an unchecked entry remove a checked entry 11 DONE ( + ) close the member list 12 CHANGE ( + ) select the category Ringer ID 13 S scroll to the ringer ID to use for calls from category entries 14 SELECT ( + ) selec...
Page 94 - Reorder Categories
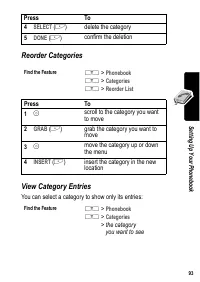
93 S ett ing U p Your P hone book Reorder Categories View Category Entries You can select a category to show only its entries: 4 SELECT ( + ) delete the category 5 DONE ( + ) confirm the deletion Find the Feature M > Phonebook M > Categories M > Reorder List Press To 1 S scroll to the categ...
Page 97 - Copying Phonebook Entries; Copy a Single Entry
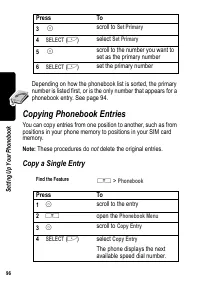
96 S et ting U p Y our P hone bo ok Depending on how the phonebook list is sorted, the primary number is listed first, or is the only number that appears for a phonebook entry. See page 94. Copying Phonebook Entries You can copy entries from one position to another, such as from positions in your ph...
Page 98 - Copy Multiple Entries
97 S ett ing U p Your P hone book Copy Multiple Entries 5 keypad keys edit the speed dial number 6 OK ( + ) copy the entry to the new speed dial location Find the Feature M > Phonebook Press To 1 M open the Phonebook Menu 2 S scroll to Copy Entries 3 SELECT ( + ) select Copy Entries 4 S scroll to...
Page 99 - Checking Phonebook Capacity
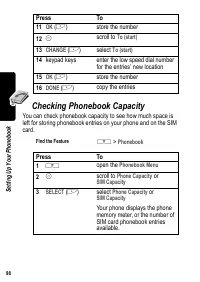
98 S et ting U p Y our P hone bo ok Checking Phonebook Capacity You can check phonebook capacity to see how much space is left for storing phonebook entries on your phone and on the SIM card. 11 OK ( + ) store the number 12 S scroll to To (start) 13 CHANGE ( + ) select To (start) 14 keypad keys ente...
Page 100 - Setting 1-Touch Dial Preference
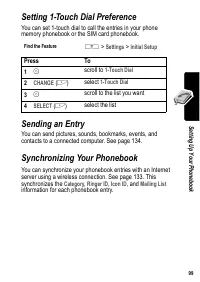
99 S ett ing U p Your P hone book Setting 1-Touch Dial Preference You can set 1-touch dial to call the entries in your phone memory phonebook or the SIM card phonebook. Sending an Entry You can send pictures, sounds, bookmarks, events, and contacts to a connected computer. See page 134. Synchronizin...
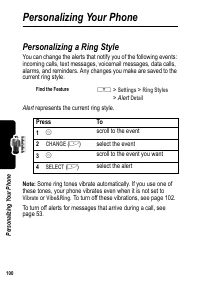
Page 101 - Personalizing Your Phone; Personalizing a Ring Style
100 P er sona liz ing Y ou r P hon e Personalizing Your Phone Personalizing a Ring Style You can change the alerts that notify you of the following events: incoming calls, text messages, voicemail messages, data calls, alarms, and reminders. Any changes you make are saved to the current ring style. ...
Page 102 - Activating Ringer IDs; Setting Ringer or Keypad Volume
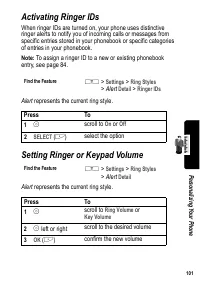
101 P er sonaliz ing Y our P hone Activating Ringer IDs When ringer IDs are turned on, your phone uses distinctive ringer alerts to notify you of incoming calls or messages from specific entries stored in your phonebook or specific categories of entries in your phonebook. Note: To assign a ringer ID...
Page 103 - Setting Reminders; Turning Reminders On or Off; Activating Haptic Vibrations
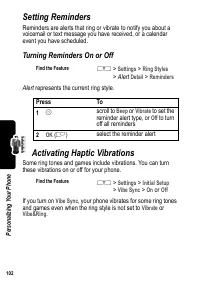
102 P er sona liz ing Y ou r P hon e Setting Reminders Reminders are alerts that ring or vibrate to notify you about a voicemail or text message you have received, or a calendar event you have scheduled. Turning Reminders On or Off Alert represents the current ring style. Activating Haptic Vibration...
Page 104 - Creating and Editing Alert Tones; Creating a Tone; Entering Notes
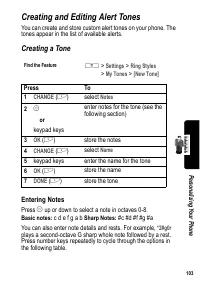
103 P er sonaliz ing Y our P hone Creating and Editing Alert Tones You can create and store custom alert tones on your phone. The tones appear in the list of available alerts. Creating a Tone Entering Notes Press S up or down to select a note in octaves 0-8. Basic notes: c d e f g a b Sharp Notes: #...
Page 105 - Key
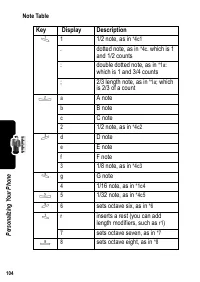
104 P er sona liz ing Y ou r P hon e Note Table Key Display Description 1 1 1/2 note, as in *4c1 . dotted note, as in *4c. which is 1 and 1/2 counts : double dotted note, as in *1a: which is 1 and 3/4 counts ; 2/3 length note, as in *1a; which is 2/3 of a count 2 a A note b B note c C note 2 1/2 not...
Page 106 - Example
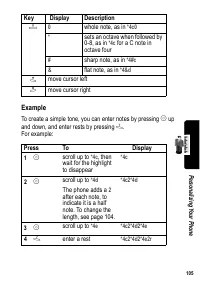
105 P er sonaliz ing Y our P hone Example To create a simple tone, you can enter notes by pressing S up and down, and enter rests by pressing 7 . For example: 0 0 whole note, as in *4c0 * sets an octave when followed by 0-8, as in *4c for a C note in octave four # sharp note, as in *4#c & flat n...
Page 107 - Editing a Tone
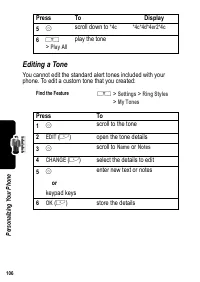
106 P er sona liz ing Y ou r P hon e Editing a Tone You cannot edit the standard alert tones included with your phone. To edit a custom tone that you created: 5 S scroll down to *4c *4c*4d*4er2*4c 6 M > Play All play the tone Find the Feature M > Settings > Ring Styles > My Tones Press T...
Page 108 - Deleting a Tone
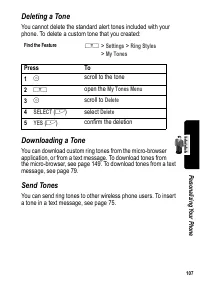
107 P er sonaliz ing Y our P hone Deleting a Tone You cannot delete the standard alert tones included with your phone. To delete a custom tone that you created: Downloading a Tone You can download custom ring tones from the micro-browser application, or from a text message. To download tones from th...
Page 110 - Personalizing Soft Keys
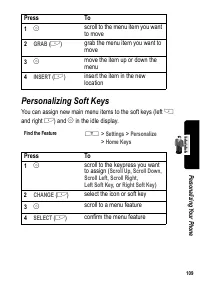
109 P er sonaliz ing Y our P hone Personalizing Soft Keys You can assign new main menu items to the soft keys (left - and right + ) and S in the idle display. Press To 1 S scroll to the menu item you want to move 2 GRAB ( + ) grab the menu item you want to move 3 S move the item up or down the menu ...
Page 112 - Clearing All Stored Information; Creating and Using Shortcuts; Standard Shortcuts
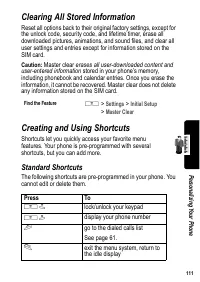
111 P er sonaliz ing Y our P hone Clearing All Stored Information Reset all options back to their original factory settings, except for the unlock code, security code, and lifetime timer, erase all downloaded pictures, animations, and sound files, and clear all user settings and entries except for i...
Page 113 - Adding Shortcuts; Using Keypad Shortcuts
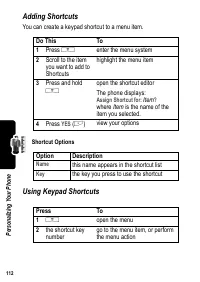
112 P er sona liz ing Y ou r P hon e Adding Shortcuts You can create a keypad shortcut to a menu item. Shortcut Options Using Keypad Shortcuts Do This To 1 Press M enter the menu system 2 Scroll to the item you want to add to Shortcuts highlight the menu item 3 Press and hold M open the shortcut edi...
Page 114 - Selecting Shortcuts from the List; Shortcuts Menu
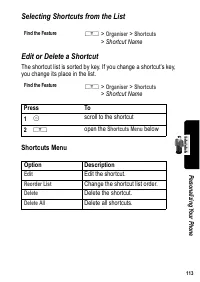
113 P er sonaliz ing Y our P hone Selecting Shortcuts from the List Edit or Delete a Shortcut The shortcut list is sorted by key. If you change a shortcut’s key, you change its place in the list. Shortcuts Menu Find the Feature M > Organiser > Shortcuts > Shortcut Name Find the Feature M &g...
Page 115 - Getting More Out of Your Phone; Making a Conference Call
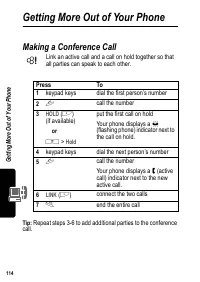
G et ting M or e O ut of Y our P hone 114 Getting More Out of Your Phone Making a Conference Call Link an active call and a call on hold together so that all parties can speak to each other. Tip: Repeat steps 3-6 to add additional parties to the conference call. Press To 1 keypad keys dial the first...
Page 116 - Diverting a Call; Set Up or Cancel Call Diverting
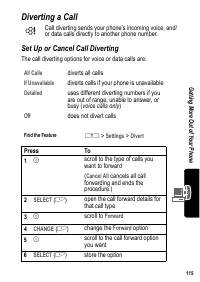
115 G ett ing M or e O ut of Y our P hone Diverting a Call Call diverting sends your phone’s incoming voice, and/or data calls directly to another phone number. Set Up or Cancel Call Diverting The call diverting options for voice or data calls are: All Calls diverts all calls If Unavailable diverts ...
Page 117 - Check Call Diverting Status
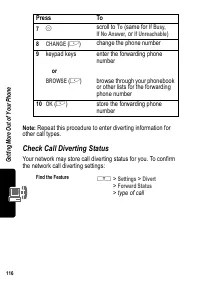
G et ting M or e O ut of Y our P hone 116 Note: Repeat this procedure to enter diverting information for other call types. Check Call Diverting Status Your network may store call diverting status for you. To confirm the network call diverting settings: 7 S scroll to To (same for If Busy , If No Answ...
Page 119 - Service Dialing
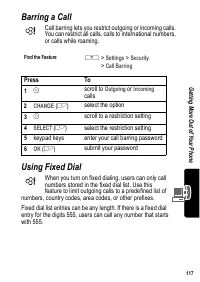
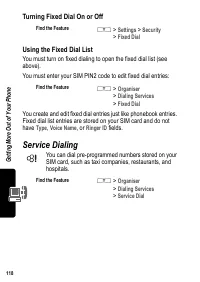
G et ting M or e O ut of Y our P hone 118 Turning Fixed Dial On or Off Using the Fixed Dial List You must turn on fixed dialing to open the fixed dial list (see above). You must enter your SIM PIN2 code to edit fixed dial entries: You create and edit fixed dial entries just like phonebook entries. F...
Page 120 - Quick Dialing; Using DTMF Tones; Activate DTMF Tones
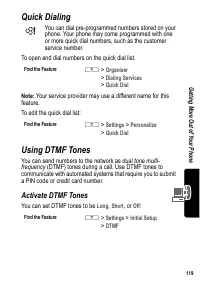
119 G ett ing M or e O ut of Y our P hone Quick Dialing You can dial pre-programmed numbers stored on your phone. Your phone may come programmed with one or more quick dial numbers, such as the customer service number. To open and dial numbers on the quick dial list. Note: Your service provider may ...
Page 121 - Send DTMF Tones; Monitoring Phone Use; Viewing and Resetting Call Timers
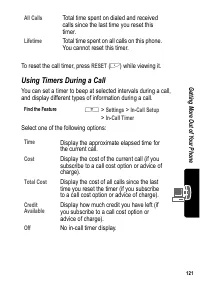
G et ting M or e O ut of Y our P hone 120 Send DTMF Tones During a call, highlight a number in the phonebook or recent call lists, then: Monitoring Phone Use Viewing and Resetting Call Timers Network connection time is the elapsed time from the moment you connect to your service provider’s network t...
Page 122 - Using Timers During a Call
121 G ett ing M or e O ut of Y our P hone To reset the call timer, press RESET ( + ) while viewing it. Using Timers During a Call You can set a timer to beep at selected intervals during a call, and display different types of information during a call. Select one of the following options: All Calls ...
Page 123 - Viewing and Resetting Cost Trackers; Cost Tracker
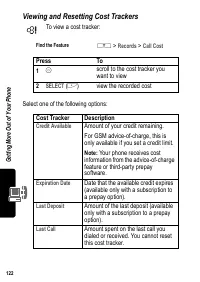
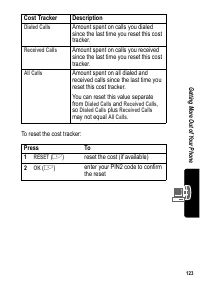
G et ting M or e O ut of Y our P hone 122 Viewing and Resetting Cost Trackers To view a cost tracker: Select one of the following options: Find the Feature M > Records > Call Cost Press To 1 S scroll to the cost tracker you want to view 2 SELECT ( + ) view the recorded cost Cost Tracker Descri...
Page 125 - Using Hands Free Features; Automatic Answer
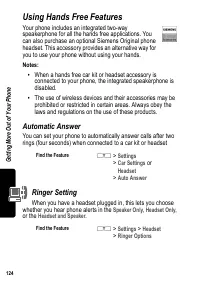
G et ting M or e O ut of Y our P hone 124 Using Hands Free Features Your phone includes an integrated two-way speakerphone for all the hands free applications. You can also purchase an optional Siemens Original phone headset. This accessory provides an alternative way for you to use your phone witho...
Page 126 - Automatic Hands Free
125 G ett ing M or e O ut of Y our P hone Automatic Hands Free You can set up your phone to automatically route calls to a car kit when it detects a connection. Power-Off Delay When your phone is connected to a car kit, you can set it to stay on for a period of time after you switch off the ignition...
Page 127 - Charger Time; Using Applications During a Call
G et ting M or e O ut of Y our P hone 126 Charger Time When your phone is connected to a car kit, you can set it to charge itself for a specified time period after you switch off the ignition. This helps ensure that the phone battery gets fully charged while the vehicle is parked. Note: This feature...
Page 129 - Setting Up a Cable Connection; Setting Up an Infrared Connection
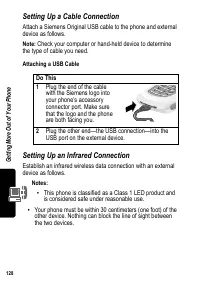
G et ting M or e O ut of Y our P hone 128 Setting Up a Cable Connection Attach a Siemens Original USB cable to the phone and external device as follows. Note: Check your computer or hand-held device to determine the type of cable you need. Attaching a USB Cable Setting Up an Infrared Connection Esta...
Page 130 - Setting Up a Bluetooth Connection
129 G ett ing M or e O ut of Y our P hone If the phone does not find an infrared-capable device, it changes the right soft key ( + ) from STOP to START . To break the infrared data connection, press STOP ( + ). You can also move the device away from the phone, turn off the device, or turn off the ph...
Page 131 - Connecting a Computer for a Data Call; Connecting and Disconnecting a Headset
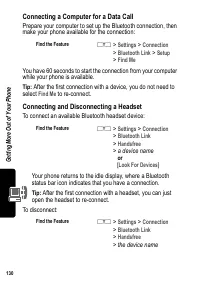
G et ting M or e O ut of Y our P hone 130 Connecting a Computer for a Data Call Prepare your computer to set up the Bluetooth connection, then make your phone available for the connection: You have 60 seconds to start the connection from your computer while your phone is available. Tip: After the fi...
Page 132 - Data Calls; Installing the Software
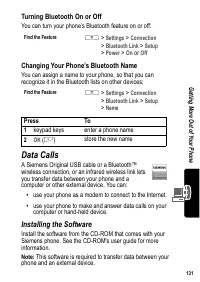
131 G ett ing M or e O ut of Y our P hone Turning Bluetooth On or Off You can turn your phone’s Bluetooth feature on or off: Changing Your Phone’s Bluetooth Name You can assign a name to your phone, so that you can recognize it in the Bluetooth lists on other devices: Data Calls A Siemens Original U...
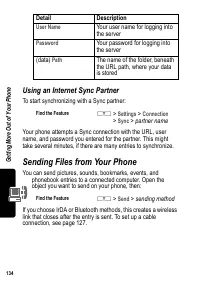
Page 134 - Using Sync; Creating an Internet Sync Partner; Detail
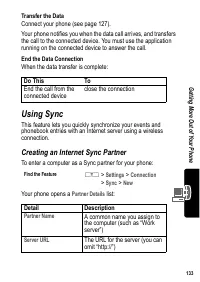
133 G ett ing M or e O ut of Y our P hone Transfer the Data Connect your phone (see page 127). Your phone notifies you when the data call arrives, and transfers the call to the connected device. You must use the application running on the connected device to answer the call. End the Data Connection ...
Page 135 - Using an Internet Sync Partner; Sending Files from Your Phone
G et ting M or e O ut of Y our P hone 134 Using an Internet Sync Partner To start synchronizing with a Sync partner: Your phone attempts a Sync connection with the URL, user name, and password you entered for the partner. This might take several minutes, if there are many entries to synchronize. Sen...
Page 136 - Viewing Phone Specifications
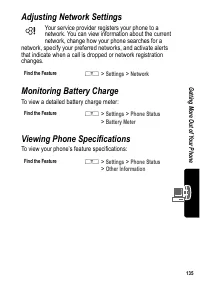
135 G ett ing M or e O ut of Y our P hone Adjusting Network Settings Your service provider registers your phone to a network. You can view information about the current network, change how your phone searches for a network, specify your preferred networks, and activate alerts that indicate when a ca...
Page 137 - Personal Organizer Features; Calendar; Viewing by the Month
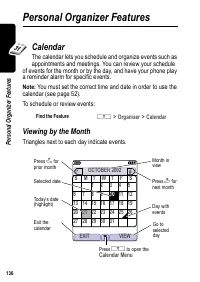
136 P er sona l O rga niz er Fe at ur es Personal Organizer Features Calendar The calendar lets you schedule and organize events such as appointments and meetings. You can review your schedule of events for the month or by the day, and have your phone play a reminder alarm for specific events. Note:...
Page 138 - Viewing by the Day
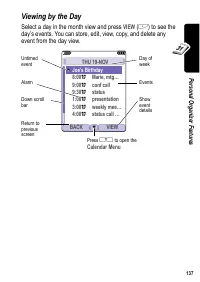
137 P er son al Org anizer Featur es Viewing by the Day Select a day in the month view and press VIEW ( + ) to see the day’s events. You can store, edit, view, copy, and delete any event from the day view. 031426o BACK VIEW THU 19-NOV y Joe's Birthday 8:00 w Marie, mtg… 9:00 w conf call 9:30 w statu...
Page 139 - Viewing by the Event; Adding a New Event
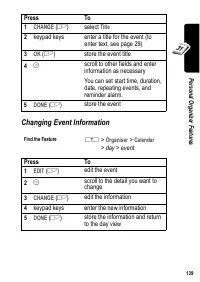
138 P er sona l O rga niz er Fe at ur es Viewing by the Event Select an event in the day view and press VIEW ( + ) to open the detailed event view. You can edit, copy, and delete events from the event view. Adding a New Event A title is required for a calendar event. All other information is optiona...
Page 140 - Changing Event Information
139 P er son al Org anizer Featur es Changing Event Information Press To 1 CHANGE ( + ) select Title 2 keypad keys enter a title for the event (to enter text, see page 29) 3 OK ( + ) store the event title 4 S scroll to other fields and enter information as necessary You can set start time, duration,...
Page 141 - Copying an Event
140 P er sona l O rga niz er Fe at ur es Copying an Event Find the Feature M > Organiser > Calendar Press To 1 S scroll to the day 2 VIEW ( + ) display the day view 3 S scroll to the event to copy 4 M open the Menu 5 S scroll to Copy 6 SELECT ( + ) copy the event 7 YES ( + ) confirm the copy Y...
Page 142 - Deleting an Event
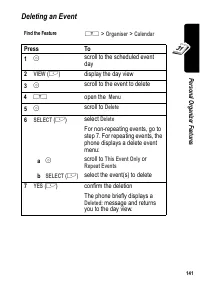
141 P er son al Org anizer Featur es Deleting an Event Find the Feature M > Organiser > Calendar Press To 1 S scroll to the scheduled event day 2 VIEW ( + ) display the day view 3 S scroll to the event to delete 4 M open the Menu 5 S scroll to Delete 6 SELECT ( + ) select Delete For non-repeat...
Page 143 - View and Dismiss an Event Reminder; Change the Calendar Setup
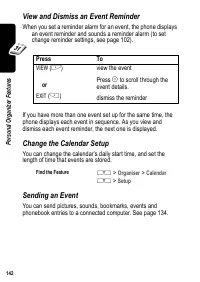
142 P er sona l O rga niz er Fe at ur es View and Dismiss an Event Reminder When you set a reminder alarm for an event, the phone displays an event reminder and sounds a reminder alarm (to set change reminder settings, see page 102). If you have more than one event set up for the same time, the phon...
Page 144 - Calculator and Currency Converter; Function
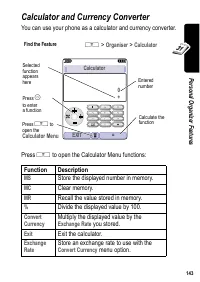
143 P er son al Org anizer Featur es Calculator and Currency Converter You can use your phone as a calculator and currency converter. Press M to open the Calculator Menu functions: Find the Feature M > Organiser > Calculator Function Description MS Store the displayed number in memory. MC Clea...
Page 145 - Security; Line Security
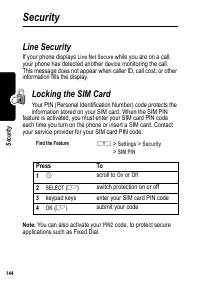
144 S ec ur ity Security Line Security If your phone displays Line Not Secure while you are on a call, your phone has detected another device monitoring the call. This message does not appear when caller ID, call cost, or other information fills the display. Locking the SIM Card Your PIN (Personal I...
Page 146 - Unblock the SIM Card PIN Code
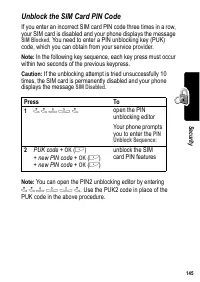
145 S ec ur ity Unblock the SIM Card PIN Code If you enter an incorrect SIM card PIN code three times in a row, your SIM card is disabled and your phone displays the message SIM Blocked . You need to enter a PIN unblocking key (PUK) code, which you can obtain from your service provider. Note: In the...
Page 147 - Locking and Unlocking Applications
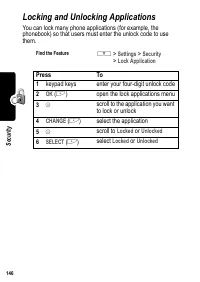
146 S ec ur ity Locking and Unlocking Applications You can lock many phone applications (for example, the phonebook) so that users must enter the unlock code to use them. Find the Feature M > Settings > Security > Lock Application Press To 1 keypad keys enter your four-digit unlock code 2 O...
Page 148 - News and Entertainment; Mobile Internet; Starting a Mobile Internet Session
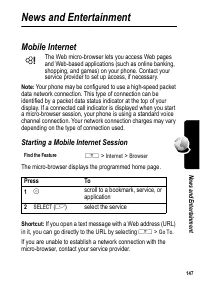
147 N ew s a nd Enterta inme nt News and Entertainment Mobile Internet The Web micro-browser lets you access Web pages and Web-based applications (such as online banking, shopping, and games) on your phone. Contact your service provider to set up access, if necessary. Note: Your phone may be configu...
Page 149 - Interacting With Web Pages
148 N ew s a nd E nt er ta inme nt Interacting With Web Pages The Browser Menu can include the following: Do This To Press S up or down scroll through a page Press M open the Browser Menu Press and hold M store the current Web page as a Web Shortcut Press M * lock your phone’s keypad while downloadi...
Page 150 - Web Page Security
149 N ew s a nd Enterta inme nt Web Page Security Your phone can provide secure Web pages connections for purchases or other transactions. Your phone uses three types of certificates to provide this security. It uses Client certificates to identify itself to Web pages. Your phone downloads Server ce...
Page 152 - Java Applications; Download an Application With the Micro-Browser
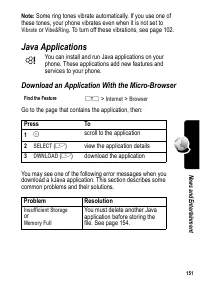
151 N ew s a nd Enterta inme nt Note: Some ring tones vibrate automatically. If you use one of these tones, your phone vibrates even when it is not set to Vibrate or Vibe&Ring . To turn off these vibrations, see page 102. Java Applications You can install and run Java applications on your phone....
Page 153 - Download an Application From a Computer; Problem
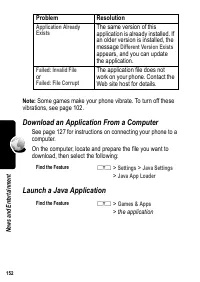
152 N ew s a nd E nt er ta inme nt Note: Some games make your phone vibrate. To turn off these vibrations, see page 102. Download an Application From a Computer See page 127 for instructions on connecting your phone to a computer. On the computer, locate and prepare the file you want to download, th...
Page 154 - Edit Network Connection Settings; Entering the DNS IP Address
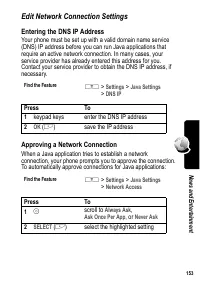
153 N ew s a nd Enterta inme nt Edit Network Connection Settings Entering the DNS IP Address Your phone must be set up with a valid domain name service (DNS) IP address before you can run Java applications that require an active network connection. In many cases, your service provider has already en...
Page 156 - View Java Version and Available Memory
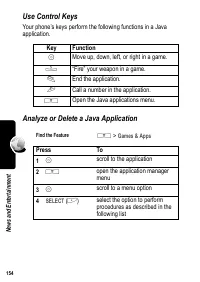
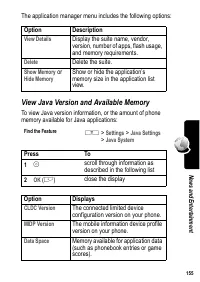
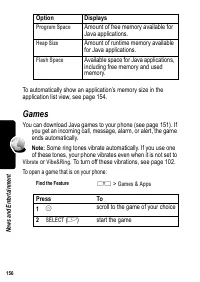
155 N ew s a nd Enterta inme nt The application manager menu includes the following options: View Java Version and Available Memory To view Java version information, or the amount of phone memory available for Java applications: Option Description View Details Display the suite name, vendor, version...
Page 157 - Games
156 N ew s a nd E nt er ta inme nt To automatically show an application’s memory size in the application list view, see page 154. Games You can download Java games to your phone (see page 151). If you get an incoming call, message, alarm, or alert, the game ends automatically. Note: Some ring tones ...
Page 158 - SIM Applications
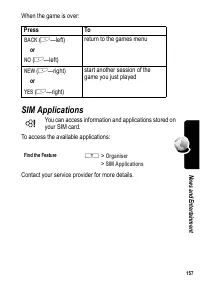
157 N ew s a nd Enterta inme nt When the game is over: SIM Applications You can access information and applications stored on your SIM card. To access the available applications: Contact your service provider for more details. Press To BACK ( + —left) or NO ( + —left) return to the games menu NEW ( ...
Page 159 - Troubleshooting
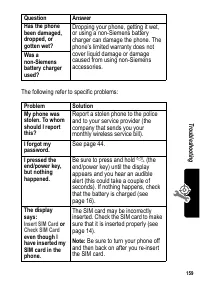
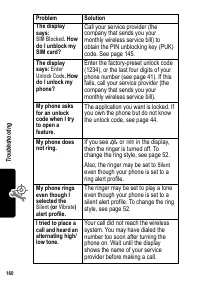
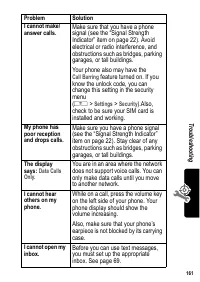
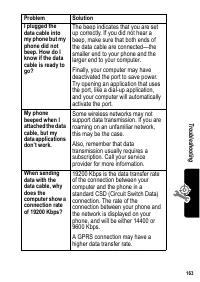
Tr ouble shoot ing 158 Troubleshooting Check these questions first if you have problems with your phone: Question Answer Is your battery charged? Do you see 6 in the display? The battery level indicator should have at least one segment showing ( 7 ). If it does not, recharge your battery. See pages ...
Page 166 - Customer Care
165 Customer Care You can also get personal advice about our range of products on our Premium Hotline: (0.75 £ per minute) Qualified Siemens employees are waiting to offer you expert information about our products and installation. In some countries repair and replace services are impossible where t...
Page 168 - Care and maintenance
167 Care and maintenance Your phone has been designed and crafted with great care and attention and should also be treated with care. The suggestions below will help you to enjoy your phone for many years. • Protect your phone from moisture and humidity! Precipitation, humidity and liquids contain m...
Page 169 - Battery quality statement
168 Battery quality statement The capacity of your mobile phone battery will reduce each time it is charged/emptied. Storage at too high or low temperatures will also result in a gradual capacity loss. As a result the operating time of your mobile phone may be considerably reduced, even after a full...
Page 170 - Specific Absorption Rate Data
169 Specific Absorption Rate Data SAR – European Union (RTTE) INFORMATION ON RF EXPOSURE /SPECIFIC ABSORPTION RATE (SAR) THIS MOBILE PHONE MEETS THE LIMITS SET BY THE EU (1999/519/EC) FOR PROTECTION OF THE HEALTH OF THE PUBLIC FROM THE EFFECTS OF EXPOSURE TO ELECTROMAGNETIC FIELDS These limits are p...
Page 174 - Guarantee certificate
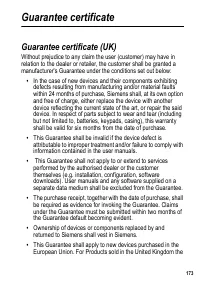
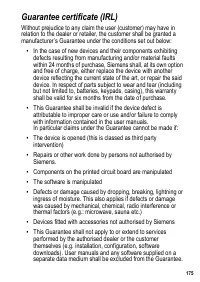
173 Guarantee certificate Guarantee certificate (UK) Without prejudice to any claim the user (customer) may have in relation to the dealer or retailer, the customer shall be granted a manufacturer's Guarantee under the conditions set out below: • In the case of new devices and their components exhib...
Page 178 - Index
177 Index A accessories connector ports 1optional 13, 124, 131standard 13 Add Digits feature 62 alert creating 103defined 52indicators 24, 52muting 19reminders 102setting 150turning off 53, 59 animation 110 screen saver, setting 47, 150storing 149using 46wallpaper 53wallpaper, setting 47, 150 applic...


 Siemens SL55 User Manual
 Siemens SL65 User Manual
 Siemens SL75 User Manual
 Siemens ST55 User Manual
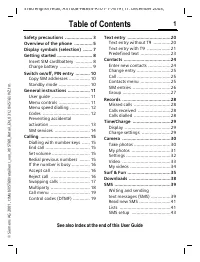 Siemens ST60 User Manual
 Siemens SX1 User Manual
 Siemens Xelibri 1 User Manual
 Siemens Xelibri 2 User Manual
 Siemens Xelibri 3 User Manual
 Siemens Xelibri 4 User Manual
 Siemens Xelibri 5 User Manual
 Siemens Xelibri 6 User Manual
 Siemens Xelibri 7 User Manual
 Siemens Xelibri 8 User Manual
 Siemens A57 User Manual
 Siemens AP75 User Manual
 Siemens C72 User Manual
 Siemens CF62 User Manual