Powermate 024-0077CT - User Manual

Powermate 024-0077CT Impact Wrench – User Manual, read for free online in PDF format. We hope this helps you resolve any issues you may have. If you have further questions, please contact us through the contact form.


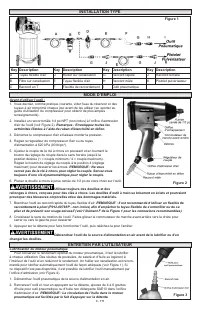
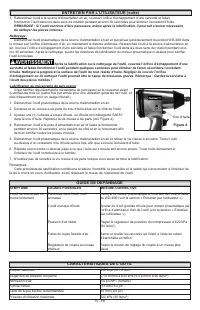


Table of Contents:
- Page 2 – Note: Keep the towel away from moving parts!
- Page 4 – Depressing the trigger helps circulate oil in the air motor.
- Page 5 – Note: Keep the towel away; TROUBLESHOOTING GUIDE; SYMPTOM; TOOL SPECIFICATIONS
- Page 6 – ONE YEAR LIMITED WARRANTY:; exclusive remedy under this warranty.; LIMITED WARRANTY
- Page 7 – SÉCURITÉ GÉNÉRALE; Remarque : Gardez la serviette à l’écart des pièces
- Page 8 – SÉCURITÉ RELATIVE À L’UTILISATION ET À L’ENTRETIEN DE L’OUTIL; soutenir la pièce à travailler à une plate-forme stable.; SÉCURITÉ LORS DE L’ENTRETIEN D’UN OUTIL
- Page 9 – Utilisez toujours des douilles et des; ENTRETIEN PAR L’UTILISATEUR
- Page 10 – de nettoyer les pièces internes.; l’écart des pièces mobiles !; Lubrification du mécanisme de percussion; Figure 4; GUIDE DE DÉPANNAGE; SYMPTÔME; CARACTÉRISTIQUES DE L’OUTIL
- Page 11 – GARANTIE LIMITÉE; teur au détail. Il s’agit du seul recours en vertu de cette garantie.
- Page 12 – SEGURIDAD GENERAL; limpio y bien iluminado.; SEGURIDAD EN EL LUGAR DE TRABAJO; como en presencia de líquidos inflamables, gases o partículas.; SEGURIDAD PERSONAL; cuando utilice herramientas que generen partículas.; de que la toalla no esté cerca de partes movibles.
- Page 14 – Utilice siempre extensiones y soportes de; INSTRUCCIONES DE MANTENIMIENTO DEL USUARIO
- Page 15 – INSTRUCCIONES DE MANTENIMIENTO DEL USUARIO (continuación); componentes internos.; Figura 4; GUÍA DE SOLUCIÓN DE PROBLEMAS; SÍNTOMAS; ESPECIFICACIONES DE LA HERRAMIENTA
- Page 16 – GARANTÍA LIMITADA; MEDIDA QUE TAL EXCLUSIÓN SEA PERMITIDA LA LEY.; consentimiento expreso por escrito de la Empresa.
1/2” Air Impact Wrench
Instruction Manual
Clé à Percussion Pneumatique de 1,3 cm
Manual d’instructions
Llave de Impacto Neumática de 1,3 cm
Manual de instrucciones
200-3103, Rev. A, 11/2/17
Read and understand all safety precautions in this manual before operating. Failure to
comply with instructions in this manual could result in personal injury, property damage and/or voiding of
your warranty. The manufacturer
WILL NOT
be liable for any damage because of failure to follow these
instructions.
Lisez et veillez à bien comprendre toutes les consignes de sécurité de ce
manuel avant d’utiliser l’appareil. Toute dérogation aux instructions contenues dans ce manuel peut
entraîner l’annulation de la garantie, causer des blessures et/ou des dégâts matériels. Le fabricant
NE
SAURA
être tenu responsable de dommages résultant de l’inobservation de ces instructions.
Lea y comprenda todas las precauciones de seguridad contenidas en este
manual antes de utilizar esta unidad. Si no cumple con las instrucciones de este manual podría ocasionar
lesiones personales, daños a la propiedad y/o la anulación de su garantía. El fabricante
NO SERÁ
responsable de ningún daño por no acatar estas instrucciones.
024-0077
"Loading the manual" means you need to wait until the file loads and becomes available for online reading. Some manuals are very large, and the time they take to appear depends on your internet speed.
Summary
2 - ENG SAFETY GUIDELINES - DEFINITIONS IMPORTANT SAFETY INSTRUCTIONS This manual contains information that is important for you to know and understand. This information relates to protecting YOUR SAFETY and PREVENTING EQUIPMENT PROBLEMS. To help you recog- nize this information, we use the followin...
4 - ENG OPERATING INSTRUCTIONS TYPICAL INSTALLATION To begin using the tool: 1. As a standard practice, drain water from the air compressor tank and air lines prior to use each day (reference your compressor operators manual for detailed instructions).2. Install a 1/4” NPT male connector (not includ...
5 - ENG Air Motor Lubrication (continued) 3. Reconnect the tool to the air supply, cover the exhaust port end with a towel and run in forward and reverse directions for approximately 30 seconds to remove excess oil. NOTE: If the tool remains sluggish after it has been lubricated, the internal compon...