Page 2 - About this unit; CAUTION; Avoid exposure to moisture.; About this manual; USB storage device; In case of trouble; Before you start
Thank you for purchasing this PIONEER product To ensure proper use, please read through thismanual before using this product. It is especiallyimportant that you read and observe WARN- ING s and CAUTION s in this manual. Please keep the manual in a safe and accessible place forfuture reference. If yo...
Page 3 - Head unit; Do not use unauthorized products.; Display indication; After installation of this unit, turn the; English; Operating this unit
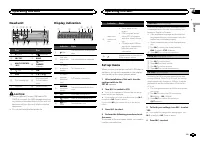
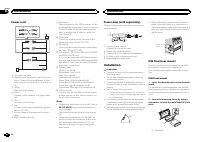
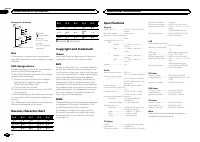
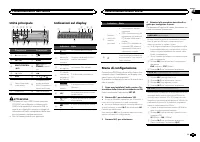
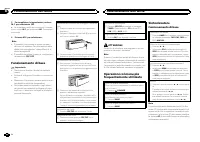
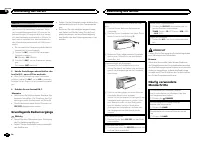
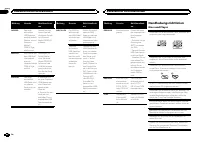
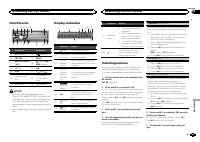
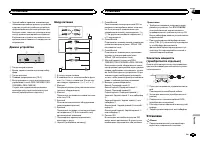
Head unit c d 5 9 1 2 3 4 6 7 b a e 8 Part Part 1 h (eject) 8 (equalizer) 2 SRC / OFF 9 BAND 3 MULTI-CONTROL ( M.C. ) a (back)/ DIMMER (dimmer) 4 (list) b c / d 5 DISP c 1 / to 6 / 6 Disc loading slot d AUX input jack(3.5 mm stereojack) 7 USB port e Detach button CAUTION ! Use an optional Pioneer US...
Page 4 - Important; Note; Basic operations; Note; Using preset tuning buttons; When you find a station that you want
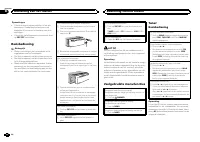
Notes ! You can set up the menu options from thesystem menu. For details about the settings,refer to System menu on page 7. ! You can cancel set up menu by pressing SRC / OFF . Basic operations Important ! Handle gently when removing or attachingthe front panel. ! Avoid subjecting the front panel to...
Page 5 - Press one of the preset tuning buttons; Switching the display; Notes; Using PTY functions; Function settings; and press to select FUNCTION.
2 Press one of the preset tuning buttons (1/ to 6/ ) to select the desired station. Switching the display Selecting the desired text information 1 Press DISP to cycle between the following: ! FREQUENCY (program service name or frequency) ! BRDCST INFO (program service name/PTY information) ! CLOCK (...
Page 6 - Operations using special buttons; Audio adjustments
Playing songs on a USB storage device 1 Open the USB port cover. 2 Plug in the USB storage device using a USBcable.Playback is performed automatically. Stopping playback of files on a USB storage de-vice 1 You may disconnect the USB storage device atany time.The unit stops playback. Selecting a fold...
Page 7 - System menu
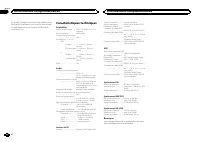
! SUB.W , SUB.W CTRL and HPF SETTING are not available when REAR/REAR is selected in SP-P/O MODE . For details, refer to SP-P/O MODE (rear output and preout set- ting) on the next page. ! SUB.W CTRL and HPF SETTING are not avail- able when SUB.W is selected in OFF . For de- tails, refer to SUB.W (su...
Page 8 - Switching the dimmer setting; You can adjust the brightness of illumination.; Initial menu
LANGUAGE (multi-language) This unit can display the text information from acompressed audio file even for information em-bedded in English or Russian. ! If the embedded language and the selectedlanguage setting are not the same, text infor-mation may not display properly. ! Some characters may not b...
Page 9 - Using an AUX source; Insert the stereo mini plug into the AUX; If an unwanted display appears; and press to select SYSTEM.; Connections; This unit; Power cord input; Installation
For details, refer to System menu on page 7. Using an AUX source 1 Insert the stereo mini plug into the AUX input jack. 2 Press SRC/OFF to select AUX as the source. Note AUX cannot be selected unless the auxiliary set-ting is turned on. For more details, refer to AUX (auxiliar y input) on the previo...
Page 10 - Power cord; Insert the mounting sleeve into the dash-
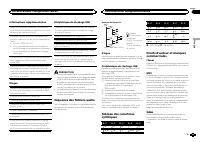
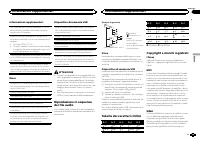
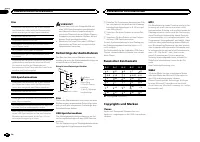
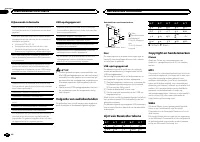
Power cord 1 3 3 2 4 4 5 5 6 6 b 8 9 7 a e d c 1 To power cord input 2 Depending on the kind of vehicle, the func-tion of 3 and 5 may be different. In this case, be sure to connect 4 to 5 and 6 to 3 . 3 YellowBack-up (or accessory) 4 YellowConnect to the constant 12 V supply termi-nal. 5 RedAccessor...
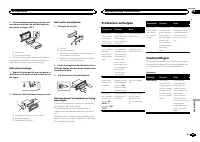
Page 11 - Removing the unit; Remove the trim ring.; Troubleshooting; Error messages; Additional information
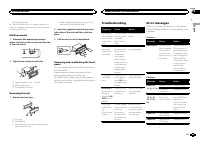
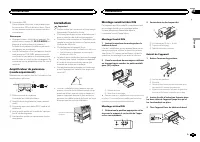
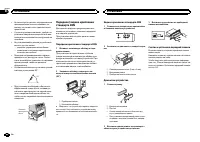
2 Mounting sleeve # Make sure that the unit is installed securely in place. An unstable installation may cause skippingor other malfunctions. DIN Rear-mount 1 Determine the appropriate position where the holes on the bracket and the sideof the unit match. 2 Tighten two screws on each side. 1 2 3 1 T...
Page 12 - Handling guidelines; Discs and player
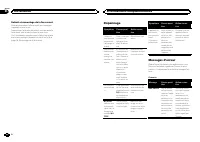
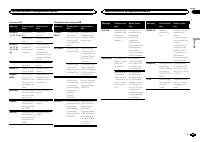
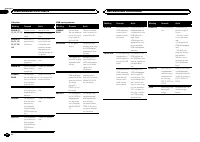
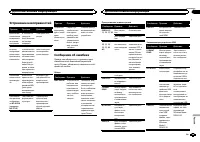
Message Cause Action FORMATREAD Sometimesthere is a delaybetween thestart of playbackand when youstart to hear anysound. Wait until themessage disap-pears and youhear sound. NO AUDIO The inserteddisc does notcontain anyplayable files. Replace the disc. SKIPPED The inserteddisc containsDRM protectedf...
Page 13 - Sequence of audio files
When using discs that can be printed on label sur-faces, check the instructions and the warnings ofthe discs. Depending on the discs, inserting andejecting may not be possible. Using such discsmay result in damage to this equipment. Do not attach commercially available labels orother materials to th...
Page 14 - Disc; Put those files into a folder.; Russian character chart; iTunes; Specifications
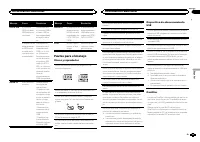
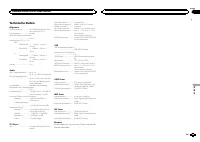
Example of a hierarchy Level 1 Level 2 Level 3 Level 4 01 02 03 04 05 : Folder : Compressed audio file01 to 05: Foldernumber 1 to 6 : Playback sequence Disc Folder selection sequence or other operationmay differ depending on the encoding or writingsoftware. USB storage device Playback sequence is th...
Page 16 - APPAREIL À LASER DE CLASSE 1; PRÉCAUTION; Remarque
Nous vous remercions d ’ avoir acheté cet ap- pareil PIONEER. Pour garantir une utilisation correcte, lisez bience mode d ’ emploi avant d ’ utiliser cet appareil. Il est particulièrement important que vous lisiez etrespectiez les indications ATTENTION et PRÉ- CAUTION de ce mode d ’ emploi. Conser v...
Page 17 - Après avoir installé l; Français
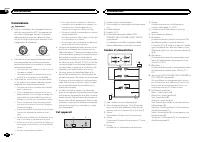
Appareil central c d 5 9 1 2 3 4 6 7 b a e 8 Partie Partie 1 h (éjection) 8 (égaliseur) 2 SRC / OFF 9 BAND 3 MULTI-CONTROL ( M.C. ) a (retour)/ DIM- MER (atténuateur de luminosité) 4 (liste) b c / d 5 DISP c 1 / à 6 / 6 Fente de charge-ment des disques d Jack d ’ entrée AUX (jack stéréo3,5 mm) 7 Por...
Page 18 - Opérations de base
5 Pour terminer la configuration, tournez M.C. pour sélectionner YES. # Si vous souhaitez modifier à nouveau le réglage, tournez M.C. pour passer à NO . Appuyez pour sélec- tionner. 6 Appuyez sur M.C. pour sélectionner. Remarques ! Vous pouvez configurer les options de menuà partir du menu système. ...
Page 19 - Utilisation des touches de présélection; Changement de l; Remarques; Utilisation des fonctions PTY; Réglages des fonctions; Utilisation de l
Enregistrement et rappel desstations pour chaque gamme Utilisation des touches de présélection 1 Lorsque se présente une station que vous souhaitez mettre en mémoire, appuyez demanière prolongée sur l ’ une des touches de présélection (1/ à 6/ ) jusqu ’ à ce que le numéro de la présélection cesse de...
Page 21 - Réglages sonores; option de
Opérations à l ’ aide de touches spéciales Sélection d ’ une étendue de répétition de lecture 1 Appuyez sur 6 / pour parcourir les options disponibles : CD/CD-R/CD-RW ! ALL – Répétition de toutes les plages ! ONE – Répétition de la plage en cours de lecture ! FLD – Répétition du dossier en cours de ...
Page 22 - Menu système
Cet appareil est équipé d ’ une sortie haut-parleur d ’ extrêmes graves qui peut être mise en service ou hors service. 1 Appuyez sur M.C. pour sélectionner le réglage souhaité. NOR (phase normale) — REV (phase inversée) — OFF (haut-parleur d ’ extrêmes graves désac- tivé) SUB.W CTRL (réglage du haut...
Page 24 - Connexions; Cet appareil
Connexions Important ! Lors de l ’ installation de cet appareil dans un véhicule sans position ACC (accessoire) surle contact d ’ allumage, ne pas connecter le câble rouge à la borne qui détecte l ’ utilisa- tion de la clé de contact peut entraîner le dé-chargement de la batterie. O N S T A R T O F ...
Page 25 - Montage avant/arrière DIN; Montage frontal DIN
e Connecteur ISODans certains véhicules, il est possible quele connecteur ISO soit divisé en deux. Dansce cas, assurez-vous de connecter les deuxconnecteurs. Remarques ! Changez le menu initial de cet appareil. Re-portez-vous à la page 23, SP-P/O MODE (ré- glage de la sortie arrière et du préamp) . ...
Page 26 - Retrait et remontage de la face avant; appareil contre le vol.; Dépannage; Messages d; entretien agréé par Pioneer le plus; Informations complémentaires
Retrait et remontage de la face avant Vous pouvez retirer la face avant pour protégerl ’ appareil contre le vol. Appuyez sur la touche de retrait, puis poussez laface avant vers le haut et tirez-la vers vous.Pour les détails, reportez-vous à Retrait de la face avant pour protéger l ’ appareil contre...
Page 28 - Conseils sur la manipulation; Disques et lecteur
Conseils sur la manipulation Disques et lecteur Utilisez uniquement des disques affichant l ’ un ou l ’ autre des logos suivants. Utilisez des disques 12 cm. N ’ utilisez pas de dis- ques 8 cm ni un adaptateur pour disques 8 cm. Utilisez seulement des disques conventionnels deforme circulaire. N ’ u...
Page 30 - Caractéristiques techniques; Généralités
Ce produit intègre une technologie détenue parMicrosoft Corporation, qui ne peut être utiliséeet distribuée que sous licence de MicrosoftLicensing, Inc. Caractéristiques techniques Généralités Tension d ’ alimentation ..... 14,4 V CC (10,8 V à 15,1 V ac- ceptable) Mise à la masse ............... Pôl...
Page 32 - Informazioni sull; PRODOTTO LASER DI CLASSE 1; ATTENZIONE; In caso di problemi; Prima di iniziare
Grazie per aver acquistato questo prodotto PIONEER Leggere attentamente questo manuale prima diutilizzare il prodotto, per assicurarne il correttoutilizzo. È particolarmente importante leggere eosservare le precauzioni contrassegnate da AV- VERTENZA e ATTENZIONE contenute in questo manuale. Conser v...
Page 33 - Dopo aver installato l; Italiano
Unità principale c d 5 9 1 2 3 4 6 7 b a e 8 Componente Componente 1 h (espulsione) 8 (equalizzato- re) 2 SRC / OFF 9 BAND 3 MULTI-CONTROL ( M.C. ) a (indietro)/ DIMMER (varialu- ce) 4 (lista) b c / d 5 DISP c Da 1 / a 6 / 6 Vano d ’ inserimen- to dei dischi d Connettore di in-gresso ausiliario(AUX)...
Page 34 - Funzionamento di base; Nota
5 Per completare le impostazioni, ruotare M.C. per selezionare YES. # Se si desidera modificare nuovamente l ’ imposta- zione, ruotare M.C. per selezionare NO . Premere per selezionare. 6 Premere M.C. per selezionare. Note ! È possibile configurare le opzioni di menudal menu di sistema. Per informaz...
Page 35 - Uso dei tasti di preselezione sintonia; Commutazione del display; Uso delle funzioni PTY; Impostazioni delle funzioni; Funzionamento dell
Memorizzazione e richiamo dellestazioni per ciascuna banda Uso dei tasti di preselezione sintonia 1 Quando viene individuata una stazione che si desidera memorizzare, premere unodei tasti di preselezione sintonia (da 1/ a 6/ ), mantenendolo premuto fino a quando il numero di preselezione non cessa d...
Page 36 - elenco dei nomi; Premere; Operazioni con i pulsanti speciali
CD/CD-R/CD-RW e dispositividi memoria USB Funzionamento di base Riproduzione di CD/CD-R/CD-RW 1 Inserire un disco nel vano d ’ inserimento dei di- schi, con il lato dell ’ etichetta rivolto verso l ’ alto. Espulsione dei CD/CD-R/CD-RW 1 Premere h . Riproduzione dei brani registrati su un dispositivo...
Page 37 - opzione di
2 Ruotare M.C. per modificare l ’ opzione di menu; premere per selezionare FUNCTION. Dopo aver effettuato la selezione, è possibile re-golare la funzione descritta di seguito. S.RTRV (Sound Retriever) Questa funzione migliora automaticamente l ’ au- dio compresso e ripristina il suono completo. 1 Pr...
Page 38 - È possibile regolare il livello della luminosità.
Se si desidera che i suoni bassi provenienti dallagamma di frequenza dell ’ uscita subwoofer non siano riprodotti dagli altoparlanti anteriori o poste-riori, attivare la funzione HPF (filtro passa alto).Solo le frequenze più alte di quelle comprese nel-l ’ intervallo selezionato vengono emesse dagli...
Page 39 - Menu di sistema
4 Ruotare M.C. per selezionare la funzione del menu iniziale. Dopo aver effettuato la selezione, è possibile re-golare le funzioni del menu iniziale descritte diseguito. FM STEP (passo di sintonizzazione FM) Normalmente il passo per la sintonizzazione in FMimpiegato dalla ricerca di sintonia è 50 kH...
Page 40 - Collegamenti; Importante; Questa unità; Installazione
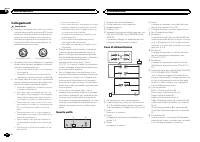
Collegamenti Importante ! Quando si installa questa unità in un veicoloche non dispone della posizione ACC (acces-soria) per l ’ interruttore della chiave di avvia- mento, se non si collega il cavo rosso a unterminale accoppiato al funzionamento del-l ’ interruttore della chiave di avviamento, la ba...
Page 41 - Montaggio DIN anteriore/posteriore; Montaggio DIN anteriore
Note ! Modifica delle impostazioni di menu inizialidi questa unità. Vedere SP-P/O MODE (usci- ta posteriore e impostazione pre-out) a pagina 39.L ’ uscita subwoofer di questa unità è mono. ! Se si usa un subwoofer da 70 W (2 W ), assicu- rarsi di collegarlo ai fili viola e viola/nero diquesta unità....
Page 42 - Rimozione e reinserimento del frontalino; alto tirandolo verso l; Risoluzione dei problemi; Messaggi di errore; Informazioni supplementari
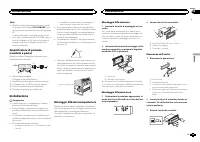
Rimozione e reinserimento del frontalino È possibile rimuovere il frontalino per protegge-re l ’ unità dai furti. Premere il tasto di rimozione e spingere il fronta-lino verso l ’ alto tirandolo verso l ’ esterno. Per ulteriori dettagli, vedere Rimozione del fronta- lino per proteggere l ’ unità dai...
Page 44 - Dischi e lettori
Linee guida per l ’ uso corretto Dischi e lettori Utilizzare esclusivamente dischi che riportino unodei due seguenti loghi. Utilizzare dischi da 12 cm. Non utilizzare dischi da8 cm o adattatori per dischi da 8 cm. Utilizzare esclusivamente dischi convenzionali,completamente circolari. Non utilizzare...
Page 45 - eventuale; Inserire tali file in una cartella.; Tabella dei caratteri cirillici
Informazioni supplementari Per i nomi dei file (incluse le estensioni) o i nomidelle cartelle, è possibile visualizzare esclusiva-mente i primi 32 caratteri. Il testo cirillico da visualizzare su questa unitàdeve essere codificato con uno dei seguenti set dicaratteri: ! Unicode (UTF-8, UTF-16) ! Un ...
Page 46 - Dati tecnici
Dati tecnici Generali Alimentazione .................. 14,4 V di c.c. (variazioni con- sentite da 10,8 V a 15,1 V) Messa a terra ................... NegativaConsumo massimo .......... 10,0 ADimensioni (L × A × P): DIN Unità principale ..................... 178 mm × 50 mm × 165 mm Pannello anteriore ...
Page 48 - Gracias; Acerca de esta unidad; PRECAUCIÓN; Evite la exposición a la humedad.; Acerca de este manual; cenamiento USB; En caso de problemas; Antes de comenzar
Gracias por haber adquirido este producto PIONEER Lea con detenimiento este manual antes de utili-zar el producto por primera vez para que puedadarle el mejor uso posible. Es muy importanteque lea y cumpla con la información que apare-ce bajo los mensajes de ADVERTENCIA y PRECAUCIÓN de este manual. ...
Page 49 - Unidad principal; No utilice productos no autorizados.; Indicaciones de la pantalla; Una vez instalada la unidad, gire la llave; Español; Utilización de esta unidad
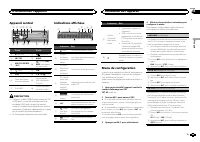
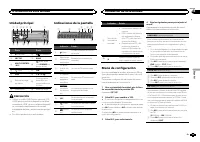
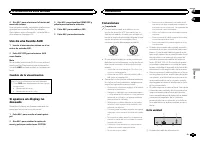
Unidad principal c d 5 9 1 2 3 4 6 7 b a e 8 Parte Parte 1 h (expulsar) 8 (ecualizador) 2 SRC / OFF 9 BAND 3 MULTI-CONTROL ( M.C. ) a (parte poste- rior)/ DIMMER (re- ductor de luz) 4 (lista) b c / d 5 DISP c 1 / a 6 / 6 Ranura de cargade discos d Conector de en-trada AUX (co-nector estéreo de3,5 mm...
Page 50 - Sintonizador; Funcionamiento básico
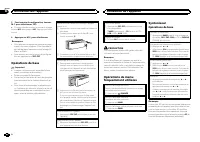
5 Para cerrar la configuración, gire M.C. y seleccione YES. # Si prefiere volver a cambiar la configuración, gire M.C. para cambiar a NO y púlselo para realizar la se- lección. 6 Pulse M.C. para seleccionarlo. Notas ! Se pueden configurar las opciones del menúdesde el menú del sistema. Si desea más ...
Page 51 - Cambio de la visualización; Notas; Uso de las funciones PTY; Ajustes de funciones
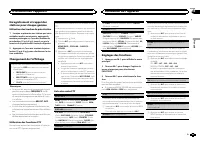
Almacenamiento y recuperaciónde emisoras para cada banda Uso de los botones de ajuste depresintonías 1 Cuando encuentre la emisora que desee almacenar en la memoria, pulse uno de losbotones de ajuste de presintonías (1/ a 6/ ) y manténgalo pulsado hasta que el nú- mero de presintonía deje de parpade...
Page 52 - Operaciones con botones especiales
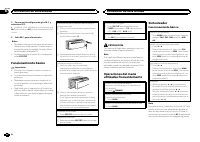
CD/CD-R/CD-RW y dispositivosde almacenamiento USB Funcionamiento básico Reproducción de un CD/CD-R/CD-RW 1 Inserte el disco en la ranura de carga de dis-cos con el lado de la etiqueta hacia arriba. Expulsión de un CD/CD-R/CD-RW 1 Pulse h . Reproducción de canciones de un dispositivo dealmacenamiento...
Page 53 - menú y pulse para seleccionar FUNCTION.; Ajustes de audio; menú y pulse para seleccionar AUDIO.; Menú del sistema
2 Gire M.C. para cambiar la opción de menú y pulse para seleccionar FUNCTION. Una vez seleccionado, se puede ajustar la fun-ción de abajo. S.RTRV (recuperador de sonido) Mejora automáticamente el audio comprimido yrestaura el sonido óptimo. 1 Pulse M.C. para seleccionar el ajuste deseado. Para obten...
Page 54 - Puede ajustar el brillo de la iluminación.; Menú inicial
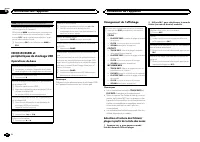
1 Pulse M.C. para acceder al menú princi- pal. 2 Gire M.C. para cambiar la opción de menú y pulse para seleccionar SYSTEM. 3 Gire M.C. para seleccionar la función del menú del sistema. Una vez seleccionado, se pueden ajustar las si-guientes funciones del menú de sistema. ! MUTE MODE y PW SAVE no est...
Page 55 - Uso de una fuente AUX; Conexiones; Esta unidad; Entrada del cable de alimentación; Instalación
4 Gire M.C. para seleccionar la función del menú del sistema. Una vez seleccionado, se pueden ajustar las si-guientes funciones del menú de sistema.Para obtener más información, consulte Menú del sistema en la página 53. Uso de una fuente AUX 1 Inserte el miniconector estéreo en el co- nector de ent...
Page 56 - Cable de alimentación; Montaje delantero/posterior de DIN
2 Salida trasera o salida de subgraves 3 Entrada de la antena 4 Fusible (10 A) 5 Entrada remota conectada (solo DEH-1500UBG, DEH-1500UBB y DEH-1500UB)Es posible conectar un adaptador de mandoa distancia físicamente conectado (se vendepor separado). Cable de alimentación 1 3 3 2 4 4 5 5 6 6 b 8 9 7 a...
Page 57 - Colocación del panel delantero
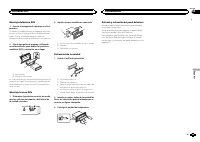
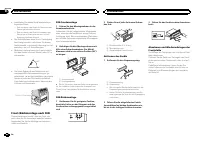
Montaje delantero DIN 1 Inserte el manguito de montaje en el sal- picadero. Si realiza la instalación en un espacio poco pro-fundo, utilice el manguito de montaje suminis-trado. Si hay suficiente espacio, utilice elmanguito de montaje que venía con el vehículo. 2 Fije el manguito de montaje utilizan...
Page 58 - Información adicional
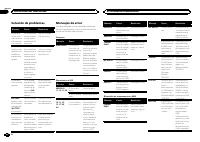
Solución de problemas Síntoma Causa Resolución La pantallavuelve auto-máticamentea la visualiza-ción normal. No ha realizadoninguna opera-ción en aproxi-madamente 30segundos. Realice la opera-ción de nuevo. El intervalo derepetición dereproduccióncambia demanera ines-perada. Dependiendodel intervalo...
Page 59 - Pautas para el manejo; Discos y reproductor
Mensaje Causa Resolución CHECK USB El conectorUSB o el cableUSB está corto-circuitado. Compruebe queel conector USB oel cable USB noesté enganchadoen algo ni daña-do. El dispositivo dealmacenamien-to USB consu-me más de lacorriente máxi-ma admisible. Desconecte eldispositivo de al-macenamientoUSB y ...
Page 60 - Secuencia de archivos de audio; Disco; Coloque esos archivos en una carpeta.
La carga y expulsión frecuente de un discoDualDisc puede producir ralladuras en el disco;las ralladuras graves pueden producir problemasde reproducción en esta unidad. En algunoscasos, un DualDisc puede atascarse en la ranurade carga del disco y no se expulsará, para evitarlo,recomendamos que no uti...
Page 61 - Especificaciones
Para reproductores de audio portátiles USB, lasecuencia es diferente y depende del reproduc-tor. Tabla de caracteres rusos D: C D: C D: C D: C D: C : А : Б : В : Г : Д : Е , Ё : Ж : З : И , Й : К : Л : М : Н : О : П : Р : С : Т : У : Ф : Х : Ц : Ч : Ш , Щ : Ъ : Ы : Ь : Э : Ю : Я D : Visualización C ...
Page 62 - Zu diesem Gerät; LASER KLASSE 1; VORSICHT; Zu dieser Anleitung; Bevor Sie beginnen
Vielen Dank , dass Sie sich für dieses PIONEER-Produkt entschieden haben. Bitte lesen Sie diese Anleitung vor der Verwen-dung dieses Produkts zur Gewährleistung seinerordnungsgemäßen Verwendung durch. Lesenund befolgen Sie dabei insbesondere die Hin-weise WARNUNG und VORSICHT . Bewahren Sie die Anle...
Page 63 - Hauptgerät; Drehen Sie nach der Installation des Ge-; Deutsch; Bedienung des Geräts
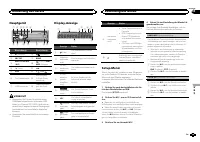
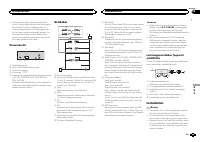
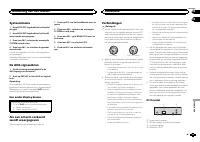
Hauptgerät c d 5 9 1 2 3 4 6 7 b a e 8 Bezeichnung Bezeichnung 1 h (Auswurf) 8 (Equalizer) 2 SRC / OFF 9 BAND 3 MULTI-CONTROL ( M.C. ) a (Zurück)/ DIM- MER (Dimmer) 4 (Liste) b c / d 5 DISP c 1 / bis 6 / 6 Disc-Ladeschacht d AUX-Eingang(3,5-mm-Stereo-anschluss) 7 USB-Anschluss e Taste zum Entrie-gel...
Page 64 - Grundlegende Bedienvorgänge; Wichtig; Hinweis
FM STEP (UKW-Kanalraster) Bei der Suchlaufabstimmung wird normalerweisedas 50-kHz-UKW-Kanalraster verwendet. Wennder Alternativfrequenzsuchlauf (AF) oder die Ver-kehrsmeldungen (TA) eingeschaltet sind, ändertsich das Kanalraster automatisch zu 100 kHz. Eskann jedoch vorteilhaft sein, das Kanalraster...
Page 65 - Verwendung der Stationstasten; Umschalten der Anzeige; Hinweise; Funktionseinstellungen
Tuner Grundlegende Bedienvorgänge Wahl eines Bands (Wellenbereich) 1 Drücken Sie BAND , bis der gewünschte Wel- lenbereich angezeigt wird ( FM1 , FM2 , FM3 für UKW bzw. MW/LW ). Wechseln der voreingestellten Sender 1 Drücken Sie c oder d . ! Wählen Sie PCH (voreingesteller Kanal) unter SEEK , um die...
Page 68 - Systemmenü
Dieses Gerät ist mit einem Subwoofer-Ausgangausgestattet, der ein- und ausgeschaltet werdenkann. 1 Drücken Sie auf M.C. , um die gewünschte Ein- stellung zu wählen. NOR (Normalphase) — REV (Gegenphase) — OFF (Subwoofer Aus) SUB.W CTRL (Subwoofer-Einstellungen) Vom Subwoofer werden nur solche Frequen...
Page 69 - ON; Grundmenü; temmenü
PW SAVE (Energiesparmodus) Wenn Sie diese Funktion einschalten, reduzierenSie den Verbrauch von Batterieleistung. ! Bei aktiviertem Energiesparmodus kann nurdie Programmquelle eingeschaltet werden. 1 Drücken Sie M.C. , um den Energiesparmodus ein- oder auszuschalten. Umschalten der Dimmer-Einstellun...
Page 70 - Anschlüsse
Bei Anzeige einerunerwünschten Anzeige Schalten Sie die unerwünschte Anzeige anhanddes unten beschriebenen Vorgangs aus. 1 Drücken Sie auf M.C., um das Hauptmenü anzuzeigen. 2 Drehen Sie M.C., um die Menüoption zu wechseln, und drücken Sie auf SYSTEM, umdie angezeigte Option zu wählen. 3 Drehen Sie ...
Page 72 - Entfernen des Geräts; Entfernen der Frontplatte zum Schutz vor
! Installieren Sie dieses Gerät keinesfalls anfolgenden Orten: — Orte, an denen das Gerät die Steuerung desFahrzeugs behindern könnte. — Orte, an denen das Gerät die Insassen desFahrzeugs im Anschluss an eine Schnell-bremsung verletzen könnte. ! Der Halbleiterlaser kann durch Überhitzungbeschädigt w...
Page 73 - Zusätzliche Informationen
Fehlerbehebung Symptom Ursache Abhilfemaßnah-me Das Displayschaltet auto-matisch in dienormale An-zeige um. Sie haben kei-nen Bedienvor-gang innerhalbvon 30 Sekun-den durchge-führt. Wiederholen Sieden Vorgang. Der Wieder-holbereichändert sichunerwartet. Ja nach Wieder-holbereich kannsich der ausge-w...
Page 74 - Handhabungsrichtlinien; Discs und Player
Meldung Ursache Abhilfemaßnah-me SKIPPED Das ange-schlosseneUSB-Speicher-medium enthältDateien, die mitWindowsMedia ä DRM 9/10 ge-schützt sind. Spielen Sie eineAudio-Datei ab,die keinen Schutzmit WindowsMedia DRM 9/10aufweist. PROTECT Alle Dateien aufdem USB-Spei-chermediumsind mitWindows MediaDRM 9...
Page 75 - DualDiscs
Wischen Sie die Discs zum Reinigen mit einemweichen Tuch von der Mitte zum Rand hin ab. Kondensation kann eine vorübergehende Störungder Player-Leistung zur Folge haben. Warten Sie indiesem Fall etwa eine Stunde ab, bis sich derPlayer an die höheren Temperaturen angepassthat. Zudem sollten feuchte D...
Page 76 - Reihenfolge der Audio-Dateien; Russischer Zeichensatz; mand; WMA
Disc Abspielbare Ordnerstruktur: bis zu acht Ebenen(der Einfachheit halber sollte die Ordnerstrukturjedoch aus weniger als zwei Ebenen bestehen). Abspielbare Ordner: bis zu 99 Abspielbare Dateien: bis zu 999 Dateisystem: Konformität mit ISO 9660 Stufe 1und 2, Romeo, Joliet Multi-Session-Wiedergabe: ...
Page 77 - Technische Daten; Allgemein
Technische Daten Allgemein Stromversorgung ............. 14,4 V Gleichspannung (Tole- ranz 10,8 V bis 15,1 V) Erdungssystem ................ NegativMaximale Leistungsaufnahme ................................... 10,0 A Abmessungen (B × H × T): DIN Einbaugröße ...... 178 mm × 50 mm × 165 mm Frontfläch...
Page 78 - Informatie over dit toestel; KLASSE 1 LASERPRODUCT; LET OP; Opmerking; Bij problemen; Vóór u begint
Hartelijk dank voor uw keuze voor dit Pioneer-product. Lees deze handleiding voordat u het product ingebruik neemt zodat u het goed leert gebruiken.Lees vooral de gedeelten die met WAARSCHU- WING en LET OP gemarkeerd zijn aandachtig. Bewaar deze handleiding na het lezen op een vei-lige, voor de hand...
Page 79 - Hoofdtoestel; Instellingenmenu; Zet het contact aan na de installatie van; stelling te voltooien.; Bediening van het toestel
Hoofdtoestel c d 5 9 1 2 3 4 6 7 b a e 8 Onderdeel Onderdeel 1 h (uitwerpen) 8 (equalizer) 2 SRC / OFF 9 BAND 3 MULTI-CONTROL ( M.C. ) a (terug)/ DIM- MER (dimmer) 4 (lijst) b c / d 5 DISP c 1 / tot 6 / 6 Laadsleuf voordisc d AUX-ingang(3,5 mm-stereo-plug) 7 USB-poort e Verwijderen LET OP ! Sluit ee...
Page 80 - Belangrijk; Veelgebruikte menufuncties; Basisbediening
Opmerkingen ! U kunt de menu-opties instellen in het sys-teemmenu. Raadpleeg Systeemmenu op bladzijde 84 voor meer informatie over de in-stellingen. ! U kunt het instellingenmenu annuleren doorop SRC / OFF te drukken. Basisbediening Belangrijk ! Wees voorzichtig bij het verwijderen en te-rugplaatsen...
Page 81 - De voorkeuzetoetsen gebruiken; Stem af op de zender die u in het geheu-; Een ander display kiezen; Opmerkingen
Zenders voor de verschillendefrequentiebanden opslaan enoproepen De voorkeuzetoetsen gebruiken 1 Stem af op de zender die u in het geheu- gen wilt opslaan. Om hem op te slaan houdtu de gewenste voorkeuzetoets (1/ t/m 6/ ) ingedrukt tot het voorkeuzenummer stopt met knipperen. 2 Druk op de gewenste v...
Page 82 - Bediening met speciale toetsen; FUNCTION en druk erop.
Cd/cd-r/cd-rw-discs en USB-opslagapparaten Basisbediening Een cd/cd-r/cd-rw afspelen 1 Plaats een disc met het etiket omhoog in delaadsleuf. Een cd/cd-r/cd-rw uitwerpen 1 Druk op h . Songs op een USB-opslagapparaat afspelen 1 Open het deksel van de USB-poort. 2 Sluit het USB-opslagapparaat aan via e...
Page 83 - U kunt de volgende audiofuncties aanpassen.
S.RTRV (sound retriever) Deze verbetert automatisch de weergave van ge-comprimeerde audio en zorgt voor een vol geluid. 1 Druk op M.C. en selecteer de gewenste instel- ling.Raadpleeg De geluidskwaliteit van gecompri- meerde audio verbeteren (sound retriever) op de vorige bladzijde voor meer informat...
Page 84 - Systeemmenu; De dimmer in- of uitschakelen
Systeemmenu Belangrijk Als het toestel van de accu wordt losgekoppeld,wordt PW SAVE (energiezuinige modus) uitge- schakeld. Deze functie moet u weer inschakelenals het toestel terug met de accu wordt verbon-den. Als het voertuig niet van een contactscha-kelaar met accessoirestand (ACC) is voorzien, ...
Page 85 - Houd SRC/OFF ingedrukt tot het toestel; Verbindingen; Dit toestel; Nederlands; Installatie
Systeemmenu 1 Houd SRC/OFF ingedrukt tot het toestel uit gaat. 2 Houd SRC/OFF ingedrukt tot het hoofd- menu wordt weergegeven. 3 Draai aan M.C., selecteer de menuoptie SYSTEM en druk erop. 4 Draai aan M.C. en selecteer de systeem- menufunctie. U kunt de volgende functies in het systeemme-nu aanpasse...
Page 86 - Stroomkabel; Schuif de montagebehuizing in het dash-
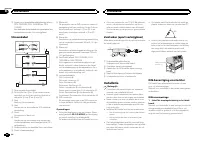
5 Ingang voor draadafstandsbediening (alleenDEH-1500UBG, DEH-1500UBB en DEH-1500UB)Een bedrade afstandsbedieningsadapter kanaangesloten worden (los verkrijgbaar). Stroomkabel 1 3 3 2 4 4 5 5 6 6 b 8 9 7 a e d c 1 Naar ingang stroomkabel 2 De functie van 3 en 5 kan verschillen af- hankelijk van het t...
Page 87 - Het toestel verwijderen; Het voorpaneel tegen diefstal ver wij-; Problemen verhelpen; Foutmeldingen; Aanvullende informatie
2 Zet de montagebehuizing vast door met een schroevendraaier de metalen lipjes ophun plaats te buigen (90°). 1 2 1 Dashboard 2 Montagebehuizing # Controleer of het toestel stevig op zijn plaats is gemonteerd. Het toestel functioneert wellicht nietnaar behoren als het niet goed is bevestigd. DIN-acht...
Page 89 - Aanwijzingen voor het gebruik; Discs en de player
Aanwijzingen voor het gebruik Discs en de player Gebruik uitsluitend discs die voorzien zijn van eenvan onderstaande twee logo ’ s. Gebruik discs van 12 cm. Gebruik geen discs van 8cm en probeer deze ook niet met een adapter af tespelen. Gebruik uitsluitend normale, ronde discs. Gebruikgeen discs me...
Page 90 - Volgorde van audiobestanden; Plaats de bestanden in een map.; Lijst van Russische tekens
Bijkomende informatie Alleen de eerste 32 tekens van de bestandsnaam(inclusief de extensie) of mapnaam worden weer-gegeven. Russische tekst kan alleen op dit toestel wordenweergegeven als die met een van de volgende te-kensets is gecodeerd: ! Unicode (UTF-8, UTF-16) ! Andere tekensets dan Unicode di...
Page 91 - Technische gegevens
Technische gegevens Algemeen Spanningsbron ................ 14,4 V gelijkstroom (10,8 tot 15,1 V toelaatbaar) Aarding ........................... NegatiefMaximaal stroomverbruik ................................... 10,0 A Afmetingen (B × H × D): DIN Chassis .............. 178 mm × 50 mm × 165 mm Voor...
Page 92 - Сведения об этом устройстве; RDS; ЛАЗЕРНЫЙ ПРОДУКТ КЛАСС 1; ВНИМАНИЕ; Pioneer CarStereo-Pass; Сведения об этом руководстве; USB; Перед началом эксплуатации
Благодарим Вас за покупку этого изделия компании PIONEER. Для обеспечения правильности эксплуата - ции внимательно прочитайте данное руко - водство перед началом использованияизделия . Особенно важно , чтобы Вы прочли и соблюдали инструкции , помеченные в дан - ном руководстве заголовками ПРЕДУПРЕ -...
Page 93 - Основное устройство; Индикация на дисплее; Управление данным устройством
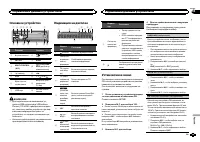
Основное устройство c d 5 9 1 2 3 4 6 7 b a e 8 Элемент Элемент 1 h ( извлечение ) 8 ( эквалай - зер ) 2 SRC / OFF 9 BAND 3 MULTI-CONTROL ( M.C. ) a ( назад )/ DIM- MER ( регулятор освещенности ) 4 ( список ) b c / d 5 DISP c С 1 / по 6 / 6 Щель для за - грузки диска d Вход AUX ( сте - реоразъем 3,5...
Page 94 - YES; Меню системы; SRC; Тюнер; Основные операции; SEEK; AF
5 Чтобы закончить настройку , поверни - те M.C. и выберите YES . # Если понадобится вновь изменить настройку , поверните M.C. и выберите NO . Нажмите для вы - бора . 6 Нажмите M.C. для выбора . Примечания ! Настроить параметры меню можно вменю системы . Более подробную инфор - мацию см . в разделе М...
Page 95 - Переключение дисплея; FREQUENCY; Использование функций; Список; Настройка функций; FUNCTION
Сохранение и вызов из памятирадиостанций для каждогодиапазона Использование кнопокпредварительной настройки 1 Чтобы сохранить в памяти нужную ра - диостанцию , нажмите одну из кнопок предварительной настройки ( с 1 / по 6 / ) и удерживайте ее , пока номер предва - рительной настройки не прекратит ми...
Page 96 - TRACK INFO; дорожек из списка
1 Нажмите M.C. , чтобы включить или выклю - чить функцию НОВОСТИ . SEEK ( настройка левой и правой кнопок ) Правой и левой кнопкам на устройстве можноназначить определенную функцию . Выберите MAN ( ручная настройка ) для ручной настройки или PCH ( предустановленный канал ) для переключения между зар...
Page 97 - Регулировки параметров звука; AUDIO
Функции с использованиемспециальных кнопок Выбор диапазона повторного воспроизведе - ния 1 Нажимайте кнопку 6 / для выбора из сле - дующих функций : CD/CD-R/CD-RW ! ALL – Повторное воспроизведение всех дорожек ! ONE – Повтор текущей дорожки ! FLD – Повтор текущей папки Запоминающее устройство USB ! ...
Page 99 - Стартовое меню; Меню систе
Звук / уровень звукового сигнала данной систе - мы автоматически понижается при получениисигнала от оборудования с функцией приглу - шения звука . 1 Для отображения установочного меню на - жмите M.C. 2 Поворачивайте M.C. для выбора настрой - ки . Можно выбрать любую настройку из сле - дующего списка...
Page 100 - Соединения; Установка
1 Нажмите M.C. , чтобы открыть главное меню . 2 Поворачивайте M.C. для прокрутки пунктов меню ; нажмите , чтобы выбрать SYSTEM . 3 Поверните M.C. , чтобы отобразить DEMO OFF , затем нажмите . 4 Поверните M.C. для выбора YES . 5 Нажмите M.C. для выбора . Соединения Важно ! При установке данного устро...
Page 101 - ISO; настройка выхода заднего канала и; Усилительмощности; RCA; Важно
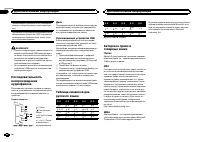
! Черный кабель является заземляющим . Заземляющие кабели данного устройстваи других устройств ( особенно устройств , предназначенных для эксплуатации прибольших токах , таких как усилитель мощ - ности ) должны монтироваться отдельно . В противном случае их случайное отсое - динение может привести к...
Page 102 - Переднее; Переднее крепление стандарта
! Не используйте детали , не разрешенные производителем к использованию , по - скольку это может стать причиной неис - правностей . ! Уточните у дилера компании , требует ли установка сверления отверстий или вне - сения иных изменений в конструкцию ав - томобиля . ! Не устанавливайте данное устройст...
Page 103 - Прежде чем обратиться к торговому пред; Дополнительная информация
Устранение неисправностей Признак Причина Действие Дисплей ав - томатическивозвращает - ся в исход - ный режим . В течение 30 секунд небыло выполне - но никакихопераций . Повторите опе - рацию . Диапазон по - вторноговоспроизве - дения само - произвольноизменяется . В зависимостиот выбранногодиапазо...
Page 104 - Диски и проигрыватель
Сообщение Причина Действие PROTECT Все файлы назапоминаю - щем устрой - стве USB закодированы Windows MediaDRM 9/10. Перенесите ау - диофайлы , не закодированные Windows MediaDRM 9/10, на за - поминающее ус - тройство USB и подключите его . N/A USB Подсоединен - ное устройство USB не под - держивает...
Page 105 - компакт
Запоминающее устройство USB С вопросами о работе запоминающего устрой - ства USB обращайтесь к производителю ус - тройства . Подключение через USB- концентратор не под - держивается . Не подключайте другие устройства , кроме за - поминающих устройств USB. При движении автомобиля надежно закрепитезап...
Page 106 - Диск
Запоминающее устройство USB, содержащее разделы : воспроизводится только первый раз - дел . При начале воспроизведения аудиофайлов назапоминающем устройстве USB, содержащем разветвленные иерархии папок , может возни - кать небольшая задержка . ВНИМАНИЕ ! Pioneer не гарантирует совместимость со всеми...
Page 107 - Технические характеристики
Технические характеристики Общие Источник питания ........... 14,4 В постоянного тока ( до - пустимый диапазон от 10,8 В до 15,1 В ) Система заземления ..... Заземление отрицательно - го полюса Максимальный потребляемый ток ................................... 10,0 А Размеры ( Ш × В × Г ): DIN Шасси ...