Page 3 - English 5; Русский
Page 6 - Contents; English
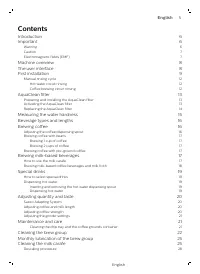
English Contents Introduction 6 Important 6 Warning 6 Caution 7 Electromagnetic fields (EMF) 7 Machine overview 8 The user interface 8 First installation 9 Manual rinsing cycle 12 Hot water circuit rinsing 12 Coffee brewing circuit rinsing 12 AquaClean filter 13 Preparing and installing the AquaClea...
Page 7 - Warning
What to do if the descaling procedure is interrupted 30 Warning icons and error codes 30 Meaning of error codes 31 Troubleshooting 32 Demo mode function 36 Ordering accessories Saeco 36 Technical specifications 36 Recycling 37 Guarantee and support 37 Introduction Dear customer, we thank you for buy...
Page 8 - Caution
- Do not make any modifications to the machine or its power cord.- Only have repairs carried out by a service center authorized by Philips to avoid a hazard. - The machine should not be used by children younger than 8 years old.- This machine can be used by children aged from 8 years and above and b...
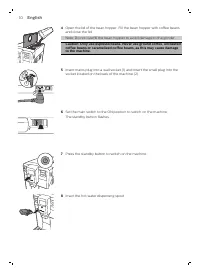
Page 10 - First installation; MAX
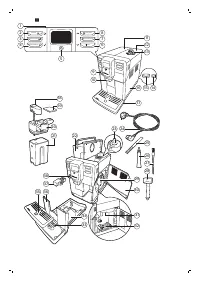
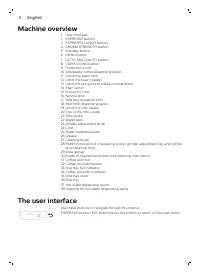
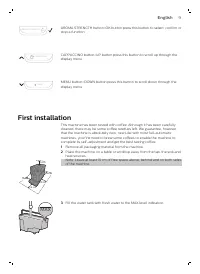
AROMA STRENGTH AROMA STRENGTH button=OK button:press this button to select, confirm orstop a function. CAPPUCCINO CAPPUCCINO button=UP button:press this button to scroll up through thedisplay menu. MENU MENU button=DOWN button:press this button to scroll down through thedisplay menu. First installat...
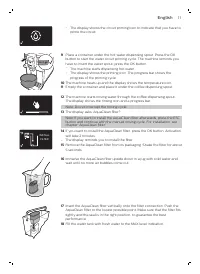
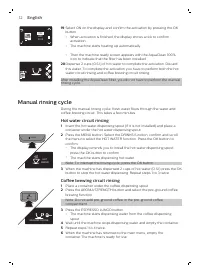
Page 13 - Manual rinsing cycle; Hot water circuit rinsing; Coffee brewing circuit rinsing
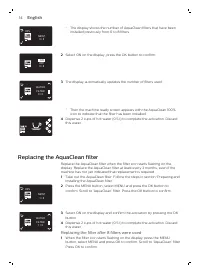
0 / 8 OFF ON 19 Select ON on the display and confirm the activation by pressing the OKbutton. - When activation is finished, the display shows a tick to confirmactivation. - The machine starts heating up automatically. - Then the machine ready screen appears with the AquaClean 100%icon to indicate t...
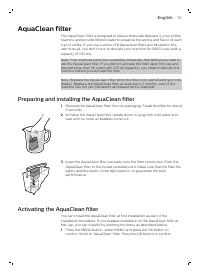
Page 14 - AquaClean filter; Preparing and installing the AquaClean filter
AquaClean filter The AquaClean filter is designed to reduce limescale deposits in your coffeemachine and provide filtered water to preserve the aroma and flavor of eachcup of coffee. If you use a series of 8 Aquaclean filters as indicated in thisuser manual, you don't have to descale your machine fo...
Page 15 - Replacing the AquaClean filter; Replacing the filter after 8 filters were used
0 / 8 80% NEW? - The display shows the number of AquaClean filters that have beeninstalled previously from 0 to 8 filters. 0 / 8 ON OFF 2 Select ON on the display, press the OK button to confirm. 0 / 8 WATER FILTER 3 The display automatically updates the number of filters used. - Then the machine re...
Page 16 - Measuring the water hardness; numbers of red squares; Setting the water hardness
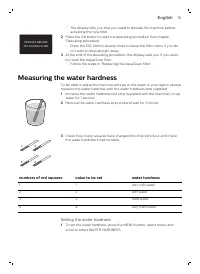
DESCALE BEFORE ACTIVATING FILTER - The display tells you that you need to descale the machine beforeactivating the new filter. 2 Press the OK button to start the descaling procedure. See chapter'Descaling procedure'. - Press the ESC button several times to leave the filter menu if you donot want to ...
Page 17 - Adjusting the coffee dispensing spout
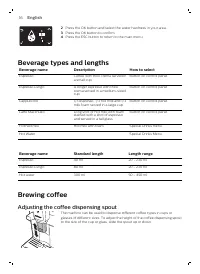
2 Press the OK button and select the water hardness in your area. 3 Press the OK button to confirm. 4 Press the ESC button to return to the main menu. Beverage types and lengths Beverage name Description How to select Espresso Coffee with thick crema served in a small cup Button on control panel Esp...
Page 18 - Brewing coffee with beans; Brewing 1 cup of coffee; Brewing coffee with pre-ground coffee; Brewing milk-based beverages; How to use the milk carafe
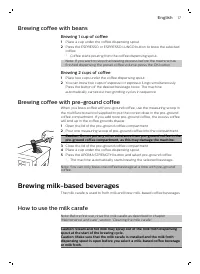
Brewing coffee with beans Brewing 1 cup of coffee 1 Place a cup under the coffee dispensing spout. 2 Press the ESPRESSO or ESPRESSO LUNGO button to brew the selectedcoffee. - Coffee starts pouring from the coffee dispensing spout. Note: If you want to stop the brewing process before the machine has ...
Page 19 - Brewing milk-based coffee beverages and milk froth
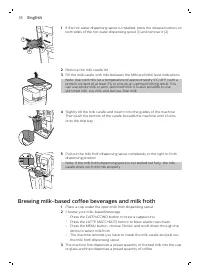
1 1 2 1 If the hot water dispensing spout is installed, press the release buttons onboth sides of the hot water dispensing spout (1) and remove it (2). 2 Remove the milk carafe lid. 3 Fill the milk carafe with milk between the MIN and MAX level indications.Note: Use cold milk (at a temperature of ap...
Page 20 - Special drinks; How to select special drinks; Inserting and removing the hot water dispensing spout; Dispensing hot water
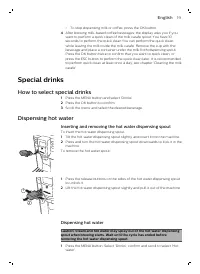
- To stop dispensing milk or coffee, press the OK button. 4 After brewing milk-based coffee beverages, the display asks you if youwant to perform a quick clean of the milk carafe spout. You have 10seconds to perform the quick clean.You can perform the quick cleanwhile leaving the milk inside the mil...
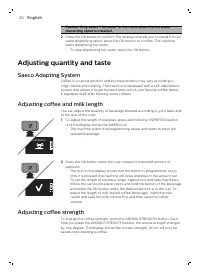
Page 21 - Adjusting quantity and taste; Saeco Adapting System; Adjusting coffee strength
Caution: Only select 'Hot water' in the menu when the hot water dispensing spout is installed. 2 Press the OK button to confirm.The display reminds you to install the hotwater dispensing spout, press the OK button to confirm. The machinestarts dispensing hot water. - To stop dispensing hot water, pr...
Page 22 - Adjusting the grinder settings; Maintenance and care; Cleaning the drip tray and the coffee grounds container
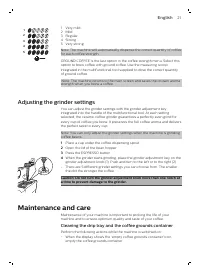
1 2 3 4 5 1 Very mild2 Mild 3 Regular4 Strong5 Very strong Note: The machine will automatically dispense the correct quantity of coffee for each coffee strength. GROUND COFFEE is the last option in the coffee strength menu. Select thisoption to brew coffee with ground coffee. Use the measuring scoop...
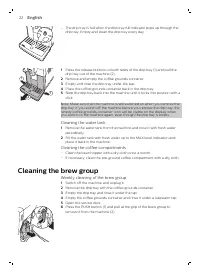
Page 23 - Cleaning the brew group; Weekly cleaning of the brew group
- The drip tray is full when the drip tray full indicator pops up through the drip tray. Empty and clean the drip tray every day. 1 1 2 1 Press the release buttons on both sides of the drip tray (1) and pull thedrip tray out of the machine (2). 2 Remove and empty the coffee grounds container. 3 Empt...
Page 25 - Monthly cleaning of the brew group with the degreasing tablet
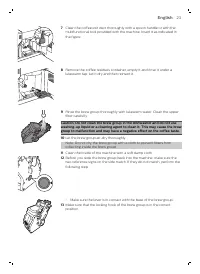
- To position the hook correctly, push it upwards until it is in uppermostposition. - The hook is not correctly positioned if it is still in bottommost position. 14 Slide the brew group back into the machine along the guiding rails on thesides until it locks into position with a click. Caution: Do n...
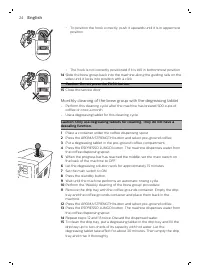
Page 26 - Monthly lubrication of the brew group; Cleaning the milk carafe; Carafe quick clean; To clean the milk carafe thoroughly, you have to do the
Monthly lubrication of the brew group Lubricate the brew group after the machine has brewed 500 cups of coffeeor once a month. 1 Switch off the machine and unplug it. 2 Remove the brew group and rinse it under a lukewarm tap as describedin section 'Weekly cleaning of the brew group'. 3 Apply some gr...
Page 27 - Weekly cleaning of the milk carafe
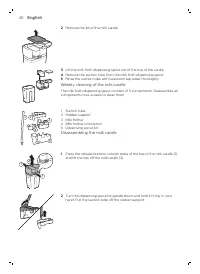
2 Remove the lid of the milk carafe. 3 Lift the milk froth dispensing spout out of the top of the carafe. 4 Remove the suction tube from the milk froth dispensing spout. 5 Rinse the suction tube with lukewarm tap water thoroughly. Weekly cleaning of the milk carafe The milk froth dispensing spout co...
Page 28 - Reassembling the milk carafe; Monthly cleaning of the milk carafe
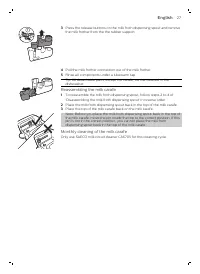
2 1 3 Press the release buttons on the milk froth dispensing spout and removethe milk frother from the the rubber support. 4 Pull the milk frother connection out of the milk frother. 5 Rinse all components under a lukewarm tap.Tip: All detachable parts, except the carafe, can be cleaned in the dishw...
Page 29 - Descaling procedure; Note: Do not remove the brew group during the descaling
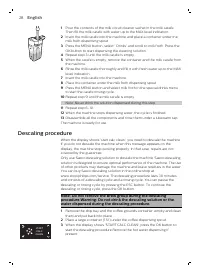
1 Pour the contents of the milk circuit cleaner sachet in the milk carafe.Then fill the milk carafe with water up to the MAX level indication. 2 Insert the milk carafe into the machine and place a container under themilk froth dispensing spout. 3 Press the MENU button, select ' Drinks' and scroll to...
Page 31 - What to do if the descaling procedure is interrupted; Warning icons and error codes
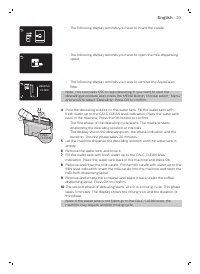
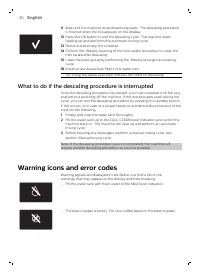
11 Wait until the machine stops dispensing water. The descaling procedureis finished when the tick appears on the display. 12 Press the OK button to exit the descaling cycle. The machine startsheating up and performs the automatic rinsing cycle. 13 Remove and empty the container. 14 Perform the 'Wee...
Page 32 - Meaning of error codes; Error code
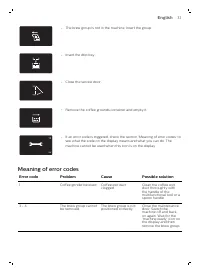
- The brew group is not in the machine. Insert the group. - Insert the drip tray. - Close the service door. - Remove the coffee grounds container and empty it. 10 xx - If an error code is triggered, check the section 'Meaning of error codes' to see what the code on the display means and what you can...
Page 33 - Troubleshooting
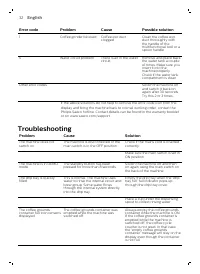
Error code Problem Cause Possible solution 1 Coffee grinder blocked Coffee exit duct clogged Clean the coffee exit duct thoroughly with the handle of the multifunctional tool or a spoon handle. 5 Water circuit problem There is air in the water circuit. Remove and place back the water tank a couple o...
Page 37 - Typenumber; Technical specifications; Description
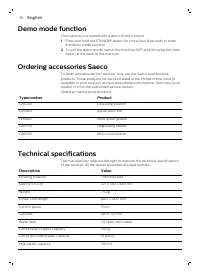
Demo mode function The machine is provided with a demo mode function. 1 Press and hold the STANDBY button for more than 8 seconds to enterthe demo mode function. 2 To exit the demo mode, switch the machine OFF and ON using the mainswitch at the back of the machine. Ordering accessories Saeco To clea...
Page 39 - Содержание
Русский Содержание Введение 39 Важная информация 39 Предупреждение 39 Внимание ! 40 Электромагнитные поля ( ЭМП ) 41 Обзор кофемашины 41 Пользовательский интерфейс 42 Первая установка 42 Цикл промывки вручную 45 Промывка контура горячей воды 45 Промывка контура заварки кофе 46 Фильтр AquaClean 46 По...
Page 40 - Saeco; Введение; Предупреждение
Действия в случае прерывания процедуры очистки от накипи 64 Значки предупреждений и коды ошибок 65 Описание кодов ошибок 66 Поиск и устранение неисправностей 66 Деморежим 71 Заказ аксессуаров Saeco 71 Технические характеристики 71 Утилизация 72 Гарантия и поддержка 72 Введение Уважаемый покупатель !...
Page 41 - Внимание
- При отключении держитесь за вилку , а не за сетевой шнур . - Не прикасайтесь к вилке питания мокрыми руками . - Запрещено пользоваться кофемашиной , если сетевая вилка , шнур питания или сам прибор повреждены .. - Запрещается вносить какие - либо изменения в конструкцию кофемашины или шнура питани...
Page 42 - Обзор
- Регулярно выполняйте очистку кофемашины от накипи . Машина предупреждает о необходимости удаления накипи . Несоблюдение этого требования приведет к сбоям в работе аппарата . В таком случае гарантия на ремонт не распространяется . - Не храните кофемашину при температуре ниже 0 °C, так как оставшаяс...
Page 43 - Первая
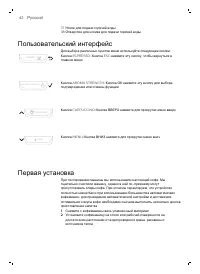
37 Носик для подачи горячей воды 38 Отверстие для носика для подачи горячей воды Пользовательский интерфейс Для выбора различных пунктов меню используйте следующие кнопки : ESPRESSO Кнопка ESPRESSO= Кнопка ESC: нажмите эту кнопку , чтобы вернуться в главное меню . AROMA STRENGTH Кнопка AROMA STRENGT...
Page 46 - Цикл; Промывка
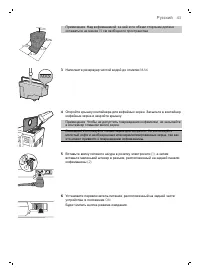
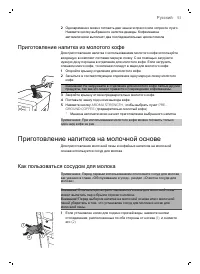
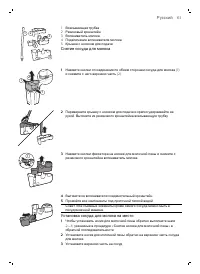
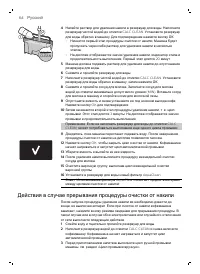
16 Переверните фильтр AquaClean и поместите его в емкость с холодной водой . Дождитесь , пока из фильтра перестанут выделяться пузырьки воздуха . 17 Вставьте фильтр AquaClean в вертикальном положении в соответствующий разъем . Нажмите на фильтр AquaClean, чтобы он опустился вниз до упора . Для обесп...
Page 47 - Фильтр; Подготовка
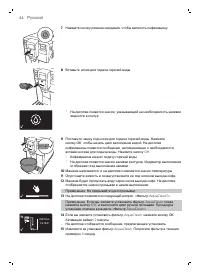
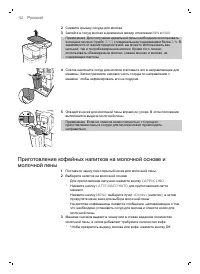
MENU HOT WATER 2 Нажмите кнопку MENU ( меню ). Перейдите к функции DRINKS ( напитки ), подтвердите выбор и прокрутите меню до пункта HOT WATER ( горячая вода ). Для подтверждения нажмите кнопку ОК . - На дисплее кофемашины появится сообщение , напоминающее о необходимости вставки носика для подачи в...
Page 48 - Активация
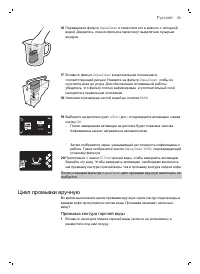
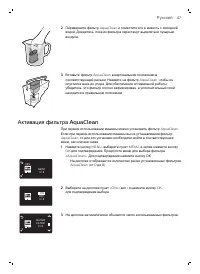
2 Переверните фильтр AquaClean и поместите его в емкость с холодной водой . Дождитесь , пока из фильтра перестанут выделяться пузырьки воздуха . 3 Вставьте фильтр AquaClean в вертикальном положении в соответствующий разъем . Нажмите на фильтр AquaClean, чтобы он опустился вниз до упора . Для обеспеч...
Page 49 - Замена; Измерение
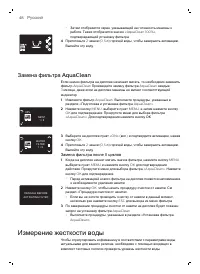
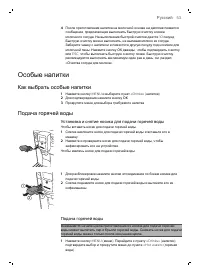
- Затем отобразится экран , указывающий на готовность машины к работе . Также отобразится значок «AquaClean 100%», подтверждающий установку фильтра . 4 Приготовьте 2 чашки (0,5 л ) горячей воды , чтобы завершить активацию . Вылейте эту воду . Замена фильтра AquaClean Если значок фильтра на дисплее н...
Page 50 - Тип
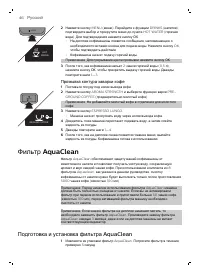
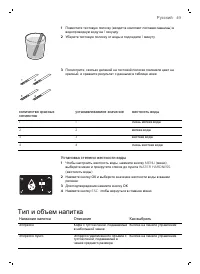
1 Поместите тестовую полоску ( входит в комплект поставки машины ) в водопроводную воду на 1 секунду . 2 Уберите тестовую полоску от воды и подождите 1 минуту . 1 2 3 4 3 Посмотрите , сколько делений на тестовой полоске поменяли цвет на красный , и сравните результат с данными в таблице ниже . колич...
Page 55 - Регулировка
Внимание ! Выбирать пункт «Hot water» в меню можно только после установки носика для подачи горячей воды . 2 Для подтверждения нажмите кнопку ОК . На дисплее кофемашины появится сообщение , напоминающее о необходимости вставки носика для подачи воды . Нажмите кнопку OK, чтобы подтвердить действие . ...
Page 56 - Техническое
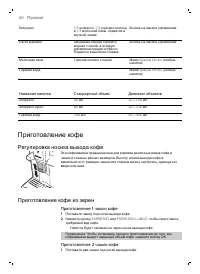
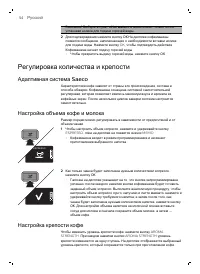
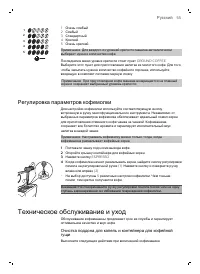
1 2 3 4 5 1 Очень слабый 2 Слабый 3 Стандартный 4 Крепкий 5 Очень крепкий Примечание . Для каждого из уровней крепости машина автоматически выбирает нужное количество кофе . Последним в меню уровня крепости стоит пункт GROUND COFFEE. Выберите этот пункт для приготовления напитка из молотого кофе . Д...
Page 57 - Очистка
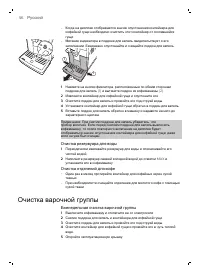
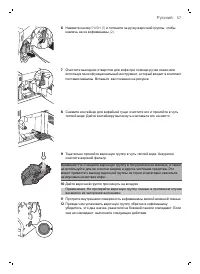
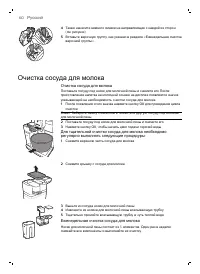
- Когда на дисплее отображается значок опустошения контейнера для кофейной гущи необходимо очистить этот контейнер от скопившейся гущи . - Мигание индикатора в поддоне для капель свидетельствует о его заполнении . Ежедневно опустошайте и очищайте поддон для капель . 1 1 2 1 Нажмите на кнопки фиксато...
Page 63 - Процесс
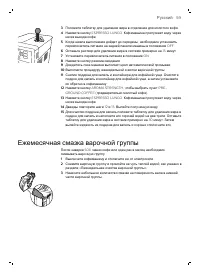
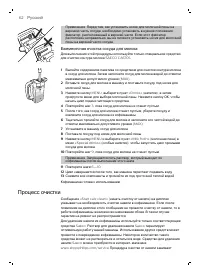
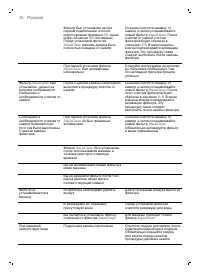
Примечание . Перед тем , как установить носик для молочной пены на верхнюю часть сосуда , необходимо установить в нужное положение фиксатор , расположенный в верхней части . Если этот фиксатор расположен неправильно , вы не сможете установить носик для молочной пены на верхней части сосуда . Ежемеся...
Page 67 - Описание; Поиск
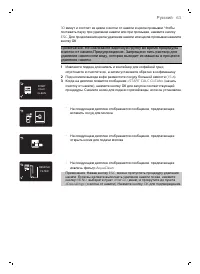
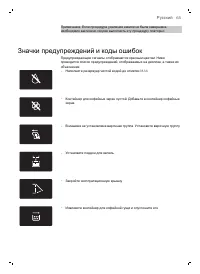
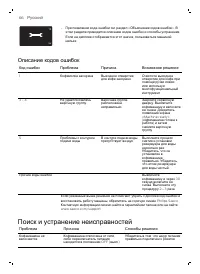
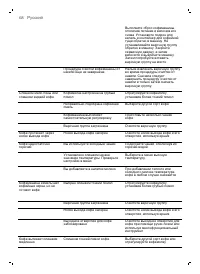
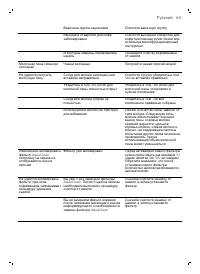
10 xx - При появлении кода ошибки см . раздел « Объяснение кодов ошибок ». В этом разделе приводится описание кодов ошибок и способы устранения . Если на дисплее отображается этот значок , пользоваться машиной нельзя . Описание кодов ошибок Код ошибки Проблема Причина Возможное решение 1 Кофемолка з...
Page 72 - Деморежим; Заказ; Номер; Технические
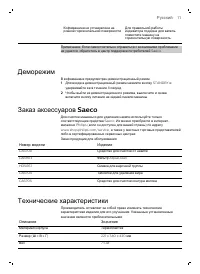
Кофемашина не установлена на ровной горизонтальной поверхности . Для правильной работы индикатора поддона для капель поместите машину на горизонтальную поверхность . Примечание . Если самостоятельно справиться с возникшими проблемами не удается , обратитесь в центр поддержки потребителей Saeco. Демо...