Page 2 - Contents; Before using the unit
2 Before using the unit Contents Before using the unit Introduction ................................................................................................... 3Intended use .................................................................................................. 3Important safety i...
Page 4 - Important safety instructions; respiratory therapist.
4 Important safety instructions Read all the information in the instruction manual and any other literature included in the box before using the device. When using an electrical product, especially when children are present, basic safety precautions should always be followed including the following:...
Page 5 - battery, do not place hair pins or other metal objects in the bag.
5 Important safety instructions EN • Do not use the main unit, AC adapter, optional rechargeable battery, or optional battery charger while they are wet, or connect them to a power outlet or other devices with wet hands. • The compressor, AC adapter, and optional rechargeable battery and charger are...
Page 6 - rechargeable battery or charger.
6 Important safety instructions • Do not leave the unit unattended with infants or persons who cannot express their consent. • Do not subject the device or the parts to any strong shocks such as dropping the device on the floor. • Do not distort the vaporiser head, or jab the nozzle of the medicatio...
Page 7 - General Safety Precautions:; Save these instructions for future reference.
7 Important safety instructions EN General Safety Precautions: • Inspect the device and parts before using them each time, and check that there are no problems. In particular, be sure to check the following:- That the vaporiser head, nozzle or air tube are not damaged.- That the nozzle is not blocke...
Page 8 - D. Inhalation Attachments; Rear View
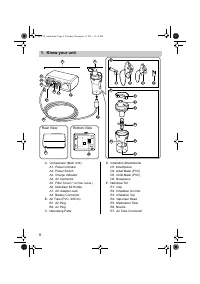
8 1. Know your unit A. Compressor (Main Unit) A1. Power IndicatorA2. Power SwitchA3. Charge IndicatorA4. Air ConnectorA5. Filter Cover (* Air filter inside.) A6. Nebuliser Kit HolderA7. AC Adapter JackA8. Battery Connector B. Air Tube (PVC, 207cm) B1. Air PlugB2. Air Plug C. Nebulising Parts D. Inha...
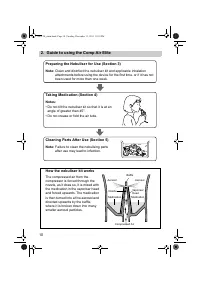
Page 10 - Guide to using the Comp Air Elite; Preparing the Nebuliser for Use (Section 3); • Do not tilt the nebuliser kit so that it is at an; How the nebuliser kit works
10 2. Guide to using the Comp Air Elite Preparing the Nebuliser for Use (Section 3) Note: Clean and disinfect the nebuliser kit and applicable inhalation attachments before using the device for the first time, or if it has not been used for more than one week. Taking Medication (Section 4) Notes: • ...
Page 11 - Operating instructions; Preparing the nebuliser for use; Plug the AC adapter into a power outlet.
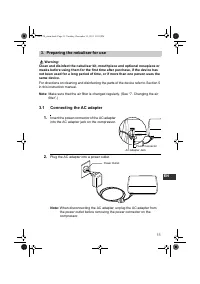
11 EN Operating instructions 3. Preparing the nebuliser for use Warning: Clean and disinfect the nebuliser kit, mouthpiece and optional nosepiece or masks before using them for the first time after purchase, if the device has not been used for a long period of time, or if more than one person uses t...
Page 12 - Adding medication and assembling the parts; Rotate the inhalation top anti-clockwise.; Caution: The capacity of the medication
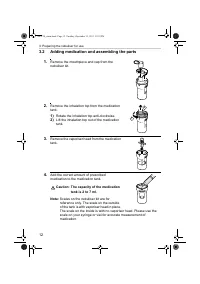
12 3. Preparing the nebuliser for use 3.2 Adding medication and assembling the parts 1. Remove the mouthpiece and cap from the nebuliser kit. 2. Remove the inhalation top from the medication tank. 1) Rotate the inhalation top anti-clockwise. 2) Lift the inhalation top out of the medication tank. 3. ...
Page 13 - Attaching the mouthpiece
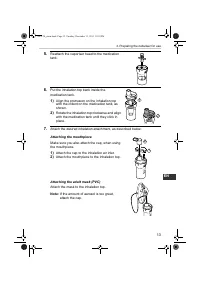
13 3. Preparing the nebuliser for use EN 5. Reattach the vaporiser head to the medication tank. 6. Put the inhalation top back inside the medication tank. 1) Align the protrusion on the inhalation top with the indent on the medication tank, as shown. 2) Rotate the inhalation top clockwise and align ...
Page 14 - Attaching the nosepiece
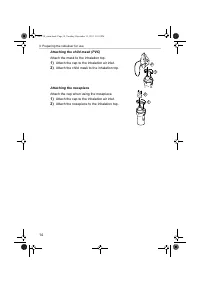
14 3. Preparing the nebuliser for use Attaching the child mask (PVC) Attach the mask to the inhalation top. 1) Attach the cap to the inhalation air inlet. 2) Attach the child mask to the inhalation top. Attaching the nosepiece Attach the cap when using the nosepiece. 1) Attach the cap to the inhalat...
Page 15 - Attach the air tube to the air connector on the compressor.
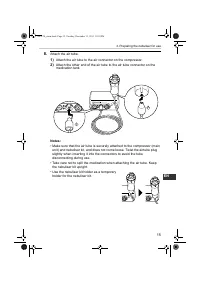
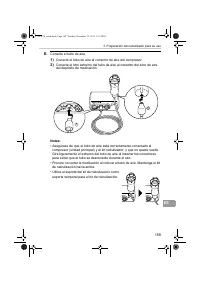
15 3. Preparing the nebuliser for use EN 8. Attach the air tube. 1) Attach the air tube to the air connector on the compressor. 2) Attach the other end of the air tube to the air tube connector on the medication tank. Notes: • Make sure that the air tube is securely attached to the compressor (main ...
Page 16 - To stop nebulisation; Do not block the air filter cover.
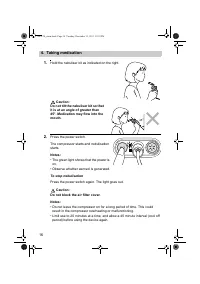
16 4. Taking medication 1. Hold the nebuliser kit as indicated on the right. Caution: Do not tilt the nebuliser kit so that it is at an angle of greater than 45°. Medication may flow into the mouth. 2. Press the power switch. The compressor starts and nebulisation starts. Notes: • The green light sh...
Page 19 - Care and maintenance; Cleaning and daily disinfecting; Make sure that the power indicator is out.
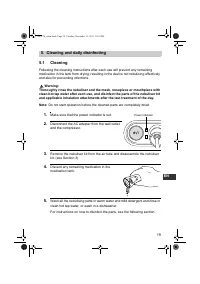
19 EN Care and maintenance 5. Cleaning and daily disinfecting 5.1 Cleaning Following the cleaning instructions after each use will prevent any remaining medication in the tank from drying, resulting in the device not nebulising effectively and also for preventing infections. Warning: Thoroughly rins...
Page 20 - Caution: The compressor is not; Nebuliser kit should be replaced after using for 6 months.; Disinfecting the nebulising parts; Remove the parts and discard the solution.; Mild Detergent
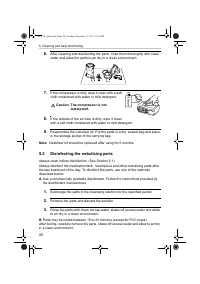
20 5. Cleaning and daily disinfecting 6. After cleaning and disinfecting the parts, rinse them thoroughly with clean water and allow the parts to air dry in a clean environment. 7. If the compressor is dirty, wipe it clean with a soft cloth moistened with water or mild detergent. Caution: The compre...
Page 21 - Handling the Vaporiser Head
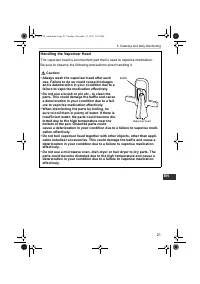
21 5. Cleaning and daily disinfecting EN Handling the Vaporiser Head The vaporiser head is an important part that is used to vaporise medication.Be sure to observe the following precautions when handling it. Caution: • Always wash the vaporiser head after each use. Failure to do so could cause block...
Page 22 - Maintenance and storage; express their consent.; under direct sunlight.; Benzene
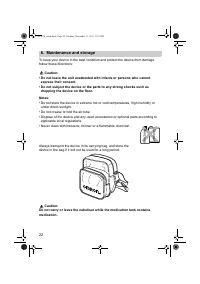
22 6. Maintenance and storage To keep your device in the best condition and protect the device from damage follow these directions: Caution: • Do not leave the unit unattended with infants or persons who cannot express their consent. • Do not subject the device or the parts to any strong shocks such...
Page 23 - Changing the air filter
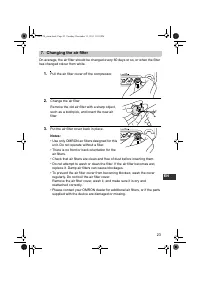
23 EN 7. Changing the air filter On average, the air filter should be changed every 60 days or so, or when the filter has changed colour from white. 1. Pull the air filter cover off the compressor. 2. Change the air filter. Remove the old air filter with a sharp object, such as a toothpick, and inse...
Page 26 - Operating Temperature/
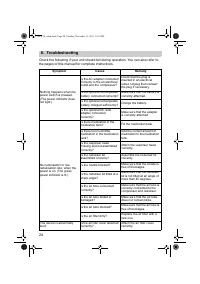
26 9. Technical data Notes: • Subject to technical modification without prior notice.• This OMRON product is produced under the strict quality system of OMRON Healthcare Co. Ltd., Japan. • The device may not work if the temperature and voltage conditions are different to those defined in the specifi...
Page 27 - ml maximum; Appropriate Medication; ml minimum - 7 ml maximum
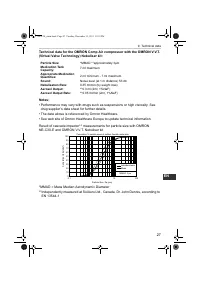
27 9. Technical data EN Technical data for the OMRON Comp Air compressor with the OMRON V.V.T. (Virtual Valve Technology) Nebuliser kit: Notes: • Performance may vary with drugs such as suspensions or high viscosity. See drug supplier’s data sheet for further details. • The data above is referenced ...
Page 28 - Read the instruction manual carefully
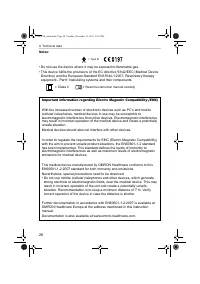
28 9. Technical data Notes: • Do not use the device where it may be exposed to flammable gas.• This device fulfils the provisions of the EC directive 93/42/EEC (Medical Device Directive) and the European Standard EN13544-1:2007, Respiratory therapy equipment - Part1: Nebulizing systems and their com...
Page 30 - Optional parts and accessories; Kit Set
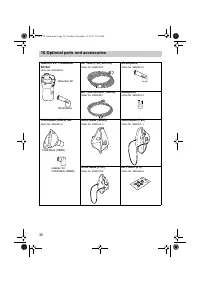
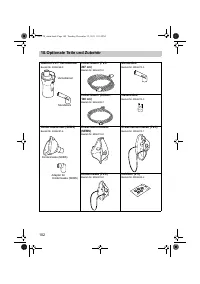
30 10.Optional parts and accessories OMRON V.V.T. Nebuliser Kit Set Order No. 9956268-9 Air Tube (PVC, 207cm) Order No. 9956270-0 Mouthpiece Order No. 9956273-5 Air Tube (Silicon, 100cm) Order No. 9956269-7 Nosepiece Order No. 9956274-3 Child Mask (SEBS) Set Order No. 9956281-6 Adult Mask (SEBS) Ord...
Page 31 - Optional parts and accessories
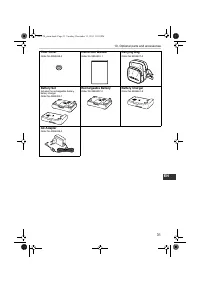
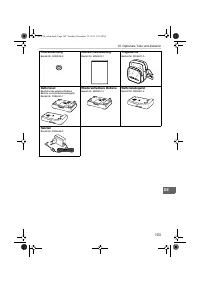
31 10. Optional parts and accessories EN Filter Cover Order No.9956638-2 Instruction Manual Order No.9956633-1 Carrying Bag Order No.9956631-5 Battery Set Includes the rechargeable battery, battery charger.Order No.9986453-7 Rechargeable Battery Order No.9986457-0 Battery Charger Order No.9986461-8 ...
Page 32 - Using the battery for; Fully charge the battery.
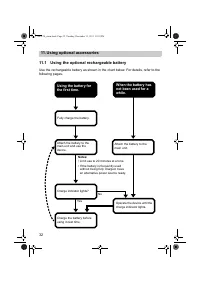
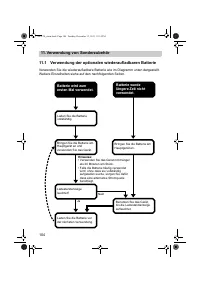
32 11. Using optional accessories 11.1 Using the optional rechargeable battery Use the rechargeable battery as shown in the chart below. For details, refer to the following pages. Using the battery for the first time. When the battery has not been used for a while. Fully charge the battery. Attach t...
Page 33 - Using optional accessories; Important notes on using the optional rechargeable battery; at the time of shipment.
33 11. Using optional accessories EN 1. Charge the battery. 1) Insert the power connector of the AC adapter into the AC adapter jack on the charger. 2) Plug the AC adapter into a power outlet. Important notes on using the optional rechargeable battery • Charge the battery before using it for the fir...
Page 35 - When battery power is low; • Battery power is low and the device will cease to; If the battery will not be used for a long time
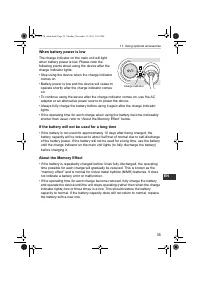
35 11. Using optional accessories EN When battery power is low The charge indicator on the main unit will light when battery power is low. Please note the following points about using the device after the charge indicator lights:• Stop using the device when the charge indicator comes on. • Battery p...
Page 36 - Made in China; THE NETHERLANDS
36 11. Using optional accessories Made in China Manufacturer OMRON HEALTHCARE Co., Ltd. 53, Kunotsubo, Terado-cho, Muko, Kyoto, 617-0002 JAPAN EU-representative OMRON HEALTHCARE EUROPE B.V. Scorpius 33, 2132 LR Hoofddorp THE NETHERLANDS www.omron-healthcare.com Production facility OMRON (DALIAN) CO....
Page 37 - РУКОВОДСТВО
Nébuliseur à compresseur Modèle NE-C30-E • Instruction Manual• Mode d’emploi• Gebrauchsanweisung• Manuale di istruzioni• Manual de instrucciones• Gebruiksaanwijzing• РУКОВОДСТВО ПО ЭКСПЛУАТАЦИИ TM 3 5 IM-NE-C30-E-06-11/2011 EN FR DE IT ES NL AR RU NE-C30_main.book Page 37 Tuesday, December 13, 2011 ...
Page 38 - Table des matières; Avant d’utiliser l’appareil
38 Avant d’utiliser l’appareil Table des matières Avant d’utiliser l’appareil Introduction ................................................................................................. 39Utilisation prévue ........................................................................................ 3...
Page 40 - Instructions de sécurité importantes
40 Instructions de sécurité importantes Lisez attentivement toutes les informations contenues dans le mode d’emploi et dans la documentation incluse dans l’emballage avant d’utiliser l’appareil. Lorsqu’un appareil électrique est utilisé, et tout particulièrement en présence d’enfants, des précaution...
Page 43 - Précautions de sécurité générales :; minutes entre deux utilisations.; Gardez soigneusement ces instructions
43 Instructions de sécurité importantes FR Précautions de sécurité générales : • Inspectez l’appareil et les composants avant chaque utilisation et assurez-vous de l’absence de problème. Vérifiez tout particulièrement les points suivants :- La tête du vaporisateur, la canule et le tube à air ne doiv...
Page 44 - Familiarisation avec l’appareil; Vue Vue
44 1. Familiarisation avec l’appareil A. Compresseur (unité principale) A1. Indicateur d’alimentationA2. InterrupteurA3. Indicateur de chargeA4. Prise d’airA5. Couvercle du filtre (* Filtre à air logé à l’intérieur.) A6. Support du kit de nébulisationA7. Prise jack de l’adaptateur CAA8. Connecteur d...
Page 45 - Accessoires
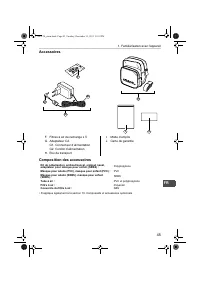
45 1. Familiarisation avec l’appareil FR Accessoires Composition des accessoires • S’applique également à la section 10. Composants et accessoires optionnels. F. Filtres à air de rechange x 5G. Adaptateur CA G1. Connecteur d’alimentationG2. Cordon d’alimentation H. Etui de transport I. Mode d’emploi...
Page 46 - Guide d’utilisation du système Comp Air Elite; Préparation du nébuliseur pour utilisation (section 3); • N’inclinez pas le kit de nébulisation d’un angle
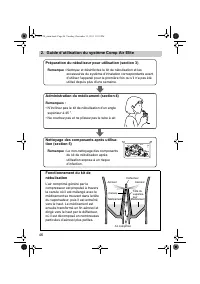
46 2. Guide d’utilisation du système Comp Air Elite Préparation du nébuliseur pour utilisation (section 3) Remarque : Nettoyez et désinfectez le kit de nébulisation et les accessoires du système d’inhalation correspondants avant d’utiliser l’appareil pour la première fois ou s’il n’a pas été utilisé...
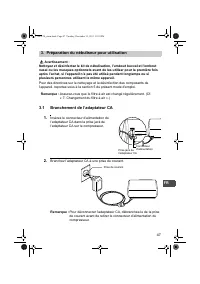
Page 47 - Instructions de fonctionnement; Préparation du nébuliseur pour utilisation; Branchez l’adaptateur CA à une prise de courant.
47 FR Instructions de fonctionnement 3. Préparation du nébuliseur pour utilisation Avertissement : Nettoyez et désinfectez le kit de nébulisation, l’embout buccal et l’embout nasal ou les masques optionnels avant de les utiliser pour la première fois après l’achat, si l’appareil n’a pas été utilisé ...
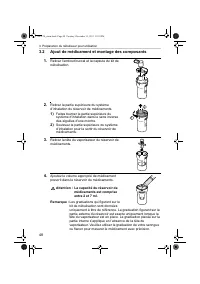
Page 48 - Ajout de médicament et montage des composants; Faites tourner la partie supérieure du; Attention : La capacité du réservoir de
48 3. Préparation du nébuliseur pour utilisation 3.2 Ajout de médicament et montage des composants 1. Retirez l’embout buccal et la capsule du kit de nébulisation. 2. Retirez la partie supérieure du système d’inhalation du réservoir de médicaments. 1) Faites tourner la partie supérieure du système d...
Page 49 - Fixation de l’embout buccal
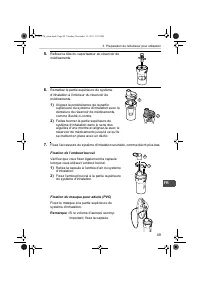
49 3. Préparation du nébuliseur pour utilisation FR 5. Refixez la tête du vaporisateur au réservoir de médicaments. 6. Remettez la partie supérieure du système d’inhalation à l’intérieur du réservoir de médicaments. 1) Alignez la protubérance de la partie supérieure du système d’inhalation avec la d...
Page 50 - Fixation de l’embout nasal
50 3. Préparation du nébuliseur pour utilisation Fixation du masque pour enfant (PVC) Fixez le masque à la partie supérieure du système d’inhalation. 1) Reliez la capsule à l’entrée d’air du système d’inhalation. 2) Fixez le masque pour enfant à la partie supérieure du système d’inhalation. Fixation...
Page 51 - Reliez le tube à air à la prise d’air sur le compresseur.
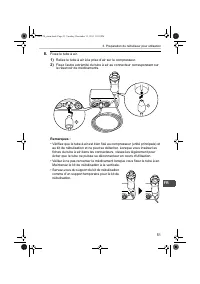
51 3. Préparation du nébuliseur pour utilisation FR 8. Fixez le tube à air. 1) Reliez le tube à air à la prise d’air sur le compresseur. 2) Fixez l’autre extrémité du tube à air au connecteur correspondant sur le réservoir de médicaments. Remarques : • Vérifiez que le tube à air est bien fixé au com...
Page 52 - Administration du médicament; Pour arrêter la nébulisation; Ne bouchez pas le couvercle du filtre à air.
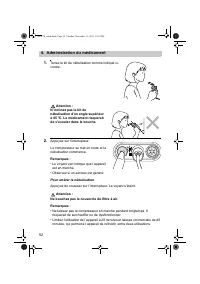
52 4. Administration du médicament 1. Tenez le kit de nébulisation comme indiqué ci-contre. Attention : N’inclinez pas le kit de nébulisation d’un angle supérieur à 45 °C. Le médicament risquerait de s’écouler dans la bouche. 2. Appuyez sur l’interrupteur. Le compresseur se met en route et la nébuli...
Page 53 - Utilisation de l’embout buccal
53 4. Administration du médicament FR 3. Inhalez le médicament conformément aux instructions de votre médecin et/ou de votre thérapeute. Utilisation de l’embout buccal Préparez votre embout buccal conformément aux instructions de la section 3.2.7. Introduisez l’embout buccal dans votre bouche et inh...
Page 54 - )Vérifiez que le tube à air est toujours relié à la prise d’air sur le
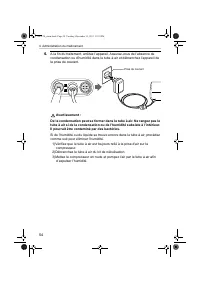
54 4. Administration du médicament 4. A la fin du traitement, arrêtez l’appareil. Assurez-vous de l’absence de condensation ou d’humidité dans le tube à air et débranchez l’appareil de la prise de courant. Avertissement : De la condensation peut se former dans le tube à air. Ne rangez pas le tube à ...
Page 55 - Entretien et maintenance; Nettoyage et désinfection quotidienne
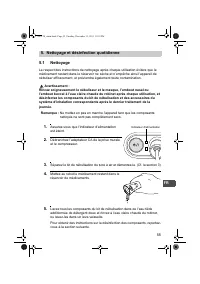
55 FR Entretien et maintenance 5. Nettoyage et désinfection quotidienne 5.1 Nettoyage Le respect des instructions de nettoyage après chaque utilisation évitera que le médicament restant dans le réservoir ne sèche et n’empêche ainsi l’appareil de nébuliser efficacement, et préviendra également toute ...
Page 56 - Attention : Le compresseur n’est pas; Le kit de nébulisation doit être remplacé tous les 6 mois.; Désinfection des composants du kit de nébulisation; fournies par le fabricant du désinfectant.
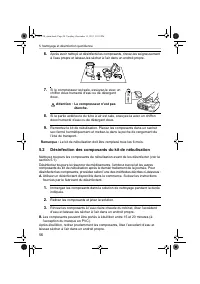
56 5. Nettoyage et désinfection quotidienne 6. Après avoir nettoyé et désinfecté les composants, rincez-les soigneusement à l’eau propre et laissez-les sécher à l’air dans un endroit propre. 7. Si le compresseur est sale, essuyez-le avec un chiffon doux humecté d’eau ou de détergent doux. Attention ...
Page 57 - Manipulation de la tête du vaporisateur
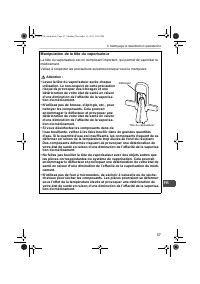
57 5. Nettoyage et désinfection quotidienne FR Manipulation de la tête du vaporisateur La tête du vaporisateur est un composant important, qui permet de vaporiser le médicament.Veillez à respecter les précautions suivantes lorsque vous le manipulez. Attention : • Lavez la tête du vaporisateur après ...
Page 58 - Maintenance et rangement; ou de personnes qui ne peuvent pas donner leur consentement.; rebut conformément aux réglementations locales applicables.; Benzène
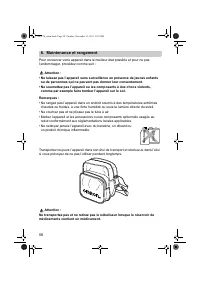
58 6. Maintenance et rangement Pour conserver votre appareil dans le meilleur état possible et pour ne pas l’endommager, procédez comme suit : Attention : • Ne laissez pas l’appareil sans surveillance en présence de jeunes enfants ou de personnes qui ne peuvent pas donner leur consentement. • Ne sou...
Page 59 - Changement du filtre à air; Changez le filtre à air.
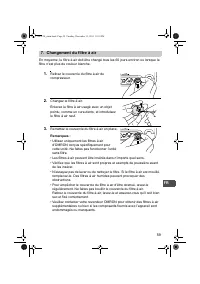
59 FR 7. Changement du filtre à air En moyenne, le filtre à air doit être changé tous les 60 jours environ ou lorsque le filtre n’est plus de couleur blanche. 1. Retirez le couvercle du filtre à air du compresseur. 2. Changez le filtre à air. Enlevez le filtre à air usagé avec un objet pointu, comme...
Page 60 - Résolution des problèmes; Symptôme
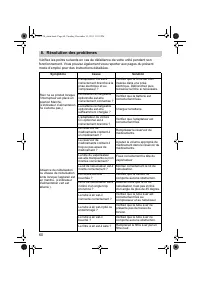
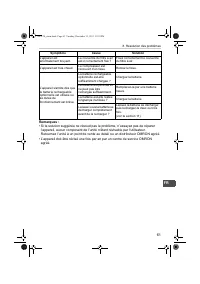
60 8. Résolution des problèmes Vérifiez les points suivants en cas de défaillance de votre unité pendant son fonctionnement. Vous pouvez également vous reporter aux pages du présent mode d’emploi pour des instructions détaillées. Symptôme Cause Solution Rien ne se produit lorsque l’interrupteur est ...
Page 62 - Données techniques; Comp Air Elite; Alimentation électrique :
62 9. Données techniques Remarques : • Soumis à des modifications techniques sans préavis.• Ce produit OMRON a été fabriqué selon les normes de qualité strictes de OMRON Healthcare Co. Ltd., Japon. • L’appareil risque de ne pas fonctionner si les conditions de température et de tension diffèrent de ...
Page 63 - Données techniques du compresseur OMRON Comp Air équipé du kit de; données du fournisseur du médicament pour de plus amples détails.; Volumes de médicament appropriés :; Taux de nébulisation :
63 9. Données techniques FR Données techniques du compresseur OMRON Comp Air équipé du kit de nébulisation OMRON V.V.T. (Virtual Valve Technology) : Remarques : • Les performances de l’appareil peuvent varier avec les médicaments, comme les suspensions ou les médicaments à viscosité élevée. Consulte...
Page 64 - fonctionnement de l’appareil si la distance est inférieure.
64 9. Données techniques Remarques : • N’utilisez pas l’appareil dans des endroits où il risquerait d’être exposé à des gaz inflammables. • Cet appareil répond aux dispositions de la directive CE 93/42/CEE (directive relative aux dispositifs médicaux) et à la norme européenne EN 13544-1:2007 Matérie...
Page 65 - Comment éliminer ce produit
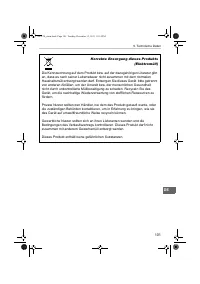
65 9. Données techniques FR Comment éliminer ce produit (déchets d’équipements électriques et électroniques) Ce symbole sur le produit ou sa documentation indique qu’il ne doit pas être éliminé en fin de vie avec les autres déchets ménagers. L’élimination incontrôlée des déchets pouvant porter préju...
Page 66 - Composants et accessoires optionnels; Ensemble du kit de
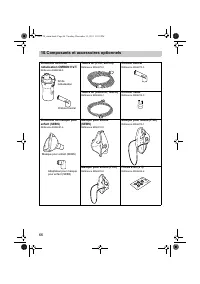
66 10.Composants et accessoires optionnels Ensemble du kit de nébulisation OMRON V.V.T. Référence 9956268-9 Tube à air (PVC, 207cm) Référence 9956270-0 Embout buccal Référence 9956273-5 Tube à air (silicone, 100cm) Référence 9956269-7 Embout nasal Référence 9956274-3 Ensemble du masque pour enfant (...
Page 67 - Composants et accessoires optionnels
67 10. Composants et accessoires optionnels FR Couvercle du filtre Référence 9956638-2 Mode d’emploi Référence 9956633-1 Etui de transport Référence 9956631-5 Ensemble de la batterie Inclut la batterie rechargeable et le chargeur de batteries.Référence 9986453-7 Batterie rechargeable Référence 99864...
Page 68 - Utilisation de la batterie
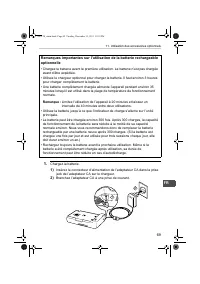
68 11. Utilisation des accessoires optionnels 11.1 Utilisation de la batterie rechargeable optionnelle Utilisez la batterie rechargeable selon les instructions fournies dans le diagramme suivant. Pour de plus amples détails, reportez-vous aux pages suivantes. Utilisation de la batterie pour la premi...
Page 69 - Utilisation des accessoires optionnels; jack de l’adaptateur CA sur le chargeur.
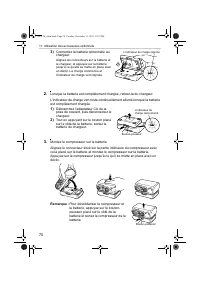
69 11. Utilisation des accessoires optionnels FR 1. Chargez la batterie. 1) Insérez le connecteur d’alimentation de l’adaptateur CA dans la prise jack de l’adaptateur CA sur le chargeur. 2) Branchez l’adaptateur CA à une prise de courant. Remarques importantes sur l’utilisation de la batterie rechar...
Page 71 - Lorsque la batterie est presque déchargée; • La batterie est presque déchargée et l’appareil; Si la batterie ne doit pas être utilisée pendant longtemps
71 11. Utilisation des accessoires optionnels FR Lorsque la batterie est presque déchargée L’indicateur de charge de l’unité principale s’allume lorsque la batterie est presque déchargée. Veuillez noter ce qui suit concernant l’utilisation de l’appareil lorsque l’indicateur de charge s’allume :• Ces...
Page 72 - Fabriqué en Chine; Opal Drive
72 11. Utilisation des accessoires optionnels Fabriqué en Chine Fabricant OMRON HEALTHCARE Co., Ltd. 53, Kunotsubo, Terado-cho, Muko, Kyoto, 617-0002 JAPON Mandataire dans l’UE OMRON HEALTHCARE EUROPE B.V. Scorpius 33, 2132 LR Hoofddorp PAYS-BAS www.omron-healthcare.com Site de production OMRON (DAL...
Page 74 - Inhalt; Vor der Verwendung des Geräts
74 Vor der Verwendung des Geräts Inhalt Vor der Verwendung des Geräts Einführung ................................................................................................... 75Verwendungszweck .................................................................................... 75Wichtige Sich...
Page 76 - Wichtige Sicherheitsanweisungen
76 Wichtige Sicherheitsanweisungen Lesen Sie alle Informationen in der Bedienungsanleitung und alle sonstigen Hinweise in der Verpackung vor der Verwendung des Geräts genau durch. Bei der Verwendung eines elektrischen Geräts müssen immer einige grundlegende Sicherheitsvorkehrungen befolgt werden, be...
Page 79 - einem Erlöschen der Garantie.; Allgemeine Vorsichtsmaßnahmen:; Gerät nicht für andere Zwecke verwenden.; Bitte bewahren Sie diese Gebrauchsanweisung
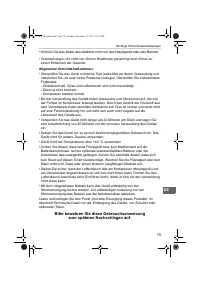
79 Wichtige Sicherheitsanweisungen DE • Wickeln Sie das Kabel des Netzteils nicht um das Hauptgerät oder das Netzteil. • Veränderungen, die nicht von Omron Healthcare genehmigt sind, führen zu einem Erlöschen der Garantie. Allgemeine Vorsichtsmaßnahmen: • Überprüfen Sie das Gerät und seine Teile jed...
Page 80 - Übersicht über Ihr Gerät; C. Teile des Verneblers; Rückansicht
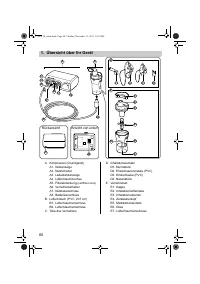
80 1. Übersicht über Ihr Gerät A. Kompressor (Grundgerät) A1. NetzanzeigeA2. NetzschalterA3. LadestandanzeigeA4. LuftschlauchbuchseA5. Filterabdeckung (Luftfilter innen) A6. VerneblersethalterA7. NetzteilanschlussA8. Batterieanschluss B. Luftschlauch (PVC, 207 cm) B1. LuftschlauchanschlussB2. Luftsc...
Page 81 - Zubehör
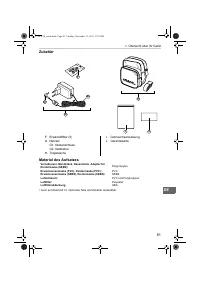
81 1. Übersicht über Ihr Gerät DE Zubehör Material des Aufsatzes • Auch auf Abschnitt 10. Optionale Teile und Zubehör anwendbar. F. Ersatzluftfilter (5)G. Netzteil G1. Netzanschluss G2. Netzkabel H. Tragetasche I. GebrauchsanweisungJ. Garantiekarte Verneblerset, Mundstück, Nasenstück, Adapter für Ki...
Page 82 - Anleitung zur Verwendung des Comp Air Elite; Vorbereitung des Verneblers für die Verwendung (Abschnitt 3)
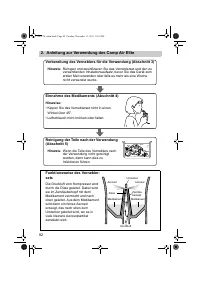
82 2. Anleitung zur Verwendung des Comp Air Elite Vorbereitung des Verneblers für die Verwendung (Abschnitt 3) Hinweis: Reinigen und desinfizieren Sie das Verneblerset und den zu verwendenden Inhalationsaufsatz, bevor Sie das Gerät zum ersten Mal verwenden oder falls es mehr als eine Woche nicht ver...
Page 83 - Gebrauchsanweisung; Vorbereitung des Verneblers für die Verwendung; Stecken Sie das Netzteil in eine Netzsteckdose.
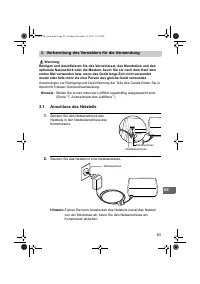
83 DE Gebrauchsanweisung 3. Vorbereitung des Verneblers für die Verwendung Warnung: Reinigen und desinfizieren Sie das Verneblerset, das Mundstück und das optionale Nasenstück oder die Masken, bevor Sie sie nach dem Kauf zum ersten Mal verwenden bzw. wenn das Gerät lange Zeit nicht verwendet wurde o...
Page 84 - Medikament hinzufügen und Zusammensetzen der Teile; Drehen Sie das Inhalationsoberteil gegen; Achtung: Die Kapazität des
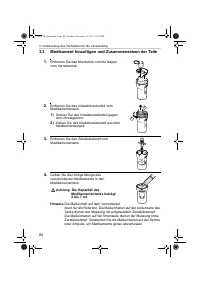
84 3. Vorbereitung des Verneblers für die Verwendung 3.2 Medikament hinzufügen und Zusammensetzen der Teile 1. Entfernen Sie das Mundstück und die Kappe vom Verneblerset. 2. Entfernen Sie das Inhalationsoberteil vom Medikamententank. 1) Drehen Sie das Inhalationsoberteil gegen den Uhrzeigersinn. 2) ...
Page 85 - Anbringen des Mundstücks
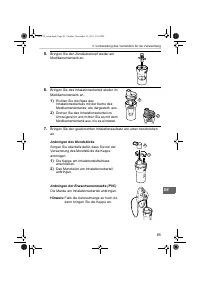
85 3. Vorbereitung des Verneblers für die Verwendung DE 5. Bringen Sie den Zerstäuberkopf wieder am Medikamententank an. 6. Bringen Sie das Inhalationsoberteil wieder im Medikamententank an. 1) Richten Sie die Nase des Inhalationsoberteils mit der Kerbe des Medikamententanks, wie dargestellt, aus. 2...
Page 86 - Die Maske am Inhalationsoberteil anbringen.
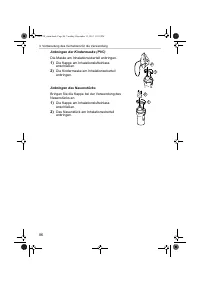
86 3. Vorbereitung des Verneblers für die Verwendung Anbringen der Kindermaske (PVC) Die Maske am Inhalationsoberteil anbringen. 1) Die Kappe am Inhalationslufteinlass anschließen. 2) Die Kindermaske am Inhalationsoberteil anbringen. Anbringen des Nasenstücks Bringen Sie die Kappe bei der Verwendung...
Page 88 - Einnahme des Medikaments; Kippen Sie das Verneblerset nicht; Beenden der Verneblung; Die Luftfilterabdeckung nicht blockieren.
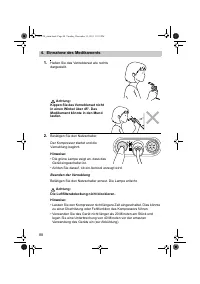
88 4. Einnahme des Medikaments 1. Halten Sie das Verneblerset wie rechts dargestellt. Achtung: Kippen Sie das Verneblerset nicht in einen Winkel über 45°. Das Medikament könnte in den Mund laufen. 2. Betätigen Sie den Netzschalter. Der Kompressor startet und die Verneblung beginnt. Hinweise: • Die g...
Page 89 - Verwendung des Mundstücks
89 4. Einnahme des Medikaments DE 3. Inhalieren Sie das Medikament gemäß den Anweisungen Ihres Arztes und/oder Ihres Gesundheitsberaters. Verwendung des Mundstücks Bereiten Sie das Mundstück gemäß Abschnitt 3.2.7. vor. Setzen Sie das Mundstück an Ihren Mund und inhalieren Sie das Medikament, wobei S...
Page 90 - ) Stellen Sie sicher, dass der Luftschlauch noch an der
90 4. Einnahme des Medikaments 4. Schalten Sie das Gerät nach Abschluss der Behandlung aus. Überprüfen Sie, dass im Luftschlauch kein Kondensat oder Feuchtigkeit ist und ziehen Sie den Netzstecker des Geräts aus der Steckdose. Warnung: Kondensat kann im Luftschlauch auftreten. Lagern Sie den Luftsch...
Page 91 - Pflege und Instandhaltung; Reinigung und tägliche Desinfektion; Beginnen Sie mit dem Betrieb erst dann, wenn die gereinigten Teile
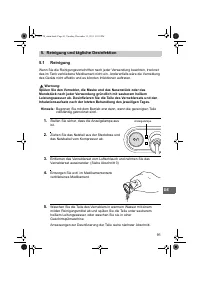
91 DE Pflege und Instandhaltung 5. Reinigung und tägliche Desinfektion 5.1 Reinigung Wenn Sie die Reinigungsvorschriften nach jeder Verwendung beachten, trocknet das im Tank verbliebene Medikament nicht ein. Anderenfalls wäre die Verneblung des Geräts nicht effektiv und es könnten Infektionen auftre...
Page 92 - Achtung: Der Kompressor ist nicht; Desinfizieren der Teile des Verneblers.
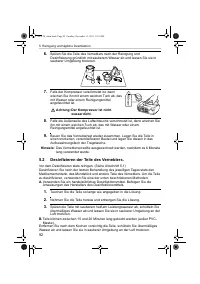
92 5. Reinigung und tägliche Desinfektion 6. Spülen Sie die Teile des Verneblers nach der Reinigung und Desinfizierung gründlich mit sauberem Wasser ab und lassen Sie sie in sauberer Umgebung trocknen. 7. Falls der Kompressor verschmutzt ist, dann wischen Sie ihn mit einem weichen Tuch ab, das mit W...
Page 93 - Handhabung des Zerstäuberkopfs
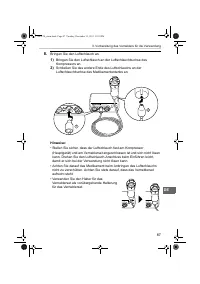
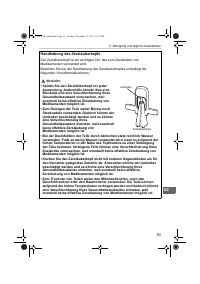
93 5. Reinigung und tägliche Desinfektion DE Handhabung des Zerstäuberkopfs Der Zerstäuberkopf ist ein wichtiges Teil, das zum Zerstäuben von Medikamenten verwendet wird.Beachten Sie bei der Handhabung des Zerstäuberkopfes unbedingt die folgenden Vorsichtsmaßnahmen: Vorsicht: • Spülen Sie den Zerstä...
Page 94 - Pflege und Lagerung; lassen, die ihre Zustimmung nicht ausdrücken können.; entsprechend den geltenden Vorschriften.; Benz
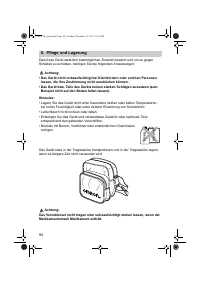
94 6. Pflege und Lagerung Damit das Gerät stets den bestmöglichen Zustand bewahrt und um es gegen Schäden zu schützen, befolgen Sie die folgenden Anweisungen: Achtung: • Das Gerät nicht unbeaufsichtigt bei Kleinkindern oder solchen Personen lassen, die ihre Zustimmung nicht ausdrücken können. • Das ...
Page 95 - Auswechseln des Luftfilters; Auswechseln des Luftfilters.
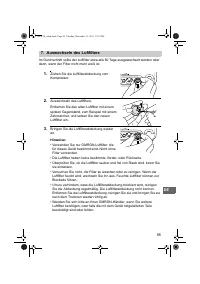
95 DE 7. Auswechseln des Luftfilters Im Durchschnitt sollte der Luftfilter etwa alle 60 Tage ausgewechselt werden oder dann, wenn der Filter nicht mehr weiß ist. 1. Ziehen Sie die Luftfilterabdeckung vom Kompressor. 2. Auswechseln des Luftfilters. Entfernen Sie den alten Luftfilter mit einem spitzen...
Page 98 - keit und Luftdruck bei
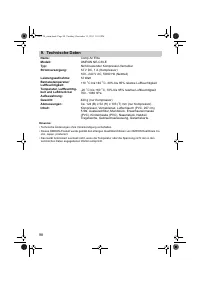
98 9. Technische Daten Hinweise: • Technische Änderungen ohne Vorankündigung vorbehalten.• Dieses OMRON-Produkt wurde gemäß den strengen Qualitätsrichtlinien von OMRON Healthcare Co. Ltd., Japan, produziert. • Das Gerät funktioniert eventuell nicht, wenn die Temperatur oder die Spannung nicht den in...
Page 99 - Technische Daten für den OMRON Comp Air Kompressor mit OMRON V.V.T.; • Die Leistung kann abhängig von den verwendeten Medikamenten wie; maximal 7 ml; Geeignete Medikamentenmenge:; minimal 2 ml - maximal 7 ml
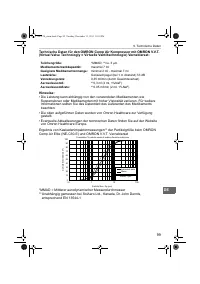
99 9. Technische Daten DE Technische Daten für den OMRON Comp Air Kompressor mit OMRON V.V.T. (Virtual Valve Technologiy = Virtuelle Ventiltechnologie) Verneblerset: Hinweise: • Die Leistung kann abhängig von den verwendeten Medikamenten wie Suspensionen oder Medikamenten mit hoher Viskosität variie...
Page 100 - Lesen Sie die Gebrauchsanweisung sorgfältig durch
100 9. Technische Daten Hinweise: • Verwenden Sie das Gerät nicht in einer Umgebung, in der es entflammbaren Gasen ausgesetzt ist. • Dieses Gerät entspricht den Bestimmungen der EG-Richtlinie 93/42/EWG (Richtlinie für medizinische Geräte) und der europäischen Norm EN13544-1:2007, Atemtherapiegeräte ...
Page 102 - Optionale Teile und Zubehör; Mundstück
102 10.Optionale Teile und Zubehör OMRON V.V.T. Verneblerset Bestell-Nr. 9956268-9 Luftschlauch (PVC, 207 cm) Bestell-Nr. 9956270-0 Mundstück Bestell-Nr. 9956273-5 Luftschlauch (Silikon, 100 cm) Bestell-Nr. 9956269-7 Nasenstück Bestell-Nr. 9956274-3 Kindermaskenset (SEBS) Bestell-Nr. 9956281-6 Erwac...
Page 103 - Optionale Teile und Zubehör
103 10. Optionale Teile und Zubehör DE Filterabdeckung Bestell-Nr. 9956638-2 Gebrauchsanweisung Bestell-Nr. 9956633-1 Tragetasche Bestell-Nr. 9956631-5 Batterieset Beinhaltet die wiederaufladbare Batterie und das Batterieladegerät.Bestell-Nr. 9986453-7 Wiederaufladbare Batterie Bestell-Nr. 9986457-0...
Page 104 - Batterie wird zum
104 11. Verwendung von Sonderzubehör 11.1 Verwendung der optionalen wiederaufladbaren Batterie Verwenden Sie die wiederaufladbare Batterie wie im Diagramm unten dargestellt. Weitere Einzelheiten siehe auf den nachfolgenden Seiten. Batterie wird zum ersten Mal verwendet. Batterie wurde längere Zeit n...
Page 105 - Verwendung von Sonderzubehör; Wichtige Hinweise zur Verwendung der optionalen
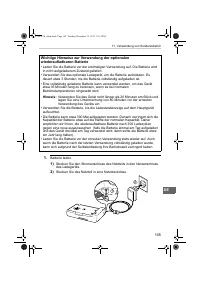
105 11. Verwendung von Sonderzubehör DE 1. Batterie laden. 1) Stecken Sie den Stromanschluss des Netzteils in den Netzanschluss des Ladegeräts. 2) Stecken Sie das Netzteil in eine Netzsteckdose. Wichtige Hinweise zur Verwendung der optionalen wiederaufladbaren Batterie • Laden Sie die Batterie vor d...
Page 107 - Niedriger Ladestand der Batterie; Ladestandanzeige aufleuchtet.; Falls die Batterie längere Zeit nicht eingesetzt wird
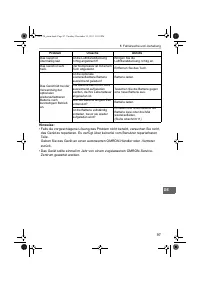
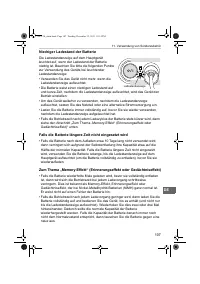
107 11. Verwendung von Sonderzubehör DE Niedriger Ladestand der Batterie Die Ladestandanzeige auf dem Hauptgerät leuchtet auf, wenn der Ladestand der Batterie niedrig ist. Beachten Sie bitte die folgenden Punkte zur Verwendung des Geräts bei leuchtender Ladestandanzeige:• Verwenden Sie das Gerät nic...
Page 108 - Hergestellt in China; NIEDERLANDE
108 11. Verwendung von Sonderzubehör Hergestellt in China Hersteller OMRON HEALTHCARE Co., Ltd. 53, Kunotsubo, Terado-cho, Muko, Kyoto, 617-0002 JAPAN EU-Repräsentant OMRON HEALTHCARE EUROPE B.V. Scorpius 33, 2132 LR Hoofddorp NIEDERLANDE www.omron-healthcare.com Herstellungswerk OMRON (DALIAN) CO.,...
Page 110 - Indice; Prima di usare l’unità
110 Prima di usare l’unità Indice Prima di usare l’unità Introduzione............................................................................................... 111Destinazione d’uso ................................................................................... 111Istruzioni importanti rela...
Page 112 - Istruzioni importanti relative alla sicurezza; esalazioni nocive o a sostanze volatili.
112 Istruzioni importanti relative alla sicurezza Prima di usare il dispositivo, leggere attentamente le informazioni contenute nel manuale di istruzioni e nella documentazione presente nella confezione. Quando si usa un’apparecchiatura elettrica, specie in presenza di bambini, è necessario adottare...
Page 113 - bambini o invalidi oppure in presenza di essi.
113 Istruzioni importanti relative alla sicurezza IT • Non usare l’unità principale, l’adattatore CA, la batteria ricaricabile opzionale o il caricabatterie opzionale se sono bagnati né collegare tali elementi a una presa elettrica o ad altri dispositivi con le mani bagnate. • Il compressore, l’adat...
Page 115 - Precauzioni generali di sicurezza:; utilizzarlo nuovamente.; Conservare queste istruzioni per farvi riferimento in futuro.
115 Istruzioni importanti relative alla sicurezza IT Precauzioni generali di sicurezza: • Ispezionare sempre il dispositivo e i suoi componenti prima di ogni utilizzo per verificare che non sussistano problemi. In particolare, avere cura di verificare quanto segue.- Assenza di eventuali danni al gru...
Page 116 - Componenti dell’unità; C. Componenti del nebulizzatore; Vista posteriore
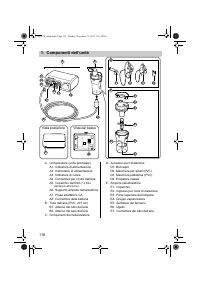
116 1. Componenti dell’unità A. Compressore (unità principale) A1. Indicatore di alimentazioneA2. Interruttore di alimentazioneA3. Indicatore di caricaA4. Connettore per il tubo dell’ariaA5. Coperchio del filtro (* il filtro dell’aria è all’interno) A6. Supporto ampolla nebulizzatriceA7. Presa adatt...
Page 117 - Accessori
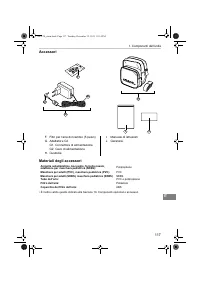
117 1. Componenti dell’unità IT Accessori Materiali degli accessori • È inoltre valido quanto indicato alla Sezione 10. Componenti opzionali e accessori. F. Filtri per l’aria di ricambio (5 pezzi)G. Adattatore CA G1. Connettore di alimentazione G2. Cavo di alimentazione H. Custodia I. Manuale di ist...
Page 118 - Guida all’uso dell’unità Comp Air Elite; Preparazione del nebulizzatore per l’utilizzo (Sezione 3); • Non inclinare l’ampolla nebulizzatrice a un
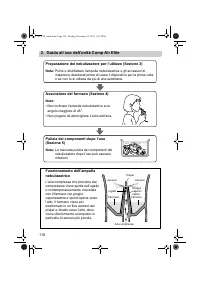
118 2. Guida all’uso dell’unità Comp Air Elite Preparazione del nebulizzatore per l’utilizzo (Sezione 3) Nota: Pulire e disinfettare l’ampolla nebulizzatrice e gli accessori di inalazione desiderati prima di usare il dispositivo per la prima volta o se non lo si utilizza da più di una settimana. Ass...
Page 119 - Istruzioni operative; Preparazione del nebulizzatore per l’uso; Inserire l’adattatore CA in una presa elettrica.
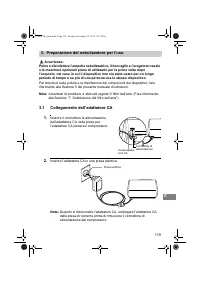
119 IT Istruzioni operative 3. Preparazione del nebulizzatore per l’uso Avvertenza: Pulire e disinfettare l’ampolla nebulizzatrice, il boccaglio e l’erogatore nasale o le maschere opzionali prima di utilizzarlo per la prima volta dopo l’acquisto, nel caso in cui il dispositivo non sia stato usato pe...
Page 120 - Introduzione del farmaco e montaggio dei componenti; Ruotare in senso antiorario la parte; Attenzione: La capacità del serbatoio del
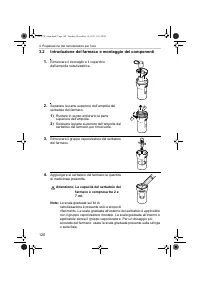
120 3. Preparazione del nebulizzatore per l’uso 3.2 Introduzione del farmaco e montaggio dei componenti 1. Rimuovere il boccaglio e il coperchio dall’ampolla nebulizzatrice. 2. Separare la parte superiore dell’ampolla dal serbatoio del farmaco. 1) Ruotare in senso antiorario la parte superiore dell’...
Page 121 - Collegamento del boccaglio
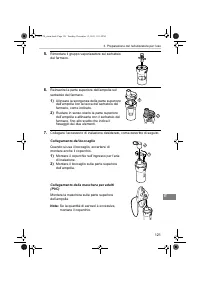
121 3. Preparazione del nebulizzatore per l’uso IT 5. Rimontare il gruppo vaporizzatore sul serbatoio del farmaco. 6. Reinserire la parte superiore dell’ampolla sul serbatoio del farmaco. 1) Allineare la sporgenza della parte superiore dell’ampolla con la tacca del serbatoio del farmaco, come indica...
Page 122 - Montaggio della maschera pediatrica (PVC)
122 3. Preparazione del nebulizzatore per l’uso Montaggio della maschera pediatrica (PVC) Montare la maschera sulla parte superiore dell’ampolla. 1) Montare il coperchio sull’ingresso per l’aria di inalazione. 2) Montare la maschera per bambini sulla parte superiore dell’ampolla. Collegamento dell’e...
Page 123 - Collegare il tubo dell’aria.
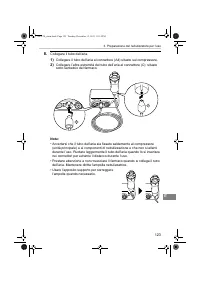
123 3. Preparazione del nebulizzatore per l’uso IT 8. Collegare il tubo dell’aria. 1) Collegare il tubo dell’aria al connettore (A4) situato sul compressore. 2) Collegare l’altra estremità del tubo dell’aria al connettore (C) situato sotto serbatoio del farmaco. Note: • Accertarsi che il tubo dell’a...
Page 124 - Assunzione del farmaco; • La spia verde indica che; Non bloccare il coperchio del filtro dell’aria.
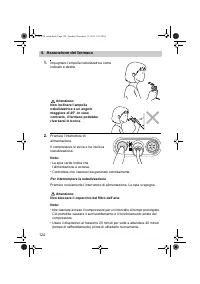
124 4. Assunzione del farmaco 1. Impugnare l’ampolla nebulizzatrice come indicato a destra. Attenzione: Non inclinare l’ampolla nebulizzatrice a un angolo maggiore di 45°. In caso contrario, il farmaco potrebbe riversarsi in bocca. 2. Premere l’interruttore di alimentazione. Il compressore si avvia ...
Page 125 - Uso del boccaglio
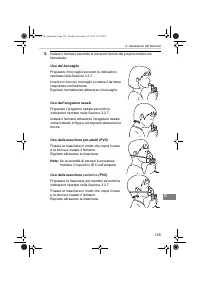
125 4. Assunzione del farmaco IT 3. Inalare il farmaco secondo le istruzioni fornite dal proprio medico e/o farmacista. Uso del boccaglio Preparare il boccaglio secondo le indicazioni riportate nella Sezione 3.2.7. Inserire in bocca il boccaglio e inalare il farmaco respirando normalmente. Espirare ...
Page 126 - posto sul compressore.
126 4. Assunzione del farmaco 4. Una volta completato il trattamento, spegnere l’alimentazione. Verificare che all’interno del tubo dell’aria non sia presente condensa o umidità, quindi scollegare il dispositivo dalla presa di alimentazione. Avvertenza: Nel tubo dell’aria potrebbe accumularsi conden...
Page 127 - Cura e manutenzione; Pulizia e disinfezione quotidiana
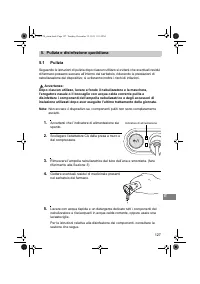
127 IT Cura e manutenzione 5. Pulizia e disinfezione quotidiana 5.1 Pulizia Seguendo le istruzioni di pulizia dopo ciascun utilizzo si eviterà che eventuali residui di farmaco possano seccare all’interno del serbatoio, riducendo le prestazioni di nebulizzazione del dispositivo; si eviteranno inoltre...
Page 128 - Attenzione: Il compressore non è; Disinfezione dei componenti del nebulizzatore; componenti, usare uno dei metodi descritti di seguito:
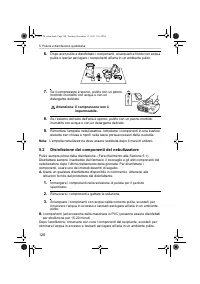
128 5. Pulizia e disinfezione quotidiana 6. Dopo aver pulito e disinfettato i componenti, sciacquarli a fondo con acqua pulita e lasciar asciugare i componenti all’aria in un ambiente pulito. 7. Se il compressore è sporco, pulirlo con un panno morbido inumidito con acqua o con un detergente delicato...
Page 129 - Precauzioni d’uso del gruppo vaporizzatore
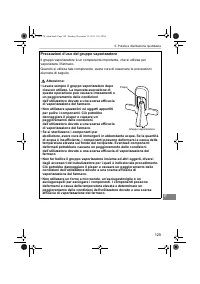
129 5. Pulizia e disinfezione quotidiana IT Precauzioni d’uso del gruppo vaporizzatore Il gruppo vaporizzatore è un componente importante, che si utilizza per vaporizzare il farmaco.Quando si utilizza tale componente, avere cura di osservare le precauzioni elencate di seguito. Attenzione: • Lavare s...
Page 130 - Manutenzione e conservazione; esempio di lasciarlo cadere sul pavimento.; secondo le normative locali.
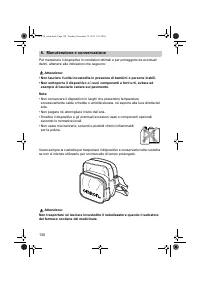
130 6. Manutenzione e conservazione Per mantenere il dispositivo in condizioni ottimali e per proteggerlo da eventuali danni, attenersi alle indicazioni che seguono: Attenzione: • Non lasciare l’unità incustodita in presenza di bambini o persone inabili.• Non sottoporre il dispositivo o i suoi compo...
Page 131 - Sostituzione del filtro dell’aria; Sostituire il filtro dell’aria.
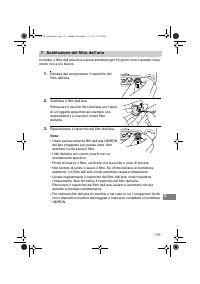
131 IT 7. Sostituzione del filtro dell’aria In media, il filtro dell’aria deve essere sostituito ogni 60 giorni circa o quando il suo colore non è più bianco. 1. Estrarre dal compressore il coperchio del filtro dell’aria. 2. Sostituire il filtro dell’aria. Rimuovere il vecchio filtro dell’aria con l...
Page 132 - Risoluzione dei problemi; Sintomo
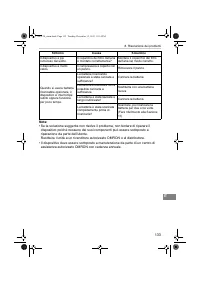
132 8. Risoluzione dei problemi Se l’unità dovesse presentare problemi durante il funzionamento, verificare quanto segue. È inoltre possibile fare riferimento al presente manuale per ottenere istruzioni dettagliate. Sintomo Causa Soluzione Premendo il pulsante di alimentazione non accade nulla (l’in...
Page 134 - pressione dell’aria di
134 9. Dati tecnici Note: • Soggetto a modifiche tecniche senza preavviso.• Questo prodotto OMRON è fabbricato in conformità alle severe norme di qualità di OMRON Healthcare Co. Ltd. (Giappone). • Il dispositivo potrebbe non funzionare in condizioni di temperatura e di tensione elettrica diverse da ...
Page 135 - massimo 7 ml; Quantità adeguata di farmaco:; minimo 2 – massimo 7 ml; Tasso di nebulizzazione:
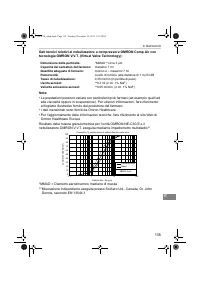
135 9. Dati tecnici IT Dati tecnici relativi al nebulizzatore a compressore OMRON Comp Air con tecnologia OMRON V.V.T. (Virtual Valve Technology): Note: • Le prestazioni possono variare con particolari tipi di farmaci (ad esempio quelli ad alta viscosità oppure in sospensione). Per ulteriori informa...
Page 136 - Leggere attentamente il manuale di istruzioni; funzionamento del dispositivo se la distanza è inferiore.
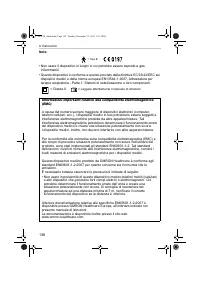
136 9. Dati tecnici Note: • Non usare il dispositivo in luoghi in cui potrebbe essere esposto a gas infiammabili. • Questo dispositivo è conforme a quanto previsto dalla direttiva EC 93/42/EEC sui dispositivi medici e dalla norma europea EN13544-1:2007, Attrezzatura per terapia respiratoria - Parte ...
Page 138 - Componenti opzionali e accessori; Set ampolla nebulizzatrice
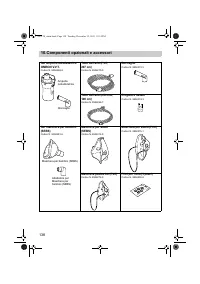
138 10.Componenti opzionali e accessori Set ampolla nebulizzatrice OMRON V.V.T. Codice N. 9956268-9 Tubo dell’aria (PVC, 207 cm) Codice N. 9956270-0 Boccaglio Codice N. 9956273-5 Tubo dell’aria (silicone, 100 cm) Codice N. 9956269-7 Erogatore nasale Codice N. 9956274-3 Set maschera per bambini (SEBS...
Page 139 - Componenti opzionali e accessori
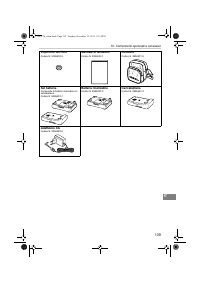
139 10. Componenti opzionali e accessori IT Coperchio del filtro Codice N. 9956638-2 Manuale di istruzioni Codice N. 9956633-1 Custodia Codice N. 9956631-5 Set batteria Comprende la batteria ricaricabile e il caricabatterie.Codice N. 9986453-7 Batteria ricaricabile Codice N. 9986457-0 Caricabatterie...
Page 140 - Uso della batteria per
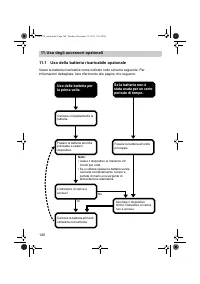
140 11. Uso degli accessori opzionali 11.1 Uso della batteria ricaricabile opzionale Usare la batteria ricaricabile come indicato nello schema seguente. Per informazioni dettagliate, fare riferimento alle pagine che seguono. Uso della batteria per la prima volta. Se la batteria non è stata usata per...
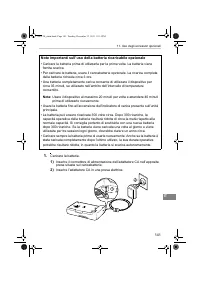
Page 141 - Uso degli accessori opzionali; Caricare la batteria.; Note importanti sull’uso della batteria ricaricabile opzionale; della batteria richiede circa 3 ore.
141 11. Uso degli accessori opzionali IT 1. Caricare la batteria. 1) Inserire il connettore di alimentazione dell’adattatore CA nell’apposita presa situata sul caricabatterie. 2) Inserire l’adattatore CA in una presa elettrica. Note importanti sull’uso della batteria ricaricabile opzionale • Caricar...
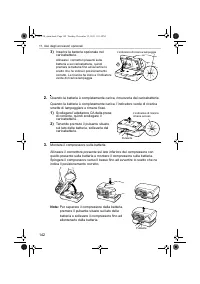
Page 143 - Se la carica residua della batteria è insufficiente; interrompere l’utilizzo del dispositivo.; L’effetto memoria
143 11. Uso degli accessori opzionali IT Se la carica residua della batteria è insufficiente Se la carica residua della batteria è insufficiente, l’indicatore di carica presente sull’unità principale si illumina. Per l’uso del dispositivo dopo l’accensione dell’indicatore di carica, tenere presente ...
Page 144 - Prodotto in Cina; PAESI BASSI
144 11. Uso degli accessori opzionali Prodotto in Cina Produttore OMRON HEALTHCARE Co., Ltd. 53, Kunotsubo, Terado-cho, Muko, Kyoto, 617-0002 GIAPPONE Rappresentante per l’UE OMRON HEALTHCARE EUROPE B.V. Scorpius 33, 2132 LR Hoofddorp PAESI BASSI www.omron-healthcare.com Stabilimento di produzione O...
Page 146 - Contenido; Antes de utilizar la unidad
146 Antes de utilizar la unidad Contenido Antes de utilizar la unidad Introducción .............................................................................................. 147Uso al que está destinado este producto ............................................... 147Instrucciones importantes so...
Page 148 - Instrucciones importantes sobre la seguridad; su médico o especialista en aparato respiratorio.
148 Instrucciones importantes sobre la seguridad Lea toda la información contenida en el manual de instrucciones y cualquier otra documentación que se incluya en la caja antes de utilizar el dispositivo. Al utilizar un producto eléctrico y, en especial, cuando haya niños delante, deben mantenerse un...
Page 151 - Precauciones de seguridad generales:; minutos antes de utilizar de nuevo el dispositivo.; Guarde estas instrucciones para consultarlas en el futuro.
151 Instrucciones importantes sobre la seguridad ES Precauciones de seguridad generales: • Examine el dispositivo y los componentes antes de cada uso, y compruebe que no haya problemas. En particular, asegúrese de comprobar lo siguiente:- Que el cabezal del vaporizador, la cánula o el tubo de aire n...
Page 152 - Vista posterior
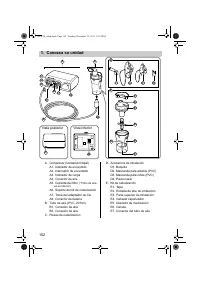
152 1. Conozca su unidad A. Compresor (Unidad principal) A1. Indicador de encendidoA2. Interruptor de encendidoA3. Indicador de cargaA4. Conector de aireA5. Cubierta del filtro (* Filtro de aire en su interior). A6. Soporte del kit de nebulizaciónA7. Toma del adaptador de CAA8. Conector de batería B...
Page 153 - H. Bolsa de transporte
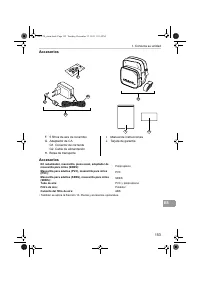
153 1. Conozca su unidad ES Accesorios Accesorios • También se aplica la Sección 10. Piezas y accesorios opcionales. F. 5 filtros de aire de recambioG. Adaptador de CA G1. Conector de corriente G2. Cable de alimentación H. Bolsa de transporte I. Manual de instruccionesJ. Tarjeta de garantía Kit nebu...
Page 154 - Guía para la utilización de Comp Air Elite; Preparación del nebulizador para su uso (Sección 3); • No incline el kit de nebulización con un
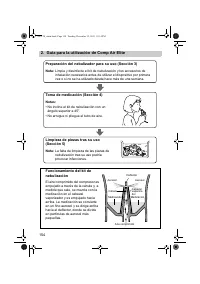
154 2. Guía para la utilización de Comp Air Elite Preparación del nebulizador para su uso (Sección 3) Nota: Limpie y desinfecte el kit de nebulización y los accesorios de inhalación necesarios antes de utilizar el dispositivo por primera vez o si no se ha utilizado desde hace más de una semana. Toma...
Page 155 - Instrucciones de funcionamiento; Preparación del nebulizador para su uso; Enchufe el adaptador de CA en una toma de corriente.
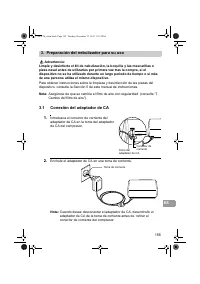
155 ES Instrucciones de funcionamiento 3. Preparación del nebulizador para su uso Advertencia: Limpie y desinfecte el kit de nebulización, la boquilla y las mascarillas o pieza nasal antes de utilizarlas por primera vez tras la compra, si el dispositivo no se ha utilizado durante un largo período de...
Page 156 - Suministro de la medicación y montaje de las piezas; Gire la parte superior de inhalación en el; Precaución: La capacidad del depósito
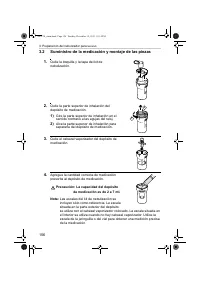
156 3. Preparación del nebulizador para su uso 3.2 Suministro de la medicación y montaje de las piezas 1. Quite la boquilla y la tapa del kit de nebulización. 2. Quite la parte superior de inhalación del depósito de medicación. 1) Gire la parte superior de inhalación en el sentido contrario a las ag...
Page 157 - Colocación de la boquilla
157 3. Preparación del nebulizador para su uso ES 5. Vuelva a colocar el cabezal vaporizador en el depósito de medicación. 6. Coloque de nuevo la parte superior de inhalación en el depósito de medicación. 1) Alinee la protuberancia de la parte superior de inhalación con la muesca del depósito de med...
Page 158 - Colocación de la pieza nasal
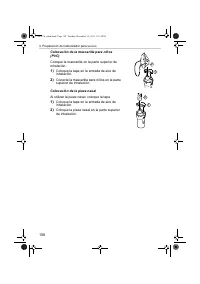
158 3. Preparación del nebulizador para su uso Colocación de la mascarilla para niños (PVC) Coloque la mascarilla en la parte superior de inhalación. 1) Coloque la tapa en la entrada de aire de inhalación. 2) Conecte la mascarilla para niños en la parte superior de inhalación. Colocación de la pieza...
Page 160 - Toma de medicación; Pulse el interruptor de encendido.; No bloquee la cubierta del filtro de aire.; • No mantenga el compresor encendido durante un largo período de
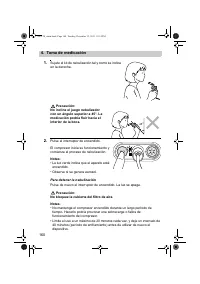
160 4. Toma de medicación 1. Sujete el kit de nebulización tal y como se indica en la derecha. Precaución: No incline el juego nebulizador con un ángulo superior a 45°. La medicación podría fluir hacia el interior de la boca. 2. Pulse el interruptor de encendido. El compresor inicia su funcionamient...
Page 161 - Utilización de la boquilla
161 4. Toma de medicación ES 3. Inhale la medicación según las instrucciones de su médico o enfermero. Utilización de la boquilla Prepare la boquilla de acuerdo con la Sección 3.2.7. Introduzca la boquilla en su boca e inhale la medicación respirando con normalidad. Exhale con normalidad a través de...
Page 162 - de aire del compresor.
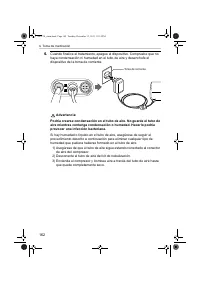
162 4. Toma de medicación 4. Cuando finalice el tratamiento, apague el dispositivo. Compruebe que no haya condensación ni humedad en el tubo de aire y desenchufe el dispositivo de la toma de corriente. Advertencia: Podría crearse condensación en el tubo de aire. No guarde el tubo de aire mientras co...
Page 163 - Cuidado y mantenimiento; Limpieza y desinfección diaria
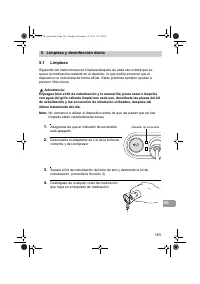
163 ES Cuidado y mantenimiento 5. Limpieza y desinfección diaria 5.1 Limpieza Siguiendo las instrucciones de limpieza después de cada uso evitará que se seque la medicación restante en el depósito, lo que podría provocar que el dispositivo no nebulizara de forma eficaz. Estas prácticas también ayuda...
Page 164 - Atención: el compresor no es resistente; Desinfección de las piezas nebulizadoras
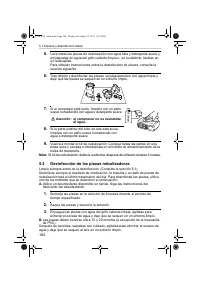
164 5. Limpieza y desinfección diaria 5. Lave todas las piezas de nebulización con agua tibia y detergente suave y enjuáguelas en agua del grifo caliente limpia o, en su defecto, lávelas en un lavavajillas.Para obtener instrucciones sobre la desinfección de piezas, consulte la sección siguiente. 6. ...
Page 165 - Manejo del cabezal vaporizador
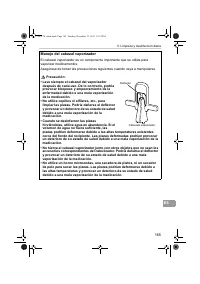
165 5. Limpieza y desinfección diaria ES Manejo del cabezal vaporizador El cabezal vaporizador es un componente importante que se utiliza para vaporizar medicamentos.Asegúrese de tomar las precauciones siguientes cuando vaya a manipularse. Precaución: • Lave siempre el cabezal del vaporizador despué...
Page 166 - Mantenimiento y conservación; puedan expresar su consentimiento.; humedad elevada o bajo la luz del sol directa.; Benceno
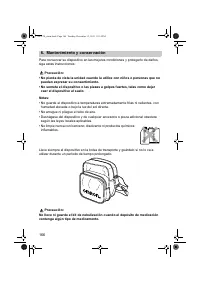
166 6. Mantenimiento y conservación Para conservar su dispositivo en las mejores condiciones y protegerlo de daños, siga estas instrucciones: Precaución: • No pierda de vista la unidad cuando la utilice con niños o personas que no puedan expresar su consentimiento. • No someta el dispositivo o las p...
Page 167 - Cambio del filtro de aire
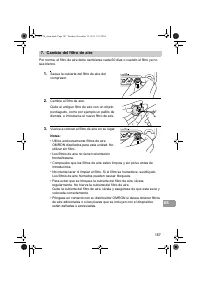
167 ES 7. Cambio del filtro de aire Por norma, el filtro de aire debe cambiarse cada 60 días o cuando el filtro ya no sea blanco. 1. Saque la cubierta del filtro de aire del compresor. 2. Cambie el filtro de aire. Quite el antiguo filtro de aire con un objeto puntiagudo, como por ejemplo un palillo ...
Page 168 - Solución de problemas; Síntoma
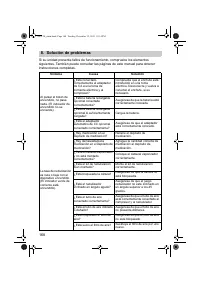
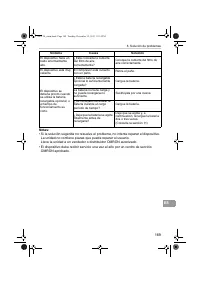
168 8. Solución de problemas Si su unidad presenta fallos de funcionamiento, compruebe los elementos siguientes. También puede consultar las páginas de este manual para obtener instrucciones completas. Síntoma Causa Solución Al pulsar el botón de encendido, no pasa nada. (El indicador de encendido n...
Page 170 - Fuente de alimentación:
170 9. Datos técnicos Notas: • Especificaciones sujetas a modificaciones técnicas sin previo aviso.• Este producto OMRON ha sido producido siguiendo los estrictos estándares de calidad de OMRON Healthcare Co. Ltd., Japón. • Puede que el dispositivo no funcione si las condiciones de temperatura y vol...
Page 171 - ml máximo; Cantidades de medicación correctas:; ml mínimo - 7 ml máximo; Velocidad de nebulización:
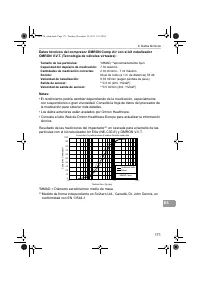
171 9. Datos técnicos ES Datos técnicos del compresor OMRON Comp Air con el kit nebulizador OMRON V.V.T. (Tecnología de válvulas virtuales): Notas: • El rendimiento podría cambiar dependiendo de la medicación, especialmente con suspensiones o gran viscosidad. Consulte la hoja de datos del proveedor ...
Page 172 - Lea el manual de instrucciones atentamente; Con el objeto de regular los requisitos para EMC (Compatibilidad
172 9. Datos técnicos Notas: • No utilice el dispositivo donde pudiera verse expuesto a gas inflamable.• Esta unidad cumple con las disposiciones de la directiva 93/42/EEC de la CE (Directiva sobre dispositivos médicos) y la Norma europea EN13544-1:2007, Equipos de terapia respiratoria - Parte 1: Si...
Page 174 - Piezas y accesorios opcionales
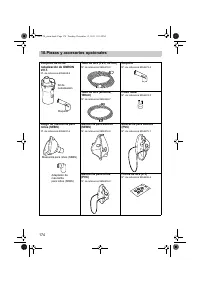
174 10.Piezas y accesorios opcionales Conjunto de kit de nebulización de OMRON V.V.T. Nº. de referencia 9956268-9 Tubo de aire (PVC, 207cm) Nº. de referencia 9956270-0 Boquilla Nº. de referencia 9956273-5 Tubo de aire (silicona, 100cm) Nº. de referencia 9956269-7 Pieza nasal Nº. de referencia 995627...
Page 175 - Piezas y accesorios opcionales
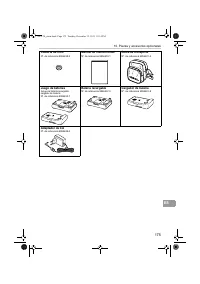
175 10. Piezas y accesorios opcionales ES Cubierta de filtro Nº. de referencia 9956638-2 Manual de instrucciones Nº. de referencia 9956633-1 Bolsa de transporte Nº. de referencia 9956631-5 Juego de baterías Incluye la batería recargable, cargador de batería.Nº. de referencia 9986453-7 Batería recarg...
Page 176 - Uso de la batería por
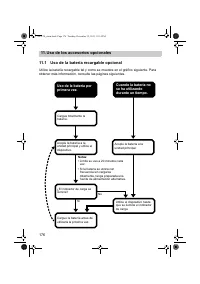
176 11. Uso de los accesorios opcionales 11.1 Uso de la batería recargable opcional Utilice la batería recargable tal y como se muestra en el gráfico siguiente. Para obtener más información, consulte las páginas siguientes. Uso de la batería por primera vez. Cuando la batería no se ha utilizando dur...
Page 177 - Uso de los accesorios opcionales; adaptador de CA del cargador.; Notas importantes sobre el uso de la batería recargable opcional; cargada en el momento del transporte.
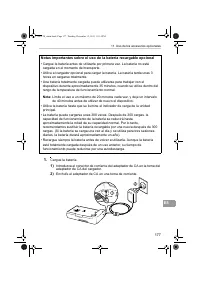
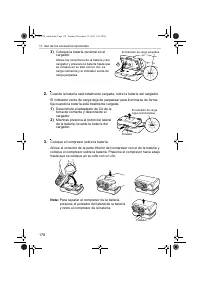
177 11. Uso de los accesorios opcionales ES 1. Cargue la batería. 1) Introduzca el conector de corriente del adaptador de CA en la toma del adaptador de CA del cargador. 2) Enchufe el adaptador de CA en una toma de corriente. Notas importantes sobre el uso de la batería recargable opcional • Cargue ...
Page 179 - Cuando la batería tenga poca carga; • La batería tiene poca carga y el dispositivo deja; Si no se utiliza la batería durante un largo período de tiempo
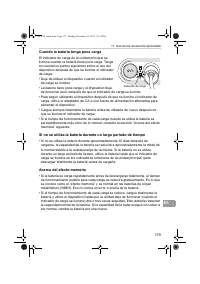
179 11. Uso de los accesorios opcionales ES Cuando la batería tenga poca carga El indicador de carga de la unidad principal se ilumina cuando la batería tiene poca carga. Tenga en cuenta los puntos siguientes sobre el uso del dispositivo después de que se ilumine el indicador de carga:• Deje de util...
Page 180 - Fabricado en China; PAÍSES BAJOS
180 11. Uso de los accesorios opcionales Fabricado en China Fabricante OMRON HEALTHCARE Co., Ltd. 53, Kunotsubo, Terado-cho, Muko, Kyoto, 617-0002 JAPÓN Representante en la UE OMRON HEALTHCARE EUROPE B.V. Scorpius 33, 2132 LR Hoofddorp PAÍSES BAJOS www.omron-healthcare.com Planta de producción OMRON...
Page 182 - Voordat u het apparaat gaat; Inhoud; Voordat u het apparaat gaat gebruiken
182 Voordat u het apparaat gaat Inhoud Voordat u het apparaat gaat gebruiken Inleiding ..................................................................................................... 183Gebruiksdoel ............................................................................................. 1...
Page 184 - Belangrijke aanwijzingen met betrekking tot de veiligheid
184 Belangrijke aanwijzingen met betrekking tot de veiligheid Lees voordat u het apparaat gaat gebruiken alle informatie die in de gebruiksaanwijzing staat en alle andere documenten die in de doos zijn meegeleverd. Wanneer u een elektrisch apparaat gebruikt, zeker wanneer dat in aanwezigheid van kin...
Page 187 - Algemene veiligheidsmaatregelen:; voordat u het apparaat weer gebruikt.; Bewaar deze aanwijzingen,
187 Belangrijke aanwijzingen met betrekking tot de veiligheid NL Algemene veiligheidsmaatregelen: • Inspecteer elke keer vóór gebruik het apparaat en de onderdelen en controleer of er geen problemen zijn. Zorg in elk geval dat u de volgende punten controleert:- De verstuiver, de luchtstraal opening ...
Page 188 - Achteraanzicht
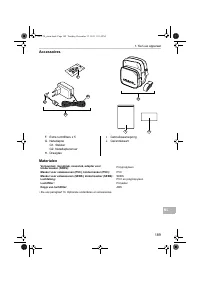
188 1. Ken uw apparaat A. Compressor (Hoofdapparaat) A1. SpanningsindicatorA2. Aan/uit schakelaarA3. OplaadindicatorA4. Aansluiting luchtA5. Filterhouder (* bevat luchtfilter.) A6. Houder vernevelaarsetA7. NetadapterbusA8. Accu-aansluiting B. Luchtslang (PVC, 207cm) B1. Aansluiting luchtslangB2. Aan...
Page 190 - Hoe gebruikt u de Comp Air Elite; De vernevelaar voorbereiden voor gebruik (Hoofdstuk 3); Hoe werkt de vernevelaarset
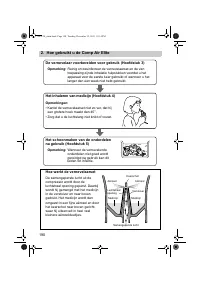
190 2. Hoe gebruikt u de Comp Air Elite De vernevelaar voorbereiden voor gebruik (Hoofdstuk 3) Opmerking: Reinig en desinfecteer de vernevelaarset en de van toepassing zijnde inhalatie hulpstukken voordat u het apparaat voor de eerste keer gebruikt of wanneer u het langer dan een week niet hebt gebr...
Page 191 - Gebruiksaanwijzingen; De vernevelaar voorbereiden voor gebruik
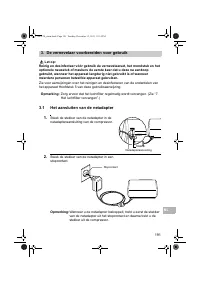
191 NL Gebruiksaanwijzingen 3. De vernevelaar voorbereiden voor gebruik Let op: Reinig en desinfecteer vóór gebruik de vernevelaarset, het mondstuk en het optionele neusstuk of maskers de eerste keer dat u deze na aankoop gebruikt, wanneer het apparaat langdurig niet gebruikt is of wanneer meerdere ...
Page 192 - Medicijn toevoegen en de onderdelen monteren; Draai de vernevelkap linksom.; Pas op: De capaciteit van het
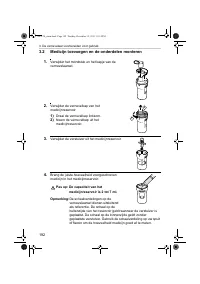
192 3. De vernevelaar voorbereiden voor gebruik 3.2 Medicijn toevoegen en de onderdelen monteren 1. Verwijder het mondstuk en het kapje van de vernevelaarset. 2. Verwijder de vernevelkap van het medicijnreservoir. 1) Draai de vernevelkap linksom. 2) Neem de vernevelkap uit het medicijnreservoir. 3. ...
Page 193 - Bevestigen van het mondstuk
193 3. De vernevelaar voorbereiden voor gebruik NL 5. Plaats de verstuiver weer in het medicijnreservoir. 6. Plaats de vernevelkap terug in het medicijnreservoir. 1) Breng de ribbel op de vernevelkap en de inkeping in het medicijnreservoir op één lijn, volgens de tekening. 2) Draai de vernevelkap re...
Page 194 - Bevestig het masker aan de vernevelkap.
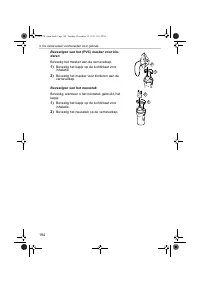
194 3. De vernevelaar voorbereiden voor gebruik Bevestigen van het (PVC) masker voor kin-deren Bevestig het masker aan de vernevelkap. 1) Bevestig het kapje op de luchtinlaat voor inhalatie. 2) Bevestig het masker voor kinderen aan de vernevelkap. Bevestigen van het neusstuk Bevestig, wanneer u het ...
Page 196 - Medicijnen inhaleren; • Het groene lampje laat zien dat het; Maak de houder van het luchtfilter niet dicht.; oververhit raken of slecht gaan werken.
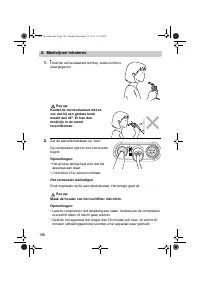
196 4. Medicijnen inhaleren 1. Houd de vernevelaarset rechtop, zoals rechts is weergegeven. Pas op: Kantel de vernevelaarset niet zo ver, dat hij een grotere hoek maakt dan 45°. Er kan dan medicijn in de mond terechtkomen. 2. Zet de aan/uitschakelaar op “Aan”. De compressor start en het vernevelen b...
Page 197 - Gebruik van het mondstuk
197 4. Medicijnen inhaleren NL 3. Inhaleer het medicijn volgens de aanwijzingen die u van uw arts en/of verpleegkundige heeft gekregen. Gebruik van het mondstuk Bereid het mondstuk voor zoals beschreven in paragraaf 3.2.7. Breng het mondstuk in uw mond en inhaleer het medicijn terwijl u normaal blij...
Page 199 - Verzorging en onderhoud; Reinigen en dagelijks desinfecteren; Zorg dat de spanningsindicator uit is.
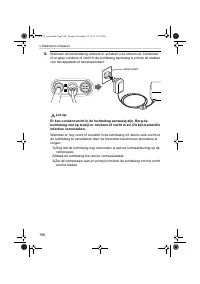
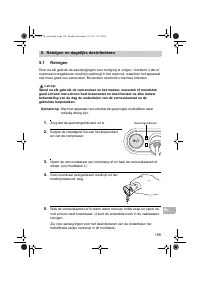
199 NL Verzorging en onderhoud 5. Reinigen en dagelijks desinfecteren 5.1 Reinigen Door na elk gebruik de aanwijzigingen voor reiniging te volgen, voorkomt u dat er eventueel overgebleven medicijn opdroogt in het reservoir, waardoor het apparaat niet meer goed zou vernevelen. Bovendien voorkomt u hi...
Page 200 - Pas op: De compressor is niet; Het desinfecteren van de vernevelaarset
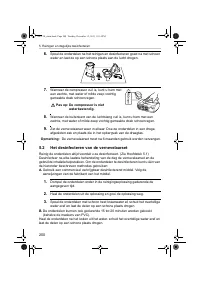
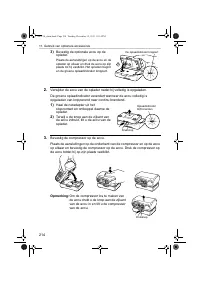
200 5. Reinigen en dagelijks desinfecteren 6. Spoel de onderdelen na het reinigen en desinfecteren goed na met schoon water en laat ze op een schone plaats aan de lucht drogen. 7. Wanneer de compressor vuil is, kunt u hem met een zachte, met water of milde zeep vochtig gemaakte doek schoonvegen. Pas...
Page 201 - Het hanteren van de verstuiver
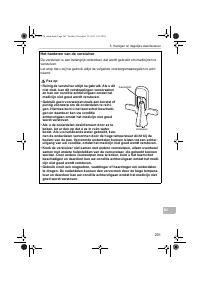
201 5. Reinigen en dagelijks desinfecteren NL Het hanteren van de verstuiver De verstuiver is een belangrijk onderdeel, dat wordt gebruikt om medicijnen te verstuiven.Let erop dat u bij het gebruik altijd de volgende voorzorgsmaatregelen in acht neemt. Pas op: • Reinig de verstuiver altijd na gebrui...
Page 202 - Onderhoud en opbergen; personen die niet in staat zijn hun instemming uit te drukken.; volgens de toepasselijke plaatselijke voorschriften.; Benzeen
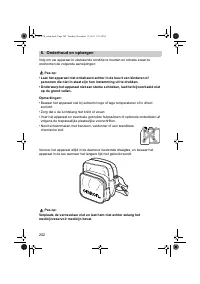
202 6. Onderhoud en opbergen Volg om uw apparaat in uitstekende conditie te houden en schade eraan te voorkomen de volgende aanwijzingen: Pas op: • Laat het apparaat niet onbeheerd achter in de buurt van kinderen of personen die niet in staat zijn hun instemming uit te drukken. • Onderwerp het appar...
Page 203 - Het luchtfilter vervangen; Vervang het luchtfilter.
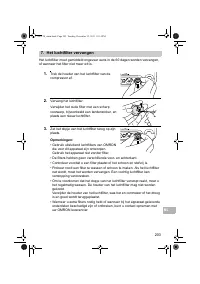
203 NL 7. Het luchtfilter vervangen Het luchtfilter moet gemiddeld ongeveer eens in de 60 dagen worden vervangen, of wanneer het filter niet meer wit is. 1. Trek de houder van het luchtfilter van de compressor af. 2. Vervang het luchtfilter. Verwijder het oude filter met een scherp voorwerp, bijvoor...
Page 204 - Problemen oplossen; Symptoom
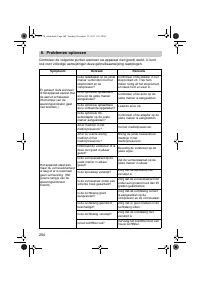
204 8. Problemen oplossen Controleer de volgende punten wanneer uw apparaat niet (goed) werkt. U kunt ook voor volledige aanwijzingen deze gebruiksaanwijzing raadplegen. Symptoom Oorzaak Remedie Er gebeurt niets wanneer ik het apparaat aanzet met de aan/uit schakelaar. (Het lampje van de spanningsin...
Page 206 - Technische gegevens
206 9. Technische gegevens Opmerkingen: • Onderworpen aan technische aanpassingen zonder kennisgeving vooraf.• Dit OMRON-product is geproduceerd volgens de strenge kwaliteitseisen van OMRON Healthcare Co. Ltd., Japan. • Het apparaat werkt mogelijk niet wanneer de temperatuur en het voltage niet over...
Page 207 - technische informatie.; maximaal 7 ml; Geschikte medicijnvolumes:; minimaal 2 ml - maximaal 7 ml; Vernevelingssnelheid:
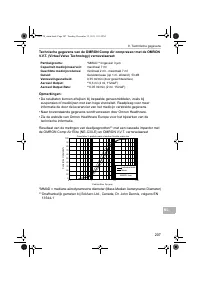
207 9. Technische gegevens NL Technische gegevens van de OMRON Comp Air compressor met de OMRON V.V.T. (Virtual Valve Technology) vernevelaarset: Opmerkingen: • De resultaten kunnen afwijken bij bepaalde geneesmiddelen, zoals bij suspensies of medicijnen met een hoge viscositeit. Raadpleeg voor meer...
Page 208 - Meer documentatie met betrekking tot de overeenstemming met
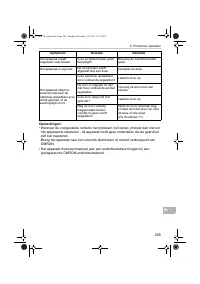
208 9. Technische gegevens Opmerkingen: • Gebruik het apparaat niet op plaatsen waar het in contact kan komen met brandbaar gas. • Dit apparaat voldoet aan de eisen van de EG-richtlijn 93/42/EEG (Richtlijn medische apparatuur) en aan de Europese norm EN13544-1:2007, Apparatuur voor ademhalingstherap...
Page 209 - Correcte verwijdering van dit product
209 9. Technische gegevens NL Correcte verwijdering van dit product (elektrische & elektronische afvalapparatuur) Dit merkteken op het product of het bijbehorende informatiemateriaal duidt erop dat het niet met ander huishoudelijk afval verwijderd moet worden aan het einde van zijn gebruikdsduur...
Page 210 - Optionele onderdelen en accessoires
210 10.Optionele onderdelen en accessoires OMRON V.V.T. Vernevelaarset Bestelnr. 9956268-9 Luchtslang (PVC, 207cm) Bestelnr. 9956270-0 Mondstuk Bestelnr. 9956273-5 Luchtslang (Siliconen, 100cm) Bestelnr. 9956269-7 Neusstuk Bestelnr. 9956274-3 Maskerset voor kinderen (SEBS) Bestelnr. 9956281-6 Masker...
Page 211 - Optionele onderdelen en accessoires
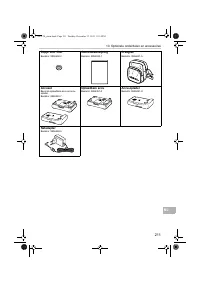
211 10. Optionele onderdelen en accessoires NL Dopje voor filter Bestelnr. 9956638-2 Gebruiksaanwijzing Bestelnr. 9956633-1 Draagtas Bestelnr. 9956631-5 Accuset Bevat de oplaadbare accu en accu- oplader.Bestelnr. 9986453-7 Oplaadbare accu Bestelnr. 9986457-0 Accu-oplader Bestelnr. 9986461-8 Netadapt...
Page 212 - De accu voor de eerste
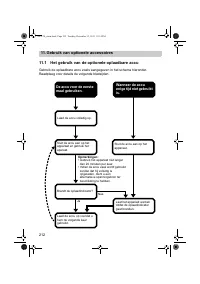
212 11. Gebruik van optionele accessoires 11.1 Het gebruik van de optionele oplaadbare accu Gebruik de oplaadbare accu zoals aangegeven in het schema hieronder. Raadpleeg voor details de volgende bladzijden. De accu voor de eerste maal gebruiken. Wanneer de accu enige tijd niet gebruikt is. Laad de ...
Page 213 - Gebruik van optionele accessoires; Steek de netadapter in een stopcontact.
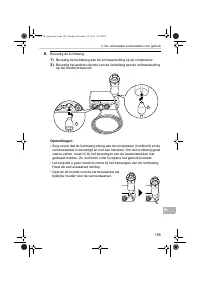
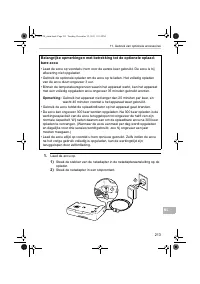
213 11. Gebruik van optionele accessoires NL 1. Laad de accu op. 1) Steek de stekker van de netadapter in de netadapteraansluiting op de oplader. 2) Steek de netadapter in een stopcontact. Belangrijke opmerkingen met betrekking tot de optionele oplaad-bare accu • Laad de accu op voordat u hem voor d...
Page 215 - Wanneer de accuspanning te laag is; oplaadindicator aan gaat.; Indien de accu langere tijd niet wordt gebruikt
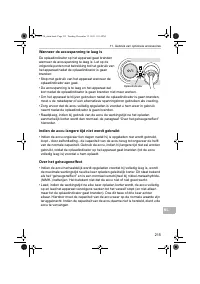
215 11. Gebruik van optionele accessoires NL Wanneer de accuspanning te laag is De oplaadindicator op het apparaat gaat branden wanneer de accuspanning te laag is. Let op de volgende punten met betrekking tot het gebruik van het apparaat nadat de oplaadindicator is gaan branden:• Stop met gebruik va...
Page 216 - Geproduceerd in China; NEDERLAND
216 11. Gebruik van optionele accessoires Geproduceerd in China Fabrikant OMRON HEALTHCARE Co., Ltd. 53, Kunotsubo, Terado-cho, Muko, Kyoto 617-0002 JAPAN Vertegenwoordiging in de EU OMRON HEALTHCARE EUROPE B.V. Scorpius 33, 2132 LR Hoofddorp NEDERLAND www.omron-healthcare.com Productiefaciliteit OM...
Page 218 - Содержание
218 До использования устройства Содержание До использования устройства Введение ................................................................................................... 219 Назначение ............................................................................................... 219 Инстр...
Page 219 - Введение; Назначение
219 RU Введение Благодарим за приобретение продукта Comp Air Elite компании OMRON. Данное устройство было разработано в сотрудничестве с пульмонологами в целях повышения эффективности лечения астмы , хронического бронхита , а также респираторных заболеваний аллергической и прочей этиологии . Компрес...
Page 220 - Предупреждение; Использование
220 Инструкция по технике безопасности До начала использования данного устройства , прочтите до конца руководство по эксплуатации и всю прочую документацию , вложенную в упаковку устройства . При использовании электроприбора , особенно в присутствии детей , надлежит всегда соблюдать основные правила...
Page 221 - OMRON; Внимание
221 Инструкция по технике безопасности RU • Не используйте основной блок , адаптер переменного тока , дополнительную аккумуляторную батарею и зарядное устройство , если они влажные , и не подсоединяйте их к электрической розетке или другим приборам мокрыми руками . • Компрессор , адаптер переменного...
Page 222 - Опасность
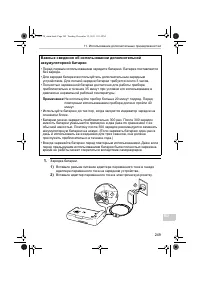
222 Инструкция по технике безопасности • Не наливайте в резервуар для лекарственных средств более 7 мл лекарства . • Не переносите и не оставляйте небулайзер без присмотра , пока в резервуаре для лекарственных средств содержится лекарство . • Не оставляйте прибор без внимания в присутствии детей или...
Page 223 - Основные
223 Инструкция по технике безопасности RU Основные меры предосторожности • Осматривайте прибор и его детали перед каждым использованием и проверяйте , все ли в порядке . В частности , обязательно убедитесь в следующем : - Что отбойник , сопло или воздуховодная трубка не повреждены . - Что сопло не з...
Page 224 - Вид
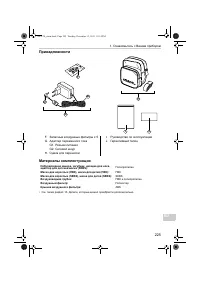
224 1. Ознакомьтесь с Вашим прибором A. Компрессор ( основной блок ) A1. Индикатор питания A2. Выключатель A3. Индикатор заряда A4. Разъем для воздушной трубки A5. Крышка фильтра (* внутри находится воздушный фильтр ) A6. Держатель небулайзерной камеры A7. Гнездо адаптера переменного тока A8. Разъем...
Page 226 - Примечание
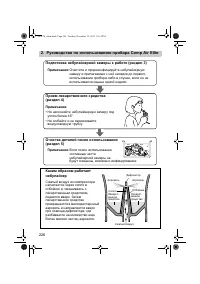
226 2. Руководство по использованию прибора Comp Air Elite Подготовка небулайзерной камеры к работе ( раздел 3) Примечание : Очистите и продезинфицируйте небулайзерную камеру и прилагаемые к ней насадки до первого использования прибора либо в случае , если он не использовался свыше одной недели . Пр...
Page 228 - Добавление
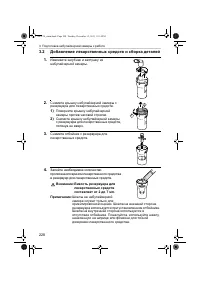
228 3. Подготовка небулайзерной камеры к работе 3.2 Добавление лекарственных средств и сборка деталей 1. Извлеките загубник и заглушку из небулайзерной камеры . 2. Снимите крышку небулайзерной камеры с резервуара для лекарственных средств . 1) Поверните крышку небулайзерной камеры против часовой стр...
Page 231 - Примечания
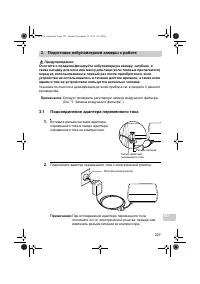
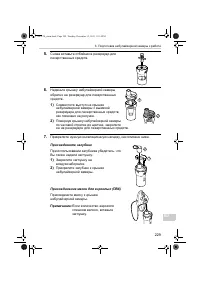
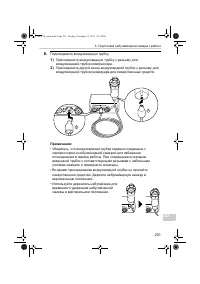
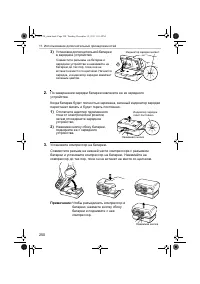
231 3. Подготовка небулайзерной камеры к работе RU 8. Подсоедините воздуховодную трубку . 1) Присоедините воздуховодную трубку к разъему для воздуховодной трубки компрессора . 2) Присоедините другой конец воздуховодной трубки к разъему для воздуховодной трубки резервуара для лекарственных средств . ...
Page 232 - Для
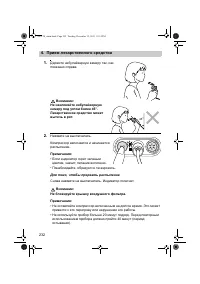
232 4. Прием лекарственного средства 1. Держите небулайзерную камеру так , как показано справа . Внимание : Не наклоняйте небулайзерную камеру под углом более 45°. Лекарственное средство может вытечь в рот . 2. Нажмите на выключатель . Компрессор включается и начинается распыление . Примечания : • Е...
Page 235 - Очистка
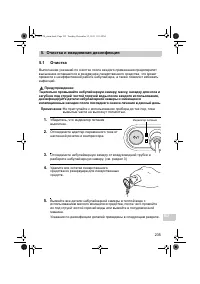
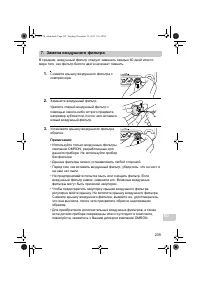
235 RU Уход и обслуживание 5. Очистка и ежедневная дезинфекция 5.1 Очистка Выполнение указаний по очистке после каждого применения предотвратит высыхание оставшегося в резервуаре лекарственного средства , что может привести к неэффективной работе небулайзера , а также позволит избежать инфекций . Пр...
Page 236 - Дезинфекция
236 5. Очистка и ежедневная дезинфекция 6. После очистки и дезинфекции деталей тщательно промойте их чистой водой и дайте им высохнуть на воздухе в чистом помещении . 7. Если компрессор загрязнился , протрите его мягкой тканью , смоченной в воде или мягком моющем средстве . Внимание : Компрессор не ...
Page 237 - Обращение
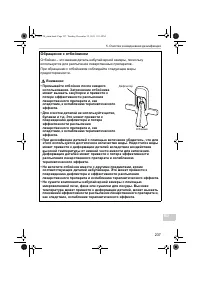
237 5. Очистка и ежедневная дезинфекция RU Обращение с отбойником Отбойник – это важная деталь небулайзерной камеры , поскольку используется для распыления лекарственных препаратов . При обращении с отбойником соблюдайте следующие меры предосторожности . Внимание : • Промывайте отбойник после каждог...
Page 238 - Бенз
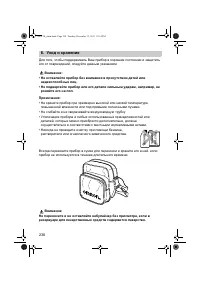
238 6. Уход и хранение Для того , чтобы поддерживать Ваш прибор в хорошем состоянии и защитить его от повреждений , следуйте данным указаниям : Внимание : • Не оставляйте прибор без внимания в присутствии детей или недееспособных лиц . • Не подвергайте прибор или его детали сильным ударам , например...
Page 240 - Симптом
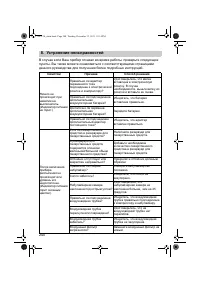
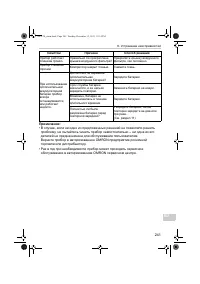
240 8. Устранение неисправностей В случае если Ваш прибор отказал во время работы , проверьте следующие пункты . Вы также можете ознакомиться с соответствующими страницами данного руководства для получения более подробных инструкций . Симптом Причина Способ решения Ничего не происходит при нажатии н...
Page 243 - OMRON Comp Air; Omron
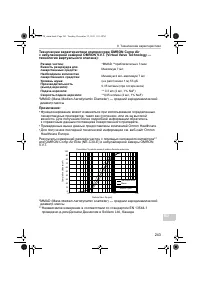
243 9. Технические характеристики RU Технические характеристики компрессора OMRON Comp Air с небулайзерной камерой OMRON V.V.T. (Virtual Valve Technology — технология виртуального клапана ): *MMAD (Mass Median Aerodynamic Diameter) — средний аэродинамический диаметр массы Примечания : • Функциониров...
Page 244 - Part 1: Nebulizing systems and their components (; II
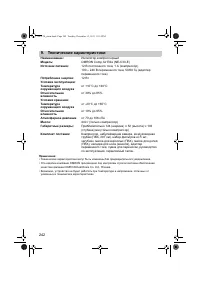
244 9. Технические характеристики Примечания : • Не используйте прибор там , где может произойти его контакт с легковоспламеняющимся газом . • Данный прибор удовлетворяет положениям директивы по электронным коммуникациям 93/42/EEC ( Директива по медицинским приборам ), а также европейскому стандарту...
Page 252 - OMRON MEDIZINTECHNIK
252 11. Использование дополнительных принадлежностей Сделано в Китае Производитель OMRON HEALTHCARE Co., Ltd. 53, Kunotsubo, Terado-cho, Muko, Kyoto, 617-0002 ЯПОНИЯ Представитель в ЕС OMRON HEALTHCARE EUROPE B.V. Scorpius 33, 2132 LR Hoofddorp НИДЕРЛАНДЫ www.omron-healthcare.com Производственное по...
Page 253 - OMRON HEALTHCARE UK LTD.; OMRON MEDIZINTECHNIK HANDELSGESELLSCHAFT mbH; ايناملا; OMRON SANTÉ FRANCE SAS; اسنرف
٣٦ AR ﺔﻳﺭﺎﻴﺘﺧﻻﺍ ﺕﺎﻘﺤﻠﻤﻟﺍ ﻡﺍﺪﺨﺘﺳﺍ . ١١ ﺔﻌﻨﺼ ُﻤﻟﺍ ﺔﻛﺮﺸﻟﺍ OMRON HEALTHCARE Co., Ltd. 53, Kunotsubo, Terado-cho, Muko, Kyoto, 617-0002 ﻥﺎﺑﺎﻴﻟﺍ ﻲﺑﻭﺭﻭﻷﺍ ﺩﺎﺤﺗﻻﺎﺑ ﻞﻴﺜﻤﺘﻟﺍ ﺔﻬﺟ OMRON HEALTHCARE EUROPE B.V. Scorpius 33, 2132 LR Hoofddorp ﺍﺪﻨﻟﻮﻫ www.omron-healthcare.com ﻊﻴﻨﺼﺘﻟﺍ ﺓﺄﺸﻨﻣ OMRON (DALIAN) CO., LTD. Da...
Page 255 - ةظحلام
٣٤ AR . ﻦﺣﺎﺸﻟﺎﺑ ﺔﻳﺭﺎﻴﺘﺧﻻﺍ ﺔﻳﺭﺎﻄﺒﻟﺍ ﻞﻴﺻﻮﺘﺑ ﻢﻗ (3 ﺔﻳﺭﺎﻄﺒﻟﺍ ﻲﻓ ﺓﺩﻮﺟﻮﻤﻟﺍ ﺕﻼﺻﻮﻤﻟﺍ ﺓﺍﺫﺎﺤﻤﺑ ﻢﻗ ﻲﻓ ﺮﻘﺘﺴﺗ ﻰﺘﺣ ﺔﻳﺭﺎﻄﺒﻟﺍ ﻰﻠﻋ ﻂﻐﺿﺍﻭ ،ﻦﺣﺎﺸﻟﺍﻭ ﺮﺷﺆﻣ ﺾﻣﻮﻳﻭ ﻦﺤﺸﻟﺍ ﺃﺪﺒﻳ . ﺢﻴﺤﺼﻟﺍ ﺎﻬﻌﺿﻮﻣ . ﺮﻀﺧﻷﺍ ﻦﺤﺸﻟﺍ ﻦﺤﺸﻟﺍ ﺮﺷﺆﻣ ﺾﻣﻮﻳ 3 . ٢ . ﻦﺣﺎﺸﻟﺍ ﻦﻣ ﺔﻳﺭﺎﻄﺒﻟﺍ ﺔﻟﺍﺯﺈﺑ ﻢﻗ ،ﺔﻣﺎﺗ ﺓﺭﻮﺼﺑ ﺔﻳﺭﺎﻄﺒﻟﺍ ﻦﺤﺷ ﺪﻌﺑ ﺔﻳﺭﺎﻄﺒﻟﺍ ﻦﺤﺷ ﻝﺎﻤﺘﻛﺍ ﺪﻨﻋ ﺓﺮﻤﺘﺴﻣ ﺓﺭﻮﺼﺑ ...
Page 257 - تاظحلام
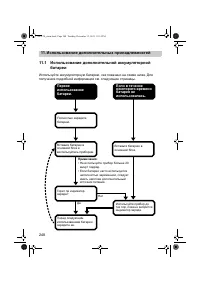
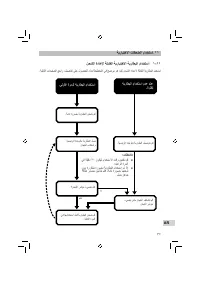
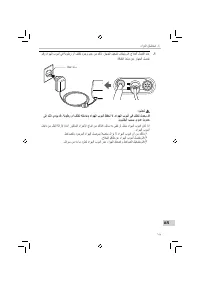
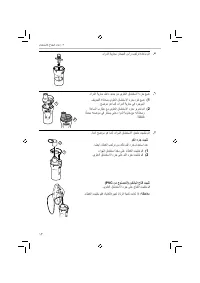
٣٢ AR ﺔﻳﺭﺎﻴﺘﺧﻻﺍ ﺕﺎﻘﺤﻠﻤﻟﺍ ﻡﺍﺪﺨﺘﺳﺍ . ١١ ﻦﺤﺸﻟﺍ ﺓﺩﺎﻋﻹ ﺔﻠﺑﺎﻘﻟﺍ ﺔﻳﺭﺎﻴﺘﺧﻻﺍ ﺔﻳﺭﺎﻄﺒﻟﺍ ﻡﺍﺪﺨﺘﺳﺍ ١ - ١١ . ﺔﻴﻟﺎﺘﻟﺍ ﺕﺎﺤﻔﺼﻟﺍ ﻊﺟﺍﺭ ،ﻞﻴﺻﺎﻔﺗ ﻰﻠﻋ ﻝﻮﺼﺤﻠﻟ . ﻩﺎﻧﺩﺃ ﻂﻴﻄﺨﺘﻟﺍ ﻲﻓ ﺢﺿﻮﻣ ﻮﻫ ﺎﻤﻛ ﻦﺤﺸﻟﺍ ﺓﺩﺎﻋﻹ ﺔﻠﺑﺎﻘﻟﺍ ﺔﻳﺭﺎﻄﺒﻟﺍ ﻡﺪﺨﺘﺳﺍ . ﺔﻣﺎﺗ ﺓﺭﻮﺼﺑ ﺔﻳﺭﺎﻄﺒﻟﺍ ﻦﺤﺸﺑ ﻢﻗ ﺔﻴﺴﻴﺋﺮﻟﺍ ﺓﺪﺣﻮﻟﺎﺑ ﺔﻳﺭﺎﻄﺒﻟﺍ ﻞﺻ . ﺯﺎﻬﺠﻟﺍ ﻡﺪﺨﺘﺳﺍﻭ . ﺔﻴﺴﻴﺋﺮﻟﺍ ﺓﺪﺣﻮﻟﺎﺑ ﺔﻳﺭﺎ...
Page 261 - EMC
٢٨ AR : ﺕﺎﻈﺣﻼﻣ . ﻝﺎﻌﺘﺷﻼﻟ ﻞﺑﺎﻗ ﺯﺎﻏ ﻰﻟﺇ ﻪﻴﻓ ﺽﺮﻌﺘﻳ ﺪﻗ ﻥﺎﻜﻣ ﻲﻓ ﺯﺎﻬﺠﻟﺍ ﻡﺪﺨﺘﺴﺗ ﻻ • ﺓﺰﻬﺟﻷﺎﺑ ﺔﺻﺎﺨﻟﺍ ﺕﺎﻬﻴﺟﻮﺘﻟﺍ ) 92/42/EEC EC ﺕﺎﻬﻴﺟﻮﺗ ﻲﻓ ﺎﻬﻴﻠﻋ ﺹﻮﺼﻨﻤﻟﺍ ﻡﺎﻜﺣﻷﺎﺑ ﺯﺎﻬﺠﻟﺍ ﺍﺬﻫ ﻲﻔﻳ • ﺓﺰﻬﺟﻷﺍ ﺔﻤﻈﻧﺃ : ١ ءﺰﺠﻟﺍ – ﻲﺴﻔﻨﺘﻟﺍ ﺯﺎﻬﺠﻟﺍ ﺝﻼﻋ ﺓﺰﻬﺟﺃ ؛ EN13544- 1:2007 ﻲﺑﻭﺭﻭﻷﺍ ﺭﺎﻴﻌﻤﻟﺍﻭ ( ﺔﻴﺒﻄﻟﺍ . ﺎﻬﺗﺎﻧﻮﻜﻣﻭ ﺔﺧﺎﺨﺒﻟﺍ II ﺔﺌﻔﻟﺍ = ﺔﻳﺎﻨﻌﺑ ﺕ...
Page 262 - Omron Healthcare Europe; EN
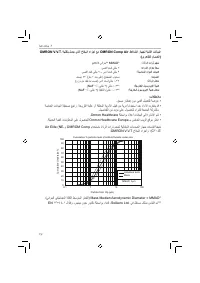
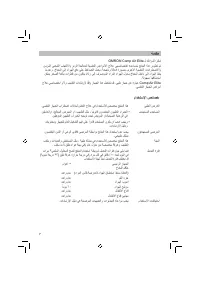
٢٧ OMRON V.V.T. ﺔﻴﻨﻘﺘﺑ ﻞﻤﻌﻳ ﻱﺬﻟﺍ ﺥﺎﺨﺒﻟﺍ ءﺍﺰﺟﺃ ﻊﻣ OMRON Comp Air ﻂﻏﺎﻀﻟﺍ ﺯﺎﻬﺠﻟ ﺔﻴﻨﻔﻟﺍ ﺕﺎﻧﺎﻴﺒﻟﺍ :( ﻱﺮﻫﺎﻈﻟﺍ ﻡﺎﻤﺼﻟﺍ ) : ﺫﺍﺫﺮﻟﺍ ﺕﺍﺭﺫ ﻢﺠﺣ μ m 3 ﻲﻟﺍﻮﺣ ** MMAD* : ءﺍﻭﺪﻟﺍ ﻥﺍﺰﺧ ﺔﻌﺳ ﻰﺼﻗﺃ ﺪﺤﻛ ﻲﻠﻠﻣ ٧ : ﺔﺒﺳﺎﻨﻤﻟﺍ ءﺍﻭﺪﻟﺍ ﺕﺎﻴﻤﻛ ﻰﺼﻗﺃ ﺪﺤﻛ ﻲﻠﻠﻣ ٧ – ﻰﻧﺩﺃ ﺪﺤﻛ ﻲﻠﻠﻣ ٢ : ﺕﻮﺼﻟﺍ ﻞﺒﺴﻳﺩ ٥٣ ( ﺮﺘﻣ ١ ﺪﻌﺑ ﻰﻠﻋ ) ﺞﻴﺠﻀﻟﺍ ﻯﻮﺘﺴﻣ : ﺫﺍﺫﺮﻟﺍ...
Page 265 - جلاعلا
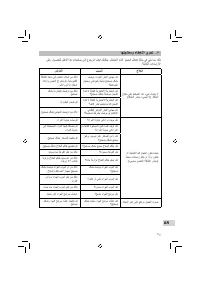
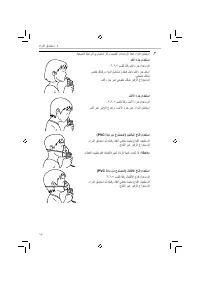
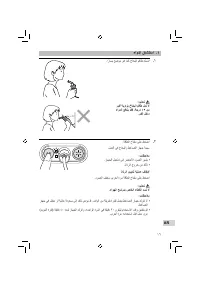
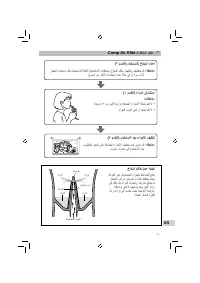
٢٤ AR ﺎﻬﺘﺠﻟﺎﻌﻣﻭ ءﺎﻄﺧﻷﺍ ﻱﺮﺤﺗ . ٨ ﻰﻠﻋ ﻝﻮﺼﺤﻠﻟ ﻞﻴﻟﺪﻟﺍ ﺍﺬﻫ ﺕﺎﺤﻔﺻ ﻰﻟﺇ ﻉﻮﺟﺮﻟﺍ ﺎ ًﻀﻳﺃ ﻚﻨﻜﻤﻳ . ﻞﻴﻐﺸﺘﻟﺍ ءﺎﻨﺛﺃ ﺯﺎﻬﺠﻟﺍ ﻞﻄﻌﺗ ﺔﻟﺎﺣ ﻲﻓ ﻲﻠﻳ ﺎﻤﻣ ﺪﻛﺄﺗ . ﺔﻠﻣﺎﻜﻟﺍ ﺕﺍﺩﺎﺷﺭﻹﺍ ﺝﻼﻌﻟﺍ ﺐﺒﺴﻟﺍ ﺽ َﺮ َﻌﻟﺍ ﺡﺎﺘﻔﻣ ﻰﻠﻋ ﻂﻐﻀﻟﺍ ﺪﻨﻋ ءﻲﺷ ﺙﺪﺤﻳ ﻻ .( ﺔﻗﺎﻄﻟﺍ ﺮﺷﺆﻣ ءﻲﻀﻳ ﻻ ) . ﺔﻗﺎﻄﻟﺍ ﻞﺻﻮﻣ ﺩﺩﺮﺘﻤﻟﺍ ﺭﺎﻴﺘﻟﺍ ﺊﻳﺎﻬﻣ ﻞﻫ ﺯﺎﻬﺠﺑﻭ ﻲﺋﺎﺑﺮﻬﻛ ﺬﺧﺄﻤﺑ ﺢﻴﺤﺻ ﻞﻜﺸﺑ ؟ﻂ...
Page 267 - نيزنبلا
٢٢ AR : ﺔﻴﻟﺎﺘﻟﺍ ﺕﺍﺩﺎﺷﺭﻹﺍ ﻊﺒﺗﺍ ﻒﻠﺘﻟﺍ ﻦﻣ ﻪﺘﻳﺎﻤﺣﻭ ﺔﻟﺎﺣ ﻞﻀﻓﺃ ﻲﻓ ﻚﺑ ﺹﺎﺨﻟﺍ ﺯﺎﻬﺠﻟﺍ ﻰﻠﻋ ﻅﺎﻔﺤﻠﻟ : ﺮﻳﺬﺤﺗ . ﻦﻴﻛﺭﺪﻤﻟﺍ ﺮﻴﻏ ﺹﺎﺨﺷﻷﺍ ﻭﺃ ﻝﺎﻔﻃﻷﺍ ﻊﻣ ﻑﺍﺮﺷﺇ ﻥﻭﺩ ﺓﺪﺣﻮﻟﺍ ﻙﺮﺘﺗ ﻻ • . ًﻼﺜﻣ ﺽﺭﻷﺍ ﻰﻠﻋ ﻪﻃﻮﻘﺴﺑ ﺙﺪﺤﺗ ﻲﺘﻟﺎﻛ ﺔﻳﻮﻗ ﺕﺎﻣﺪﺻ ﻱﻷ ﺯﺎﻬﺠﻟﺍ ﺽﺮﻌﺗ ﻻ • : ﺕﺎﻈﺣﻼﻣ ﺔﻌﺷﺃ ﻞﻔﺳﺃ ﻭﺃ ﺔﺑﻮﻃﺮﻟﺍ ﻲﻟﺎﻋ ﻮﺟ ﻲﻓ ﻪﻈﻔﺤﺗ ﻻ ﻚﻟﺬﻛ ﺔﻳﺎﻐﻠﻟ ﺓﺩﺭﺎﺑ ﻭﺃ ﺔﻨﺧﺎﺳ ﺓﺭﺍﺮ...
Page 277 - ءازجلأا
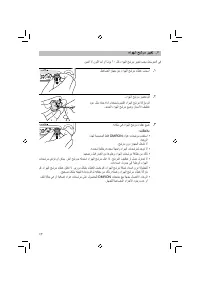
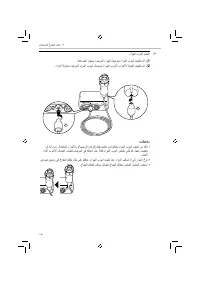
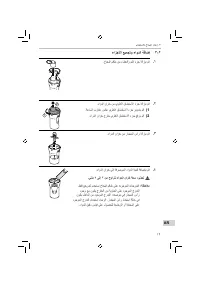
١٢ AR ﻡﺍﺪﺨﺘﺳﻼﻟ ﺥﺎﺨﺒﻟﺍ ﺩﺍﺪﻋﺇ . ٣ ءﺍﺰﺟﻷﺍ ﻊﻴﻤﺠﺗﻭ ءﺍﻭﺪﻟﺍ ﺔﻓﺎﺿﺇ ٣ - ٢ . ﺥﺎﺨﺒﻟﺍ ﻢﻗﺎﻃ ﻦﻣ ءﺎﻄﻐﻟﺍﻭ ﻢﻔﻟﺍ ءﺰﺟ ﺔﻟﺍﺯﺈﺑ ﻢﻗ . ١ . ءﺍﻭﺪﻟﺍ ﻥﺍﺰﺧ ﻦﻣ ﻱﻮﻠﻌﻟﺍ ﻕﺎﺸﻨﺘﺳﻻﺍ ءﺰﺟ ﺔﻟﺍﺯﺈﺑ ﻢﻗ . ٢ . ﺔﻋﺎﺴﻟﺍ ﺏﺭﺎﻘﻋ ﺲﻜﻋ ﻱﻮﻠﻌﻟﺍ ﻕﺎﺸﻨﺘﺳﻻﺍ ءﺰﺟ ﺮﻳﻭﺪﺘﺑ ﻢﻗ (1 . ءﺍﻭﺪﻟﺍ ﻥﺍﺰﺧ ﺝﺭﺎﺧ ﻱﻮﻠﻌﻟﺍ ﻕﺎﺸﻨﺘﺳﻻﺍ ءﺰﺟ ﻊﻓﺮﺑ ﻢﻗ (2 . ءﺍﻭﺪﻟﺍ ﻥﺍﺰﺧ ﻦﻣ ﺭﺎﺨﺒﻤﻟﺍ ﺱﺃﺭ ﺔﻟﺍﺯﺈ...
Page 281 - PVC
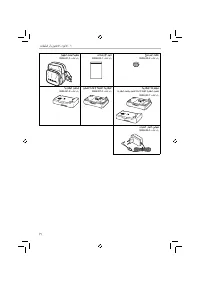
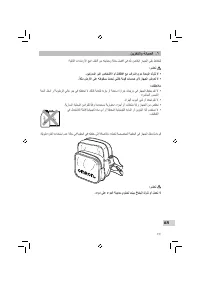
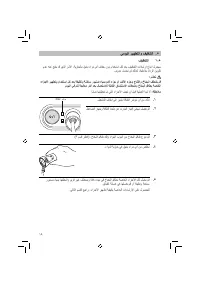
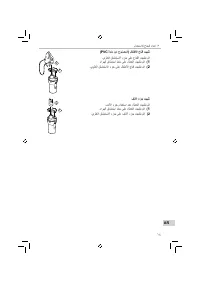
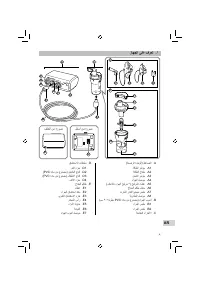
٨ AR ﺯﺎﻬﺠﻟﺍ ﻰﻠﻋ ﻑﺮﻌﺗ . ١ ﻒﻠﺨﻟﺍ ﻦﻣ ﺓﺭﻮﺻ ﻞﻔﺳﺃ ﻦﻣ ﺓﺭﻮﺻ 3 5 3 5 A7 A8 B E1 E3 E2 E6 E4 E5 D2 D3 D1 A C D E A4 A5 A2A3 A1 A6 E7 B1 B2 D4 ( ﺔﻴﺴﻴﺋﺮﻟﺍ ﺓﺪﺣﻮﻟﺍ ) ﻂﻏﺎﻀﻟﺍ .A ﺔﻗﺎﻄﻟﺍ ﺮﺷﺆﻣ .A1 ﺔﻗﺎﻄﻟﺍ ﺡﺎﺘﻔﻣ .A2 ﻦﺤﺸﻟﺍ ﺮﺷﺆﻣ .A3 ءﺍﻮﻬﻟﺍ ﻞﺻﻮﻣ .A4 (. ﻞﺧﺍﺪﻟﺎﺑ ءﺍﻮﻬﻟﺍ ﺢﺷﺮﻣ *) ﺢﺷﺮﻤﻟﺍ ءﺎﻄﻏ .A5 ﺥﺎﺨﺒﻟﺍ ﻢﻗﺎﻃ ﻞﻣﺎﺣ .A6 ﺩﺩﺮﺘﻤﻟﺍ ﺭﺎﻴ...
Page 282 - ةماه
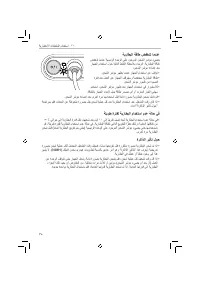
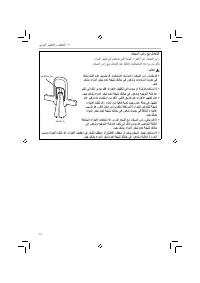
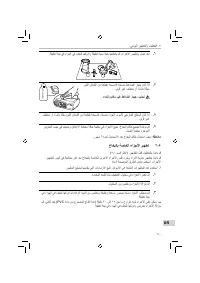
٧ : ﺔﻣﺎﻋ ﻥﺎﻣﺃ ﺕﺎﻃﺎﻴﺘﺣﺍ ﻦﻣ ﺪﻛﺄﺗ ،ﺔﺻﺎﺧ ﺔﻔﺼﺑﻭ . ﺕﻼﻜﺸﻣ ﺩﻮﺟﻭ ﻡﺪﻋ ﻦﻣ ﺪﻛﺄﺗﻭ ،ﺓﺮﻣ ﻞﻛ ﺎﻬﻣﺍﺪﺨﺘﺳﺍ ﻞﺒﻗ ءﺍﺰﺟﻷﺍﻭ ﺯﺎﻬﺠﻟﺍ ﺺﺤﻔﺑ ﻢﻗ • : ﻲﻠﻳ ﺎﻣ ﺺﺤﻓ . ﻒﻠﺘﻠﻟ ءﺍﻮﻬﻟﺍ ﺏﻮﺒﻧﺃ ﻭﺃ ﺔﻫﻮﻔﻟﺍ ﻭﺃ ﺭﺎﺨﺒﻤﻟﺍ ﺱﺃﺭ ﺽﺮﻌﺗ ﻡﺪﻋ - . ﺓﺩﻭﺪﺴﻣ ﺮﻴﻏ ﺔﻫﻮﻔﻟﺍ - . ﻲﻌﻴﺒﻃ ﻞﻜﺸﺑ ﻂﻏﺎﻀﻟﺍ ﻞﻤﻋ - ﺐﺒﺴﺘﻴﺳ ﻚﻟﺬﻛ . ﻂﻏﺎﻀﻟﺍ ﻲﻓ ﺓﺩﻮﺟﻮﻤﻟﺍ ﺔﺨﻀﻤﻟﺍ ﺐﺒﺴﺑ ﺯﺍﺰﺘﻫﻻﺍﻭ ﺔﺠﻀﻟﺍ ﺾﻌﺑ ﺙﺪ...
Page 283 - OMRON Healthcare
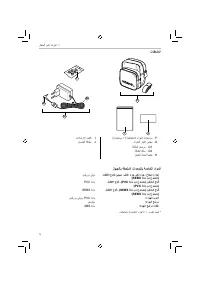
٦ AR . ﺰﻴﻴﻤﺘﻟﺍﻭ ﻙﺍﺭﺩﻹﺍ ﻦﻋ ﻥﻭﺰﺠﻌﻳ ﺹﺎﺨﺷﺃ ﻊﻣ ﻭﺃ ﺔﺒﻗﺍﺮﻣ ﻥﻭﺩ ﻝﺎﻔﻃﻷﺍ ﻊﻣ ءﺍﻭﺪﻟﺍ ﺓﺪﺣﻭ ﻙﺮﺘﺗ ﻻ • . ًﻼﺜﻣ ﺽﺭﻷﺍ ﻰﻠﻋ ﻪﻃﻮﻘﺴﺑ ﺙﺪﺤﺗ ﻲﺘﻟﺎﻛ ﺔﻳﻮﻗ ﺕﺎﻣﺪﺻ ﻱﻷ ﺯﺎﻬﺠﻟﺍ ﺽﺮﻌﺗ ﻻ • . ﺦﻟﺇ ﺱﻮﺑﺩ ﻡﺍﺪﺨﺘﺳﺎﺑ ءﺍﻭﺪﻟﺍ ﻥﺍﺰﺧ ﺔﻫﻮﻓ ﺰﺧﻭ ﻝﻭﺎﺤﺗ ﻭﺃ ﺭﺎﺨﺒﻤﻟﺍ ﺱﺃﺭ ﻒﻠﺘﺗ ﻻ • ءﺎﻨﺛﺃ ﺮﺧﺁ ءﻲﺷ ﻱﺃ ﻭﺃ ﺔﻔﺸﻨﻣ ﻭﺃ ﺔﻴﻧﺎﻄﺒﺑ ﻦﺣﺎﺸﻟﺍﻭ ﻦﺤﺸﻟﺍ ﺓﺩﺎﻋﻹ ﺔﻠﺑﺎﻘﻟﺍ ﺔﻳﺭﺎﻴﺘﺧﻻﺍ ﺔﻳﺭ...
Page 284 - OMRON AC; هيبنت
٥ ﻦﺣﺎﺷ ﻭﺃ ﻦﺤﺸﻟﺍ ﺓﺩﺎﻋﻹ ﺔﻠﺑﺎﻘﻟﺍ ﺔﻳﺭﺎﻴﺘﺧﻻﺍ ﺔﻳﺭﺎﻄﺒﻟﺍ ﻭﺃ ﺩﺩﺮﺘﻤﻟﺍ ﺭﺎﻴﺘﻟﺍ ﺊﻳﺎﻬﻣ ﻭﺃ ﺔﻴﺴﻴﺋﺮﻟﺍ ﺓﺪﺣﻮﻟﺍ ﻡﺪﺨﺘﺴﺗ ﻻ • ﺎﻣﺪﻨﻋ ﻯﺮﺧﺃ ﺓﺰﻬﺟﺃ ﺔﻳﺃ ﻭﺃ ﺔﻗﺎﻃ ﺬﺧﺄﻤﺑ ﺎﻬﻠﻴﺻﻮﺘﺑ ﻢﻘﺗ ﻻﻭ ،ﺔﻠﺘﺒﻣ ﺓﺰﻬﺟﻷﺍ ﻩﺬﻫ ﻥﻮﻜﺗ ﺎﻣﺪﻨﻋ ﻱﺭﺎﻴﺘﺧﻻﺍ ﺔﻳﺭﺎﻄﺒﻟﺍ . ﻦﻴﺘﻠﺘﺒﻣ ﻙﺍﺪﻳ ﻥﻮﻜﺗ ﺔﻣﻭﺎﻘﻣ ﺖﺴﻴﻟ ﻦﺣﺎﺸﻟﺍﻭ ﻦﺤﺸﻟﺍ ﺓﺩﺎﻋﻹ ﺔﻠﺑﺎﻘﻟﺍ ﺔﻳﺭﺎﻴﺘﺧﻻﺍ ﺔﻳﺭﺎﻄﺒﻟﺍﻭ ﺩﺩﺮﺘﻤﻟﺍ ﺭﺎﻴﺘﻟﺍ ﺊﻳﺎﻬ...
Page 286 - ةمدقم; .OMRON Comp Air Elite; مادختسلإا
٣ ﺔﻣﺪﻘﻣ .OMRON Comp Air Elite ـﻟ ﻚﺋﺍﺮﺸﻟ ﺍ ًﺮﻜﺷ ﻦﻣﺰﻤﻟﺍ ﻲﺒﻌﺸﻟﺍ ﺏﺎﻬﺘﻟﻻﺍﻭ ﻮﺑﺮﻟﺍ ﺔﺠﻟﺎﻌﻤﻟ ﺔﻴﺴﻔﻨﺘﻟﺍ ﺽﺍﺮﻣﻷﺍ ﺝﻼﻋ ﻲﻴﺻﺎﺼﺘﺧﺍ ﺓﺪﻋﺎﺴﻤﺑ ﺞﺘﻨﻤﻟﺍ ﺍﺬﻫ ﺮﻳﻮﻄﺗ ﻢﺗ ﺎﻣﺪﻨﻋﻭ . ﺥﺎﺨﺒﻟﺍ ﻰﻟﺇ ءﺍﻮﻬﻟﺍ ﻊﻓﺩ ﻰﻠﻋ ﻂﻏﺎﻀﻟﺍ ﻞﻤﻌﻳ . ﺔﺤﺟﺎﻧﻭ ﺔﻟﺎﻌﻓ ﺓﺭﻮﺼﺑ ﻯﺮﺧﻷﺍ ﺔﻴﺴﻔﻨﺘﻟﺍ ﺕﺎﺑﺍﺮﻄﺿﻻﺍﻭ ﻦﻜﻤﻳ ﺮﻐﺼﻟﺍ ﺔﻐﻟﺎﺑ ﺕﺍﺮﻄﻗ ﻦﻣ ﻥﻮﻜﺘﻳ ﺫﺍﺫﺭ ﻰﻟﺇ ﻑﻮﺻﻮﻤﻟﺍ ءﺍﻭﺪﻟﺍ ءﺍﻮﻬﻟﺍ ﻝﻮ...
Page 287 - تايوتحملا
٢ AR ﺕﺎﻳﻮﺘﺤﻤﻟﺍ ﺯﺎﻬﺠﻟﺍ ﻡﺍﺪﺨﺘﺳﺍ ﻞﺒﻗ ٣ .................................................................................................................. ﺔﻣﺪﻘﻣ ٣ .................................................................................................... ﻡﺍﺪﺨﺘﺳﻹﺍ ﺺﺋﺎﺼﺧ ٤ ..........................
Page 288 - خاخبلا; РУКОВОДСТВО ПО ЭКСПЛУАТАЦИИ
IM-NE-C30-E-06-11/2011 TM ﺥﺎﺨﺒﻟﺍ ﻂﻏﺎﺿ NE-C30-E ﺯﺍﺮﻄﻟﺍ • Instruction Manual• Mode d’emploi• Gebrauchsanweisung• Manuale di istruzioni• Manual de instrucciones• Gebruiksaanwijzing • EN FR DE IT ES NL AR RU • РУКОВОДСТВО ПО ЭКСПЛУАТАЦИИ 3 5