Page 2 - TABLE OF CONTENTS; DRYER SAFETY; TABLE DES MATIÈRES
2 TABLE OF CONTENTS DRYER SAFETY .......................................................................... 2INSTALLATION REQUIREMENTS ............................................. 5 Tools and Parts ......................................................................... 5 Location Requirements ......
Page 5 - INSTALLATION REQUIREMENTS; Optional parts not included:
5 Tools Needed: 8" or 10" 8" or 10" Flat-blade screwdriver Phillips screwdriver Pipe wrench Adjustable wrench that opens to 1" TORX T20 ®† security 1" Hex-head 5⁄16" Socket wrench Pliers screwdriver or bit socket wrench (that open to 1 9 / 16 ") Level Utility knife Pi...
Page 6 - Location Requirements; Recessed Area and Closet Installation Instructions; WARNING; Minimum Installation Clearances
6 Location Requirements IMPORTANT: Do not install or store the dryer where it will be exposed to the weather. Proper installation is your responsibility. You will need: ■ A grounded electrical outlet located within 6 ft. (1.8 m) of where the power cord is attached to the back of the dryer. See “Elec...
Page 7 - Electrical Requirements – Gas Dryer; Gas Dryer Grounding
7 Electrical Requirements – Gas Dryer IMPORTANT: The dryer must be electrically grounded in accordance with local codes and ordinances or, in the absence of local codes, with the National Electrical Code, ANSI/NFPA 70, latest edition, or Canadian Electrical Code, CSA C22.1. If codes permit and a sep...
Page 8 - Electrical Requirements –; It is your responsibility:; Electrical Connection
8 Electrical Requirements – Electric Dryer (U.S.A. Only) It is your responsibility: ■ To contact a qualified electrical installer. ■ To be sure that the electrical connection is adequate and in conformance with the National Electrical Code, ANSI/NFPA 70-latest edition and all local codes and ordinan...
Page 9 - Electric Dryer Power Supply Cord; If using a power supply cord:; Direct Wire; If connecting by direct wire:
9 Electric Dryer Power Supply Cord If using a power supply cord: Use a UL listed power supply cord kit marked for use with clothes dryers. The kit should contain: ■ A UL listed 30 A power supply cord, rated 120/240 V minimum. The cord should be type SRD or SRDT and be at least 4 ft. (1.22 m) long. T...
Page 10 - Gas Supply Requirements; Type of Gas; Electrical Requirements – Canada only; GROUNDING INSTRUCTIONS
10 Gas Supply Requirements IMPORTANT: Observe all governing codes and ordinances. This installation must conform with all local codes and ordinances. In the absence of local codes, installation must conform with American National Standard, National Fuel Gas Code ANSI Z223.1/NFPA 54 or CAN/CSA B149.A...
Page 11 - Venting Requirements
11 Allow as much room as possible when using elbows or making turns. Bend vent gradually to avoid kinking.Vent outlet is located at the back of the dryer, at bottom center. The vent can be routed up, down, left, right, behind the dryer, or straight out the back of the dryer. See “Product Dimensions”...
Page 12 - If An Exhaust Hood Cannot Be Used; Multiple Dryer Venting
12 For vent systems not covered by the vent specification chart, see your parts distributor.If dryer is installed in a confined area, such as a bedroom, bathroom, or closet, provision must be made for enough air for combustion and ventilation. (Check governing codes and ordinances.) See “Recessed Ar...
Page 13 - Leveling
13 Leveling Leveling your dryer properly reduces excess noise and vibration. 1. Remove cardboard from beneath dryer. Place a level on top edges of dryer, checking each side and front. If not level, tip dryer and adjust legs up or down as shown in Step 3, repeating as necessary. 2. Grip dryer from to...
Page 14 - Make Gas Connection; Gas Supply Line; INSTALLATION INSTRUCTIONS – GAS DRYER
14 Gas Supply Pressure Testing A 1/8" (3 mm) NPT minimum plugged tapping, accessible for gauge testing, must be installed immediately downstream of the installed shut-off valve to the dryer (as shown above). The dryer must be disconnected from the gas supply piping system during any pressure tes...
Page 15 - D C; Connect Vent
15 ■ Must include a shutoff valve: The supply line must be equipped with a manual shutoff valve installed within 6 ft. (1.8 m) of dryer in accordance with National Fuel Gas Code, ANSI Z223.1. In Canada, an individual manual shutoff valve must be installed in accordance with the B149 installation cod...
Page 16 - INSTALLATION INSTRUCTIONS – ELECTRIC DRYER
16 1. Disconnect power. 2. Remove the hold-down screw and terminal block cover. A B E D C 3. Install strain relief. INSTALLATION INSTRUCTIONS – ELECTRIC DRYER Power Supply Cord (U.S.A. Only) A. Terminal block cover B. External ground conductor screw C. Center terminal block screw D. Hold-down screw ...
Page 17 - Power supply cord strain relief:
17 A. Strain relief tab pointing up B. Hole below terminal block opening C. Clamp sectionD. Strain relief tab pointing down C B A D Tighten strain relief screws enough to hold the two clamp sections together. Power supply cord strain relief: ■ Remove the screws from a 3/4" (19 mm) UL listed stra...
Page 19 - Use where local codes permit connecting
19 A. External ground conductor screwB. Neutral ground wireC. Center terminal block screwD. Neutral wire (white or center wire)E. 3/4 " (19 mm) UL listed strain relief A. 3-wire receptacle (NEMA type 10-30R)B. 3-wire plugC. Neutral prongD. Spade terminals with upturned endsE. 3/4 " (19 mm) U...
Page 23 - Use for direct wire or power supply
23 2. Plug in dryer or reconnect power. 3. Check dryer operation: Insert coins. Select a cycle. Using the WHITES & COLORS cycle, let the dryer run for at least five minutes. Dryer will stop when time is used up. NOTE: Dryer door must be closed for dryer to operate. When door is open, dryer stops...
Page 24 - REVERSING THE DOOR SWING
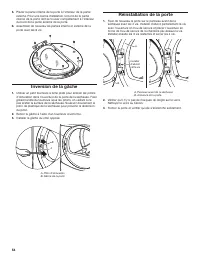
24 Reverse Hinge 1. Use a small flat-blade screwdriver to remove 2 plug strips from the inner door. Slide the head of the screwdriver under the plugs, being certain not to scratch the inner door surface. Lift up. 2. Remove the 4 screws that attach to the inner door hinge and move the hinge to the ot...
Page 25 - Reinstall The Door; Maintenance instructions:; Reverse The Strike; MAINTENANCE INSTRUCTIONS
25 Reinstall The Door 1. Reattach door to dryer front panel with the 4 screws. Partially install the screw with keyhole opening first, and fit the keyhole opening in the hinge over the screw. Then install the remaining 3 screws and tighten all 4 screws. 2. Check for fingerprints on the glass. Clean ...
Page 26 - ELECTRONIC CONTROL SETUP
26 GENERAL USER INFORMATION Scrolling “out of order” showing in display, followed by a failure code This condition indicates the dryer is inoperative. ‘0 Minutes’ showing in display This condition indicates the dryer cannot be operated. Coins dropped or debit inputs during this condition will be sto...
Page 27 - DISPLAY; PD Models
27 1. 0 0 1. 0 0 1. 0 c 1. c0 2. 0 0 2. 0 0 2. s p 3. 0 63. 0 6 3. 0 0 4. 0 5 4. 0 5 4. 4 5 5. 0 05. 0 0 6. 0 0 6. 0 0 6 0 6 6 0 6 6 0 0 7 0 5 7 0 5 7 4 5 8 0 0 8 0 0 8 f c 9 0 0 9 0 0 9 0 c CODE EXPLANATION MONEY COUNTER OPTION This option is either Selected ‘ON’ or Not Selected ‘OFF’.Not Selected ...
Page 29 - END OF SET-UP PROCEDURES; EXIT FROM SET-UP MODE
29 If cycle counter (9 0C) is selected, the following is true: 1 00 Represents the number of cycles in HUNDREDS. 1 02 = 200 2 00 Represents the number of cycles in ONES. 2 25 = 2 25 TOTAL CYCLES = 225 This is ‘VIEW ONLY’ and cannot be cleared. Press the PERM. PRESS button once to advance to next cod...
Page 30 - LIMITED WARRANTY (PARTS ONLY – LABOR NOT INCLUDED)
28 MAYTAG ® COMMERCIAL WASHER, DRYER, STACKED DRYER/DRYER, COMMERCIAL STACK LAUNDRY, AND MULTI-LOAD COIN OPERATED COMMERCIAL WASHERS AND DRYERS WARRANTY LIMITED WARRANTY (PARTS ONLY – LABOR NOT INCLUDED) For the first five years from the original date of purchase, when this commercial appliance is i...
Page 31 - Votre sécurité et celle des autres est très importante.; AVERTISSEMENT; SÉCURITÉ DE LA SÉCHEUSE; QUE FAIRE DANS LE CAS D’UNE ODEUR DE GAZ :
31 Risque possible de décès ou de blessure grave si vous ne suivez pas immédiatement les instructions. Risque possible de décès ou de blessure grave si vous ne suivez pas les instructions. Tous les messages de sécurité vous diront quel est le danger potentiel et vous disent comment réduire le risque...
Page 33 - CONSERVEZ CES INSTRUCTIONS; IMPORTANTES INSTRUCTIONS DE SÉCURITÉ
33 IMPORTANT : L’installation au gaz doit être conforme aux codes locaux, ou en l’absence de codes locaux, au Code National d’alimentation au gaz, à la norme ANSI Z223.1/NFPA 54 ou au Code des installations au gaz naturel et au propane, CSA-B149.1.La sécheuse doit être correctement reliée à la terre...
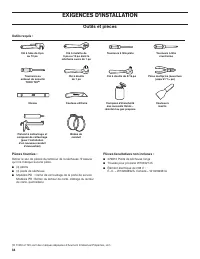
Page 34 - EXIGENCES D’INSTALLATION; Pièces facultatives non incluses :; Outils et pièces
34 Outils requis : EXIGENCES D’INSTALLATION Pièces fournies : Retirer le sac de pièces du tambour de la sécheuse. S’assurer qu’il ne manque aucune pièce. ■ (4) patins ■ (4) pieds de sécheuse ■ Mpdèles PD : Came de verrouillage de la porte de service Modèles PR : Boîtier du lecteur de carte, câblage...
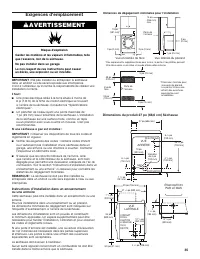
Page 35 - Exigences d’emplacement; Instructions d’installation dans un encastrement; Garder les matières et les vapeurs inflammables, telle; Distances de dégagement minimales pour l’installation
35 Exigences d’emplacement IMPORTANT : Ne pas installer ou entreposer la sécheuse dans un endroit où elle serait exposée aux intempéries. C’est à l’utilisateur qu’incombe la responsabilité de réaliser une installation correcte. Il faut : ■ Une prise électrique reliée à la terre située à moins de 6 p...
Page 36 - Mise à la terre de la sécheuse à gaz
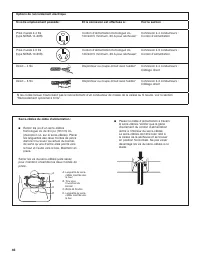
36 Spécifications électriques – Sécheuse à gaz IMPORTANT : La sécheuse doit être correctement reliée à la terre en conformité avec les codes et règlements locaux en vigueur, ou en l’absence de tels codes, avec le National Electrical Code, ANSI/NFPA 70 – dernière édition, ou le Code canadien des inst...
Page 37 - Spécifications électriques – Sécheuse; C’est à l’utilisateur qu’incombe la responsabilité de :; Raccordement électrique
37 Spécifications électriques – Sécheuse électrique (É.-U. seulement) C’est à l’utilisateur qu’incombe la responsabilité de : ■ Contacter un électricien qualifié. ■ S’assurer que le raccordement électrique est adéquat et conforme au code national de l’électricité, ANSI/NFPA 70 – plus récente édition...
Page 38 - Cordon d’alimentation de la sécheuse; En cas d’utilisation d’un cordon d’alimentation :; Câblage direct; Pour le raccordement direct :
38 Cordon d’alimentation de la sécheuse En cas d’utilisation d’un cordon d’alimentation : Utiliser un ensemble de câble d’alimentation électrique homologué UL marqué pour utilisation avec les sécheuses à vêtements. L’ensemble doit contenir : ■ Un cordon d’alimentation électrique homologué UL de 30 A...
Page 39 - Spécifications de l’alimentation en gaz; Type de gaz; Utiliser une canalisation neuve d'arrivée de gaz; Spécifications électriques – Canada seulement; INSTRUCTIONS DE LIAISON À LA TERRE
39 Spécifications de l’alimentation en gaz IMPORTANT : Observer les dispositions de tous les codes et règlements en vigueur.Cette installation doit être effectuée conformément avec les codes et règlements locaux. En l’absence de code local, l’installation doit satisfaire aux prescriptions de la norm...
Page 40 - Longueur du système d’évacuation; Exigences concernant l’évacuation
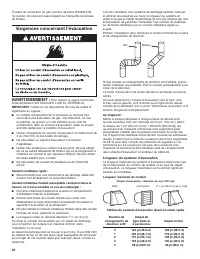
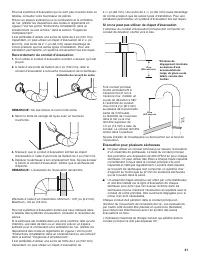
40 Si des coudes ou changements de direction sont utilisés, prévoir autant d’espace que possible. Plier le conduit graduellement pour éviter de le déformer.La sortie d’évacuation est située derrière la sécheuse, en bas au centre. On peut acheminer le conduit d’évacuation vers le haut, vers le bas, v...
Page 41 - Raccordement du conduit d’évacuation; Évacuation pour plusieurs sécheuses
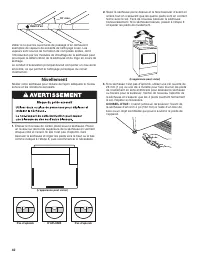
41 Collerette du raccord de sortie Pour les systèmes d’évacuation qui ne sont pas couverts dans ce tableau, consulter votre fournisseur de pièces.Prévoir un espace suffisant pour la combustion et la ventilation de l’air. (Vérifier les dispositions des codes et règlements en vigueur.) Voir les points...
Page 42 - Nivellement
42 30˚ max. Air flow Débit d’air Veiller à ce que les ouvertures de passage d’air demeurent exemptes de vapeurs de solvants de nettoyage à sec. Les vapeurs sont source de formation de composés acides, dont l’introduction par les modules de chauffage de la sécheuse peut provoquer la détérioration de ...
Page 43 - Raccordement au gaz; Canalisation d’alimentation en gaz
43 Essai de pression de la canalisation de gaz Un piquage bouché de 1/8 po (3 mm) NPT minimum, accessible pour le contrôle de pression, doit être installé immédiatement en aval du robinet d’arrêt installé pour la sécheuse (comme illustré ci-dessous). Lors de toute épreuve de pressurisation du systèm...
Page 44 - Raccordement du conduit; Terminer l’installation
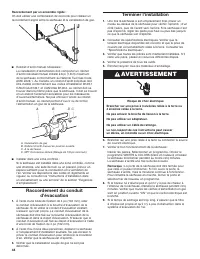
44 Raccordement par un ensemble rigide : On doit utiliser une combinaison de raccords pour réaliser un raccordement aligné entre la sécheuse et la canalisation de gaz. ■ Robinet d’arrêt manuel nécessaire : La canalisation d’alimentation doit comporter un robinet d’arrêt individuel manuel installé à ...
Page 45 - INSTRUCTIONS D’INSTALLATION – SÉCHEUSE ÉLECTRIQUE; Cordon d’alimentation
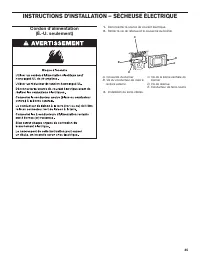
45 1. Déconnecter la source de courant électrique. 2. Retirer la vis de retenue et le couvercle du bornier. A B E D C 3. Installation du serre-câbles. INSTRUCTIONS D’INSTALLATION – SÉCHEUSE ÉLECTRIQUE Cordon d’alimentation (É.-U. seulement) A. Couvercle du bornier B. Vis du conducteur de mise à la t...
Page 47 - Câble d’alimentation à 4 fils :
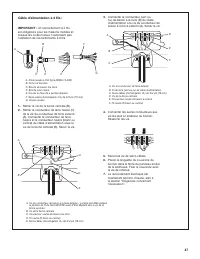
47 C B A D 1. Retirer la vis de la borne centrale (B). 2. Retirer le conducteur de terre neutre (C) de la vis du conducteur de terre externe (A). Connecter le conducteur de terre neutre et le conducteur neutre (blanc ou central) du câble d’alimentation sous la vis de la borne centrale (B). Serrer la...
Page 48 - Câble d’alimentation à 3 fils :; À utiliser lorsque les codes locaux
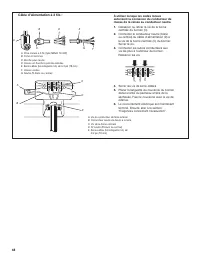
48 A. Vis du conducteur de terre externeB. Connecteur neutre de liaison à la terreC. Vis de la borne centraleD. Fil neutre (fil blanc ou central)E. Serre-câbles (homologation UL) de 3/4 po (19 mm) A. Prise murale à 3 fils (type NEMA 10-30R)B. Fiche à 3 brochesC. Broche pour neutreD. Cosses en fourc...
Page 49 - Méthode de raccordement direct; Risque d’incendie
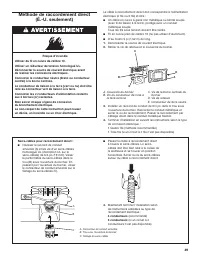
49 A. Connecteur de conduit amovibleB. Trou sous l’ouverture du bornierC. Filetage du serre-câbles B C A Serre-câbles pour raccordement direct : ■ Dévisser le raccord de conduit amovible (A) et les vis d’un serre-câbles homologué UL (inscription UL sur le serre-câbles) de 3/4 po (19 mm). Visser la p...
Page 50 - Connexion à 4 conducteurs par
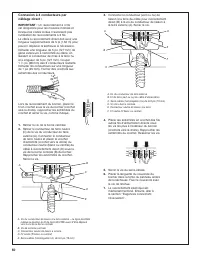
50 A. Vis du conducteur de liaison à la terre externe – La ligne pointillée indique la position du fil de terre NEUTRE avant d’être déplacé vers la vis de la borne centrale. B. Vis de la borne centraleC. Connecteur neutre de liaison à la terreD. Fil neutre (fil blanc ou central)E. Serre-câbles (homo...
Page 51 - Connexion à 3 conducteurs par
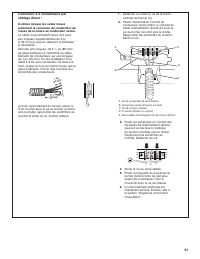
51 Connexion à 3 conducteurs par câblage direct : À utiliser lorsque les codes locaux autorisent la connexion du conducteur de masse de la caisse au conducteur neutre. Le câble à raccordement direct doit avoir une longueur supplémentaire de 5 pi (1,52 m) pour pouvoir déplacer la sécheuse si nécessai...
Page 52 - Connexion facultative –; À utiliser pour le raccordement direct
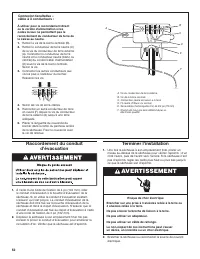
52 Terminer l’installation 1. Une fois la sécheuse à son emplacement final, placer un niveau au-dessus de la sécheuse pour vérifier l’aplomb ; d’un côté l’autre, puis de l’avant vers l’arrière. Si la sécheuse n’est pas d’aplomb, régler les pieds plus haut ou plus bas jusqu’à ce que la sécheuse soit ...
Page 53 - INVERSION DU SENS D’OUVERTURE DE LA PORTE
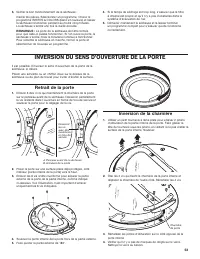
53 3. Vérifier le bon fonctionnement de la sécheuse : Insérer les pièces. Sélectionner un programme. Choisir le programme WHITES & COLORS (blanc et couleurs) et laisser la sécheuse fonctionner pendant au moins cinq minutes. La sécheuse s’arrête une fois la durée écoulée. REMARQUE : La porte de l...
Page 55 - INFORMATIONS GÉNÉRALES POUR
55 Consignes d’entretien : ■ Nettoyer le filtre à charpie avant chaque charge. ■ Comment enlever la charpie accumulée : • À l’intérieur de la caisse de la sécheuse : Retirer la charpie tous les 2 ans, ou plus souvent, selon l’utilisation de la sécheuse. Le nettoyage doit être effectué par une person...
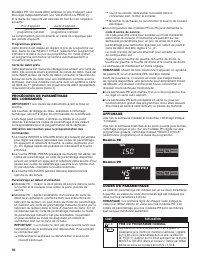
Page 56 - PROCÉDURES DE PARAMÉTRAGE; Modèles PD; CODES DE PARAMÉTRAGE; CODE
56 g Ouvrir la console, débrancher la bretelle dans le connecteur AA1, fermer la console. g Brancher la sécheuse ou reconnecter la source de courant électrique. ■ La configuration des modèles PR en PN peut demander le code d’accès de service . Ce code peut être entré pour accéder au mode d’entretien...
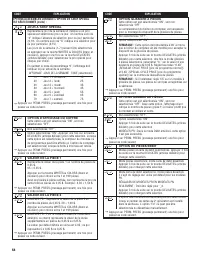
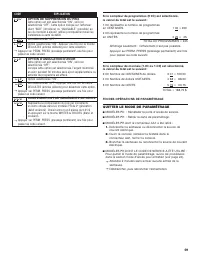
Page 59 - QUITTER LE MODE DE PARAMÉTRAGE
59 7. 0 0 7. 0 0 8. 0 0 8. 0 0 9. 1 09. 1 0 a. 0 0 a. 0 0 6. 0 5 6. 0 5 a. s c c. 2 0c. 2 0 c. 0 5 8. 0 0 e. 0 0 e. 0 0 e. a c 8. 0 0 8. c s j. c8 l. 0 0 l. 0 0l. p s j. c8 j. c8 j. c8 j. e8 8. c e 8. c e8. 0 0 0. 0 0 0. 0 0 7. 0 0 7. 0 0 8. 0 0 8. 0 0 9. 1 09. 1 0 a. 0 0 a. 0 0 6. 0 5 6. 0 5 a. s c...
Page 60 - GARANTIE LIMITÉE (PIÈCES UNIQUEMENT – MAIN-D’ŒUVRE NON COMPRISE)
60 60 GARANTIE DE LAVEUSE, SÉCHEUSE, LAVEUSE ET SÉCHEUSE SUPERPOSÉES À USAGE COMMERCIAL, BUANDERIE SUPERPOSÉE À USAGE COMMERCIAL, ET LAVEUSES ET SÉCHEUSES À CHARGE MULTIPLE ET À USAGE COMMERCIAL PAYANTES MAYTAG ® GARANTIE LIMITÉE (PIÈCES UNIQUEMENT – MAIN-D’ŒUVRE NON COMPRISE) Pendant les cinq premi...
Page 62 - NOTES