Page 4 - Table of Contents
2 Important Customer Information...............................................1 Table of Contents .......................................................................2 The Basics ...................................................................................5 Phone Overview ....................
Page 7 - The Basics; Phone Overview; Front View; Proximity Sensor
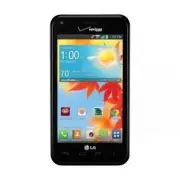
5 The Basics Phone Overview Front View Recent Apps Key Quick Keys Back Key Home Key Proximity Sensor LED Indicator Front Camera Lens Earpiece Home Screen Menu Key Search Key Function Key Menu Key Direction Keys Home Key Back Key Write and Share Key NOTES • All screen shots in this guide are simulate...
Page 9 - Directional Keys; Rear View; LED Flash
7 The Basics 14. Directional Keys Scroll through menu items. You can highlight a specific field or object by pressing up, down, left or right. Rear View LED Flash Speaker Back Cover Rear Camera Lens 15. LED Flash Brightens up the captured image or recorded video when you turn on the flash. 16. Speaker ...
Page 10 - Volume Keys; Top and Bottom Views; Microphone
8 The Basics Side Views USB/Charger Port Volume Keys Power/ Lock Key 19. Power/Lock Key Press to lock/unlock the screen. Press and hold to turn the phone on/off, restart it, activate/deactivate airplane mode, or change the sound settings. 20. USB/Charger Port Allows you to connect the phone and the ...
Page 11 - Help; The; Setting Up Your Phone; Step 1. Remove the Back Cover
9 The Basics Help The Help application allows you to quickly and conveniently view information about your phone, including an icon glossary, how-to videos, My Verizon video, and additional guides. To access Help, from the Home screen, tap the Apps Key > Help . Setting Up Your Phone Step 1. Remove...
Page 12 - Step 3. Insert the Battery
10 The Basics Step 3. Insert the Battery Insert the battery, making sure to align the gold contacts. Press down gently to secure the battery. Step 4. Replace the Back Cover Place the cover over the back of the phone, then press down along the edges to secure the cover. Step 5. Charge the Phone Befor...
Page 13 - Charging with USB; USB Cable
11 The Basics Your device comes with a USB Cable and an adapter which connect together to charge your phone. To charge your phone: NOTE Improper handling of the USB/Charger Port, as well as the use of an incompatible charger, may cause damage to your phone and void the warranty. 1. Correctly orient ...
Page 14 - Removing the Battery and SIM Card; Removing the battery; the phone and gently pop the back cover off to remove it.
12 The Basics Removing the Battery and SIM Card WARNING! Your device includes a heat sensor activated by the battery temperature. A pop-up message will be displayed if the device turned itself off or stopped charging as in the following cases: • Your phone may turn itself off when the battery temper...
Page 15 - Inserting and Removing a Memory Card; Inserting a microSD card; To remove the microSD card
13 The Basics Removing the SIM card 1. Turn the phone off, then remove the back cover and the battery (as demonstrated in the previous instructions). 2. Locate the SIM card slot and gently slide the SIM card out to remove it. CAUTION If you switch to a new SIM card, the device will display a message...
Page 16 - Powering your phone on/off; Optimizing Battery Life; Tips to extend the life of your battery
14 The Basics To unmount the microSD card It is important to unmount the microSD card to avoid damage to it or the data saved on the card. 1. From the Home screen, tap the Apps Key . 2. Tap Settings > Storage . 3. Tap Unmount SD card > OK . Powering your phone on/off To turn your phone on, pre...
Page 17 - To check the battery charge level
15 The Basics connection, and power used for the device such as screen brightness and phone ringtone. NOTE Allowing other devices to use your phone's mobile hotspot connection will drain your battery more quickly. To check the battery charge level From the Home screen, tap the Apps Key > Settings...
Page 18 - Setting Up Your Device; To set up your device, follow the steps below:
16 The Basics Battery saver mode If the battery charge level drops to low levels, the phone automatically activates Battery saver mode (if set to On) to conserve battery power until you can recharge it. From the Home screen, tap the Apps Key > Settings > Battery. Tap next to Battery saver to t...
Page 20 - Done
18 The Basics 8. Setup is complete. Tap Done to begin using your phone. * During the initial setup, you have the option to select from two different modes. If you did not make a selection, the default mode is set to Standard. Starter mode Starter mode is a simplified smartphone software version to he...
Page 22 - Phone’s Status Icons; Call icons
20 The Basics Phone’s Status Icons The Status Bar appears at the top of the screen. It displays icons indicating that you’ve received notifications (on the left) and icons indicating the phone’s status (on the right), along with the current time. Notification icons Status icons If you have more notific...
Page 24 - Touchscreen; Touch or tap; A single finger touch selects items. For example, tap an; Touch and hold; Touch and hold an item on the screen by touching it and; Drag; Touch and hold an item for a moment and then, without lifting your
22 The Basics Touchscreen Your touchscreen provides an excellent way to interact with and use your phone. With the touch of your finger, you can download and use available applications, make menu selections, and access data saved to your phone. The following terms are used for describing the differen...
Page 25 - Rotate the screen; Capturing the screen; Volume Key; To turn the phone sounds off; Silent mode; OR
23 The Basics canvas view and the spread apart gesture returns to the normal Home screen view. Rotate the screen From many applications, the orientation of the screen rotates with the phone as you turn it from portrait to landscape and back again. Rotate the phone sideways for landscape orientation....
Page 26 - Getting to Know the Home Screen; Quick Keys; Phone
24 The Basics Getting to Know the Home Screen The Home screen is your starting point to access all of the features on your phone. It displays application shortcuts, icons, widgets, and other features. Status Bar Shows device status information, including the time, signal strength, battery status, an...
Page 27 - Modifying the Quick Keys Bar; Rearrange; To return to the Home screen; Home Key; To view other Home screen canvases; Mini canvas view
25 The Basics Modifying the Quick Keys Bar You can modify the icons in the Quick Keys bar to suit your needs. Rearrange : Touch and hold the icon to move, then drag it to another position in the Quick Keys bar. Add : Open the Applications screen, then drag the icon you want onto the Quick Keys bar. ...
Page 28 - Add canvas; Hiding items on the Home screen; Back Key
26 The Basics Pinch in on any of the Home screen canvases to change from full screen view to mini canvas view. From mini canvas view you have the following options: To go directly to any canvas, simply tap the one you want. To add another canvas, tap the Add canvas icon . To delete a canvas, touch a...
Page 29 - To return to the full screen view, touch the; The Smart screen feature
27 The Basics Using Dual View Dual view allows you to easily add items to any of the Home screen canvases. Touch and hold an empty spot on any of the Home screen canvases to view your Home screen on top and the Applications screen on the bottom. Flick sideways to scroll through the Home screen canva...
Page 30 - Text Input Methods; QWERTY Keyboard; On-screen keyboard typing tips
28 The Basics Text Input Methods QWERTY Keyboard Your device has a slide-out QWERTY Keyboard which you can use instead of the on-screen keyboard. It functions like a standard keyboard, but also includes additional keys to help you use your device. Search Key Function Key Menu Key Direction Keys Home...
Page 31 - Text input settings
29 The Basics Enter one capital letter Tap the Shift Key to capitalize the next letter. The key changes to . Enter all capital letters Tap the Shift Key twice until is displayed. Tap again to revert to lowercase. Highlight text Double-tap a word to highlight it. To highlight a range of text, double-...
Page 33 - To change the default language; Keyboard use for input; Interchangeable input
31 The Basics Languages You can set only one default language for your device, but you can set multiple languages used for the on-screen keyboard and QWERTY Keyboard. To change the default language From the Home screen, tap the Apps Key > Settings > Language and input > Language > tap th...
Page 34 - Applications: How to View, Open and Switch; Opening and Closing the Applications screen; Opening the Applications screen
32 The Basics Applications: How to View, Open and Switch All of the applications on your phone, including any applications that you downloaded and installed from Play Store or other sources, are grouped together on the Applications screen, which you access from your Home screen. If you have more app...
Page 35 - Closing the Applications screen; Customizing the Applications screen
33 The Basics Closing the Applications screen To manually close the Applications screen, tap (or press) the Home Key . You can also tap (or press) the Back Key to close it. NOTE The Applications screen closes automatically when you tap an icon to open its application. Dragging an icon onto your Home...
Page 36 - Checking application information; Opening an application
34 The Basics Rearranging the Applications screen icons You can rearrange the order of the icons on the Applications screen to provide more convenient access to the applications you use the most. 1. From the Home screen, tap the Apps Key . 2. Tap the Apps tab at the top of the screen (if necessary),...
Page 37 - Opening multiple applications; Switching between multiple applications; Recent Apps Key; Adding items to the Home screen; Applications screen; Apps Key
35 The Basics Opening multiple applications 1. Tap an application icon to open it. 2. Tap (or press) the Home Key . NOTE If the application icon you want is on your Home screen, simply tap the icon to open and use it. 3. From the Home screen, tap the Apps Key in the Quick Keys bar. 4. Tap the icon f...
Page 38 - Changing an icon into a widget
36 The Basics 3. Drag the icon to where you want it on the screen, then lift your finger. Customizing an application icon on your Home screen You can create your own custom application icon(s) using the images in your Gallery. Tap to change the icon size. 1. Touch and hold the icon you want to custom...
Page 39 - Moving items to other Home screen canvases; Working with Menus; Options menus; Menu Key
37 The Basics 1. Touch and hold an app icon on the Home screen, then release it. A blue frame appears around the icon if it can be resized and changed into a widget (if it can’t, only the Edit icon is displayed). 2. Drag the corners of the frame to make it larger and change it into a widget. Touch a...
Page 40 - Managing Notifications; To open the Notifications panel; Touch and drag the Status Bar to the bottom of the screen.
38 The Basics Context menus Context menus contain options that apply to a specific item on the screen. To open a Context menu, touch and hold an item on the screen. Not all items have Context menus. If you touch and hold an item that has no Context menu, nothing will happen. When you touch and hold c...
Page 41 - To respond to a notification; Clear; To close the Notifications panel; Back
39 The Basics Clear button Tap here to clear your list of event-based notifications. Tap a notification to open it. Quick Settings Bar Displays up to 15 Quick settings icons. Flick right or left to scroll through the list. QSlide Apps Bar Displays up to 4 QSlide applications. Tap an icon to open it in...
Page 42 - Using the Quick Settings; Customizing the Quick Settings bar; Edit
40 The Basics Quick Settings on the Notifications panel The top of the Notifications panel includes a Quick Settings bar. The icons in this bar provide a quick, convenient way to change settings without accessing any applications. If you set more than four icons on the bar, swipe left and right to scr...
Page 43 - QSlide apps on the Notifications panel; Using the QSlide apps; QSlide; Customizing the QSlide apps bar
41 The Basics Drag one of the icon handles at the right side of the screen to move its icon to another position in the Quick Settings bar. NOTE Changing the checkmarks reorganizes the icons in the Quick Settings bar. 2. Tap (or press) the Back Key to return to the Notifications panel. QSlide apps on ...
Page 44 - Searching Your Phone and the Web; Phone and Web search using text entry; Search Widget
42 The Basics 1. Open the Notifications panel, then tap the Edit icon on the right side of the QSlide apps bar. Drag one of the icon handles at the right side of the screen to move its icon to another position in the QSlide apps bar. NOTE Changing the checkmarks automatically reorganizes the icons. W...
Page 46 - Locking the Screen; Setting a Screen Lock for the First Time
44 The Basics Locking the Screen You can lock your screen so that only you can unlock it to make calls, access your data, buy applications, and prevent unauthorized use. Setting a Screen Lock for the First Time 1. From the Home screen, tap the Apps Key > Settings > Lock screen . NOTE From this...
Page 47 - Unlocks the screen with an alphanumeric sequence. Enter; Disabling the screen lock; You’re prompted to draw and redraw your new pattern.
45 The Basics Password Unlocks the screen with an alphanumeric sequence. Enter a password (at least 4 characters) and tap Continue . Re-enter your password and tap OK to confirm it. From then on, any time you want to turn the phone on or unlock the screen, you will need to perform the unlock action y...
Page 48 - Lock timer
46 The Basics 6. Enter a Backup PIN and tap Continue . Then confirm your Backup PIN and tap OK . Changing your Lock Screen PIN or Password 1. From the Home screen, tap the Apps Key > Settings > Lock screen . 2. Tap Select screen lock . 3. Enter your current unlock sequence, then tap Next . 4. T...
Page 50 - Customizing the Home Screen; To add an item to the Home screen; Go to the Home screen canvas where you want to add the item.; The following category tabs appear at the bottom of the screen:
48 The Basics Customizing the Home Screen You can personalize your Home screen by adding application icons, shortcuts, widgets, and other items to any Home screen canvas. You can also change the wallpaper. To add an item to the Home screen 1. Go to the Home screen canvas where you want to add the it...
Page 52 - QuickMemoTM; To create a QuickMemo; QuickMemo; Using QuickMemo options
50 The Basics QuickMemo™ The QuickMemo ™ feature allows you to create memos and capture screen shots. You can use QuickMemo to easily and efficiently create memos during a call, with a saved picture or on the current phone screen. To create a QuickMemo Drag the Status Bar downward, then tap the Quick...
Page 53 - Viewing saved QuickMemos
51 The Basics Overlay : Tap to keep the memo on top and continue using other phone features. NOTE Tap the front touch keys icon in the bottom left corner of the screen to enable or disable the front touch keys at the bottom of the device while using the QuickMemo feature. Memo background : Tap to to...
Page 54 - Connecting Quickly With Your Contacts; Open your Contacts list and tap the contact’s picture.; on the icon you’ve tapped, a different application will open.
52 The Basics Connecting Quickly With Your Contacts As you build up your list of contacts on your phone, you can use the Quick Contact for Android feature to quickly email, text message, place a call, or locate your contacts. Quick Contact for Android is a special set of icons that you can use to qu...
Page 55 - Connecting to Networks and Devices; Connecting to Mobile Networks; To disable data when roaming; to remove the checkmark from the box. You
53 Connecting to Networks and Devices Connecting to Mobile Networks When you buy your phone and sign up for service, your phone is configured to use your provider’s mobile networks for voice calls and for transmitting data. Different locations may have different mobile networks available. Initially, ...
Page 56 - Connecting to Wi-Fi Networks; Modify network; To turn Wi-Fi on and connect to a Wi-Fi network
54 Connecting to Networks and Devices Connecting to Wi-Fi Networks Wi-Fi is a wireless networking technology that can provide Internet access at distances of up to 100 meters, depending on the Wi-Fi router and your surroundings. To use Wi-Fi on your phone, you must connect to a wireless access point...
Page 57 - Security; To forget a Wi-Fi network; Forget network
55 Connecting to Networks and Devices When you’re connected to a network, you can tap the network name in the Wi-Fi settings screen for details about the speed, security, address, and related settings. To add a Wi-Fi network You can add a Wi-Fi network so the phone will remember it, along with any s...
Page 58 - USB connection; To select a USB mode for a connection; or; Prompt for connection mode; checkbox in the USB connection; Using the Status Bar to change the connection mode setting
56 Connecting to Networks and Devices USB connection USB connection is a feature that allows your device to connect to a PC using a USB Cable. Allows the phone to be used as mass storage when a microSD card (sold separately) is present in the device. It also allows you to transfer unprotected conten...
Page 59 - microSD Card; Viewing Memory in the microSD Card; The storage capacity page is divided into two sections: Internal; Formatting the microSD Card; to release the microSD card from device use.; Connecting Your Device to Your Computer; To connect your device to a computer via USB; Use the USB Cable that came with your phone to connect the phone to
57 microSD Card microSD Card A microSD card can be used to provide additional file storage for your device. It is an optional accessory that is sold separately. This device supports microSD cards up to 64 GB. Viewing Memory in the microSD Card 1. From the Home screen, tap the Apps Key > Settings &...
Page 60 - Sending data from your phone using Bluetooth; Sending data using Bluetooth
58 microSD Card 2. Open the Notifications panel, then tap USB connected. 3. Tap the connection mode you want to use to connect to the PC. Choose from the following options: Charge phone, Media sync (MTP) , Internet connection , and Camera (PTP) . Using Media sync (MTP) or Camera (PTP) mode When you c...
Page 62 - Calls; Placing and Ending Calls; To open the Phone application
60 Calls Placing and Ending Calls You can place and end calls using the Phone application. Manually dial calls using the Dial tab. Dial from your phone’s memory using the Recent calls tab, the Contacts tab, the Favorites tab, or the Groups tab. To open the Phone application From the Home screen, tap...
Page 64 - Airplane mode
62 Calls To end a call Simply tap the End Key on the Call screen to end the call. If you accessed other device functions while the call was in progress, there are several ways to return to the Call screen to end the call. Tap (or press) the Home Key , tap the Phone Key in the Quick Keys bar, then ta...
Page 65 - Answering or Rejecting Calls; To answer a call; To ignore a call and divert it to voice mail
63 Calls Answering or Rejecting Calls When you receive a phone call, the Incoming call screen opens with the caller ID and any additional information about the caller that you have saved in the Contacts list. All incoming calls are recorded in the Recent tab. To answer a call If the screen is unlock...
Page 66 - To ignore a call and send a text message
64 Calls Tap to send a quick message to the caller and forward them to your voice mail. Unlocked Screen Locked Screen Tap to ignore the call and send the caller directly to your voice mail box to leave a message. Swipe in any direction to send a quick message to the caller and forward them to your v...
Page 67 - Working With the Recent tab; To open the Recent tab
65 Calls Working With the Recent tab The Recent tab lists all of the calls you’ve dialed, received, or missed. It offers a convenient way to redial a number, return a call, or add a number to your Contacts. To open the Recent tab From the Home screen, tap the Phone Key , then tap the Recent tab at t...
Page 68 - Calling Your Contacts; To call a contact
66 Calls To add a number from the Recent tab to your Contacts 1. Touch and hold the call entry. 2. Tap Add to Contacts in the Context menu. 3. Tap New contact or Update contact and save it as necessary. Clearing your Recent calls You can delete the entire list of Recent calls at once or selectively ...
Page 69 - Contacts Key; Instant List; Dial; Sequence matches; Call Key
67 Calls To call a favorite contact 1. From the Home screen, tap the Contacts Key in the Quick Keys bar, then tap the Favorites tab . 2. Tap the contact you want to call. 3. Tap the contact’s phone number you want to call. Instant List Instant list is displayed on the Dial tab to help you use the in...
Page 70 - Voice Command; To place a call by speaking; Options During a Call; To mute the microphone
68 Calls Voice Command You can use the Voice Command application to place a phone call by speaking the name of a contact or a phone number. To place a call by speaking 1. From the Home screen, tap the Apps Key > Voice Command . If you have a Bluetooth headset that supports “voice-recognition” or ...
Page 71 - Mute; To turn the speakerphone on or off; Speaker; To switch between a Bluetooth headset and the phone; Bluetooth
69 Calls When viewing the in-call screen, you can unmute the microphone by tapping the Mute button again. The microphone is unmuted automatically when the call ends. To turn the speakerphone on or off Tap the Speaker button . The light bar on the Speaker button illuminates blue up to indicate that t...
Page 72 - Managing Multiple Calls; To switch between current calls; Swap calls; To set up a conference call; Add call
70 Calls Managing Multiple Calls Contact your wireless service provider to find out which call services are supported. To switch between current calls When you are connected to more than one caller, tap the Swap calls button . The current call will be placed on hold and you will be connected with the...
Page 73 - Listening to Your Voice Mail; To listen to your Voice Mail; To set up your Voice Mailbox
71 Calls Listening to Your Voice Mail When you have a new voice mail message, the Voice mail notification icon appears in the Status Bar. If you have not set up your voice mail number, or if you need to change it, you can do that in the Call settings. To listen to your Voice Mail Following actions wi...
Page 74 - Web; Chrome; Browse web pages
72 Web Chrome The Chrome application allows you to access the internet from your device. Access and selections within this feature are dependent upon your service provider. For specific information on internet access through your phone, contact your service provider. NOTES • You may incur additional ...
Page 76 - Browse with tabs; Create a new tab
74 Web To sign in, open Chrome and tap (or press) the Menu Key > Settings > SIGN IN TO CHROME (at the bottom of the screen). Browse with tabs Your device displays webpages in a tab format allowing you to browse several webpages simultaneously. Create multiple tabs for the sites you want, then ...
Page 77 - Working with tabs; Open an Incognito tab (browse in private)
75 Web Working with tabs Open an Incognito tab (browse in private) From the Chrome application, tap (or press) the Menu Key > New incognito tab . When browsing in incognito mode, your browsing history, cookies, and cache are automatically cleared once you’ve closed all of your incognito tabs. You...
Page 78 - Download files; To view downloaded files:; Use bookmarks; Create a bookmark
76 Web Download files 1. Touch and hold a download link. 2. In the Context menu that appears, tap Save link . To view downloaded files: From the Applications screen (or the Home screen), tap the Downloads icon . To open an a downloaded file, tap it. To view earlier downloads, tap the heading date you w...
Page 79 - Edit or delete bookmark; Chrome Settings; Preload webpages
77 Web Open a bookmark 1. From the Chrome application, tap (or press) the Menu Key > Bookmarks (or open a new tab and tap at the bottom of the screen). 2. Tap the bookmark you want to visit. NOTE If you don't see the bookmark, tap the folder you saved it in, or tap the filepath to go to the locati...
Page 80 - Enable or disable autofill
78 Web Autofill forms Use the autofill feature to fill in web forms with a single tap. Enable or disable autofill 1. From the Chrome application, tap (or press) the Menu Key > Settings > Autofill forms . 2. Slide the Autofill forms switch at the top of the screen to either On (blue) or Off (grey). M...
Page 81 - Enable or disable saving passwords
79 Web Save passwords You can let Chrome remember your passwords for the sites you use. Enable or disable saving passwords 1. From the Chrome application, tap (or press) the Menu Key > Settings > Save passwords . 2. Slide the switch at the top of the screen to either On (blue) or Off (grey). M...
Page 83 - Adjust text size on webpages; slider along the bar to adjust the text size scaling.; Force enable zoom; checkbox to override a site's zoom; Clear browsing data; Checkmark the items to clear, then tap
81 Web Accessibility Adjust text size on webpages 1. From the Chrome application, tap (or press) the Menu Key > Settings > Accessibility . 2. Drag the Text scaling slider along the bar to adjust the text size scaling. The Preview box displays how it will appear on webpages. Force enable zoom 1...
Page 84 - Maps; To search for a location
82 Maps Maps Directions Icon Tap here to get directions to a destination. Search Icon Tap here to open the keyboard to enter your search. Maps Menu Tap here to access various other map settings. To search for a location 1. From the Home screen, tap the Apps Key > Maps . 2. Tap the Search icon . 3...
Page 85 - Switching between common features
83 Maps The starting point and destination can be entered manually using the keyboard or you can select places using their drop-down menus. NOTE When you search for a location in the Maps application, your current location is automatically entered as the starting point and a dialog box displays your...
Page 86 - Weather; Checking the Weather; To get details about the weather
84 Weather Checking the Weather The Weather application provides weather forecasts and other weather information. You can place a Weather widget on your Home screen for a summary of your local weather. Access the Weather application for more detailed weather information. NOTE The Weather widget on y...
Page 87 - Changing Weather Settings; List Settings
85 Weather Managing your City list The City list screen allows you to manage a list of cities that you want to monitor. From the Weather application, tap (or press) the Menu Key > Settings > Edit city list . Tap the Add icon in the upper-right corner of the screen to add another location. Tap ...
Page 88 - Communication; Contacts; Using Your Contacts; To open your Contacts application; Contacts list
86 Communication Contacts The Contacts application allows you to store names, phone numbers, and other information in your phone’s memory. Using Your Contacts Use the Contacts application to add, view, and communicate with your friends and acquaintances. To open your Contacts application From the Ho...
Page 89 - To view details about a contact
87 Communication ICE Contacts You can select up to 5 contacts to include in this list. In addition, you can enter personal information about you (such as medical record number, allergies, medications, special instructions, etc.) that can be accessed in case of an emergency. To add your personal info...
Page 90 - Adding Contacts; To add a new contact
88 Communication 3. The Contact’s information will be displayed. The following options are available. The Dial icon places a call to the number. The Message icon starts a message. The Email icon starts an email. Tap (or press) the Menu Key for the following menu options: Delete , Share , Join, Set a...
Page 91 - Editing a Contact entry; To import contacts from your microSD card
89 Communication entered information to open a drop-down menu of preset labels. For example, WORK or HOME for a phone number. 7. Tap the Picture frame icon to select a picture to display next to the name in your list of contacts and in other applications. 8. When you’re finished, tap Save . Editing a...
Page 93 - Adding a Contact to Your Favorites; To add a contact to your Favorites list
91 Communication Send as one file : This setting combines all of your contacts into one file. It allows a faster transfer, but some devices can’t receive contact information sent using this option. Send separately : This setting sends each contact as a separate vCard file. It allows all devices to rece...
Page 94 - To connect using Quick Contact for Android
92 Communication Communicating with Your Contacts From the Contacts , Favorites , or Recent tab, you can quickly call or send a text (SMS) or multimedia message (MMS) to a contact’s default phone number. You can also open a list of all of the ways you can communicate with that contact. This section ...
Page 95 - To call a contact’s default number; Selecting Which Contacts are Displayed; To change which groups are displayed
93 Communication To communicate with a contact 1. Open the Contacts application. 2. Tap the contact with whom you want to communicate. 3. In the contact’s details screen, tap the way to start communicating with the contact. The Dial icon places a call to the number. The Message icon starts a message...
Page 96 - Joining Contacts; application attempts to avoid duplication by; To join contacts; Tap the contact whose information you want to join with the first; Separating Contact Information; To separate contact information; Tap the contact entry whose information you want to separate.; Viewing joined contacts
94 Communication Joining Contacts When you add an account or add contacts in other ways, such as by exchanging emails, the Contacts application attempts to avoid duplication by joining contact information automatically. You can also join contacts manually. To join contacts 1. Open the Contacts appli...
Page 97 - Email; Email icons
95 Communication 3. Tap Join contacts . 4. Tap the Joined contacts tab to view joined entries, then tap the Separate button if you want to separate them. Searching your online contacts simultaneously You can search for your contacts simultaneously from all of your online accounts. To set your device...
Page 99 - Reading Your Email; To read an email; Email settings; General settings
97 Communication The account from which you send email by default is indicated by a red vertical line on the left side of the account. NOTE While viewing the combined list of your email messages, default email account messages are indicated by a vertical red line along the left side if the list. Rea...
Page 100 - Account settings
98 Communication Tap Auto-advance to select which screen to display after deleting an email. Tap Resize image to set the default size for image attached while composing. Tap Geotagging notification to checkmark this setting to display a notification pop-up when sharing pictures with location informati...
Page 102 - Visual Voice Mail; To use Voice Mail
100 Communication Tap Outgoing server settings to manually change your outgoing server settings. Tap Exchange server settings (only available for Exchange account) to manually change your Exchange server settings. REMOVE ACCOUNT Tap Remove account to remove your email account. To add an account From...
Page 103 - Gmail; Opening Gmail and Your Inbox; To open the Gmail application; Messaging; To open the Messaging application
101 Communication voice mail list, you can select an entry (see step 5). For additional options, tap (or press) the Menu Key . The following options are available: Search , Save , Delete , Set as heard , Sort by , Saved Voice Mail , Refresh , Settings , and Subscribe to Premium . 4. Tap a voice mail...
Page 104 - To delete a message thread from the Messaging window; Delete; To send a text message; New message
102 Communication Tap here to create a new message. Tap an existing message thread to open it. NOTE Pinch in (or spread apart) on your list of messages to resize it for easier viewing or navigation. To delete a message thread from the Messaging window 1. Touch and hold the message thread. 2. Tap Del...
Page 105 - To create and send a multimedia message
103 Communication Contacts icon Tap here to enter the recipient(s) by selecting from entries in your Contacts. To field Tap here to enter the recipient(s) manually. Message field Tap here to enter your message. Attachment icon Tap here to add an attachment to your message. Character counter Displays t...
Page 106 - To send a group message
104 Communication Tap Audio to select an audio file. Tap Record voice to record an audio message and attach it. Tap Location to select a map location to send. Tap Contact to select either vCard or text to attach. Tap Schedule to select an event to send. Tap Richnote to select a memo saved in Richnote...
Page 107 - To view details about a message; Changing Messaging Settings; Storage
105 Communication To respond to messages you receive If you’re working in a message window, messages that you receive from that contact are displayed. Otherwise, you receive a new message notification and a new message icon appears in the Status Bar. When you tap the new message notification, the Mess...
Page 108 - Manage SIM card messages:; Multimedia message; Allow delivery reports:; Group Conversation
106 Communication Signature: Tap to enter a signature to automatically send with your messages. Checkmark appears after a signature is entered. Callback number: Tap to view or edit the callback number sent with your messages. Checkmark appears after the dialog box is closed. Text message Delivery re...
Page 109 - Hangouts; To open the Hangouts app
107 Communication Conversation theme Allows you to change the conversation display style. Tap the Wallpaper tab to choose the conversation background. Choose from the 6 options provided, a photo from your Gallery, or take a picture to use. Tap the Bubble tab to choose the conversation style. Choose ...
Page 110 - Hangouts chatting list
108 Communication To sign out of Hangouts From your chatting list, tap the Menu icon (at the upper-right corner of the screen) > Settings > tap your account > Sign out . Chatting with Friends 1. From the Home screen, tap the Apps Key > Hangouts . 2. Tap the New icon to view the contacts ...
Page 111 - Hangouts Option menu
109 Communication Chatting list Options menu From the chatting list, tap the Menu icon (at the upper-right corner of the screen) to access its Options menu that includes Set mood , Invites , Snooze notifications , Archived Hangouts , Settings , Send feedback , and Help . Switching between the chattin...
Page 112 - Call a Contact by Voice Command
110 Communication invites , Google+ profile , Phone number confirmed , Blocked people , Sign out , and Improve Hangouts . Tap SMS to access the following settings: SMS Enabled/Disabled , Import SMS , Notifications , Sound , Vibrate , Group messaging , Delete old messages , Delivery reports , Auto retri...
Page 113 - Entertainment; Camera; To open the Camera app; Camera; Getting to know the viewfinder; Flash
111 Entertainment Camera The Camera app not only allows you to take high quality pictures and share them, but also includes many specialized features eliminating the need for any other camera. To open the Camera app From the Home screen, tap Camera (in the QuickTap Bar). OR With the backlight off, p...
Page 117 - Using the Time catch shot mode
115 Entertainment The captured image retains the orientation in which it was taken. If you hold the phone both vertically and horizontally to take pictures, you’ll need to rotate the phone to view full screen images in the Gallery app. TIP! While viewing a photo, you can tap the Menu Key , then tap ...
Page 118 - Gallery views
116 Entertainment While viewing a photo in Gallery, tap the Menu Key to access the following additional options. Set image as : Tap to set the photo as the icon identifying a contact or set it as your Home screen wallpaper or Lock screen wallpaper. Move : Tap to move the picture to another album or ...
Page 119 - The pinch-to-zoom gesture allows you to easily zoom in and out of the; Video Camera; To open the Video Camera; From the Home screen, tap
117 Entertainment or flick horizontally to quickly scroll through them, then tap the one you want to view. The pinch-to-zoom gesture allows you to easily zoom in and out of the displayed picture. Spread your fingers to zoom in and pinch your fingers to zoom out. Continue the pinch in gesture on an imag...
Page 121 - Watching your saved videos
119 Entertainment Volume key : Set how to use the Volume Key. Choose Record or Zoom . Storage : Sets where your pictures are saved. Choose SD card or Internal storage . Help : Tap to open the Camera help guide. Reset : Tap to reset to the default settings. Recording a quick video 1. Open the Camera ...
Page 122 - The Video Editor application; Opening the Video Editor application
120 Entertainment 3. Tap the Play icon in the middle of the still image of the video you want to play. 4. Tap Photos or Videos , then tap Always or Just once to begin the video playback. From your Gallery 1. From the Home screen, tap the Apps icon > the Apps tab (if necessary) > Gallery , then...
Page 123 - Project Options
121 Entertainment Project list screen Help Icon Project List Area Tap a project to edit it. Project Title Tap here to edit the title. Project options Project Options New : Tap to create a new project. Export : Tap to export the finished project to play in other applications. Play : Tap to play your v...
Page 124 - Zoom in or out of the timeline; Video Wiz; Opening and using the Video Wiz application
122 Entertainment Add text : Tap to add text to a video or image clip. QSlide while playing videos in the Video Editor application You can play videos in a QSlide window allowing you to use other applications while you are watching a video in the Video Editor application. 1. Open the Video Editor ap...
Page 126 - Play Store; To open the Play Store application; To get help with Play Store
124 Entertainment Play Store Play Store allows you to browse and search for free and paid applications. To open the Play Store application From the Home screen, tap the Apps Key > Play Store . Tap here to search for apps. To get help with Play Store Play Store Help web pages are available from al...
Page 127 - button; Your Wishlist; at; Downloading and Installing Applications; To download and install an application; Find an application you want and open its details screen.
125 Entertainment Play Store menu options Tap (or press) the Menu setting button to access My apps , My wishlist , People , Redeem , Settings , and Help . Your Wishlist While viewing an app (or music, games, etc.), tap the Wishlist icon at the top of the screen to add it to your wishlist for future ...
Page 128 - ACCEPT; To create a Google Wallet account
126 Entertainment If the application requires access to your data or control of any functions on your phone, Play Store tells you what the application can access. WARNING! Read this screen carefully. Be especially cautious with applications that have access to many functions or to a significant amoun...
Page 129 - Music; Transferring Music Files to Your Phone; To copy music files into your phone; Opening Music and Working with Your Library
127 Entertainment WARNING! When you’ve used Google Wallet once to purchase an application from Play Store, the phone remembers your password, so you don’t need to enter it the next time. For this reason, you should secure your phone to prevent others from using it without your permission. Music Tran...
Page 130 - To switch views, simply select a Music tab.; To search for music in your library
128 Entertainment To open Music and view your music library From the Home screen, tap the Apps Key > Music . The Music application searches for music files you copied into your phone, then builds a catalog of your music based on the information contained in each music file. This can take from a few...
Page 131 - To delete multiple songs; Playing Music; To play music
129 Entertainment 2. Start typing the name of the artist, album, or track you’re looking for. Matching songs are displayed in the list below the search box. 3. Tap a matching song to play it or tap a matching album or artist to view a list of associated songs. To delete a song Touch and hold a song ...
Page 132 - stops when you stop it.; To control playback
130 Entertainment The Playback screen opens and the song you tapped or the first song in the album or other playlist starts to play. Your music continues to play even when you switch applications or receive a phone call. The tracks in the current playlist play in order until it reaches the end, then ...
Page 133 - To control playback volume
131 Entertainment Tap to restart the current track or skip to the previous track in the album, playlist, or shuffle. Touch and hold to rewind. Tap to open the current playlist. Tap to play the current playlist in shuffle mode (tracks are played in random order). Tap to toggle through the repeat modes ...
Page 134 - Working with Playlists; To create a playlist
132 Entertainment Sleep timer: Turns off the player automatically. Choose from the following options to activate the sleep timer: Off , After 10 min , After 20 min , After 30 min , After 1 h , After 2 h . Dolby Digital Plus: Applies the following sound effect options (when using a headset): Normal ,...
Page 135 - Videos; To open the Videos application
133 Entertainment To remove a song from a playlist 1. Open a playlist. 2. Touch and hold the song you want to remove, then tap Remove from playlist in the Context menu that appears. To delete a playlist 1. Open the Playlists library. 2. Touch and hold the playlist, then tap Delete in the Context men...
Page 136 - Video playback icons
134 Entertainment Playing Videos 1. Open the Videos application. 2. Tap the video you want to play. Hold the phone in the orientation it was recorded in for correct playback sizing. Tap the screen to display the playback controls. The following options allow you to control the video playback: Tap to...
Page 137 - YouTubeTM; Opening YouTube and Watching Videos; To open the YouTube application
135 Entertainment DivX ® VOD : Tap to display a pop-up window with the DivX registration code. Register your device with DivX before using this video-on-demand feature. SmartShare Tap Videos at the top of the screen, then tap Nearby devices to connect to a device to view your video(s). Tap Nearby de...
Page 138 - SmartShare
136 Entertainment Tap (or press) the Back Key to stop playback and return to the videos list. For details about these features, visit the YouTube website. To search for videos 1. At the top of the main YouTube screen, tap the Search icon . 2. Enter the text to search for or tap the Microphone icon t...
Page 139 - Enjoying the content from Nearby devices; Connecting devices; Voice Recorder
137 Entertainment Enjoying the content via a variety of devices You can share your phone’s content with a variety devices. Tap or tap > SmartShare Beam to share the content in the Gallery , Music , Videos , POLARIS Office 4 apps. Playing/Sending Play : You can play the content via a TV, a Bluetoot...
Page 140 - Play a Voice Memo
138 Entertainment Record a Voice Memo 1. From the Home screen, tap the Apps Key > Voice Recorder . 2. Tap the Record button to start recording. 3. Speak into the microphone. 4. When you’re finished, tap the Stop button . The recording is automatically saved to your recordings list. Storage Icon Ta...
Page 142 - Tools; Calendar; Viewing Your Calendar and Events; To open the Calendar application
140 Tools Calendar Viewing Your Calendar and Events Open the Calendar application to view events you’ve created or that others have invited you to. When you first set up your phone, you configured it to use an existing Google Account or you created a new account. The first time you open the Calendar ap...
Page 143 - Day; Dual Calendar Views; Working in Day View
141 Tools To change your calendar view No matter where you are in the Calendar application, you can easily switch calendar views. Simply tap the date in the upper left corner of the screen to display a drop-down menu of calendar views. Tap Day , Week , Month , Year , or Agenda . To view more informa...
Page 144 - To learn more about events in Day view; Tap an event to view its details.; To add an event in Day view; Tap and hold a timeslot in the day to open a Context menu then tap; Working in Week View
142 Tools To switch to Day view Tap the date in the top left corner above the calendar, then tap Day in the drop-down menu. New Event Icon Tap here to create a new event. Month Calendar Handle Drag this handle downward to display (or upward to hide) the Month dual view. Return to Current Date Tap he...
Page 145 - Week; To learn more about events in Week view; New event; Working in Month View
143 Tools To switch to Week view Tap the date in the top left corner above the calendar, then tap Week in the drop-down menu. Return to Current Date Tap here to jump back to the current date in the Week calendar. Month Calendar Handle Drag this handle downward to display (or upward to hide) the Mont...
Page 146 - To view more information about events in Month view
144 Tools To choose the Calendar view style From the Home screen, tap the Apps Key > Calendar > Menu Key > Settings > Calendar settings > Show events by . Event brief displays a brief description of the event in the timeslot on the calendar. Timeline displays a line to indicate a cale...
Page 147 - Working in Agenda View; Touch to view events before; To switch to Agenda view; Agenda; To learn more about events in Agenda view; Viewing Event Details; To view information about an event
145 Tools Working in Agenda View Agenda view is a list of your events in chronological order by day. A month’s worth of events is displayed. To show earlier Agenda events, tap Touch to view events before at the top of your Agenda list. To show later Agenda events tap Touch to view events after at th...
Page 148 - While viewing an event’s details; Setting an Event Reminder; To set an event reminder
146 Tools Delete Icon Tap here to delete the event. Edit Icon Tap here to edit the event. Calendar Icon Tap here to go back to Calendar view. While viewing an event’s details Tap the Reminders fields to change them (time and notification). Tap Add reminder to add another reminder, or tap the Remove re...
Page 149 - To delete an event reminder; Calculator; To open and use the Calculator
147 Tools You can use Google Calendar on the web to configure additional reminder settings. To edit an event reminder 1. Tap an event to view its details. 2. Tap the existing Time field, then tap when you want to be notified. 3. Tap the corresponding Notification field, then tap how you want to be notifie...
Page 151 - Setting and Activating Alarms; To set an alarm
149 Tools functions underneath it. Drag it back to the right to use the QSlide window again. Tap in the upper right corner of the title bar to close the Calculator QSlide window. Alarm/Clock You use the Alarm/Clock application to access the Alarms, Timer, World clock, and Stopwatch functions. These ...
Page 153 - Alarm; Setting the Timer
151 Tools When the alarm sounds Tap Dismiss or, if set, use the gesture feature of simply flipping the device over to stop the alarm. Tap Snooze to stop the alarm for the snooze duration you set. NOTE If Puzzle lock is set to On, using the gesture feature of flipping the device over will snooze the al...
Page 154 - Managing the World Clock Cities; Polaris Office 4; Create a New Document
152 Tools 2. Tap the New City icon at the bottom of the screen then search through the available cities for the one you want. Managing the World Clock Cities Tap the New City icon at the bottom left corner of the screen to select another city for your list. Tap the Delete icon at the bottom right co...
Page 156 - File Manager; To open the File Manager app
154 Tools 5. When you’re finished editing, tap the File icon > Save . Then tap (or press) the Back Key to exit. Polaris Office 4 toolbar The Polaris Office 4 application has a toolbar that appears automatically when you create a document. 1. To display the toolbar in an existing document, tap the To...
Page 157 - Tasks; To open the Tasks application
155 Tools : Allows you to copy files and folders to another folder. : Allows you to delete files and folders. Tap the Menu Key to access the following options. Sort by : Allows you to sort files and folders by Name, Size, Date, or Type. View by : Allows you to display your files as a List or in a Grid. ...
Page 159 - To open the Settings application; To switch to tab view
157 Settings Settings The Settings application contains most of the tools for customizing and configuring your phone. All of the settings in the Settings application are described in this section. For settings specific to the Chrome application, see the Chrome section and for settings specific to the G...
Page 161 - Mobile data
159 Settings Battery saving for Wi-Fi : Checkmark to minimize battery usage when Wi-Fi is on. Install certificates : Allows you to install certificates from storage. MAC address : Displays your phone's MAC address (which may need to be entered in the router to connect to some wireless networks with MA...
Page 166 - DEVICE; Mode change
164 Settings Bluetooth tethering: Tap the Bluetooth tethering switch to toggle between On and Off. On shares the phone's internet connection with other Bluetooth devices. Help: Displays information regarding mobile broadband connection, mobile hotspot, and Bluetooth tethering. NETWORK Mobile network...
Page 172 - PERSONAL; Location
170 Settings Brightness: Checkmark to set the screen brightness when Battery saver is activated. Tap the Settings icon to change the setting. Screen timeout: Checkmark to set the screen timeout when Battery saver is activated. Tap the Settings icon to change the setting. Touch key light: Checkmark t...
Page 176 - PERSONAL DATA; ACCOUNTS; Backup Assistant Plus; Daily backup schedule:
174 Settings MOUSE/TRACKPAD Pointer speed: Sets the pointer speed using a slide bar to select it. Backup & reset This menu allows you to back up and erase your data. BACKUP & RESTORE Back up my data: Checkmark to backup application data, Wi-Fi passwords, and other settings to Google servers....
Page 177 - Automatic date & time
175 Settings Email This menu is available when you set up an email account and displays your accounts and settings. Refer to the Email settings section on page 95. Google This menu is available when you set up a Google account and displays your accounts and allows you to manage their settings. Add a...
Page 180 - About phone
178 Settings Auto-launch Car Home: Checkmark to automatically set the phone to the Car Home mode when it’s mounted in the car cradle. Printing PRINT SERVICES Cloud Print : Tap the Cloud Print switch to toggle it On or Off. On allows you to select a printer via the Cloud feature. About phone This men...
Page 181 - Safety; This product contains chemicals known to the State of; HAC
179 Safety WARNING: This product contains chemicals known to the State of California to cause cancer and birth defects or reproductive harm. Call (800) 243-0000 for more information. Wash hands after handling. HAC This phone has been tested and rated for use with hearing aids for some of the wireles...
Page 182 - Bodily Contact During Operation
180 Safety Bodily Contact During Operation This device was tested for typical use with the back of the phone kept 0.39 inches (1.0 cm) from the body. To comply with FCC RF exposure requirements, a minimum separation distance of 0.39 inches (1.0 cm) must be maintained between the user’s body and the ...
Page 183 - - Reorient or relocate the receiving antenna.; Are wireless phones safe?
181 Safety Part 15.21 statement Changes or modifications that are not expressly approved by the manufacturer could void the user’s authority to operate the equipment. Part 15.105 statement This equipment has been tested and found to comply with the limits for a class B digital device, pursuant to Par...
Page 184 - What does “SAR” mean?
182 Safety continues. In the United States, the Food and Drug Administration (“FDA”) and the Federal Communications Commission (“FCC”) set policies and procedures for wireless phones. The FDA issued a website publication on health issues related to cell phone usage where it states, “The scientific co...
Page 185 - Can I minimize my RF exposure?
183 Safety SAR value. This is because the SAR value may vary from call to call, depending on factors such as proximity to a cell site, the proximity of the phone to the body while in use, and the use of hands-free devices. For more information about SARs, see the FCC’s OET Bulletins 56 and 65 at htt...
Page 186 - Where can I get further information about RF emissions?; FDA Consumer magazine November-December 2000
184 Safety that using a cell phone causes brain tumors or other ill effects. [The UK’s] recommendation to limit cell phone use by children was strictly precautionary; it was not based on scientific evidence that any health hazard exists. A copy of the UK’s leaflet is available at http://www.dh.gov.uk ...
Page 187 - Consumer Information on SAR
185 Safety World Health Organization Avenue Appia 20 1211 Geneva 27 Switzerland Telephone: 011 41 22 791 21 11 http://www.who.int/mediacentre/factsheets/fs193/en/ International Commission on Non-Ionizing Radiation Protection c/o Bundesamt fur Strahlenschutz Ingolstaedter Landstr. 1 85764 Oberschleis...
Page 190 - FCC Hearing Aid Compatibility and Volume Control
188 Safety T-Ratings: Phones rated T3 or T4 meet FCC requirements and are likely to generate less interference to hearing devices than phones that are not labeled. T4 is the better/ higher of the two ratings. Hearing devices may also be rated. Your hearing device manufacturer or hearing health profe...
Page 191 - or other wireless
189 Safety Caution: Avoid potential hearing loss. Prolonged exposure to loud sounds (including music) is the most common cause of preventable hearing loss. Some scientific research suggests that using portable audio devices, such as portable music players and cellular telephones, at high volume setti...
Page 192 - TIA Safety Information; Exposure to Radio Frequency Signal
190 Safety hearing difficulty after listening to your portable audio device, discontinue use and consult your doctor. TIA Safety Information The following is the complete TIA Safety Information for wireless handheld phones. Exposure to Radio Frequency Signal Your wireless handheld portable phone is a...
Page 193 - Phone Operation; For your phone to operate most efficiently:; Electronic Devices; Should not carry the phone in a breast pocket; Hearing Aids
191 Safety Phone Operation NORMAL POSITION: Hold the phone as you would any other telephone with the antenna pointed up and over your shoulder. Tips on Efficient Operation For your phone to operate most efficiently: Don’t touch the antenna unnecessarily when the phone is in use. Contact with the anten...
Page 195 - For Vehicles Equipped with an Air Bag; Safety Information; Caution; Do not disassemble or open crush, bend or deform, puncture or shred.
193 Safety facilities; vehicles using liquefied petroleum gas (such as propane or butane); areas where the air contains chemicals or particles (such as grain, dust, or metal powders); and any other area where you would normally be advised to turn off your vehicle engine. For Vehicles Equipped with an...
Page 196 - Battery usage by children should be supervised.; Charger and Adapter Safety; The charger and adapter are intended for indoor use only.; Battery Information and Care
194 Safety an unqualified and non-approved battery may present a risk of fire, explosion, leakage or other hazard. • Promptly dispose of used batteries in accordance with local regulations. • Battery usage by children should be supervised. • Avoid dropping the phone, battery or exposing the phone or b...
Page 199 - General Notice; Do not paint your phone.
197 Safety or pen) may short-circuit the phone and may cause an explosion. Always cover the receptacle when not in use. • Don’t short-circuit the battery. Metallic articles such as a coin, paperclip or pen in your pocket or bag or contact with sharp objects including animal bites may short-circuit t...
Page 200 - Do not turn your phone on or off when putting it to your ear.; FDA Consumer Update; Do wireless phones pose a health hazard?
198 Safety pictures, and videos could also be deleted.) The manufacturer is not liable for damage due to the loss of data. • When you use the phone in public places, set the ringtone to vibration so you don't disturb others. • Do not turn your phone on or off when putting it to your ear. • Use acces...
Page 201 - National Institute for Occupational Safety and Health
199 Safety users of the health hazard and to repair, replace, or recall the phones so that the hazard no longer exists. Although the existing scientific data do not justify FDA regulatory actions, the FDA has urged the wireless phone industry to take a number of steps, including the following: • Supp...
Page 202 - What kinds of phones are the subject of this update?
200 Safety get from wireless phones. Base stations are thus not the subject of the safety questions discussed in this document. 3. What kinds of phones are the subject of this update? The term “wireless phone” refers here to handheld wireless phones with built-in antennas, often called “cell”, “mobi...
Page 203 - phones poses a health risk?
201 Safety and primary brain cancer, glioma, meningioma, or acoustic neuroma, tumors of the brain or salivary gland, leukemia, or other cancers. None of the studies demonstrated the existence of any harmful health effects from wireless phone RF exposures. However, none of the studies can answer ques...
Page 204 - How can I find out how much Radio Frequency energy exposure I can
202 Safety new research programs around the world. The project has also helped develop a series of public information documents on EMF issues. The FDA and the Cellular Telecommunications & Internet Association (CTIA) have a formal Cooperative Research And Development Agreement (CRADA) to do rese...
Page 205 - What steps can I take to reduce my exposure to Radio Frequency
203 Safety participation and leadership of FDA scientists and engineers. The standard, “Recommended Practice for Determining the Spatial-Peak Specific Absorption Rate (SAR) in the Human Body Due to Wireless Communications Devices: Experimental Techniques”, sets forth the first consistent test methodol...
Page 207 - Where can I find additional information?; Driving
205 Safety 12. Where can I find additional information? For additional information, please refer to the following resources: FDA web page on wireless phones (http://www.fda.gov/cellphones/) Federal Communications Commission (FCC) RF Safety Program (http://www.fcc.gov/oet/rfsafety) International Commi...
Page 208 - Don’t take notes or look up phone numbers while driving. If you are
206 Safety 1. Get to know your wireless phone and its features such as speed dial and redial. Carefully read your instruction manual and learn to take advantage of valuable features most phones offer, including automatic redial and memory. Also, work to memorize the phone keypad so you can use the s...
Page 210 - Cautions; Locations are inaccurate when GPS and Wi-Fi are not set.
208 Safety Cautions The user interface of Google applications (Google Search, Google Maps, Navigation, etc.) can vary depending on its software version. Locations are inaccurate when GPS and Wi-Fi are not set. With the Android operating system, some available Play Store applications only operate cor...
Page 211 - Specifications; DivX Mobile
209 Specifications DivX Mobile ABOUT DIVX VIDEO: DivX ® is a digital video format created by DivX, LLC, a subsidiary of Rovi Corporation. This is an official DivX Certified ® device that plays DivX video. Visit divx.com for more information and software tools to convert your files into DivX videos. ABOU...
Page 212 - LIMITED WARRANTY STATEMENT
210 LIMITED WARRANTY STATEMENT 1. WHAT THIS WARRANTY COVERS: LG offers you a limited warranty that the enclosed subscriber unit and its enclosed accessories will be free from defects in material and workmanship, according to the following terms and conditions: (1) The limited warranty for the produc...
Page 213 - (7) Damage resulting from use of non LG approved accessories.
211 LIMITED WARRANTY STATEMENT (5) Products which have had the serial number removed or made illegible. (6) This limited warranty is in lieu of all other warranties, express or implied either in fact or by operations of law, statutory or otherwise, including, but not limited to any implied warranty ...
Page 214 - DO NOT RETURN YOUR PRODUCT TO THE ABOVE ADDRESS.
212 LIMITED WARRANTY STATEMENT Some states do not allow the exclusive limitation of incidental or consequential damages or limitations on how long an implied warranty lasts; so these limitations or exclusions may not apply to you. This warranty gives you specific legal rights and you may also have ot...
Page 216 - Index; Numbers
214 Index Numbers 10 Driver Safety Tips 205 A About phone 178 ACCOUNTS 174 Adding a Contact to Your Favorites 91 Adding Contacts 88 Alarm/Clock 149 Answering or Rejecting Calls 63 Applications: How to View Open and Switch 32 Avoid potential hearing loss. 189 B Browse with tabs 74 C Calculator 147 Ca...