Page 2 - UWP Mounting System installation; Optional Cover Plate installation; Optional Cover Plate
2 UWP Mounting System installation 1. Open package to find the UWP. See Figure 1. 2. Position the UWP on the wall. Level and mark hole positions. See Figure 2. Drill holes at marked positions, and then lightly tap supplied wall anchors into wall using a hammer. ‒ If your box contains red anchors, us...
Page 3 - Terminal designations; Wiring UWP; Gently
3 Terminal designations Conventional Systems Heat pump systems Terminal Description Terminal Description S/S Input for a wired indoor, outdoor sensor S/S Input for a wired indoor, outdoor sensor Y Compressor Stage 1 Y Compressor Stage 1 Y2 Compressor Stage 2 Y2 Compressor Stage 2 G Fan Relay G Fan R...
Page 4 - Setting Slider Tabs
4 Setting Slider Tabs Set R Slider Tab, see Figure 9. • Use built-in jumper (R Slider Tab) to differentiate between one or two transformer systems. • If there is only one R wire, and it is connected to the R , Rc , or RH terminal on the old thermostat, set the slider to the up position (1 wire) . • ...
Page 5 - Whole house humidifier, dehumidifier, or ventilator; Using U Slider Tab
5 Whole house humidifier, dehumidifier, or ventilator Using U Slider Tab Wired to humidifier, dehumidifier or ventilator with built-in transformer. Wired to fresh air damper powered by furnace transformer. Wired to humidifier, ventilator, or damper powered by external transformer Wired to low speed ...
Page 6 - Wiring; Conventional systems; Heat-only System with Fan
6 * This thermostat requires a C-Wire. If a C-Wire is not available and the system uses Y and G, use C-Wire adapter accessory THP9045A1098 or THP9045A1023. Wiring 1H/1C System (1 transformer) R Power Rc [R+Rc joined by Slider Tab] Y Compressor contactor C* 24VAC common W Heat relay G Fan relay NOTES...
Page 10 - Apple® HomeKitTM Setup
10 1. Touch Menu icon at the bottom of the T10 home screen.2. Scroll down and select “Connect HomeKit”.3. Use the Apple Home App and select “Add Accessory”. Scan the code shown on your thermostat with your phone. 4. Follow the instructions on your phone. Apple® HomeKit™ Setup How to use your thermos...
Page 11 - How to use Priority
11 72 72 72 72 M38799 M38798 72 72 72 72 How to use Priority Priority creates an average temperature in your home based on specific rooms. This allows you to prioritize comfort where you want it. Selected Rooms Rooms you manually select create an average temperature in your home. Unselected Room Wil...
Page 12 - How to find more options; Installer options include; Installer Setup; Menu
12 How to find more options Installer options include Installer Setup • System type• IAQ control (hum, dehum, vent) reminders Installer Test • Turn on heat, cool, or IAQ equipment Devices & Sensors • View, add, or remove RedLINK indoor sensors• View, add, or remove wireless outdoor sensor (T10+ ...
Page 13 - Alerts and notifications
13 Alerts and notifications 1. The red dot above the Menu icon indicates an active alert or notification. Touch the Menu icon to view active Alerts & Notifications. 2. Touch Notifications to open this menu. 3. Touch the alert message to see more information about the alert. M38797 Notifications ...
Page 14 - Troubleshooting
14 Screen is blank • Check circuit breaker and reset if necessary. • Make sure power switch at heating and cooling system is on. • Make sure furnace door is closed securely. Screen is difficult to read • Check setting in MENU / Preferences / Inactive backlight brightness or Inactive sleep backlight ...
Page 15 - Specifications
15 Temperature Ranges Heat: 40 °F to 90 °F (4.5 °C to 32.0 °C) Cool: 50 °F to 99 °F (10.0 °C to 37.0 °C) Operating Ambient Temperature 32 °F to 120 °F (0 °C to 48.9 °C) Shipping Temperature -20 °F to 120 °F (-28.9 °C to 48.9 °C) Operating Relative Humidity 5% to 90% (non-condensing) Humidity setting...
Page 16 - -year limited warranty
www.resideo.com © 2023 Resideo Technologies, Inc. All rights reserved. The Honeywell Home trademark is used under license from Honeywell International, Inc. This product is manufactured by Resideo Technologies, Inc. and its affiliates. Tous droits réservés. La marque de commerce Honeywell Home est u...
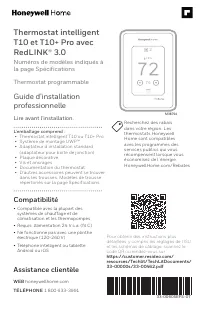
Page 17 - Thermostat intelligent; Numéros de modèles indiqués à; Guide d’installation; Lire avant l’installation.; L’emballage comprend :; Compatibilité; WEB
74 2 18% M38794 33-00605EFS-07 Pour obtenir des instructions plus détaillées, y compris les réglages de l’ISU et les schémas de câblage, scannez le code QR ou rendez-vous sur https://customer.resideo.com/ resources/Techlit/TechLitDocuments/ 33-00000s/33-00462.pdf Thermostat intelligent T10 et T10+ P...
Page 18 - Installation du système de montage UWP; Installation du couvercle en option; plaque du couvercle en option
2 Installation du système de montage UWP 1. Ouvrez l’emballage, puis repérez l’UWP. Voir la figure 1. 2. Placez l’UWP contre le mur. Placez-le de niveau, puis marquez l’emplacement des trous. Voir la figure 2. Percez les trous aux emplacements marqués, puis à l’aide d’un marteau, posez doucement les...
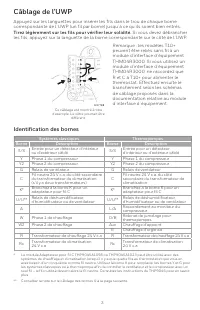
Page 19 - Identification des bornes; Câblage de l’UWP; Tirez légèrement sur les fils pour vérifier leur solidité.
3 Identification des bornes Systèmes classiques Thermopompes Borne Description Borne Description S/S Entrée pour un détecteur d’intérieur ou d’extérieur câblé S/S Entrée pour un détecteur d’intérieur ou d’extérieur câblé Y Phase 1 du compresseur Y Phase 1 du compresseur Y2 Phase 2 du compresseur Y2 ...
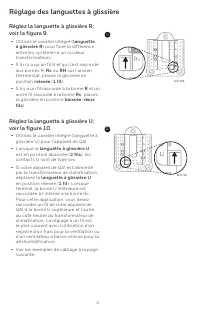
Page 20 - Réglage des languettes à glissière; Réglez la languette à glissière R
4 Réglage des languettes à glissière Réglez la languette à glissière R; voir la figure 9. • Utilisez le cavalier intégré ( languette à glissière R ) pour faire la différence entre les systèmes à un ou deux transformateurs. • S’il n’y a qu’un fil R et qu’il est raccordé aux bornes R, Rc ou RH sur l ’...
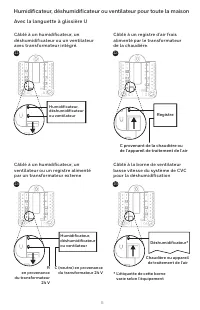
Page 21 - Avec la languette à glissière U
5 Humidificateur, déshumidificateur ou ventilateur pour toute la maison Avec la languette à glissière U Câblé à un humidificateur, un déshumidificateur ou un ventilateur avec transformateur intégré. Câblé à un registre d’air frais alimenté par le transformateur de la chaudière. 11 12 Registre C prov...
Page 22 - Câblage; Systèmes classiques; Système de chauffage avec ventilateur
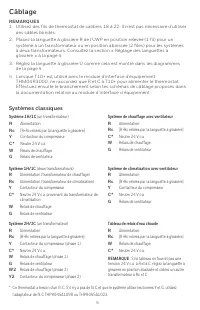
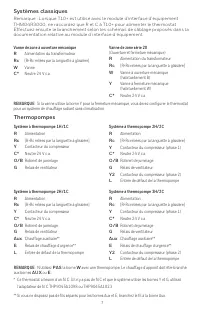
6 * Ce thermostat a besoin d’un fil C. S’il n’y a pas de fil C et que le système utilise les bornes Y et G, utilisez l’adaptateur de fil C THP9045A1098 ou THP9045A1023. Câblage Système 1H/1C (un transformateur) R Alimentation Rc [R+Rc reliées par la languette à glissière] Y Contacteur du compresseur...
Page 26 - Utilisation de votre thermostat; Configuration d’Apple® HomeKitTM
10 Utilisation de votre thermostat L’écran s’allume lorsque vous appuyez au centre de la zone de température affichée. Température intérieure Affiche la température intérieure actuell Régler la température Utilisez les flèches vers le haut et vers le bas pour sélectionner la température souhaitée. P...
Page 27 - Utilisation de la fonction Priorité
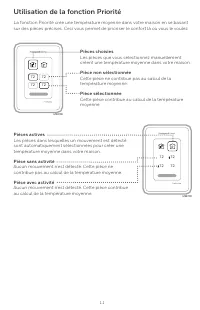
11 72 72 72 72 M38799 M38798 72 72 72 72 Utilisation de la fonction Priorité La fonction Priorité crée une température moyenne dans votre maison en se basant sur des pièces précises. Ceci vous permet de prioriser le confort là où vous le voulez. Pièces choisies Les pièces que vous sélectionnez manue...
Page 28 - Comment trouver d’autres options; Les options de l’installateur comprennent; Configuration de l’installateur; la configuration de l’installateur.
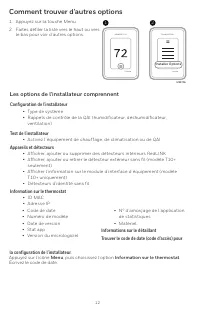
12 Comment trouver d’autres options 1. Appuyez sur la touche Menu.2. Faites défiler la liste vers le haut ou vers le bas pour voir d’autres options. Les options de l’installateur comprennent Configuration de l’installateur • Type de système• Rappels de contrôle de la QAI (humidificateur, déshumidifi...
Page 29 - Alertes et notifications
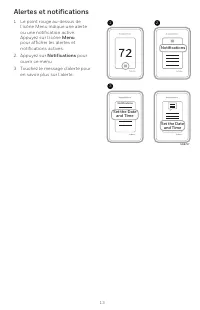
13 Alertes et notifications 1. Le point rouge au-dessus de l’icône Menu indique une alerte ou une notification active. Appuyez sur l’icône Menu pour afficher les alertes et notifications actives. 2. Appuyez sur Notifications pour ouvrir ce menu. 3. Touchez le message d’alerte pour en savoir plus sur...
Page 30 - Dépannage
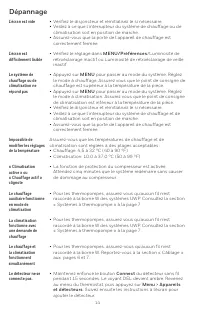
14 L’écran est vide • Vérifiez le disjoncteur et réinitialisez le si nécessaire. • Veillez à ce que l’interrupteur du système de chauffage ou de climatisation soit en position de marche. • Assurez-vous que la porte de l’appareil de chauffage est correctement fermée. L’écran est difficilement lisible...
Page 31 - Spécifications
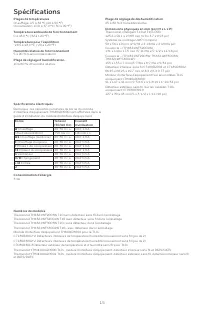
15 Plages de températures Chauffage: 4,5 à 32 °C (40 à 90 °F) Climatisation: 10,0 à 37,0 °C (50 à 99 °F) Température ambiante de fonctionnement 0 à 48,9 °C (32 à 120 °F) Température pour l’expédition -28,9 à 48,9 °C (-20 à 120 °F) Humidité relative de fonctionnement 5 à 90 % (sans condensation) Plag...
Page 32 - Garantie limitée de 5 ans
www.resideo.com © 2023 Resideo Technologies, Inc. All rights reserved. The Honeywell Home trademark is used under license from Honeywell International, Inc. This product is manufactured by Resideo Technologies, Inc. and its affiliates. Tous droits réservés. La marque de commerce Honeywell Home est u...
Page 33 - El paquete incluye lo siguiente:; Termostato inteligente; Números de modelo indicados; Guía de instalación; Leer antes de instalar; Compatibilidad; Servicio de atención al cliente; SITIO WEB
74 2 18% M38794 33-00605EFS-07 Para obtener instrucciones más detalladas, incluidos los ajustes de configuración del instalador (Installer Setup, ISU) y los diagramas de cableado, escanee el código QR o vaya a https://customer.resideo.com/resources/ Techlit/TechLitDocuments/ 33-00000s/33-00462.pdf E...
Page 34 - Instalación del sistema de montaje UWP; Instalación de placa de cubierta opcional; placa de cubierta opcional
2 Instalación del sistema de montaje UWP 1. Abra el paquete para buscar el UWP. Consultar la figura 1. 2. Posicione el UWP en la pared. Nivele y marque las posiciones de los orificios. Consultar la figura 2. Perfore los orificios en los lugares marcados y luego inserte cuidadosamente los anclajes pr...
Page 35 - Designaciones de las terminales; Cableado UWP; Tire suavemente de los cables para verificar que estén
3 Designaciones de las terminales Sistemas convencionales Sistemas de bomba de calor Terminal Descripción Terminal Descripción S/S Entrada para un sensor cableado interior o exterior S/S Entrada para un sensor cableado interior o exterior Y Etapa de compresión 1 Y Etapa de compresión 1 Y2 Etapa de c...
Page 36 - Configuración de las lengüetas deslizantes; Configure la lengüeta deslizante
4 Configuración de las lengüetas deslizantes Configure la lengüeta deslizante R; consulte la Figura 9. • Utilice el puente incorporado ( lengüeta deslizante R ) para diferenciar entre sistemas de uno o dos transformadores. • Si solo hay un cable R y está conectado a la terminal R , Rc o RH del termo...
Page 37 - Humidificador, deshumidificador o ventilador para toda la casa; Uso de la lengüeta deslizante U
5 Humidificador, deshumidificador o ventilador para toda la casa Uso de la lengüeta deslizante U Cableado a un humidificador, deshumidificador o ventilador con transformador incorporado. Cableado a un regulador de aire fresco alimentado por un transformador de caldera. 11 12 Regulador C de una calde...
Page 38 - Cableado; Sistemas convencionales
6 * Este termostato requiere un cable C. Si no hay uno disponible y el sistema usa los cables Y y G, use el accesorio adaptador para cables C THP9045A1098 o THP9045A1023. Cableado Sistema de 1 nivel de calefacción y 1 de enfriamiento (1 transformador) R Potencia Rc [R+Rc conectados con lengüeta desl...
Page 42 - Cómo usar el termostato; Temperatura interior; Configuración de Apple® HomeKitTM
10 Cómo usar el termostato La pantalla se activará cuando presione el área central de la temperatura que se muestra. Temperatura interior Muestra la temperatura interior actual. Ajustar la temperatura Toque las flechas arriba y abajo para configurar su temperatura deseada. Prioridad actual Muestra e...
Page 43 - Cómo usar la prioridad
11 72 72 72 72 M38799 M38798 72 72 72 72 Cómo usar la prioridad La configuración de prioridades genera una temperatura promedio en el hogar tomando como referencia habitaciones específicas. Esto le permite priorizar la comodidad en los espacios que desee. Habitaciones seleccionadas Las habitaciones ...
Page 44 - Cómo obtener más opciones; Entre las opciones del instalador, se incluyen las siguientes:; Configuración del instalador; Dispositivos y sensores; Información del termostato
12 Cómo obtener más opciones Entre las opciones del instalador, se incluyen las siguientes: Configuración del instalador • Tipo de sistema• Recordatorios de control IAQ (hum., deshum., vent.) Prueba del instalador • Encender la calefacción, la refrigeración o el equipo IAQ Dispositivos y sensores • ...
Page 45 - Alertas y notificaciones
13 Alertas y notificaciones 1. El punto rojo encima del ícono Menu (Menú) indica una alerta o notificación activa. Toque el ícono Menu (Menú) para ver las alertas y notificaciones activas. 2. Toque Notifications (Notificaciones) para abrir este menú. 3. Toque el mensaje de alerta para ver más inform...
Page 46 - Solución de problemas
14 La pantalla está en blanco • Revise el disyuntor del circuito y restablezca si es necesario. • Asegúrese que el interruptor de alimentación del sistema de calefacción y refrigeración se encuentre encendido. • Asegúrese que la puerta de la caldera se encuentre bien cerrada. Tiene dificultades para...
Page 47 - Especificaciones
15 Rangos de temperatura Calefacción: De 4.5 ºC a 32.0 ºC (de 40 ºF a 90 ºF) Refrigeración: De 10.0 °C a 37.0 °C (de 50 °F a 99 °F) Temperatura ambiente de funcionamiento De 0 °C a 48.9 °C (de 32 °F a 120 °F) Temperatura de envío De -28.9 °C a 48.9 °C (de 20 °F a 120 °F) Humedad relativa de funciona...
Page 48 - Garantía limitada de 5 años; Información regulatoria
www.resideo.com © 2023 Resideo Technologies, Inc. All rights reserved. The Honeywell Home trademark is used under license from Honeywell International, Inc. This product is manufactured by Resideo Technologies, Inc. and its affiliates. Tous droits réservés. La marque de commerce Honeywell Home est u...