Honeywell THX321WF2003W - Manuals
Honeywell THX321WF2003W – Manual, User Manual, Installation Manual in PDF format online.
Manuals:
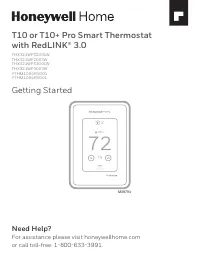
Manual Honeywell THX321WF2003W


Summary
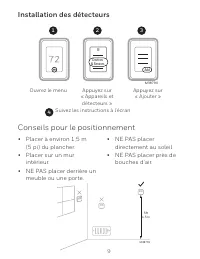
3 Installing sensors Placement Tips Open the Menu Tap “Devices & Sensors” Tap “Add” Follow the on-screen instructions • DO place about 5 feet above the floor. • DO place on inside walls.• DON’T place behind furniture or doors. • DON’T place in direct sunlight. • DON’T place above air vents. Devi...
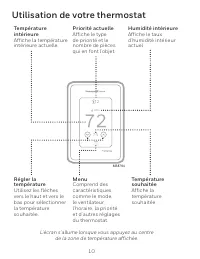
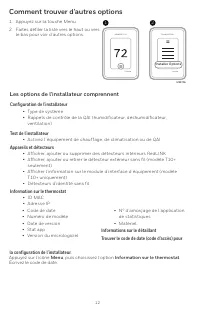
4 How to use your thermostat The screen will wake up by pressing the center area of the displayed temperature. 74 2 18% M38794 Indoor Temperature Displays the current indoor temperature. Adjust Temperature Touch the up and down arrows to set your desired temperature. Current Priority Displays the ty...
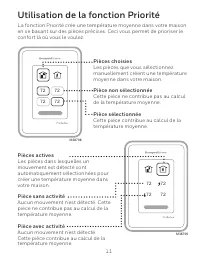
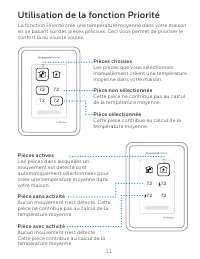
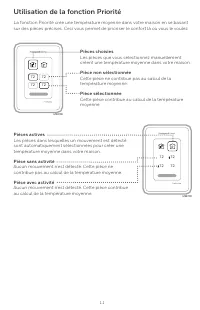
5 72 72 72 72 M38799 How to use Priority Priority creates an average temperature in your home based on specific rooms. This allows you to prioritize comfort where you want it. Selected Rooms Rooms you manually select create an average temperature in your home. Unselected Room Will not contribute to ...
User Manual Honeywell THX321WF2003W


Summary
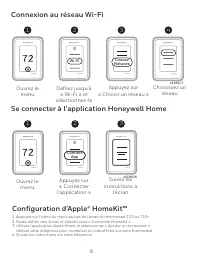
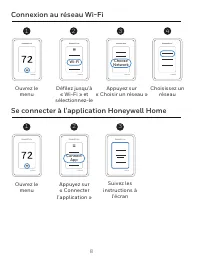
2 Connect to Wi-Fi Connect to the Honeywell Home App 1 Open the Menu 2 Scroll to and select “Wi-Fi” Wi-Fi 3 Tap “Choose Network” Choose Network 4 Select a network 1 Open the Menu 2 Tap “Connect App” Connect App 3 Follow the on-screen instructions
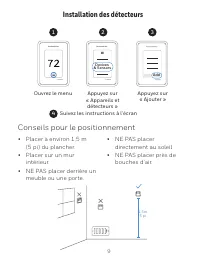
3 Installing sensors 1 3 2 Open the Menu Tap “Devices & Sensors” Tap “Add” Devices & Sensors Add Follow the on-screen instructions 4 5ft 1.5m Placement Tips • DO place about 5 feet above the floor. • DO place on inside walls.• DON’T place behind furniture or doors. • DON’T place in direct su...
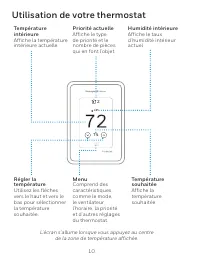
4 How to use your thermostat The screen will wake up by pressing the center area of the displayed temperature. 74 2 18% Indoor Temperature Displays the current indoor temperature. Adjust Temperature Touch the up and down arrows to set your desired temperature. Current Priority Displays the type of p...
Installation Manual Honeywell THX321WF2003W


Summary
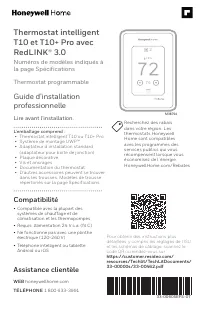
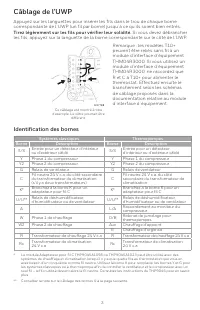
2 UWP Mounting System installation 1. Open package to find the UWP. See Figure 1. 2. Position the UWP on the wall. Level and mark hole positions. See Figure 2. Drill holes at marked positions, and then lightly tap supplied wall anchors into wall using a hammer. ‒ If your box contains red anchors, us...
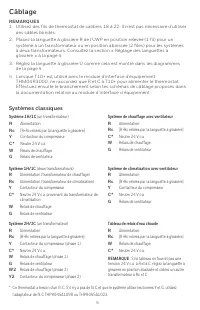
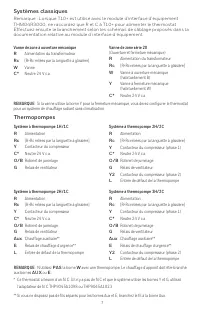
3 Terminal designations Conventional Systems Heat pump systems Terminal Description Terminal Description S/S Input for a wired indoor, outdoor sensor S/S Input for a wired indoor, outdoor sensor Y Compressor Stage 1 Y Compressor Stage 1 Y2 Compressor Stage 2 Y2 Compressor Stage 2 G Fan Relay G Fan R...
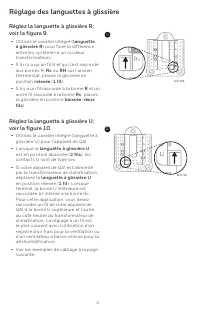
4 Setting Slider Tabs Set R Slider Tab, see Figure 9. • Use built-in jumper (R Slider Tab) to differentiate between one or two transformer systems. • If there is only one R wire, and it is connected to the R , Rc , or RH terminal on the old thermostat, set the slider to the up position (1 wire) . • ...
Honeywell Manuals
-
 Honeywell DT8050A
Installation Manual
Honeywell DT8050A
Installation Manual
-
Honeywell DT8050A
Manual
-
Honeywell DT8050A
User Manual
-
 Honeywell DT8050
Manual
Honeywell DT8050
Manual
-
Honeywell DT8050
User Manual
-
 Honeywell TPFIT25WK
User Manual
Honeywell TPFIT25WK
User Manual
-
Honeywell TPFIT25AWK
User Manual
-
Honeywell TPFIT32WK
User Manual
-
 Honeywell TPFIT32AWK
User Manual
Honeywell TPFIT32AWK
User Manual
-
 Honeywell 24DX47
User Manual
Honeywell 24DX47
User Manual
-
Honeywell 24DX47
Manual
-
 Honeywell TPFIT50PWK
User Manual
Honeywell TPFIT50PWK
User Manual
-
 Honeywell TPFIT50WK
User Manual
Honeywell TPFIT50WK
User Manual
-
Honeywell TPFIT50AWK
User Manual
-
Honeywell TPFIT50APWK
User Manual
-
 Honeywell 00010
User Manual
Honeywell 00010
User Manual
-
 Honeywell ADVBLEWIFI
Manual
Honeywell ADVBLEWIFI
Manual
-
Honeywell ADVBLEWIFI
User Manual
-
Honeywell ADVBLE
Manual
-
Honeywell ADVBLE
User Manual