Honeywell RTH8560D - User Manual
Honeywell RTH8560D Thermostat – User Manual, read for free online in PDF format. We hope this helps you resolve any issues you may have. If you have further questions, please contact us through the contact form.


Table of Contents:
- Page 2 – Quick Installation Guide; Removing your old thermostat; Check that your system is off.; Do you have thick black wires with; If you answered yes to either of
- Page 4 – Disconnect the wires and remove the old wall plate.; the letter on the terminal.; Installing your RTH8500 thermostat; Bundle and insert wires through the UWP.; Pull open the UWP and insert the bundle of
- Page 5 – or; up
- Page 6 – Mount the UWP and close the door.; Attach your thermostat.; Align the thermostat onto the UWP; Connect wires from Step 7.
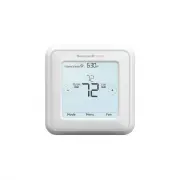
- Page 8 – Key features; Select system; of Menu button; Select Fan mode; Shows schedule; Displays desired; Cool On may flash; Displays current
- Page 9 – System Setup options; To access all system options in the table below, press and hold; MENU; Touch; to scroll through the list.
- Page 10 – Number; Done
- Page 11 – Fan operation settings; System operation settings
- Page 12 – Program Schedule
- Page 13 – Schedule overrides; Hold Until
- Page 14 – Wiring—conventional systems
- Page 15 – Wiring—heat pump; NOT
- Page 16 – Smart Response® Technology
- Page 17 – DATE; TEMP SCALE; Choosing Fahrenheit or Celsius; Alerts and maintenance reminders; ALERTS
- Page 18 – Most problems can be corrected quickly and easily.; Troubleshooting
- Page 19 – -year limited warranty
- Page 20 – Customer assistance
RTH8500 Series
Programmable Thermostat
Quick Installation Guide
M37764
PM
Menu
Fan
Mode
Fan
Auto
Mode
Heat
Wake Away Home Sleep
Following Schedule
Tools you will need
Tools you may need
Wire stripper
Needle-nose pliers
Drill and drill bit
Included in your box
Small flat head screwdriver
Phillips screwdriver
Pencil
Level
Screws and
anchors
UWP™
Mounting
System
(UWP)
RTH8500
Thermostat
Quick Install
Guide
Read and save these
instructions.
For help please visit
honeywellhome.com
Find rebates:
HoneywellHome.com/Rebates
"Loading the manual" means you need to wait until the file loads and becomes available for online reading. Some manuals are very large, and the time they take to appear depends on your internet speed.
Summary
2 Quick Installation Guide Removing your old thermostat 2 Check that your system is off. Change the temperature on your old thermostat. If you don’t hear the system turn on within 5 minutes, the power is off. Note: If you have a digital thermostat that has a blank display, skip this step 1 Turn powe...
4 Quick Installation Guide 8 Disconnect the wires and remove the old wall plate. Use a screwdriver to release wires from terminals. Then, use a wire label to identify each wire as it’s disconnected. The letter on the wire label should match the letter on the terminal. Tip: To prevent wires from fall...
5 RTH8500 Series 10 Insert the wall anchors. It is recommended that you use the wall anchors included in the box to mount your thermostat. You can use the UWP to mark where you want to place the wall anchors. a) Level the wall plate.b) Mark the location of the wall anchors using a pencil. c) Drill t...