Honeywell DLC203AE - User Manual
Honeywell DLC203AE – User Manual, read for free online in PDF format. We hope this helps you resolve any issues you may have. If you have further questions, please contact us through the contact form.


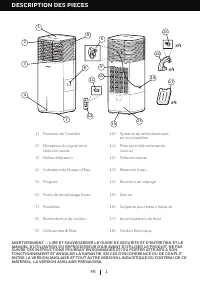
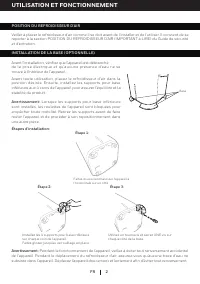
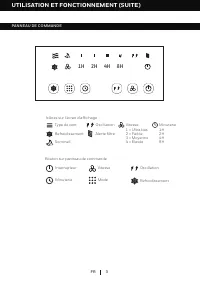
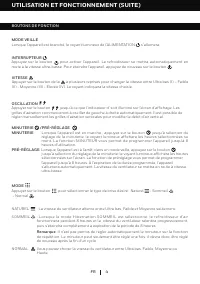
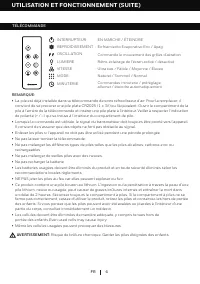
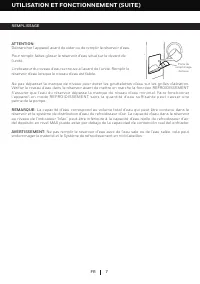
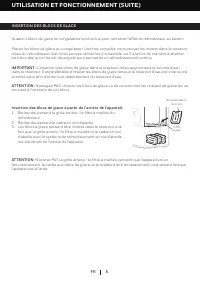


Table of Contents:
- Page 2 – PARTS DESCRIPTION; 0) Honeycomb Cooling Media
- Page 3 – ONE; When the bottom base stands are installed, the unit; COOLER LOCATION
- Page 4 – CONTROL PANEL
- Page 5 – FUNCTION BUTTONS
- Page 7 – REMOTE CONTROL
- Page 8 – FILLING WITH WATER
- Page 9 – ADDING ICE PACKS; exchange the ice packs when the unit is turned OFF.; Insert Ice Packs from the Back of the Unit:
- Page 10 – located at the bottom of the unit. Allow the tank to empty.
- Page 11 – CLEANING THE MESH FILTER AND HONEYCOMB COOLING MEDIA; DO NOT operate the Air Cooler when
- Page 12 – DESCRIPTION DES PIECES
- Page 13 – UTILISATION ET FONCTIONNEMENT; Lorsque les supports pour base inférieure; POSITION DU REFROIDISSEUR D’AIR
- Page 14 – PANNEAU DE COMMANDE
- Page 15 – BOUTONS DE FONCTION; NATUREL
- Page 17 – TÉLÉCOMMANDE; recommandations locales règlements.
- Page 18 – REMPLISSAGE; L’indicateur du niveau d’eau se trouve à l’avant de l’unité. Remplir le
- Page 19 – INSERTION DES BLOCS DE GLACE; ATTENTION
- Page 22 – DESCRIPCIÓN DE PARTES; ADVERTENCIA -- LEA Y GUARDE LA GUIA DE MANTENIMIENTO Y EL MANUAL DE
- Page 23 – USO Y FUNCIONAMIENTO; Pasos de instalación:; Cuando se instalen los soportes inferiores de; UBICACIÓN DEL ENFRIADOR
- Page 24 – PANEL DE CONTROL
- Page 25 – BOTONES DE FUNCIONES
- Page 27 – CONTROL REMOTO
- Page 28 – LLENAR CON AGUA Y HIELO; llenar el depósito de agua.
- Page 29 – AÑADIENDO PAQUETES DE HIELO; de las bolsas de hielo.; Insertar los paquetes de hielo desde la parte posterior de la
- Page 30 – la marca de nivel mínimo de agua. Conecte y encienda de nuevo.; INDICADOR BAJO NIVEL DE AGUA
- Page 31 – LIMPIEZA DEL FILTRO DE MALLA Y FILTRO DE ENFRIAMIENTO HONEYCOMB
Portable Evaporative Air Cooler
User Manual
Read and save these instructions before use
EN
Refroidisseur d'air par évaporation portatif
Mode d'emploi
Lire ces instructions avant l'utilisation et les conserver
FR
Enfriador de Aire Evaporativo Portátil
Manual de Instrucciones
Lea y guarde estas instrucciones antes de usar la unidad
ES
Model / Modèle / Modelo:
DLC203AE Series / Série / Serie
Customer Support:
Assistance Au Client:
Servicio de atencion a clientes:
Web: www.jmatek.com
USA: 1-800-474-2147 | [email protected]
CANADA^: 1-888-209-0999 | [email protected]
^ Canada Customer Support service available for models sold in Canada only.
^ Le Service Client Canadien est disponible uniquement pour les modèles vendus sur le territoire Canadien.
^ Servicio de Atención A Clientes en Canadá disponible solo para modelos vendidos en Canadá.
"Loading the manual" means you need to wait until the file loads and becomes available for online reading. Some manuals are very large, and the time they take to appear depends on your internet speed.
Summary
1 PARTS DESCRIPTION EN WARNING -- READ AND SAVE THE AIR COOLER SAFETY & MAINTENANCE GUIDE AND USER MANUAL BEFORE USING THIS PRODUCT. FAILURE TO FOLLOW THESE INSTRUCTIONS MAY DAMAGE AND/ OR IMPAIR ITS OPERATION AND VOID THE WARRANTY. IN CASE THERE IS ANY INCONSISTENCY OR CONFLICT BET WEEN THE ENG...
2 EN USE & OPERATION Step 3: Use a screwdriver to tighten ONE screw on each of the four base stands. Step 2: Step 1: Installation Steps: Install the 4 bottom base stands on each corner of the unit. Slide and lock them into place. Carefully tip the unit horizontally onto one side. Base Prior to u...
3 USE & OPERATION EN CONTROL PANEL 1H 2H 4H 8H Cool Power Speed Mode Swing Buttons on Control Panel Wind Type Swing Cool Speed:I = Ultra Low II = Low III = Medium IV = High Filter Alert Timer:1H 2H 4H 8H Icons on Display Screen Sleep Timer