Page 2 - PARTS DESCRIPTION; 0) Honeycomb Cooling Media
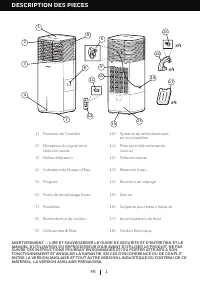
1 PARTS DESCRIPTION EN WARNING -- READ AND SAVE THE AIR COOLER SAFETY & MAINTENANCE GUIDE AND USER MANUAL BEFORE USING THIS PRODUCT. FAILURE TO FOLLOW THESE INSTRUCTIONS MAY DAMAGE AND/ OR IMPAIR ITS OPERATION AND VOID THE WARRANTY. IN CASE THERE IS ANY INCONSISTENCY OR CONFLICT BET WEEN THE ENG...
Page 3 - ONE; When the bottom base stands are installed, the unit; COOLER LOCATION
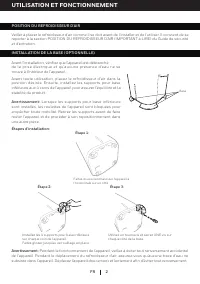
2 EN USE & OPERATION Step 3: Use a screwdriver to tighten ONE screw on each of the four base stands. Step 2: Step 1: Installation Steps: Install the 4 bottom base stands on each corner of the unit. Slide and lock them into place. Carefully tip the unit horizontally onto one side. Base Prior to u...
Page 4 - CONTROL PANEL
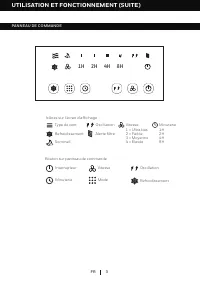
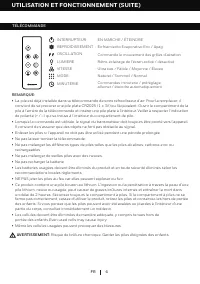
3 USE & OPERATION EN CONTROL PANEL 1H 2H 4H 8H Cool Power Speed Mode Swing Buttons on Control Panel Wind Type Swing Cool Speed:I = Ultra Low II = Low III = Medium IV = High Filter Alert Timer:1H 2H 4H 8H Icons on Display Screen Sleep Timer
Page 5 - FUNCTION BUTTONS
4 USE & OPERATION (CONTINUED) EN FUNCTION BUTTONS MODE Press the button to select your desired wind type: Natural - Sleep - Normal . POWER Press the to turn the unit on. The cooler will start automatically at Ultra Low speed. To turn the unit off, press button again. SPEED Press the button repea...
Page 7 - REMOTE CONTROL
6 USE & OPERATION (CONTINUED) EN REMOTE CONTROL NOTE: • • •••••• •• •• The remote control requires a CR2025 (1 x 3V) coin type or equivalent battery for replacement.Open the battery compartment at the back of the remote control and insert the battery inside. Care must be taken to insert the batt...
Page 8 - FILLING WITH WATER
7 USE & OPERATION (CONTINUED) EN CAUTION: Unplug the unit from the electrical socket before emptying or refilling the water tank. Open the Water Fill Door located on the side of the unit. The Water Level Indicator is located at the front of the unit. Refill the water tank when water level is low...
Page 9 - ADDING ICE PACKS; exchange the ice packs when the unit is turned OFF.; Insert Ice Packs from the Back of the Unit:
8 Back Side USE & OPERATION (CONTINUED) EN ADDING ICE PACKS WARNING: DO NOT attempt to open the ice packs or consume the ice crystals from inside of the ice packs. Four re-freezble Ice Packs are included to help enhance the cooling effect when required. Freeze the ice packs in a freezer. When fr...
Page 10 - located at the bottom of the unit. Allow the tank to empty.
9 USE & OPERATION (CONTINUED) EN In cooling mode, when water in the tank is below the minimum level the unit will automatically pause evaporative cooling and then will flash. Refill the water tank to deactivate the indicator in cooling mode. First switch OFF the unit and unplug from the power ou...
Page 11 - CLEANING THE MESH FILTER AND HONEYCOMB COOLING MEDIA; DO NOT operate the Air Cooler when
10 USE & OPERATION (CONTINUED) EN Figure 1: Honeycomb Frame Honeycomb Cooling Media Rear Grill/ Mesh Filter WARNING: Before cleaning the unit, switch the unit OFF and disconnect the power adapter from the unit andelectrical socket. CLEANING THE MESH FILTER AND HONEYCOMB COOLING MEDIA The applian...
Page 12 - DESCRIPTION DES PIECES
1 DESCRIPTION DES PIECES FR AVERTISSEMENT -- LIRE ET SAUVEGARDER LE GUIDE DE SECURITE ET D'ENTRETIEN ET LE MANUEL D'UTILISATION DU REFROIDISSEUR D'AIR AVANT D'UTILISER LE PRODUIT. NE PAS SUIVRE CES INSTRUCTIONS POURRAIT ENDOMMAGER ET/OU PORTER ATTEINTE A SON FONCTIONNEMENT ET ANNULER LA GARANTIE. EN...
Page 13 - UTILISATION ET FONCTIONNEMENT; Lorsque les supports pour base inférieure; POSITION DU REFROIDISSEUR D’AIR
2 FR UTILISATION ET FONCTIONNEMENT Étape 3: Utilisez un tournevis et serrez UNE vis sur chaque côté de la base. Étape 2: Étape 1: Étapes d'installation: Installez les 4 supports pour base inférieure sur chaque coin de l'appareil. Faites glisser jusqu'au verrouillage en place. Faites doucement bascul...
Page 14 - PANNEAU DE COMMANDE
3 UTILISATION ET FONCTIONNEMENT (SUITE) FR PANNEAU DE COMMANDE 1H 2H 4H 8H Type de vent Oscillation Refroidissement Alerte filtre Icônes sur l’écran d’affichage Sommeil Vitesse:1 = Ultra bas 2 = Faible 3 = Moyenne 4 = Élevée Minuterie:1H 2H 4H 8H Bouton sur panneau de commande Refroidissement Interr...
Page 15 - BOUTONS DE FONCTION; NATUREL
4 UTILISATION ET FONCTIONNEMENT (SUITE) FR BOUTONS DE FONCTION MODE Appuyer sur le bouton pour sélectionner le type de brise désiré: Naturel - Sommeil - Normal . INTERRUPTEUR Appuyez sur le bouton pour activer l'appareil. Le refroidisseur se mettra automatiquement en route à la vitesse ultra-basse. ...
Page 17 - TÉLÉCOMMANDE; recommandations locales règlements.
6 UTILISATION ET FONCTIONNEMENT (SUITE) FR TÉLÉCOMMANDE INTERRUPTEUR : : : : : : : EN MARCHE / ÉTEINDRE Ultra bas / Faible / Moyenne / Élevée Enfriamiento Evaporativo Enc / Apag Commande le mouvement des grilles d’aération Naturel / Sommeil / Normal Rétro-éclairage de l'écran activé / désactivé Comm...
Page 18 - REMPLISSAGE; L’indicateur du niveau d’eau se trouve à l’avant de l’unité. Remplir le
7 UTILISATION ET FONCTIONNEMENT (SUITE) FR Ne pas dépasser la marque de niveau pour éviter les gouttelettes d'eau sur les grilles d'aération. Vérifier le niveau d’eau dans le réservoir avant de mettre en marche la fonction REFROIDISSEMENT. S’assurer que l’eau du réser voir dépasse la marque du nivea...
Page 19 - INSERTION DES BLOCS DE GLACE; ATTENTION
8 Côté arrière UTILISATION ET FONCTIONNEMENT (SUITE) FR INSERTION DES BLOCS DE GLACE ATTENTION: N'essayez PAS d'ouvrir les blocs de glace ou de consommer les cristaux de glace qui se trouvent à l'intérieur de ces blocs. Quatre 4 blocs de glace re-congelables sont inclus pour renforcer l'effet de ref...
Page 22 - DESCRIPCIÓN DE PARTES; ADVERTENCIA -- LEA Y GUARDE LA GUIA DE MANTENIMIENTO Y EL MANUAL DE
1 DESCRIPCIÓN DE PARTES ES ADVERTENCIA -- LEA Y GUARDE LA GUIA DE MANTENIMIENTO Y EL MANUAL DE INSTRUCCIONES ANTES DE USAR ESTE PRODUCTO. EL INCUMPLIMIENTO DE ESTAS INSTRUCCIONES PUEDE DAÑAR Y / O PERJUDICAR SU FUNCIONAMIENTO E INVALIDAR LA GARANTÍA. EN CASO DE EXISTIR ALGUNA DISCREPANCIA O CONFLICT...
Page 23 - USO Y FUNCIONAMIENTO; Pasos de instalación:; Cuando se instalen los soportes inferiores de; UBICACIÓN DEL ENFRIADOR
2 ES USO Y FUNCIONAMIENTO Paso 3: Usar un destornillador para apretar UN tornillo en cada lado de la base. Paso 2: Paso 1: Pasos de instalación: Instalar los 4 soportes inferiores en cada esquina de la unidad. Deslizar y asegurar en su lugar. Con cuidado, incline la unidad horizontalmente sobre un l...
Page 24 - PANEL DE CONTROL
3 USO Y FUNCIONAMIENTO (CONTINUACIÓN) ES PANEL DE CONTROL 1H 2H 4H 8H Oscilación Alerta de Filtro Iconos en la Pantalla Display Tipo de Viento Frío Nocturno Velocidad:1 = Ultra Bajo 2 = Bajo 3 = Media 4 = Alta Temporizador: 1H 2H 4H 8H Frío Encendido Velocidad Mode Oscilación Botones en la Pantalla ...
Page 25 - BOTONES DE FUNCIONES
4 USO Y FUNCIONAMIENTO (CONTINUACIÓN) ES BOTONES DE FUNCIONES ENCENDIDO / APAGADO Presione para encender la unidad. El enfriador iniciará automáticamente a velocidad ultra baja.Para apagar la unidad, presione el botón nuevamente. VELOCIDAD Presione el botón repetídamente para cambiar la velocidad Ul...
Page 27 - CONTROL REMOTO
6 USO Y FUNCIONAMIENTO (CONTINUACIÓN) ES CONTROL REMOTO ENCENDIDO : : : : : : : Encendido / Apagado Ultra Bajo / Bajo / Media / Alta Encendido / Apagado del modoenfriamiento evaporativoControla el movimiento de los deflectores Natural / Nocturno / Normal Luz de la pantalla Encendido / Apagado Contro...
Page 28 - LLENAR CON AGUA Y HIELO; llenar el depósito de agua.
7 USO Y FUNCIONAMIENTO (CONTINUACIÓN) ES No llene de agua por encima de la marca de nivel de agua “Max.” para evitar que se acumulen gotitas de agua en las rejillas. Revise el nivel de agua en el tanque antes de poner a funcionar la función FRIO. Asegúrese de que el agua en el tanque esté por encima...
Page 29 - AÑADIENDO PAQUETES DE HIELO; de las bolsas de hielo.; Insertar los paquetes de hielo desde la parte posterior de la
8 Parte Trasera USO Y FUNCIONAMIENTO (CONTINUACIÓN) ES AÑADIENDO PAQUETES DE HIELO ADVERTENCIA: No intente abrir los paquetes de hielo ni consumir los cristales de hielo del interior de las bolsas de hielo. Se incluyen cuatro paquetes de hielo para ayudar a eficientar el efecto de enfriamiento cuand...
Page 30 - la marca de nivel mínimo de agua. Conecte y encienda de nuevo.; INDICADOR BAJO NIVEL DE AGUA
9 USO Y FUNCIONAMIENTO (CONTINUACIÓN) ES En Modo Enfriamiento, cuando el agua esté por abajo del nivel minímo la unidad comenzará automáticamente a pausar el enfriamiento y entonces estará parpadeando Vuelva a llenar el tanque de agua para desactivar la alarma en el modo de Frío. Primero apague la u...
Page 31 - LIMPIEZA DEL FILTRO DE MALLA Y FILTRO DE ENFRIAMIENTO HONEYCOMB
10 USO Y FUNCIONAMIENTO (CONTINUACIÓN) ES LIMPIEZA DEL FILTRO DE MALLA Y FILTRO DE ENFRIAMIENTO HONEYCOMB ADVERTENCIA: Antes de limpiar la unidad, apague la unidad y desconecte de la toma de corriente. • El aparato tiene un Filtro de Malla y un Medio de Enfriamiento Honeycomb.• El Filtro de Malla y ...