Page 2 - Manual; Pictograms used; Important information
GB Manual GB 3 - GB 39 Pictograms used Important information Tip
Page 3 - CONTENTS
GB 3 CONTENTS Your induction hob Introduction 4Control panel 5 Description 7 Safety What you should pay attention to 9 Connection and repair 9 During use 9 Temperaturna varnost 11 Cooking-time limiter 11 Use Using the touch controls 12 Induction cooking 12 How does induction workA magnet 13 Pans 13 ...
Page 4 - Introduction; The appliance; YOUR INDUCTION HOB
GB 4 Introduction This hob has been designed for the real lover of cooking. Cooking on an induction hob has a number of advantages. It is easy, because the hob reacts quickly and can also be set to a very low power level. Because, moreover, it can also be set to a high power level, it can bring thin...
Page 5 - Control panel
GB 5 Control panel GIT63B/GIT73B GIT95B YOUR INDUCTION HOB 1. Keep food warm/melt with indicator2. Cooking timer indicator left front zone3. Reduce time button4. Egg timer indicator5. Increase time button6. Cooking timer indicator right front zone7. Boost with indicator8. Decrease power left front z...
Page 7 - Description; GIT73B
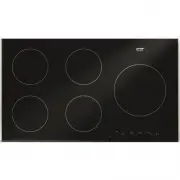
GB 7 Description GIT63B GIT73B GIT95B YOUR INDUCTION HOB 2 2 1 4 1 4 3 3 1. Cooking zone front left Ø210 3,7 kW2. Cooking zone rear left Ø145 2,2 kW3. Cooking zone rear right Ø180 3,0 kW4. Cooking zone front right Ø180 3,0 kW 5. Cooking zone front left Ø180 3,0 kW6. Cooking zone rear left Ø180 3,0 k...
Page 9 - SAFETY
GB 9 What you should pay attention to • Induction cooking is extremely safe. Various safety devices have been incorporated in the hob such as a residual heat indicator and a cooking time limiter. There are nevertheless a number of precautions you should take. Connection and repair • This appliance m...
Page 11 - Temperaturna varnost; Setting
GB 11 Temperaturna varnost • A sensor continuously measures the temperature of certain parts of the hob. Every cooking zone is equipped with a sensor that measures the temperature of the bottom of the pan to avoid any risk of overheating when a pan boils dry. In case of temperatures rising too high,...
Page 12 - USE; Using the touch controls; Induction cooking is fast; • Grains of sand may cause scratches which cannot be removed.
GB 12 USE Using the touch controls The touch controls may take some getting used to if you are used to other (rotary) controls. Place the tip of your finger flat on the control to achieve the best results. You do not have to apply any pressure. The touch sensors only react to the light pressure of a...
Page 13 - How does induction workA magnet; Induction cooking requires a particular quality of pan.
GB 13 USE How does induction workA magnet A magnetic field is generated in the appliance. By placing a pan with an iron base on a cooking zone, a current is induced in the pan base. This induced current generates heat in the base of the pan. Easy The electronic controls are accurate and easy to set....
Page 15 - Switching on the hob and setting the power; Touching the + button for the first time displays setting ‘4.’.; Tip; Pan detection; OPERATION
GB 15 Switching on the hob and setting the power The power has 9 settings. There is also a ‘boost’ setting, which is indicated by a ‘P.’ in the display (see page 15 ‘Boost’). • Put a pan on a cooking zone.• Touch the On/Off button. You will hear a short bleep and the display for each cooking zone wi...
Page 16 - Automatic heat-up function; Switching on the automatic heat-up function; The hob is switched on and a pan has been placed in a cooking zone.; • When the pan has reached the desired temperature, the automatic; • Touch the - button for the cooking zone.
GB 16 Automatic heat-up function The automatic heat-up function temporarily increases the power (setting ‘9.’) to heat the contents of the pan faster. This function is available in all settings except the ‘Boost’ setting and setting ‘9.’. Switching on the automatic heat-up function The hob is switch...
Page 17 - Boost; Switching on the boost function; The hob is switched on and a pan is on the cooking zone.; Switching off the boost function; Two cooking zones behind each other; • Two cooking zones that are behind each other influence each other.
GB 17 OPERATION Boost The ‘Boost’ function is used to cook at maximum power for a short period of time (maximum 10 minutes). The power is reduced to setting 9 at the end of the maximum boost time. Switching on the boost function The hob is switched on and a pan is on the cooking zone. • Touch the P ...
Page 18 - Topljenje/ohranjanje toplote; Switching on the melt function; Switching on the function to keep food warm; Two lights to the right above the ‘keep food warm’ button light up.; Switching off the melting/keeping food warm function; The display shows setting ‘0.’. The cooking zone is switched off.
GB 18 Topljenje/ohranjanje toplote Use the ‘keep food warm’ button to switch on the function to melt or keep food warm. The cooking timer is used to set the maximum melting/warming time. The melt function (u) The function to keep food warm (U) The melt function keeps the temperature of the food at a...
Page 19 - Switching off the hob; Switching off one cooking zone; • Touch and hold the - and the + button for one second to switch off; Switching off all of the cooking zones at the same time
GB 19 OPERATION Switching off the hob Switching off one cooking zone The cooking zone is switched on. The display shows a power setting between 1 and 9, or ‘P.’. • Touch and hold the - and the + button for one second to switch off the cooking zone. Or: • Select setting ‘0.’ by touching the - button....
Page 20 - Child lock; Child lock mode; One or more cooking zones are active.; Switching on the child lock
GB 20 OPERATION Child lock You can secure the hob with the child lock. With this setting, the hob cannot be switched on and the cooking zone settings cannot be changed. The child lock button gives you access to the following two functions: (Standard) lock mode Child lock mode The (standard) lock mod...
Page 21 - Pause; Switching the hob to pause mode; Switching off pause mode; • Press the pause button again within 10 minutes.
GB 21 OPERATION Tip Switch the hob to child lock mode before cleaning it to prevent it from accidentally switching on. Pause Use the pause function to ‘pause’ the whole hob for 10 minutes while cooking. The power for all of the cooking zones is automatically switched off. This is convenient, for exa...
Page 22 - Memory; Recognising a mode
GB 22 OPERATION Memory The memory function enables you to retrieve the last settings within 6 seconds of the hob switching off. This is convenient, for example, if the whole hob was accidentally switched off by touching the On/Off button. Recognising a mode Stand-by mode The display for each cooking...
Page 23 - Cooking timer/Egg timer; The cooking timer; The hob is switched on.; Switching off the egg timer; The dot next to the set time illuminates.
GB 23 OPERATION Cooking timer/Egg timer A cooking timer can be set for each cooking zone. All of the cooking timers can be used at the same time. The hob also has an egg timer. Both the cooking timer and the egg timer can be set to a maximum of 99 minutes. The egg timer works the same way as the coo...
Page 24 - Assigning and switching on the cooking timer; • Use the - or the + buttons to set the desired cooking time.; Attention; timer at the same time to select the time you want to switch off.
GB 24 OPERATION • Touch and hold the - button for the cooking timer/egg timer until ‘01.’ shows in the display. Touch the - button again. The cooking timer/egg timer is now in stand-by mode. The cooking timer/egg timer automatically switches off after 10 seconds. Assigning and switching on the cooki...
Page 25 - Switching off the cooking timer/egg timer alarm
GB 25 OPERATION Switching off the cooking timer/egg timer alarm When the set time/cooking time has elapsed, the alarm rings and the red light for the active cooking zone/egg timer flashes ‘00’. • Touch any button to switch off the alarm. Tip • You can touch and hold the - or the + button to set the ...
Page 26 - Healthy cooking; Burning point of different types of oil; Cooking settings; Use setting ‘boost’ and setting 9 to:; COOKING
GB 26 Healthy cooking Burning point of different types of oil To ensure your food is fried as healthily as possible, Gorenje+ recommends choosing the type of oil according to the frying temperature. Each oil has a different burning point at which toxic gasses are released. The below table shows the ...
Page 27 - Use setting 6 and 5 to:
GB 27 COOKING Use setting 7 to: • fry thick pancakes;• fry thick slices of breaded meat;• fry bacon (fat);• fry raw potatoes; • make French toast; • fry breaded fish. Use setting 6 and 5 to: • complete the cooking of large quantities;• defrost hard vegetables;• fry thin slices of breaded meat. Use s...
Page 28 - Cleaning; Set the child lock before you start cleaning the hob.; Daily cleaning; Special agents are available.; Never use; • Never use anything sharp such as steel wool or scourers.; MAINTENANCE
GB 28 Cleaning Tip Set the child lock before you start cleaning the hob. Daily cleaning • Although food spills cannot burn into the glass, we nevertheless recommend you to clean the hob immediately after use. • Best for daily cleaning is a damp cloth with a mild cleaning agent.• Dry with kitchen pap...
Page 29 - Symptom; The preset time has ended.; TROUBLESHOOTING
GB 29 General If you notice a crack in the glass top (however small), switch the hob off immediately, unplug the hob, turn off the (automatic) fuse switch(es) in the meter cupboard or, in the event of a permanent connection, set the switch in the power supply lead to zero.) Contact the service depar...
Page 30 - The hob simply switches off.
GB 30 Symptom Possible cause Solution The hob is not working and nothing appears in the display. There is no power supply due to a defective cable or a faulty connection. Check the fuses or the electric switch (if there is no plug). A fuse blows as soon as the hob is switched on. The hob has been wr...
Page 31 - What you need to consider; Safety instructions for the installation; • For the connection, use an approved cable (for example type HO7RR); Clearance; INSTALLATION
GB 31 What you need to consider Safety instructions for the installation • The connection must comply with national and local regulations.• The appliance must always be earthed.• This appliance may only be connected by a competent electrical installer. • For the connection, use an approved cable (fo...
Page 33 - Ventilation; • An opening at least 140 mm high must be provided on the back wall
GB 33 INSTALLATION Ventilation The electronics in the appliance need cooling. The appliancewill automatically switch off if there is insuffi cient air circulation.There are ventilation openings on the underside of the appliance.It must be possible for cool air to be drawn in through theseopenings. T...
Page 34 - Lower kitchen cabinet with an oven; • Installing the oven under an induction hob is possible with oven
GB 34 INSTALLATION Lower kitchen cabinet with an oven • Installing the oven under an induction hob is possible with oven types EVP4.., EVP2.., which are fi tted with a cooling fan. Before installing the oven, the rear wall of the kitchen cabinet should be removed. Furthermore, a minimum of 6 mm clea...
Page 35 - Electrical connection; The voltage between the phases and the zeros is 230 V~.
GB 35 INSTALLATION Electrical connection Common connections: • 2 phase and 1 zero connection (2 1N, 400 V~/ 50 Hz): ▷ The voltage between the phases and the zeros is 230 V~. The voltage between the two phases is 400 V~. Fit a connecting bridge between connecting points 4-5. The groups must have fuse...
Page 36 - Connection for hobs with 5 cooking zones:; Fix the cable with a pull relief and close the cover.
GB 36 INSTALLATION Connection for hobs with 5 cooking zones: • 3 phases with 1 zero connection (3 1N, 400 V~ / 50 Hz): ▷ The voltage between the phases and the zero is 230 V~. The voltage between the phases is 400 V~. Fit a connecting bridge between connecting points 4-5. The groups must have fuses ...
Page 37 - Building in; Lay the hob upside down on the worktop.
GB 37 Building in Check that the cabinet and the cut-out meet the dimension and ventilation requirement. Threat the sawn ends of wooden or synthetic worktops with sealing varnish if necessary, to prevent moisture causing the worktop to swell. Lay the hob upside down on the worktop. Fit the connectin...
Page 38 - Technical details; Hob type
GB 38 Technical details This appliance complies with all relevant CE directives. Hob type GIT63B GIT73B GIT95BGIT95XC Induction x x x Connection 230 V - 50 Hz 230 V - 50 Hz 230 V - 50 Hz Max. capacity cooking zonesFront left 3,7 kW (Ø 210) 3,7 kW (Ø 210) 3,0 kW (Ø 180) Rear left 2,2 kW (Ø 145) 2,2 k...
Page 39 - ENVIRONMENTAL ASPECTS; Disposal of packaging and appliance; film
GB 39 ENVIRONMENTAL ASPECTS Disposal of packaging and appliance In the manufacturing of this appliance durable materials were used. Make sure to dispose of this equipment responsibly at the end of its lifecycle. Ask the authorities for more information regarding this. The appliance packaging is recy...