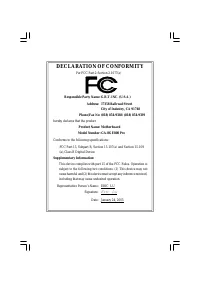
Page 4 - DECLARATION OF CONFORMITY; Responsible Party Name:; Eric Lu; Supplementary Information:
FCC Part 15, Subpart B, Section 15.107(a) and Section 15.109 (a),Class B Digital Device DECLARATION OF CONFORMITY Per FCC Part 2 Section 2.1077(a) Responsible Party Name: Address: Phone/Fax No: hereby declares that the product Product Name: Conforms to the following specifications: This device compl...
Page 5 - P4 Titan Motherboard; Pentium
USER'S MANUAL GA-8GE800 Pro P4 Titan Motherboard Pentium ® 4 Processor Motherboard Rev. 1101 12ME-8GE800P-1101
Page 6 - English; Table of Content
- 2 - GA-8GE800 Pro Motherboard English Table of Content Item Checklist ...................................................................................... 4 Chapter 1 Introduction ......................................................................... 5 Features Summary ..........................
Page 7 - Easy Tune
Table of Content English - 3 - PnP /PCI Configurations ........................................................................... 48PC H ealth Status ..................................................................................... 49Frequency/Voltage Control ......................................
Page 8 - Item Checklist; ower connector on the motherboard.; Installing the motherboard to the chassis...
- 4 - GA-8GE800 Pro Motherboard English Item Checklist Computer motherboards and expansion cards contain very delicate Integrated Circuit (IC) chips. Toprotect them against damage from static electricity, you should follow some precautions whenever youwork on your computer. 1. Unplug your computer w...
Page 9 - Chapter 1 Introduction; Features Summary
Introduction - 5 - English Form F actor — 30.5 cm x 2 4.4cm ATX size form facto r, 4 layers PCB. CPU — Sock et 478 for In tel ® Mic ro FC-PGA2 Pentium ® 4 pro cessor — Support Intel ® Pentium ® 4 (Northwood, 0.13 m) processor — Support Intel ® Pentium ® 4 Processor with HT Technology — Inte l Pentiu...
Page 10 - Pentium 4 Processor with HT Technology
- 6 - GA-8GE800 Pro Motherboard English On-Board Sound — Realtek ALC650 CODEC — Line Out / 2 front speaker — Line In / 2 rear spe aker(by s/w switch) — Mic In / center& subwoofer(by s/w switch) — SPDIF Ou t /SPDIF In — CD In/ AUX_IN/ Game Port On-Board LAN — Build in Kinnereth-R Chipset On-Board...
Page 11 - P4 Titan
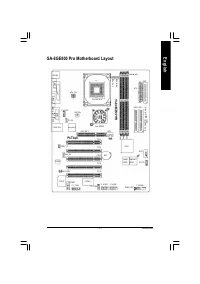
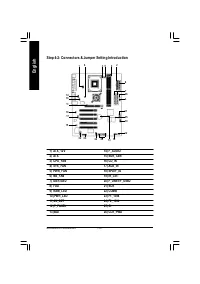
Introduction - 7 - English GA-8GE800 Pro Motherboard Layout RAM_ LED GA-8GE800 Pro KB_M S COMA VGA LINE_OUT ATX_12V SOC KET478 CPU_FAN ATX FD D ID E1 ID E2 LPT1 PWR_FAN CLR_PWD N B_FAN GAME LINE_IN MIC_IN C D_IN F_AU DIO SYS_FAN PW R_LED SPDIF_IO SC R C ODC E I T8712 F_PAN EL BAT BAC KU PBIOS ICH 4 ...
Page 12 - Block Diagram
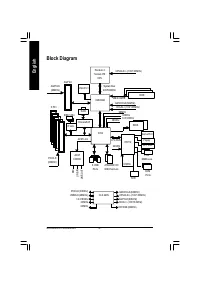
- 8 - GA-8GE800 Pro Motherboard English Block Diagram VT 6306 IEEE 1394 Pentium 4 Socket 478 CPU 82845GE AC97 CODEC ICH4 CPUCLK+/- (100/133MHz) System Bus 400/533MHz DDR 266/333MHz GMCHCLK (66M Hz) HCLK+/- (100/133MHz) 66MHz 33 M Hz 14.318 M Hz 48 M Hz 24 M Hz 33 M Hz LPC BUS AGP 4X AGPCLK (66M Hz) ...
Page 14 - To set up your computer, you must complete the following steps:; Chapter 2 Hardware Installation Process
- 10 - GA-8GE800 Pro Motherboard English To set up your computer, you must complete the following steps: Step 1- Install the Central Processing Unit (CPU)Step 2- Install memory modulesStep 3- Install expansion cardsStep 4- Connect ribbon cables, cabinet wires, and power supply Chapter 2 Hardware Ins...
Page 15 - Locate Pin 1 in the socket and look; Pin1 indicator; Angling the rod to 65-degree maybe feel a; Before installing the processor , adhere to the following warning:
- 11 - Hardware Installation Process English Step 1: Install the Central Processing Unit (CPU) Step 1-1: CPU Installation Pin1 indicator 3. CPU Top View 2. Pull the rod to the 90-degree directly. 4. Locate Pin 1 in the socket and look for a (golden) cut edge on the CPUupper corner. Then insert the C...
Page 16 - Make sure the CPU fan is plugged to
- 12 - GA-8GE800 Pro Motherboard English Step 1-2 : CPU Heat Sink Installation 1.Please use Intel approved cooling fan.2.We recommend you to apply the thermal tape to provide better heat conductionbetween your CPU and heatsink. (The CPU cooling fan might stick to the CPU due to the hardening of the ...
Page 17 - DDR
- 13 - Hardware Installation Process English The motherboa rd has 3 dual in line memory module (DIMM) sockets . The BIOS will automaticallydete cts me mory type and size. To ins tall the memo ry mod ule, just pus h it vertically into the DIMMsock et. The DIMM module c an only fit in one direction du...
Page 18 - DDR Introduction
- 14 - GA-8GE800 Pro Motherboard English Establishe d on the existing SDRAM industry infrastructure, DDR (Double Data Rate) memory is ahigh performance and cost-effective solution that allows easy adoption for memory vendors, OEMsand system integrators.DDR me mory is a s ensible evo lutionary so lut...
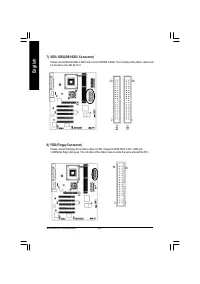
Page 19 - AGP Card
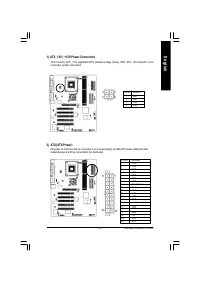
- 15 - Hardware Installation Process English Step 3: Install expansion cards 1. Read the related expansion card’s instruction document before install the expansion card into the computer. 2. Remove your computer’s chassis cover, necessary screws and slot bracket from the computer.3. Press the expans...
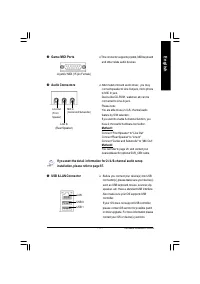
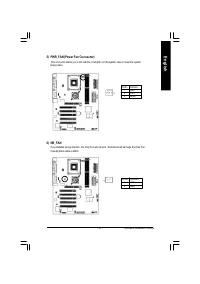
Page 20 - This connector supports standard PS/2 keyboard
- 16 - GA-8GE800 Pro Motherboard English Step 4: Connect ribbon cables, cabinet wires, and powersupply Step 4-1: I/O Back Panel Introduction u PS/2 Keyboard and PS/2 Mouse Connector Ø This connector supports standard PS/2 keyboard and PS/2 mouse. PS/2 Mouse Connector(6 pin Female) PS/2 Keyboard Con ...
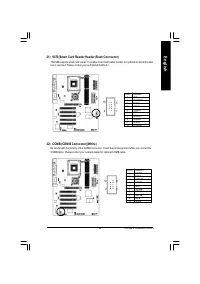
Page 21 - Audio Connectors; This connector supports joystick, MIDI keyboard
- 17 - Hardware Installation Process English w Game /MIDI Ports x Audio Connectors Ø This connector supports joystick, MIDI keyboard and other relate audio devices. Ø After in stall onboa rd au dio driver, you may connect spea ker to Line Out jack, micro phoneto MIC In jac k.Device like CD-ROM , wal...
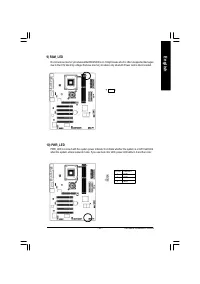
Page 29 - CAUTION
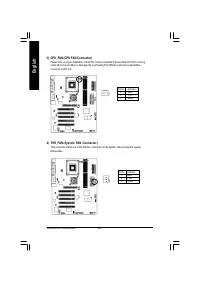
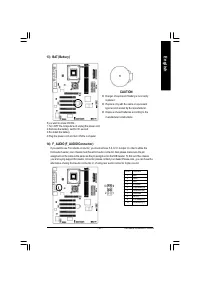
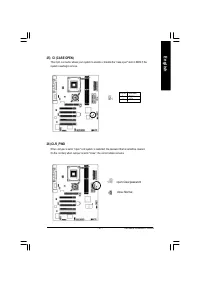
- 25 - Hardware Installation Process English 13) BAT (Battery) CAUTION v Danger of explosion if batte ry is incor rectlyreplaced. v Replace only with th e sam e or equ ivalenttype recom m ended by the m anufacturer. v Dispos e of used batteries according to them anufacturer’s instructions. If yo u w...
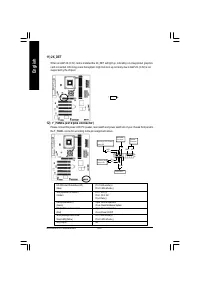
Page 37 - Chapter 3 BIOS Setup; ENTERING
- 33 - BIOS Setup English < á > M ov e to prev ious item < â > M ov e to nex t item < ß > M ov e to the item in the left hand < à > M ov e to the item in the right hand Enter Select item <Esc> M ain M enu - Quit and not sav e changes into C M OS Status Page Setup M enu ...
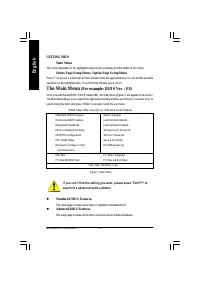
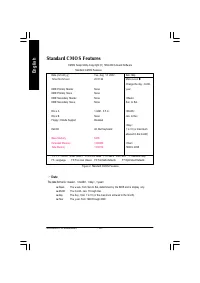
Page 38 - S tandard CMOS Features; The Main Menu; GETTING HELP
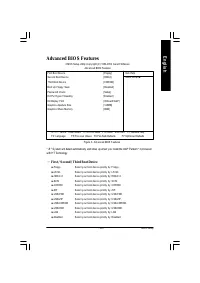
- 34 - GA-8GE800 Pro Motherboard English l S tandard CMOS Features This setup page includes all the items in standard compatible BIOS. l Advanced BIOS Features This setup page includes all the items of Aw ard special enhanced features. Main Menu The on-line description of the highlighted setup funct...
Page 40 - Date
- 36 - GA-8GE800 Pro Motherboard English Standard CMOS Features CMOS Setup Utility -Copy right (C) 1984-2003 Aw ard Softw are Standard CMOS Features Date (mm:dd:y y ) Tue, Aug 13 2002 Item Help Time (hh:mm:ss) 22:31:24 Menu Lev el u Change the day , month, } IDE Primary Master None y ear } IDE Prima...
Page 41 - Time
- 37 - BIOS Setup English C Time The times format in <hour> <minute> <second>. The time is calculated base on the 24-hour military - time clock. For ex ample, 1 p.m. is 13:00:00. C IDE Pri mary Mas ter, S lave / IDE S e condary Mas ter , S lave The category identifies the ty pes of...
Page 42 - Halt on
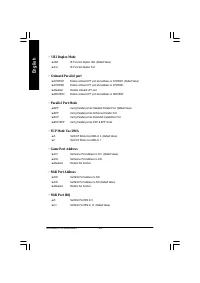
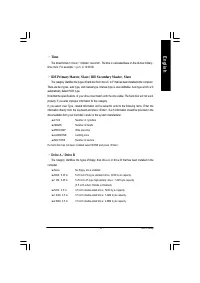
- 38 - GA-8GE800 Pro Motherboard English C Floppy 3 Mode S upport (for J apan Area) 8 Disabled Normal Floppy Driv e. (Default v alue) 8 Driv e A Driv e A is 3 mode Floppy Driv e. 8 Driv e B Driv e B is 3 mode Floppy Driv e. 8 Both Driv e A & B are 3 mode Floppy Driv es. C Halt on The category de...
Page 44 - Boot Up Fl oppy S eek; Please refer to the detail on P.58; Init Dis play Firs t
- 40 - GA-8GE800 Pro Motherboard English C Boot Up Fl oppy S eek During POST, BIOS w ill determine the floppy disk driv e installed is 40 or 80 tracks. 360 K ty pe is40 tracks 720 K, 1.2 M and 1.44 M are all 80 tracks. 8 Enabled BIOS searches for floppy disk driv e to determine it is 40 or 80 tracks...
Page 47 - Onboard S er ial Port 1
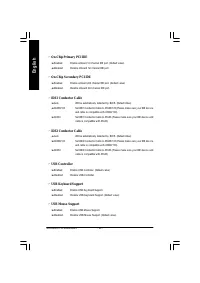
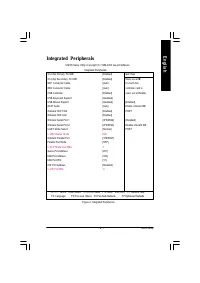
- 43 - BIOS Setup English C AC97 Audio 8 Auto Enable onboard AC'97 audio function. (Default Value) 8 Disabled Disable this function. C Onboard H/W 1394 8 Enable Enable onboard IEEE 1394 function.(Default v alue) 8 Disable Disable this function. C Onboard H/W LAN 8 Enabled Enable Onboard H/W LAN func...
Page 49 - CIR Port Addres s; CIR Port IRQ
- 45 - BIOS Setup English C CIR Port Addres s 8 310 Set CIR Port Address to 310. 8 320 Set CIR Port Address to 320. 8 Disabled Disable this function. (Default Value) C CIR Port IRQ 8 5 Set CIR Port IRQ to 5. 8 11 Set CIR Port IRQ to 11. (Default Value)
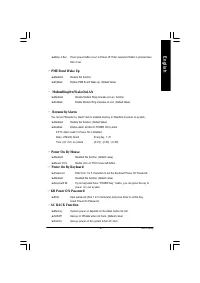
Page 50 - ACPI S us pend Type
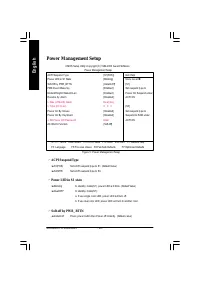
- 46 - GA-8GE800 Pro Motherboard English Power Management Setup CMOS Setup Utility -Copy right (C) 1984-2003 Aw ard Softw are Pow er Management Setup ACPI Suspend Ty pe [S1(POS)] Item Help Pow er LED in S1 State [Blinking] Menu Lev el u Soft-Off by PWR_BTTN [Instant-Off] [S1] PME Ev ent Wake Up [Ena...
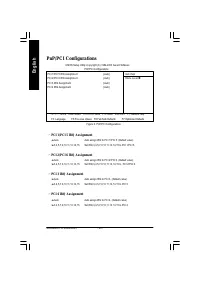
Page 52 - PCI 1/P CI 5 IRQ As s ignment
- 48 - GA-8GE800 Pro Motherboard English PnP/PCI Configurations Figure 6: PnP/PCI Configurations C PCI 1/P CI 5 IRQ As s ignment 8 Auto Auto assign IRQ to PCI 1/PCI 5. (Default v alue) 8 3,4,5,7,9,10,11,12,14,15 Set IRQ 3,4,5,7,9,10,11,12,14,15 to PCI 1/PCI 5. C PCI 2/P CI 6 IRQ As s ignment 8 Auto ...
Page 53 - Res et Cas e Open S tatus
- 49 - BIOS Setup English PC Health Status Figure 7: PC Health Status C Res et Cas e Open S tatus C Cas e O pened If th e case i s closed, "Case O pened" w i ll show "No".If th e case hav e been ope ned, "Case Opened" w ill show " Yes".If y o u w ant to reset "C a...
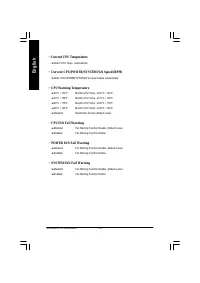
Page 54 - Current CPU Temperature
- 50 - GA-8GE800 Pro Motherboard English C Current CPU Temperature 8 Detect CPU Temp. automatically. C Current CPU/POWER/S YS TEM FAN S pee d (RPM) 8 Detect CPU/POWER/SYSTEM Fan speed status automatically . C CPU Warning Temperature 8 60°C / 140°F Monitor CPU Temp. at 60°C / 140°F. 8 70°C / 158°F Mo...
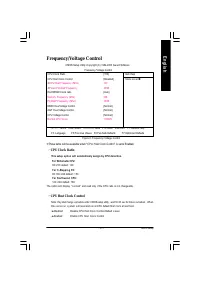
Page 55 - CPU Cloc k Ratio; This setup option will autom atically assign by CPU detection.; CPU Hos t Cl ock Control
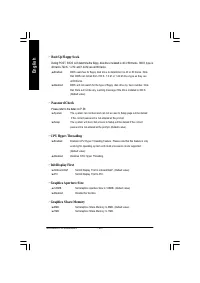
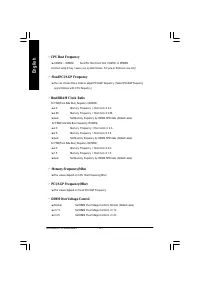
- 51 - BIOS Setup English Frequency/Voltage Control Figure 8: Frequency /Voltage Control CMOS Setup Utility -Copy right (C) 1984-2003 Aw ard Softw are Frequency /Voltage Control CPU Clock Ratio [15X] Item Help CPU Host Clock Control [Disabled] Menu Lev el u ø CPU Host Frequency (Mhz) 100 ø Fix ed PC...
Page 56 - CPU Hos t Frequency
- 52 - GA-8GE800 Pro Motherboard English C CPU Hos t Frequency 8 100MHz ~ 355MHz Set CPU Host Clock from 100MHz to 355MHz. Incorrect using it may cause y our sy stem broken. For pow er End-User use only ! C Fixed PCI/A GP Frequency 8 You can choose those mode to adjust PCI/ AGP frequency. (Select PC...
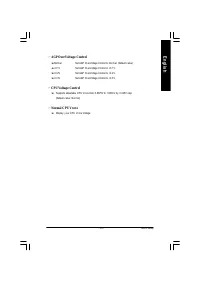
Page 57 - AGP OverVolt age Control; CPU Voltag e Control
- 53 - BIOS Setup English C AGP OverVolt age Control 8 Normal Set AGP Ov erVoltage Control to Normal. (Default v alue) 8 +0.1V Set AGP Ov erVoltage Control to +0.1V. 8 +0.2V Set AGP Ov erVoltage Control to +0.2V. 8 +0.3V Set AGP Ov erVoltage Control to +0.3V. C CPU Voltag e Control 8 Supports adjust...
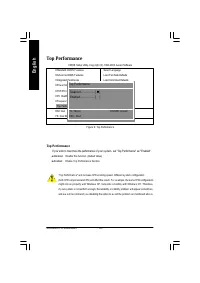
Page 58 - Top Performance
- 54 - GA-8GE800 Pro Motherboard English "Top Performance" w ill increase H/W w orking speed. Different sy stem configuration (both H/W component and OS) w ill effect the result. For ex ample, the same H/W configurationmight not run properly w ith Window s XP, but w orks smoothly w ith Windo...
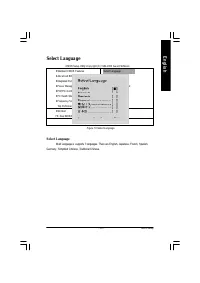
Page 59 - S elect Language
- 55 - BIOS Setup English Select Language S elect Language M ulti Language is supports 7 languages. There are English, Japanese, French, Spanish, Germany , Simplified C hinese, Traditional C hinese. Figure 10:Select Language CMOS Setup Utility -Copy right (C) 1984-2003 Aw ard Softw are } Standard CM...
Page 60 - Load Fail-S afe Defaults
- 56 - GA-8GE800 Pro Motherboard English Load Fail-Safe Defaults Load Fail-S afe Defaults Fail-Safe defaults contain the most appropriate v alues of the sy stem parameters that allowminimum sy stem performance. CMOS Setup Utility -Copy right (C) 1984-2003 Aw ard Softw are } Standard CMOS Features Se...
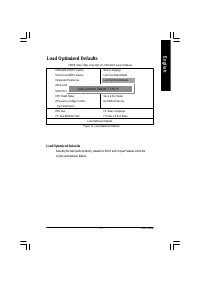
Page 61 - Load Optimiz ed Defaults
- 57 - BIOS Setup English Load Optimized Defaults Load Optimiz ed Defaults Selecting this field loads the factory defaults for BIOS and C hipset Features w hich thesy stem automatically detects. CMOS Setup Utility -Copy right (C) 1984-2003 Aw ard Softw are } Standard CMOS Features Select Language } ...
Page 97 - Gigabyte announces; Revision History; Chapter 4 Technical Reference
Tech nical Refere nce - 6 3 - English @ BIOS TM Introduction Gigabyte announces @ BIOS Windows BIOS live update utility Have you ever updated BIOS by yourself? Or likemany other people, you just know what BIOS is,but always hesitate to update it? Because you thinkupdating newest BIOS is unnecessary ...
Page 98 - Introduction; EasyTune; Windows based Overclocking utility
- 6 4 - GA-8GE800 Pro M otherboard English Easy Tune TM 4 Introduction Gigabyte announces EasyTune TM 4 Windows based Overclocking utility EasyTune 4 carries on the heritage so as to pave the way for future generations. Overclock" might be one of the most common issuesin computer field. But have...
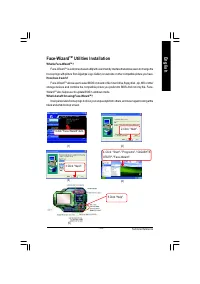
Page 99 - Utilities Installation; also helps user to update BIOS in windows mode.; What’s benefit for using Face-Wizard; black and white boot up screen.
Tech nical Refere nce - 6 5 - English Face-Wizard TM Utilities Installation What is Face-Wizard TM ? Face-Wizard TM is a windows based utility with user-friendly interface that allows users to change the boot-up logo with picture from Gigabyte Logo Gallery on web site or other compatible picture you...
Page 102 - “Del”; Copy Main ROM Data to Backup; Load dual BIOS default value.; Save Settings to CMOS; Save revised setting.
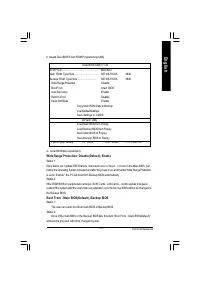
- 6 8 - GA-8GE800 Pro M otherboard English Auto Recovery : Enable(Default), Disable When one of the Main BIOS or Backup BIOS occurs checksum failure, the working BIOS willautomatically recover the BIOS of checksum failure.(In the Power Management Setup of the BIOS Setting, if ACPI Suspend Type is se...
Page 103 - 5 6K
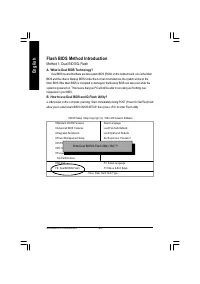
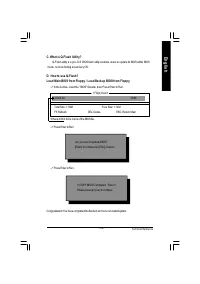
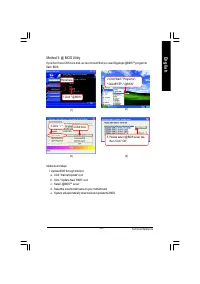
Tech nical Refere nce - 6 9 - English D. How to use Q-Flash?Load Main BIOS from Floppy / Load Backup BIOS from Floppy C. What is Q-Flash Utility? Q-Flash utility is a pre -O.S. BIOS flash utility enables users to upda te its BIOS within BIOS mode, no more fooling around any OS. Congratulation! You h...
Page 104 - Save Main BIOS to Floppy / Save Backup BIOS to Floppy
- 7 0 - GA-8GE800 Pro M otherboard English Save Main BIOS to Floppy / Save Backup BIOS to Floppy ! In the A:drive, insert the floppy disk, then Press Enter to Run. File name: XXXX.XX Total Size: 1.39M Free Size: 1.39M F5: Refresh DEL: Delete TAB: Switch TYPE FILE NAME To name the file. Congratulate ...
Page 105 - technology simply; DualBIOS; Technology FAQ; What’s DualBIOS
Tech nical Refere nce - 7 1 - English I. Q: What is DualBIOS T M technology? Answer: DualBIOS technology is a patented technology from Giga-Byte Technology. The concept of this technology is based on the redundancy and fault tolerance theory. DualBIOS TM technology simply means there are two system ...
Page 106 - II. Q: Why does anyone need a motherboard with DualBIOS
- 7 2 - GA-8GE800 Pro M otherboard English III. Q: How does DualBIOS T M technology work? Answer: 1. DualBIOS TM technology provides a wide range of protection during the boot up procedure. It protects your BIOS d uring system POST, ESCD update, and eve n all the way to PNPdetection/assignment. 2. D...
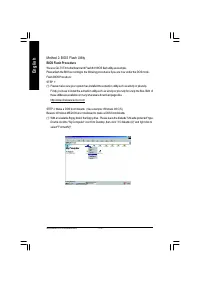
Page 108 - Method 2: BIOS F lash Utility; BIOS Flash Procedure
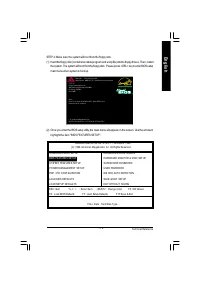
- 7 4 - GA-8GE800 Pro M otherboard English Method 2: BIOS F lash Utility BIOS Flash Procedure We use GA-7VTX motherboard and Flash841 BIOS flash utility as example.Please flash the BIOS according to the following procedures if you are now under the DOS mode.Flash BIOS Procedure:STEP 1:(1) Please mak...
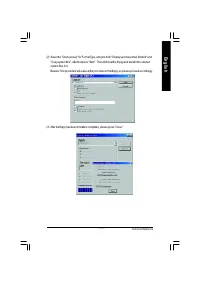
Page 111 - menu to obtain BIOS flash files.
Tech nical Refere nce - 7 7 - English (3) We use GA-7VTX motherboard as example. Please select GA-7VTX by Model or Chipset optional menu to obtain BIOS flash files. (4) Select an appropriate BIOS version (For example: F4), and click to download the file. It will pop up a file download screen, then s...
Page 115 - Starting Windows 98...
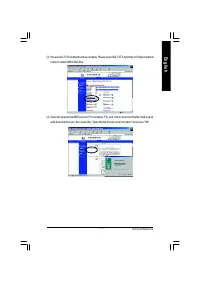
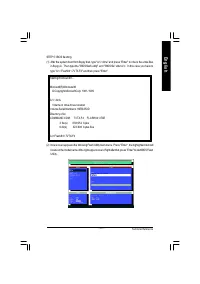
Tech nical Refere nce - 8 1 - English STEP 5 : BIOS fla shing.(1) After the system boot from floppy disk, type "A:\> dir/w" and press "Enter" to check the entire files in floppy A. Then type the "BIOS flash utility" an d "BIOS file" after A:\>. In this case you ...
Page 117 - indicate your motherboard model and current BIOS version.
Tech nical Refere nce - 8 3 - English STEP 6: Load BIOS defaults. Normally the system redetects all devices after BIOS has been upgraded. Therefore, we highly recommend reloading the BIOS defaults after BIOS has been upgraded. This important step resetseverything after the flash.(1) Take out the flo...
Page 118 - (4) Congratulate you have accomplished the BIOS flash procedure.
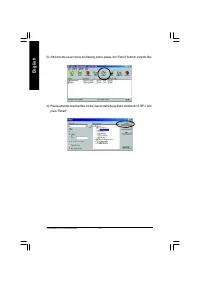
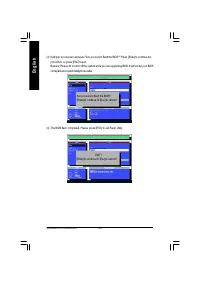
- 8 4 - GA-8GE800 Pro M otherboard English (3) Use the arrows to highlight the item "SAVE & EXIT SETUP" and press "Enter". System will ask "SAVE to CMOS and EXIT (Y/N)?" Press "Y" and "Enter" keys to confirm. Now the system willreboot automatically, the ne...
Page 119 - program to; se ver
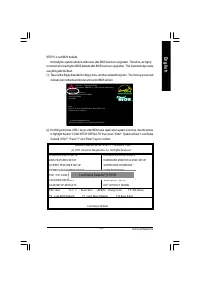
Tech nical Refere nce - 8 5 - English Method 3: @ BIOS U tility If you don’t have DOS boot disk, we recommend that you used Gigabyte @BIOS TM program to flash BIOS. Methods and steps: I. Update BIOS through Internet a. Click "Internet Update" iconb. Clic k "Upda te New BIOS" iconc . ...
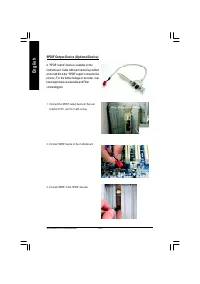
Page 121 - Stereo Speakers Connection and Settings:
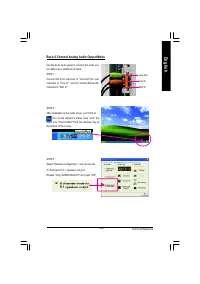
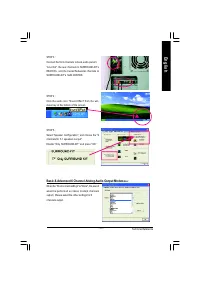
Tech nical Refere nce - 8 7 - English Revision History 2-/4-/6-Channel Audio Function Introuction Stereo Speakers Connection and Settings: ST EP 3: Select "Speaker Configuratio n", and choo se the "2 cha nnels for stereo spe akers out put". We recom m end that you use the speaker wit...
Page 122 - Channel Analog Audio Output Mode
- 8 8 - GA-8GE800 Pro M otherboard English 4 Channel Analog Audio Output Mode ST EP 1 : Connec t the fron t channels to "Line Out", the rear channels to "L ine In". ST EP 3 :Select "Speaker Con figuration", and choose the "4chann els for 4 speake rs out p ut".Dis able...
Page 123 - Basic 6 Channel Analog Audio Output Mode
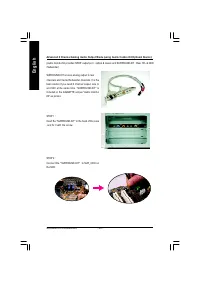
Tech nical Refere nce - 8 9 - English Use the back au dio panel to connect the audio out-put witho ut an y additiona l m odu le. ST EP 1 : Co nne ct th e fro nt cha nn els to " Lin e O ut",the re arch an ne ls to " Line In" , a nd the Cen ter /Sub wo oferchanne ls to "M IC In"...
Page 125 - Basic & Advanced 6 Channel Analog Audio Output Mode
Tech nical Refere nce - 9 1 - English ST EP 4 : Clic k the a udio ico n "Soun d Effec t" fr om th e win-dows tr ay at the bottom of the scre en. ST EP 3 : Conn ect the front ch annels to back a udio pan el's "Lin e Out" , the r ear cha nnels to SURROUND-KIT'sREAR R/ L, a nd the Cente...
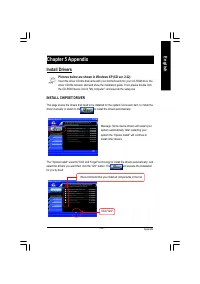
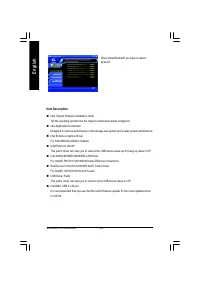
Page 129 - Chapter 5 Appendix; INSTALL CHIPSET DRIVER; Install Drivers; to install the drivers automatically.
Appendix - 95 - English Revision History Chapter 5 Appendix Pictures below are shown in Windows XP (CD ver. 2.22) Insert the driver CD-title that came with your motherboard into your CD-ROM drive, thedriver CD-title will auto start and show the installation guide. If not, please double clickthe CD-R...
Page 130 - Intel Chipset Software Installation Utility; Item Description
- 96 - GA-8GE800 Pro Motherboard English n Intel Chipset Software Installation Utility Tell the operating system how the chipset components will be configured. n Intel Application Accelerator Designed to improve performance of the storage sub-system and overall system performance. n Intel Extreme Gr...
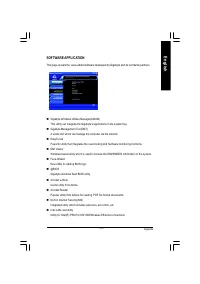
Page 131 - SOFTWARE APPLICATION
Appendix - 97 - English SOFTWARE APPLICATION This page reveals the value-added software developed by Gigabyte and its worldwide partners. n Gigabyte Windows Utilities Manager(GWUM)This utility can integrate the Gigabyte's applications in the system tray. n Gigabyte Management Tool(GMT)A useful tool ...
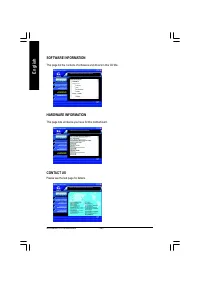
Page 132 - SOFTWARE INFORMATION; This page lists all device you have for this motherboard.; CONTACT US; Please see the last page for details.
- 98 - GA-8GE800 Pro Motherboard English SOFTWARE INFORMATION This page list the contects of softwares and drivers in this CD title. HARDWARE INFORMATION This page lists all device you have for this motherboard. CONTACT US Please see the last page for details.
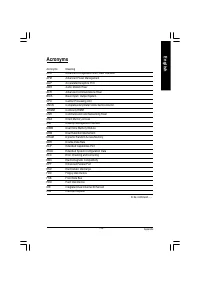
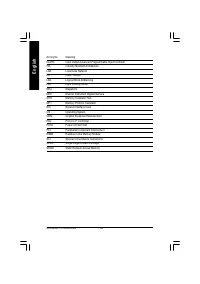
Page 133 - Acronyms
Appendix - 99 - English Acronyms Meaning ACPI Advanced Configuration and Power Interface APM Advanced Power Management AGP Accelerated Graphics Port AMR Audio Modem Riser ACR Advanced Communications Riser BIOS Basic Input / Output System CPU Central Processing Unit CMOS Complementary Metal Oxide Sem...
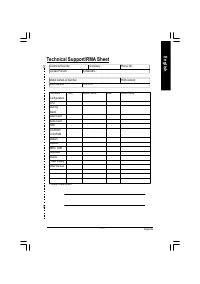
Page 135 - Technical Support/RMA Sheet; Hardware
Appendix - 101 - English Technical Support/RMA Sheet Customer/Country: Company: Phone No.: Contact Person: E-mail Add. : Model name/Lot Number: PCB revision: BIOS version: O.S./A.S.: Hardware Mfs. Model name Size: Driver/Utility: ConfigurationCPUMemoryBrandVideo CardAudio CardHDDCD-ROM /DVD-ROMModem...
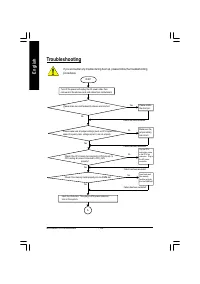
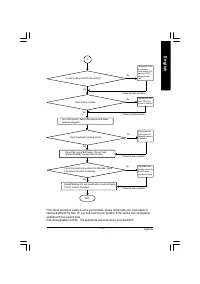
Page 136 - Troubleshooting
- 102 - GA-8GE800 Pro Motherboard English Troubleshooting If you encounter any trouble during boot up, please follow the troubleshootingprocedures . Turn off the power and unplug the AC power cable, thenremove all of the add-on cards and cables from motherboard. START Failure has been excluded. Yes ...
Page 142 - Contact us via the information in this page all over the world.
- 108 - GA-8GE800 Pro Motherboard English CONTACT US Contact us via the information in this page all over the world. — Taiwan Gigabyte Technology Co., Ltd.Address: No.6, Bau Chiang Road, Hsin-Tien, Taipei Hsien, Taiwan, R.O.C.TEL: 886 (2) 8912-4888 (50 lines)FAX: 886 (2) 8912-4004Technical issue:htt...