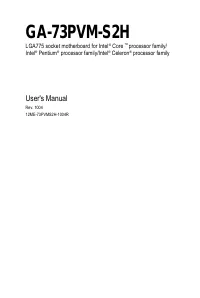
Page 2 - Motherboard
Oct. 11, 2007 Motherboard GA-73PVM-S2H Motherboard GA-73PVM-S2H Oct. 11, 2007
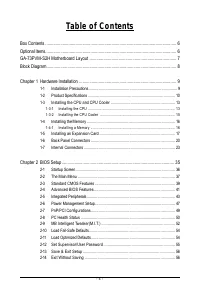
Page 4 - Table of Contents
- 4 - Table of Contents Box Contents ................................................................................................................. 6Optional Items................................................................................................................. 6GA-73PVM-S2H Mother...
Page 6 - Box Contents
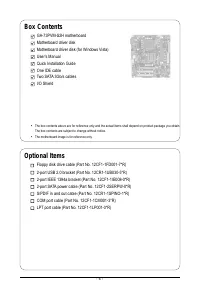
- 6 - • The box contents above are for reference only and the actual items shall depend on product package you obtain.The box contents are subject to change without notice. • The motherboard image is for reference only. Box Contents GA-73PVM-S2H motherboardMotherboard driver diskMotherboard driver d...
Page 8 - Block Diagram
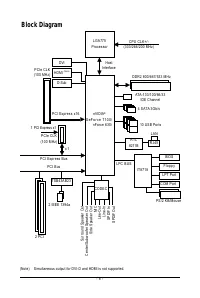
- 8 - Block Diagram (Note) Simultaneous output for DVI-D and HDMI is not supported. LGA775 Processor 4 SATA 3Gb/s LPC BUS 10 USB Ports Line-Out MIC CODEC Line-In SPDIF In SPDIF Out Side Speaker Out Center/Subwoofer Speaker Out Surround Speaker Out 2 PCI PCI Bus 2 IEEE 1394a TSB43AB23 LPT Port BIOS F...
Page 9 - Hardware Installation; Installation Precautions; Do not place the computer system on an uneven surface.; Chapter 1 Hardware Installation
Hardware Installation - 9 - 1-1 Installation Precautions The motherboard contains numerous delicate electronic circuits and components which can becomedamaged as a result of electrostatic discharge (ESD). Prior to installation, carefully read the user'smanual and follow these procedures: • Prior to ...
Page 10 - Product Specifications
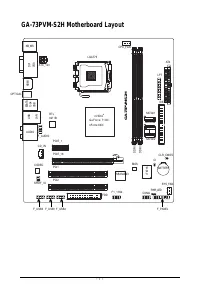
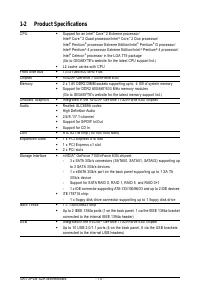
GA-73PVM-S2H Motherboard - 1 0 - 1-2 Product Specifications CPU Support for an Intel ® Core TM 2 Extreme processor/ Intel ® Core TM 2 Quad processor/Intel ® Core TM 2 Duo processor/ Intel ® Pentium ® processor Extreme Edition/Intel ® Pentium ® D processor/ Intel ® Pentium ® 4 processor Extreme Edi...
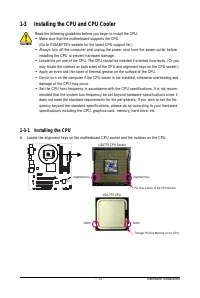
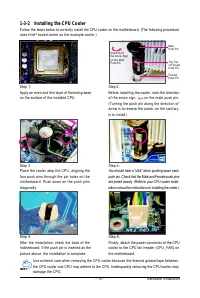
Page 13 - Installing the CPU and CPU Cooler; Read the following guidelines before you begin to install the CPU:
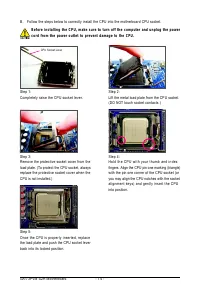
Hardware Installation - 13 - 1-3 Installing the CPU and CPU Cooler Read the following guidelines before you begin to install the CPU: • Make sure that the motherboard supports the CPU.(Go to GIGABYTE's website for the latest CPU support list.) • Always turn off the computer and unplug the power cord...
Page 14 - back into its locked position.
GA-73PVM-S2H Motherboard - 1 4 - B. Follow the steps below to correctly install the CPU into the motherboard CPU socket. Step 2:Lift the metal load plate from the CPU socket.(DO NOT touch socket contacts.) Step 4:Hold the CPU with your thumb and index fingers. Align the CPU pin one marking (triangle...
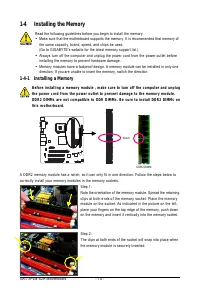
Page 16 - Installing the Memory
GA-73PVM-S2H Motherboard - 1 6 - 1-4 Installing the Memory Read the following guidelines before you begin to install the memory: • Make sure that the motherboard supports the memory. It is recommended that memory ofthe same capacity, brand, speed, and chips be used.(Go to GIGABYTE's website for the ...
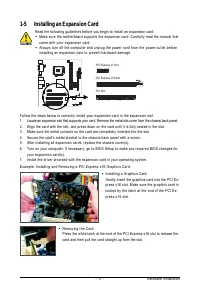
Page 17 - Installing an Expansion Card; came with your expansion card.
Hardware Installation - 17 - 1-5 Installing an Expansion Card Read the following guidelines before you begin to install an expansion card: • Make sure the motherboard supports the expansion card. Carefully read the manual that came with your expansion card. • Always turn off the computer and unplug ...
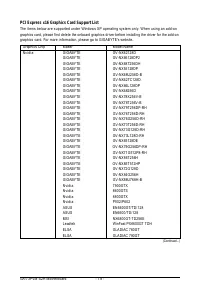
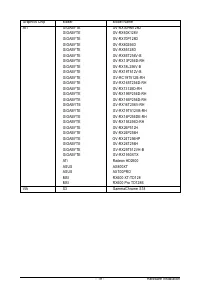
Page 18 - PCI Express x16 Graphics Card Support List
GA-73PVM-S2H Motherboard - 1 8 - PCI Express x16 Graphics Card Support List The items below are supported under Windows XP operating system only. When using an add-ongraphics card, please first delete the onboard graphics driver before installing the driver for the add-ongraphics card. For more info...
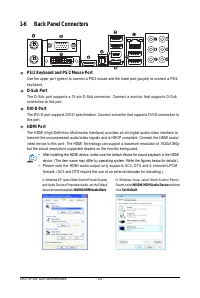
Page 20 - Back Panel Connectors; HDMI Port
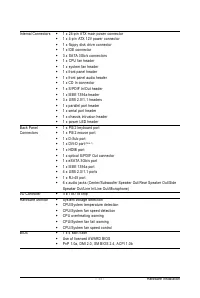
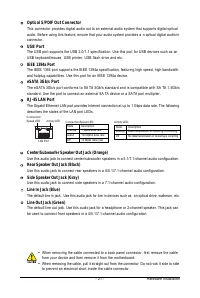
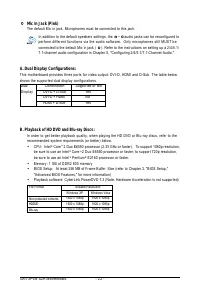
GA-73PVM-S2H Motherboard - 2 0 - 1-6 Back Panel Connectors • After installing the HDMI device, make sure the default device for sound playback is the HDMI device. (The item name may differ by operating system. Refer the figures below for details.) • Please note the HDMI audio output only supports AC...
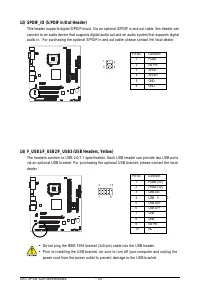
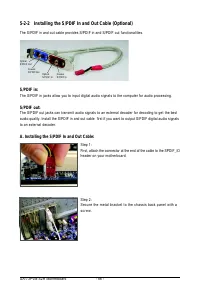
Page 21 - Optical S/PDIF Out Connector; to prevent an electrical short inside the cable connector.
Hardware Installation - 21 - Center/Subwoofer Speaker Out Jack (Orange) Use this audio jack to connect center/subwoofer speakers in a 5.1/7.1-channel audio configuration. Rear Speaker Out Jack (Black) Use this audio jack to connect rear speakers in a 4/5.1/7.1-channel audio configuration. Side Speak...
Page 23 - Internal Connectors
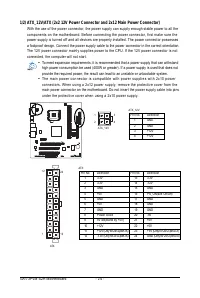
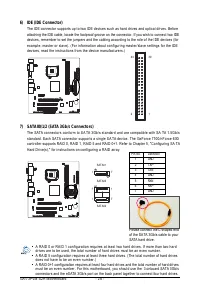
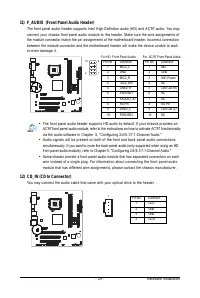
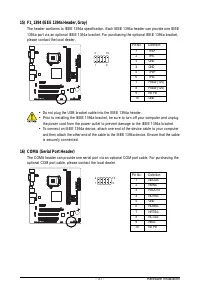
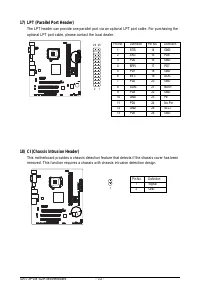
Hardware Installation - 23 - 1-7 Internal Connectors Read the following guidelines before connecting external devices: • First make sure your devices are compliant with the connectors you wish to connect. • Before installing the devices, be sure to turn off the devices and your computer. Unplug thep...
Page 25 - typically designated by a stripe of different color.
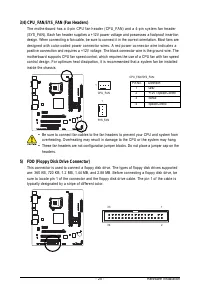
Hardware Installation - 25 - • Be sure to connect fan cables to the fan headers to prevent your CPU and system fromoverheating. Overheating may result in damage to the CPU or the system may hang. • These fan headers are not configuration jumper blocks. Do not place a jumper cap on theheaders. 3/4) C...
Page 28 - before connecting the cables.; ments and the pin assignments are matched correctly.
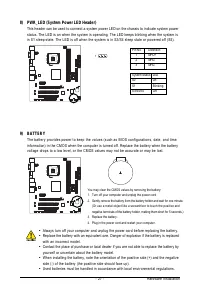
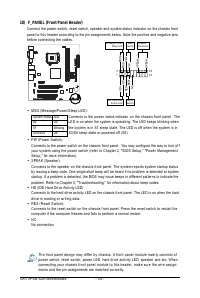
GA-73PVM-S2H Motherboard - 2 8 - 10) F_PANEL (Front Panel Header) Connect the power switch, reset switch, speaker and system status indicator on the chassis frontpanel to this header according to the pin assignments below. Note the positive and negative pins before connecting the cables. 1 2 1 9 2 0...
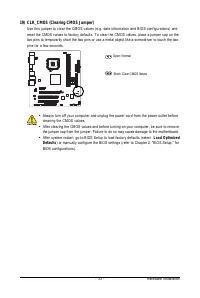
Page 33 - Load Optimized
Hardware Installation - 33 - Open: Normal Short: Clear CMOS Values 19) CLR_CMOS (Clearing CMOS Jumper) Use this jumper to clear the CMOS values (e.g. date information and BIOS configurations) andreset the CMOS values to factory defaults. T o clear the CMOS values, place a jumper cap on the two pins ...
Page 35 - BIOS Setup; Chapter 2 BIOS Setup; of the BIOS Setup program.
- 3 5 - BIOS Setup Chapter 2 BIOS Setup BIOS (Basic Input and Output System) records hardware parameters of the system in the CMOS on themotherboard. Its major functions include conducting the Power-On Self-T est (POST) during systemstartup, saving system parameters and loading operating system, etc...
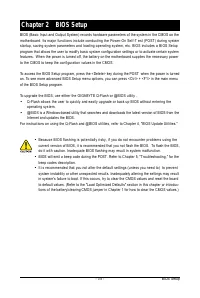
Page 36 - Startup Screen; The following screen may appear when the computer boots.
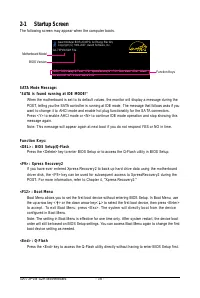
GA-73PVM-S2H Motherboard - 3 6 - 2-1 Startup Screen The following screen may appear when the computer boots. Function Keys:<DEL> : BIOS Setup/Q-Flash Press the <Delete> key to enter BIOS Setup or to access the Q-Flash utility in BIOS Setup. <F9> : Xpress Recovery2 If you have ever ...
Page 37 - The Main Menu; Main Menu Help; BIOS Setup Program Function Keys; Load Optimized Defaults
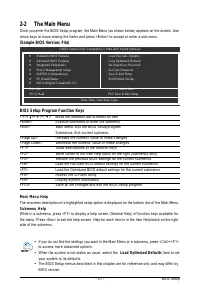
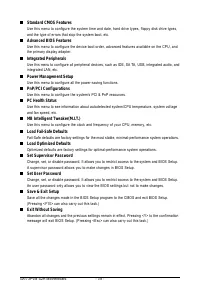
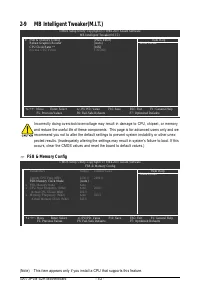
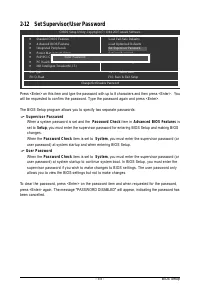
- 3 7 - BIOS Setup 2-2 The Main Menu Once you enter the BIOS Setup program, the Main Menu (as shown below) appears on the screen. Use arrow keys to move among the items and press <Enter> to accept or enter a sub-menu. (Sample BIOS Version: F4a) Main Menu Help The onscreen description of a high...
Page 38 - Use this menu to configure all the power-saving functions.
GA-73PVM-S2H Motherboard - 3 8 - Standard CMOS Features Use this menu to configure the system time and date, hard drive types, floppy disk drive types,and the type of errors that stop the system boot, etc. Advanced BIOS Features Use this menu to configure the device boot order, a...
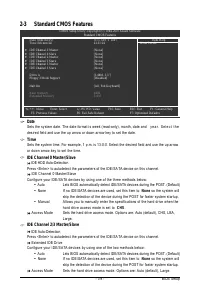
Page 39 - Standard CMOS Features; Date; None
- 3 9 - BIOS Setup 2-3 Standard CMOS Features Date Sets the system date. The date format is week (read-only), month, date and y e a r . S e l e c t t h edesired field and use the up arrow or down arrow key to set the date. Time Sets the system time. For example, 1 p.m. is 13:0:0. Select the desired ...
Page 40 - Drive A; Floppy 3 Mode Support
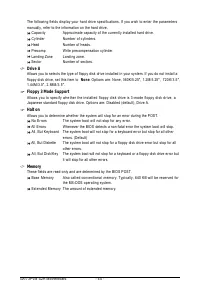
GA-73PVM-S2H Motherboard - 4 0 - The following fields display your hard drive specifications. If you wish to enter the parameters manually, refer to the information on the hard drive. Capacity Approximate capacity of the currently installed hard drive. Cylinder Number of cylinders. Head Number of he...
Page 41 - Advanced BIOS Features; Hard Disk Boot Priority; Password; item in the BIOS Main Menu.
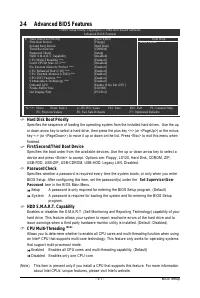
- 4 1 - BIOS Setup 2-4 Advanced BIOS Features Hard Disk Boot Priority Specifies the sequence of loading the operating system from the installed hard drives. Use the up or down arrow key to select a hard drive, then press the plus key <+> (or <PageUp>) or the minus key <-> (or <P...
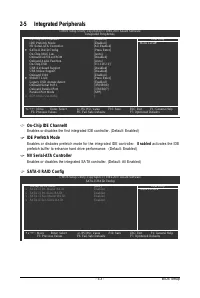
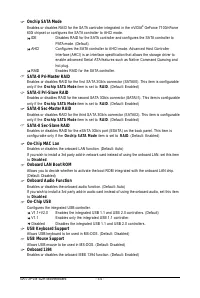
Page 43 - Integrated Peripherals; IDE Prefetch Mode; Enabled; activates the IDE; NV Serial-ATA Controller
- 4 3 - BIOS Setup 2-5 Integrated Peripherals SATA-II RAID Config CMOS Setup Utility-Copyright (C) 1984-2007 Award Software SATA-II RAID Config Item Help Menu Level Onchip SATA Mode [IDE] x SATA-II Pri-Master RAID Enabled x SATA-II Pri-Slave RAID Enabled x SATA-II Sec-Master RAID Enabled x SATA-I...
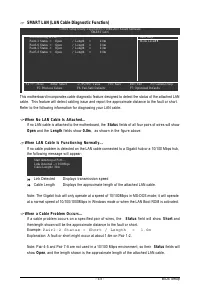
Page 45 - SMART LAN (LAN Cable Diagnostic Function)
- 4 5 - BIOS Setup SMART LAN (LAN Cable Diagnostic Function) CMOS Setup Utility-Copyright (C) 1984-2007 Award Software SMART LAN Item HelpMenu Level Start detecting at Port.....Pair1-2 Status = Open / Length = 0.0m Pair3-6 Status = Open / Length = 0.0m Pair4-5 Status = Open / Length = 0.0m Pair7-...
Page 46 - Parallel Port; is set to; ECP; or
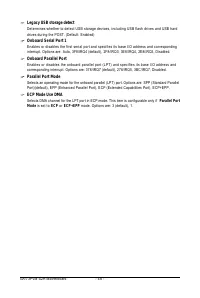
GA-73PVM-S2H Motherboard - 4 6 - Legacy USB storage detect Determines whether to detect USB storage devices, including USB flash drives and USB harddrives during the POST. (Default: Enabled) Onboard Serial Port 1 Enables or disables the first serial port and specifies its base I/O address and corres...
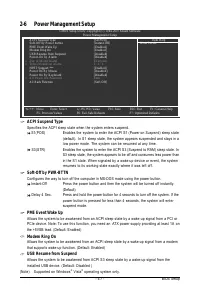
Page 47 - Power Management Setup; ACPI Suspend Type; Specifies the ACPI sleep state when the system enters suspend.; PME Event Wake Up; Vista
- 4 7 - BIOS Setup 2-6 Power Management Setup ACPI Suspend Type Specifies the ACPI sleep state when the system enters suspend. S1(POS) Enables the system to enter the ACPI S1 (Power on Suspend) sleep state (default). I n S 1 sleep state, the system appears suspended and stays in alow power mode. The...
Page 48 - Power On by Keyboard; AC Back Function
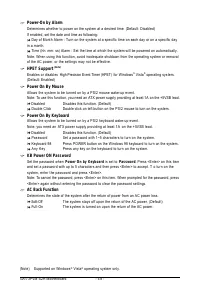
GA-73PVM-S2H Motherboard - 4 8 - Power-On by Alarm Determines whether to power on the system at a desired time. (Default: Disabled)If enabled, set the date and time as following: Day of Month Alarm : Turn on the system at a specific time on each day or on a specific day in a month. Time (hh: mm: ss)...
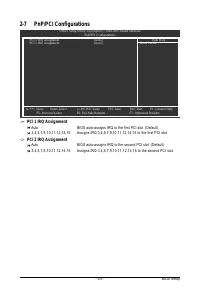
Page 49 - PnP/PCI Configurations; PCI 1 IRQ Assignment; PCI 2 IRQ Assignment; Auto
- 4 9 - BIOS Setup 2-7 PnP/PCI Configurations PCI 1 IRQ Assignment Auto BIOS auto-assigns IRQ to the first PCI slot. (Default) 3,4,5,7,9,10,11,12,14,15 Assigns IRQ 3,4,5,7,9,10,11,12,14,15 to the first PCI slot. PCI 2 IRQ Assignment Auto BIOS auto-assigns IRQ to the second PCI slot. (Default) 3,4,5,...
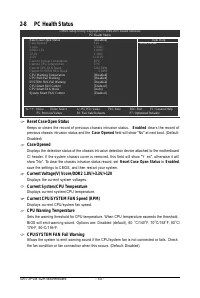
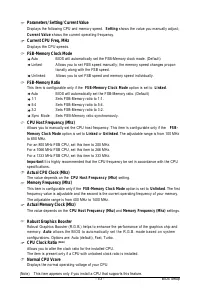
Page 50 - PC Health Status; Case Opened; Reset Case Open Status; Current System/CPU Temperature
GA-73PVM-S2H Motherboard - 5 0 - 2-8 PC Health Status Reset Case Open Status Keeps or clears the record of previous chassis intrusion status. Enabled clears the record of previous chassis intrusion status and the Case Opened field will show "No" at next boot. (Default: Disabled) Case Opened ...
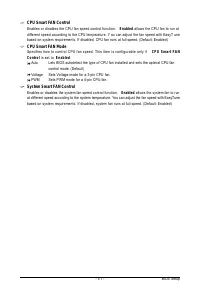
Page 51 - CPU Smart FAN Control; CPU Smart FAN Mode; CPU Smart FAN; System Smart FAN Control
- 5 1 - BIOS Setup CPU Smart FAN Control Enables or disables the CPU fan speed control function. Enabled allows the CPU fan to run at different speed according to the CPU temperature. Y ou can adjust the fan speed with EasyT une based on system requirements. If disabled, CPU fan runs at full speed. ...
Page 54 - -11 Load Optimized Defaults
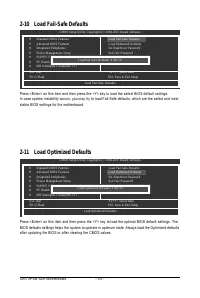
GA-73PVM-S2H Motherboard - 5 4 - 2-10 Load Fail-Safe Defaults Press <Enter> on this item and then press the <Y> key to load the safest BIOS default settings.In case system instability occurs, you may try to load Fail-Safe defaults, which are the safest and moststable BIOS settings for th...
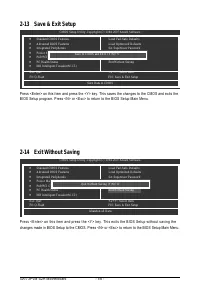
Page 56 - -14 Exit Without Saving
GA-73PVM-S2H Motherboard - 5 6 - 2-13 Save & Exit Setup 2-14 Exit Without Saving Press <Enter> on this item and press the <Y> key. This saves the changes to the CMOS and exits theBIOS Setup program. Press <N> or <Esc> to return to the BIOS Setup Main Menu. Press <Enter...
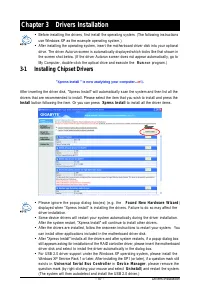
Page 57 - Chapter 3 Drivers Installation; Installing Chipset Drivers
Drivers Installation - 57 - Chapter 3 Drivers Installation 3-1 Installing Chipset Drivers • Before installing the drivers, first install the operating system. (The following instructionsuse Windows XP as the example operating system.) • After installing the operating system, insert the motherboard d...
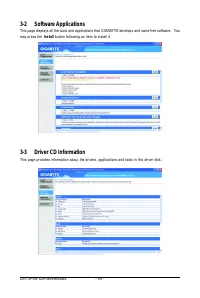
Page 58 - Software Applications; Install; button following an item to install it.; Driver CD Information
GA-73PVM-S2H Motherboard - 5 8 - 3-2 Software Applications This page displays all the tools and applications that GIGABYTE develops and some free software. Youmay press the Install button following an item to install it. 3-3 Driver CD Information This page provides information about the drivers, app...
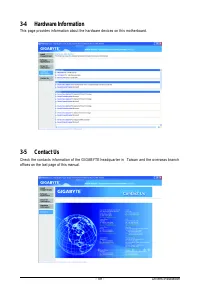
Page 59 - Drivers Installation; Hardware Information; offices on the last page of this manual.
Drivers Installation - 59 - 3-4 Hardware Information This page provides information about the hardware devices on this motherboard. 3-5 Contact Us Check the contacts information of the GIGABYTE headquarter in Taiwan and the overseas branch offices on the last page of this manual.
Page 61 - Xpress Recovery2; Chapter 4 Unique Features
Unique Features - 61 - 4-1 Xpress Recovery2 "*" Xpress Recovery2 checks the first physical hard drive in the following sequence: The first PATA IDE connector, the second P ATA IDE connector , the first SA TA connector , the second SA TAconnector and so forth. For example, when hard drives ar...
Page 62 - Figure 1
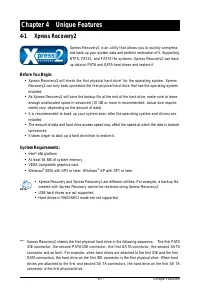
GA-73PVM-S2H Motherboard - 6 2 - Installation and Configuration (The following procedure uses Windows XP as the example operating system.) A. Installing Windows XP and Partitioning the Hard Drive 1. Set CD-ROM drive as the first boot device under "Advanced BIOS Features" in the BIOS Setup pr...
Page 64 - B. Accessing Xpress Recovery2; see the following message:; C. Using the Backup Function in Xpress Recovery2; BACKUP; to check disk allocation.
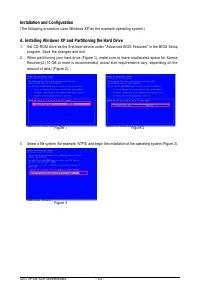
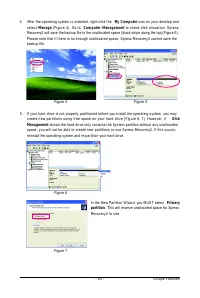
GA-73PVM-S2H Motherboard - 6 4 - 2. After you use the backup function in Xpress Recovery2 for the first time, Xpress Recovery2 will stay permanent in your hard drive. If you wish to enter Xpress Recovery2 later, simply press <F9> during the POST (Figure 9). Figure 8 Figure 9 B. Accessing Xpres...
Page 65 - D. Using the Restore Function in Xpress Recovery2; RESTORE; E. Removing the Backup; REMOVE; F. Exiting Xpress Recovery2; REBOOT
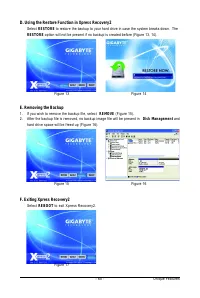
Unique Features - 65 - D. Using the Restore Function in Xpress Recovery2 Select RESTORE to restore the backup to your hard drive in case the system breaks down. The RESTORE option will not be present if no backup is created before (Figure 13, 14). Figure 13 Figure 14 E. Removing the Backup 1. If you...
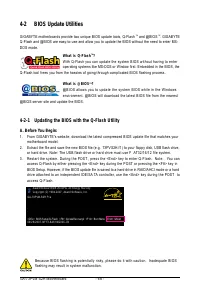
Page 66 - BIOS Update Utilities
GA-73PVM-S2H Motherboard - 6 6 - 4-2 BIOS Update Utilities GIGABYTE motherboards provide two unique BIOS update tools, Q-Flash TM and @BIOS TM . GIGABYTE Q-Flash and @BIOS are easy-to-use and allow you to update the BIOS without the need to enter MS-DOS mode. What is Q-Flash TM ? With Q-Flash you ca...
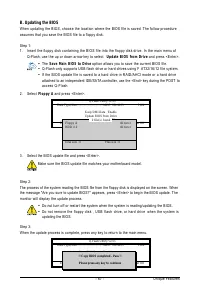
Page 67 - Update BIOS from Drive; The; Save Main BIOS to Drive; option allows you to save the current BIOS file.; Floppy A; Make sure the BIOS update file matches your motherboard model.
Unique Features - 67 - B. Updating the BIOS When updating the BIOS, choose the location where the BIOS file is saved. The follow procedureassumes that you save the BIOS file to a floppy disk. Step 1:1. Insert the floppy disk containing the BIOS file into the floppy disk drive. In the main menu of Q-...
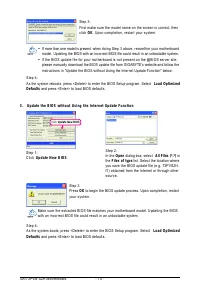
Page 68 - and press
GA-73PVM-S2H Motherboard - 6 8 - Step 6:Select Save & Exit Setup and then press <Y> to save settings to CMOS and exit BIOS Setup. The procedure is complete after the system restarts. Press <Y> to load BIOS defaults Step 4:Press <Esc> and then <Enter> to exit Q-Flash and r...
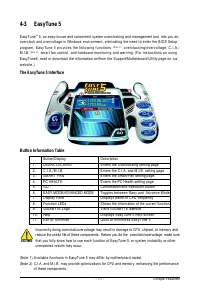
Page 71 - EasyTune 5; The EasyTune 5 Interface
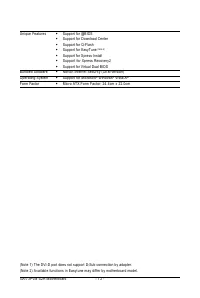
Unique Features - 71 - 4-3 EasyTune 5 EasyTune TM 5, an easy-to-use and convenient system overclocking and management tool, lets you do overclock and overvoltage in Windows environment, eliminating the need to enter the BIOS Setupprogram. EasyTune 5 provides the following functions (Note 1) : overcl...
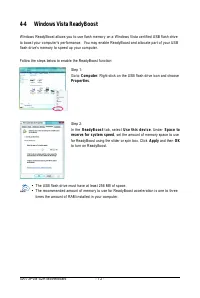
Page 72 - Windows Vista ReadyBoost
GA-73PVM-S2H Motherboard - 7 2 - 4-4 Windows Vista ReadyBoost Windows ReadyBoost allows you to use flash memory on a Windows Vista certified USB flash driveto boost your computer's performance. You may enable ReadyBoost and allocate part of your USBflash drive's memory to speed up your computer. Fol...
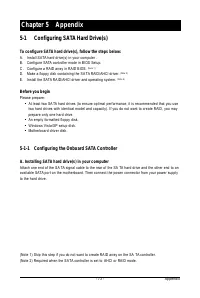
Page 73 - Appendix; Chapter 5 Appendix; Before you begin; prepare only one hard drive.; -1-1 Configuring the Onboard SATA Controller
Appendix - 73 - Chapter 5 Appendix (Note 1) Skip this step if you do not want to create RAID array on the SA TA controller.(Note 2) Required when the SA TA controller is set to AHCI or RAID mode. 5-1 Configuring SATA Hard Drive(s) To configure SATA hard drive(s), follow the steps below: A. Install S...
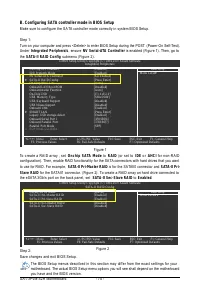
Page 74 - Configuring SATA controller mode in BIOS Setup
GA-73PVM-S2H Motherboard - 7 4 - B. Configuring SATA controller mode in BIOS Setup Make sure to configure the SA TA controller mode correctly in system BIOS Setup. Step 1:Turn on your computer and press <Delete> to enter BIOS Setup during the POST (Power-On Self-Test).Under Integrated Peripher...
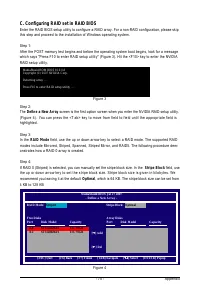
Page 75 - C. Configuring RAID set in RAID BIOS; Figure 3; Define a New Array; , which is 64 KB. The stripe block size can be set from
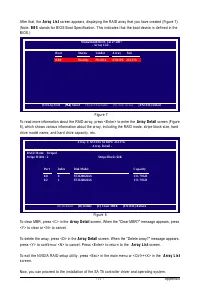
Appendix - 75 - C. Configuring RAID set in RAID BIOS Enter the RAID BIOS setup utility to configure a RAID array. For a non-RAID configuration, please skipthis step and proceed to the installation of Windows operating system. Step 1: After the POST memory test begins and before the operating system ...
Page 76 - block; Free Disks; block. Select the target hard drives using the up or down arrow; Array Disks
GA-73PVM-S2H Motherboard - 7 6 - Step 6:After assigning the RAID drives, press <F7>. A message which says "All data on new(or added) diskswill be overwritten. Continue?" appears (Figure 6). T o overwrite the data in the selected hard drives,press <Y> to confirm or press <N>...
Page 78 - c d b o o t d r v; )NVIDIA MCP73 RAID DRIVER
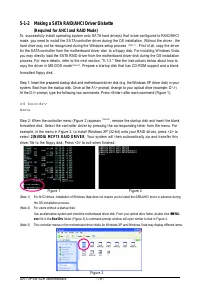
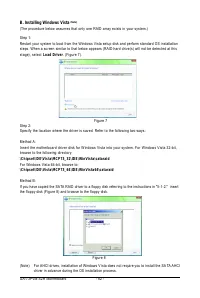
GA-73PVM-S2H Motherboard - 7 8 - 5-1-2 Making a SATA RAID/AHCI Driver Diskette (Required for AHCI and RAID Mode) To successfully install operating system onto SA TA hard drive(s) that is/are configured to RAID/AHCI mode, you need to install the SA TA controller driver during the OS installation. Wit...
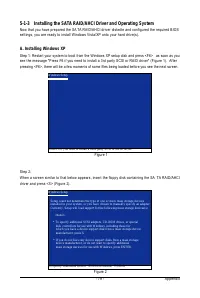
Page 79 - -1-3 Installing the SATA RAID/AHCI Driver and Operating System; as soon as you; A. Installing Windows XP
Appendix - 79 - Figure 1 Figure 2 Step 2:When a screen similar to that below appears, insert the floppy disk containing the SA TA RAID/AHCIdriver and press <S> (Figure 2). Windows Setup Press F6 if you need to install a third party SCSI or RAID driver. Windows Setup S=Specify Additional Device...
Page 80 - Figure 4; NVIDIA
GA-73PVM-S2H Motherboard - 8 0 - If a message appears saying one or some file(s) cannot be found, please check the floppy disk or copy the correct SA TA RAID driver again from the motherboard driver disk. Figure 3 Windows Setup ENTER=Select F3=Exit You have chosen to configure a SCSI Adapter for use...
Page 82 - B. Installing Windows Vista; Load Driver; Figure 7
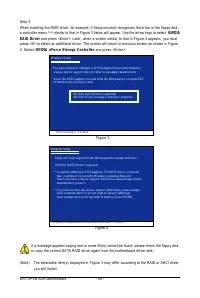
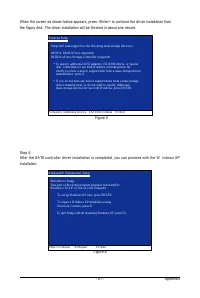
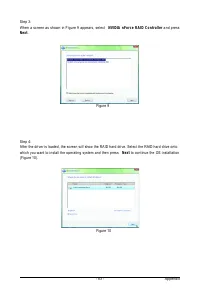
GA-73PVM-S2H Motherboard - 8 2 - B. Installing Windows Vista (Note) (The procedure below assumes that only one RAID array exists in your system.) Step 1:Restart your system to boot from the Windows Vista setup disk and perform standard OS installationsteps. When a screen similar to that below appear...
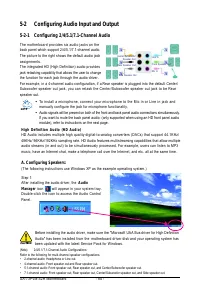
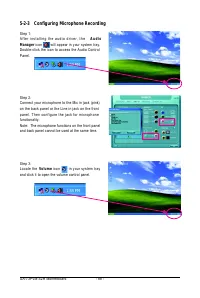
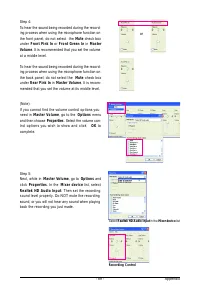
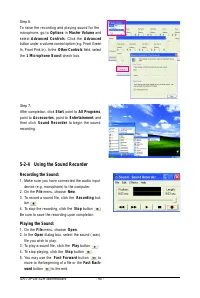
Page 84 - Configuring Audio Input and Output; Audio; icon
GA-73PVM-S2H Motherboard - 8 4 - Rear Speaker Out Center/Subwoofer Speaker Out Side Speaker Out Line In Front Speaker Out Mic In 5-2 Configuring Audio Input and Output 5-2-1 Configuring 2/4/5.1/7.1-Channel Audio The motherboard provides six audio jacks on theback panel which support 2/4/5.1/7.1-chan...
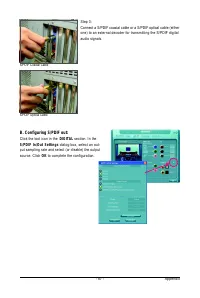
Page 87 - DIGITAL; to complete the configuration.
Appendix - 87 - Step 3: Connect a S/PDIF coaxial cable or a S/PDIF optical cable (eitherone) to an external decoder for transmitting the S/PDIF digitalaudio signals. S/PDIF Coaxial Cable S/PDIF Optical Cable B. Configuring S/PDIF out: Click the tool icon in the DIGITAL section. In the S/PDIF In/Out ...
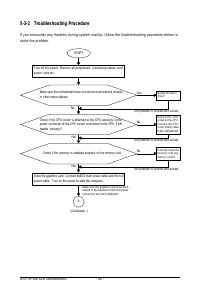
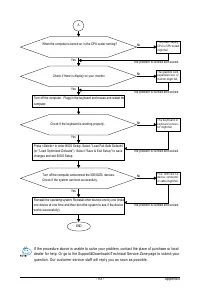
Page 91 - Troubleshooting
Appendix - 91 - 5-3 Troubleshooting 5-3-1 Frequently Asked Questions To read more F AQs for your motherboard, please go to the Support\Motherboard\F AQ page on GIGABYTE's website. Q: In the BIOS Setup program, why are some BIOS options missing? A: Some advanced options are hidden in the BIOS Setup p...
Page 94 - Regulatory Statements; Regulatory Notices; a commitment by GIGABYTE.; Our Commitment to Preserving the Environment; or regional waste collection administration for recycling.
GA-73PVM-S2H Motherboard - 9 4 - Regulatory Statements Regulatory Notices This document must not be copied without our written permission, and the contents there of must not beimparted to a third party nor be used for any unauthorized purpose. Contravention will be prosecuted.We believe that the inf...
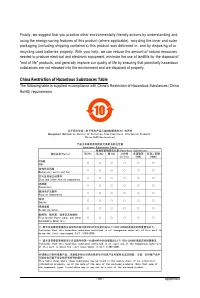
Page 95 - China Restriction of Hazardous Substances Table
Appendix - 95 - Finally, we suggest that you practice other environmentally friendly actions by understanding andusing the energy-saving features of this product (where applicable), recycling the inner and outerpackaging (including shipping containers) this product was delivered in, and by disposing...
Page 99 - Contact Us
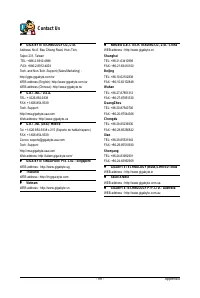
Appendix - 99 - Contact Us GIGA-BYTE TECHNOLOGY CO., LTD. Address: No.6, Bau Chiang Road, Hsin-Tien,Taipei 231, Taiwan TEL: +886-2-8912-4888 FAX: +886-2-8912-4003Tech. and Non-Tech. Support (Sales/Marketing) :http://ggts.gigabyte.com.twWEB address (English): http://www.gigabyte.com.twWEB ad...
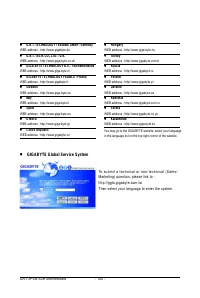
Page 100 - GIGABYTE Global Service System
GA-73PVM-S2H Motherboard - 100 - G.B.T. TECHNOLOGY TRADING GMBH - Germany WEB address : http://www.gigabyte.de G.B.T. TECH. CO., LTD. - U.K. WEB address : http://www.giga-byte.co.uk GIGA-BYTE TECHNOLOGY B.V. - The Netherlands WEB address : http://www.giga-byte.nl ...