Epson ET 7700 - Manual

A user manual for the Epson ET-7700 printer covers essential topics like initial setup, including unpacking, ink tank installation, power connections, and paper loading. The document also addresses software requirements–such as installing drivers on Windows or Mac–and wireless connectivity options, including mobile printing via cloud services. Safety precautions and troubleshooting for common operational issues are included to ensure proper functionality and maintenance.


Table of Contents:
- Page 1 – Initial Setup and Ink Tank Installation
- Page 2 – Hardware Setup and Power-On Procedure
- Page 3 – Software Installation and Network Connectivity
- Page 4 – Troubleshooting and Support Resources
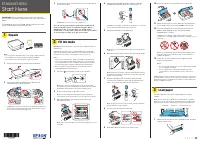
Start Here
12
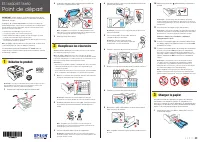
When the message to start initialization appears on the
LCD screen, press the start button to start charging
the ink. Ink charging takes approximately 7 minutes. A
message appears when ink charging is complete. Press
the
OK button to continue.
Note:
After some ink is used for charging, the rest is available for
printing.
Caution:
Do not turn off the product, raise the scanner unit, or
load paper while the product is charging or you’ll waste ink.
13
Follow the on-screen instructions to adjust the print
quality. Press the
OK button to continue.
Note:
You can change these settings later using the product’s
control panel. For more information, see the online User’s Guide.
14
To complete filling the ink tanks, repeat steps 1 through 6
using the remaining ink in the bottles.
Note:
Replace the bottle cap before disposing of the bottles.
15
Press the
OK button to proceed. Follow the on-screen
instructions to reset the ink levels.
16
Close the ink tank cover and scanner unit.
3
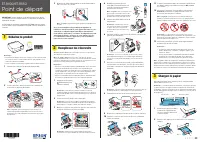
Load paper
See the online User’s Guide for information about available
paper types and sizes, loading capacity, rear feed loading, and
loading CD/DVD/Blu-ray™ discs.
Output tray
Cassette 1
Cassette 2/front cover
You can load the following paper sizes:
• Cassette 1: 3.5 × 5-, 4 × 6-, or 5 × 7-inch photo paper
• Cassette 2: Letter-, A4-, legal-size, or 8 × 10-inch paper
See the instructions below for loading paper.
1
Raise the control panel and lower the front cover.
Read these instructions before using your product.
Note for Spanish speakers/Nota para hispanohablantes:
Para
obtener instrucciones de configuración en español, consulte la Guía
de instalación en
www.epson.com/support/et7700sp (requiere una
conexión a Internet).
1
Unpack
Note:
• Do not open the ink bottles until you are ready to fill the ink tanks.
The ink bottles are vacuum packed to maintain reliability.
• The CD/DVD tray is taped to the bottom of cassette 2.
1
Remove all protective materials from the product.
2
Lift up the scanner unit. Remove all protective materials
from inside the product.
Caution:
Do not touch the flat white cable or the ink tubes and
their translucent cover.
2
Fill ink tanks
Note:
This product requires careful handling of ink. If ink spills, wipe it
off immediately with a damp towel to avoid permanent stains. If ink gets
on your clothes or belongings, it may not come off.
Warning:
Keep the ink bottles out of the reach of children and do not
drink the ink.
1
Open the ink tank cover, then open the cap for the ink tank
you are going to fill.
2
Unpack one of the ink bottles. Hold the ink bottle upright
and slowly turn the bottle cap to remove it.
Caution:
Do not shake or squeeze the ink bottle. Do not touch
the top of the ink bottle after its cap is removed; otherwise, ink
may leak.
3
Position the top of the ink bottle along the slot in front of
the filling port, then slowly stand the bottle up to insert it.
Note:
Refer to the color-coded sticker on the ink unit to identify
the color of each tank. Do not force the bottles into position; they
are keyed for each color.
4
Wait for the ink to fill the tank.
Do not squeeze the bottle.
Ink flows into the tank and stops automatically when the
ink is filled to the upper line.
Note:
If ink does not flow from the bottle, lift and reinsert the
bottle.
5
When the ink tank is full, remove the ink bottle and
securely close the ink tank cap. Place the remaining ink
aside; you will need it later.
Note:
Replace the bottle cap and tighten it.
6
Repeat the previous steps for the other colors.
7
Close the ink tank cover and then the scanner unit.
8
Connect the power cord to the back of the product and to
an electrical outlet.
Caution:
Do not connect to your computer yet.
9
Raise the control panel, then press the power button to
turn on the product.
Note:
If an error message appears, turn off the product and
check that no protective material has been left inside the product.
10
Press or to select your language on the LCD screen,
then press the
OK button. Follow steps 11 and 12 to
continue ink charging.
Note:
You can change this setting later using the product’s
control panel. For more information, see the online User’s Guide.
11
When the message to see the Start Here sheet appears
on the LCD screen, press the
OK button. On the next
screen, press and hold the
OK button for 3 seconds.
ET-7700
"Loading the manual" means you need to wait until the file loads and becomes available for online reading. Some manuals are very large, and the time they take to appear depends on your internet speed.
Was this manual helpful?
About this manual
- Brand
- Epson
- Model
- ET 7700
- Document type
- Manual
- Language(s)
- English
- Pages
- 4
- File size
- 3 MB
- Format
Other Manuals for Epson ET 7700
Summary
Instructions for unpacking the printer, safely installing ink bottles, removing protective materials, and handling safety warnings during initial setup.
Steps for installing ink tanks, connecting power, powering on the device, loading paper into cassettes, and operational cautions.
Instructions for installing printer software on Windows and Mac systems, configuring wireless, USB, and wired network connections, and setting up mobile printing via external applications.
Ask a question
Related manuals
Popular Epson Other
 Epson PictureMate Flash - PM 280 - PictureMate Flash Compact Photo Printer User Manual
 Epson TM-T70II Troubleshooting Guide
 Epson U925 - TM B/W Dot-matrix Printer User Manual
 Epson RR 70W Manual
 Epson 9890 Manual
 Epson 206636 - PocketJet 3 Plus User Manual
 Epson Printer TM-H5000II User Manual
 Epson TM-T88V User Manual