Page 2 - • Mostofthepackagingmaterialsarerecyclable.Please
2 ContEntS 3 General warnings 4 Part names 8 Using your cooktop 9 Burners 10 Cleaning and care 11 Troubleshooting 12 Technical data 14 Installation instructions 18 Installation procedure 23 Gas connection 24 LP conversion 26 Electrical connection 27 Testing appliance operation 29 Warranty LEGEnD War...
Page 3 - GEnErAL WArnInGS; read the following carefully to avoid damage or injury.; This symbol indicates never to do this
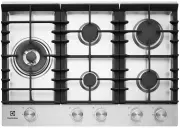
3 CaUTIon! read the following carefully to avoid an electric shock or fire. It is important to use your cooktop safely. Check these safety points before using your cooktop. this appliance is not intended for use by persons (includingchildren)withreducedphysical,sensoryormentalcapabilities,orlackofex...
Page 4 - Description of the burner; pArt nAmES; Figure 2b; Figure 1a
4 Description of the burner pArt nAmES EHG643Ba 1 Burners–thisunithasasmall,medium,largeand dual wok burner 2 Ceramic Glass hob – the glass hob is resistant to heat,coldandrapidtemperaturechanges,butis vulnerable to impact. A pepper mill falling on the hob could crack it. never stand or put heavy lo...
Page 8 - Figure 4; uSInG Your CooKtop
8 Installation • Anauthorisedpersonmustinstallthisapplianceand mUST provide a Certificate of Compliance. Thiscertificateshouldberetainedalongwithpurchase information. • Beforeusingtheappliance,ensurethatallpacking materials are removed from the appliance. • Inordertoavoidanypotentialhazard,theinstal...
Page 9 - Choice of burner; for your convenience there is a choice of burners:; Pots and pans; BurnErS; Choice of flame height; Incorrect – flame too high; Choice of cooking utensils; Figure 5
9 Choice of burner for your convenience there is a choice of burners: • Asmallburnerforspeciallowheatand slow cooking. • Amediumburnerfornormalcookingandsimmering (oneonthefourburnermodelsandtwoonthefiveburner models). • Alargeburnerforfastheatingandlargepots and pans. • Awokburnerforveryfastheating...
Page 10 - CLEAnInG AnD CArE; use the scraper to remove spillages from the ceramic hob.; Changing the razor blade:
10 CaUTIon! Ensure the appliance is off and cool before cleaning. Enamel (on burner skirts and trivets) persistent stains may require rubbing with a nylon scourer or creamed powder cleansers. Household enamelcleanersareavailable,followthemanufacturer’sinstructions in their use. Harsh abrasive cleane...
Page 11 - trouBLESHootInG; Table 1; problem
11 Ifyouhaveaproblemwiththecooktop,checkthetablebelow. You may be able to solve the problem and this will save you from paying for a service call. You will have to pay for a service call even in the warranty period if the problem is one listed below. trouBLESHootInG Table 1 problem possible cause so...
Page 12 - tECHnICAL DAtA; features; Table 2
12 We reserve the right to alter these specifications. This appliance conforms to aS 4551. tECHnICAL DAtA features EHG313Ba EHG643Ba EHG643Sa EHG645Sa Cooking zones 1 4 4 4 Wok Yes,dual Yes,dual Yes,dual Yes,dual Ignition 220-240V 220-240V 220-240V 220-240V trivet Cast Cast Cast Cast Hob material Ce...
Page 13 - Table 2 continued
13 features EHG755Sa EHG955Sa EHG953Ba EHG953Sa Cooking zones 5 5 5 5 Wok Yes,dual Yes,dual Yes,dual Yes,dual Ignition 220-240V 220-240V 220-240V 220-240V trivet Cast Cast Cast Cast Hob material Stainless steel Stainless steel Ceramic glass Stainless steel features Ignition through knob Ignition thr...
Page 14 - InStALLAtIon InStruCtIonS; Gas supply
14 this appliance must be installed by an authorised person and in compliance with:1. AS/nZS 5601.1 Gas Installations part 1: General Installations,andAS/NZS5601.2GasInstallations part 2: Lp Gas installations in caravans and boats for non-propulsivepurposes,ortherelevantinstallationcode for gas appl...
Page 18 - InStALLAtIon proCEDurE; Combustible surface
18 1. the bench cutout should be made as per cutout dimensions in table 2 and figure 6. 2. adjacent walls, cupboards and protection for combustible materials : Ensure that the appliance is installed in accordance with clauses 6.2.5 and 6.10.1.1 ofAS/NZS5601.1,orclauses6.9.1and6.9.5ofAS/nZS 5601.2 wi...
Page 22 - Figure 8 – Clamp fitment
22 Figure 8 – Clamp fitment Benchtop Seal Hob Burner Box Screw Clamp Figure 7h – EHG955SA Combustible surface 101 117 115
Page 23 - GAS ConnECtIon; Supply pipe sizing; ELBoW poSItIonInG; regulator
23 GAS ConnECtIon This appliance is supplied for use with natural Gas. However, it can be converted for use with LPG. refer to LP conversion on page 24 & 25. Supply pipe sizing the total hourly gas consumption for the appliance is shown on the data label. the required supply pressure (i.e. at in...
Page 24 - CHECKInG tHE GAS SuppLY; turn on the gas supply and electricity and try to; LP Conversion – Important; Table 3; burner type; assembly of regulator; Figure 9
24 CHECKInG tHE GAS SuppLY 1. Check the manometer zero point is correct.2. Connect the manometer to the cooktop pressure point. this is located on the regulator. 3. turn on the gas supply and electricity and try to ignite the gas. NOTE! It will take additional time to light the gas for the first tim...
Page 25 - Use of hose assembly
25 Hex nut assembly,fully screwed down Hexnutassembly, removed from regulator and insert disassembled Insert oriented for LpG operation Figure 10 Insert oriented for natural gas operation 2. unscrew the hex nut from the regulator. the hex nut,brasswasherandnyloninsertwilldisengageasan assembly. 3. u...
Page 26 - TS AC; Diagram 1 is a schematic of the wiring in the appliance.; WEIGHT; of the unit is printed on the appliance
26 Diagram 1a – All models except EHG313BA Diagram 1b – model EHG313BA D anGEr 220-240 VOL TS AC DISCONNECT FROM SUPPL Y BEFORE REMOVING P ANEL 220-240V IGnItIon Box BoDY E n L KnoB IGnItIon SWItCHES to BurnEr SpArK pLuGS D anGEr 220-240 VOL TS AC DISCONNECT FROM SUPPL Y BEFORE REMOVING P ANEL 220-2...
Page 27 - HaVE; tEStInG AppLIAnCE opErAtIon
27 Afterinstallation,testtheapplianceandensurethatit operates correctly before handing it over to the customer. the following procedure is recommended:1. turn on the gas and electricity supply and attempt ignitiononallburners,bothseparatelyandincombination. (for correct procedure refer to page 8 Lig...
Page 28 - notES
Page 29 - Warranty; Important Notice
29 This document sets out the terms and conditions of the product warranties for Electrolux Appliances. It is an important document. Please keep it with your proof of purchase documents in a safe place for future reference should you require service for your Appliance. 1. In this warranty (a) ‘accep...