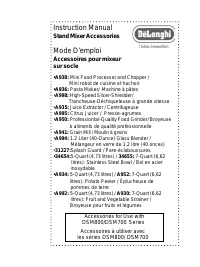
Page 2 - ) Do not operate any appliance with a damaged
When using electrical appliances, basic safety pre-cautions should always be followed to reduce the riskof fire, electrical shock and/or personal injury. READ AND SAVE THESE INSTRUCTIONS IMPORTANTSAFEGUARDS 1) Read all instructions.2) Close supervision is necessary when any appliance is used by or n...
Page 3 - BEFORE YOUR FIRST USE; attachments. To protect against electrical shock, do
BEFORE YOUR FIRST USE Carefully unpack your accessory and remove allpackaging material. For accessories with blades,remove the plastic blade covers from the bladeassembly. Use caution when removing the plasticcovers, the blades are extremely sharp. These coversshould be discarded as they are to prot...
Page 5 - Figure 1
Operating Your Mini Food Processorand Chopper 1) Put your ingredients into the container (3). Do not fill above the maximum level. 2) Be sure the rubber seal fits tightly in place on the blade unit (2). 3) Turn the blade unit upside down. Lower it into the container with the blades facing downward. ...
Page 6 - Know Your Potato Peeler; ) Switch the stand mixer “off” and remove the mini; Operating Your Potato Peeler
POTATO PEELER (Model A934: 5-Quart)( Model A952: 7-Quart) Know Your Potato Peeler 1) Cover2) Rotating Plate3) Bowl 1) Switch the stand mixer “off” and remove the mini food processor and chopper from the unit. 2) Containers, Lid and Base: Wash by hand in warm water with mild detergent, and then rinse...
Page 8 - For Your Pasta Maker
1) Switch the stand mixer “off” and remove the potato peeler from the unit.2) Remove the bowl by turning it clockwise.3) Rinse the parts by hand in cold water immediately. Do not place in your dishwasher. Then leave to dry. PASTA MAKER(Model A936) 1) Dough that is too dry or fed too quickly can brea...
Page 9 - Assembling Your Pasta Maker; ) Make pasta dough according to the directions on; Operating Your Pasta Maker
Assembling Your Pasta Maker 1) Optional: For easier pasta making, warm the pasta maker parts in hot water, and then drythoroughly. 2) Fit the scroll (4) inside the body (5). Then fit a screen(3) by putting the notchesover the pins. Figure 1 . The screens are numbered:1: Spaghetti2: Macaroni3: Rigato...
Page 12 - ) Plug the stand mixer in and put a bowl under the; Figure 3; Julienne Disc: Figure 3
Know Your High-Speed Slicer / Shredder (con’t) 1) One side slices cheese, potato, carrot, cabbage, onion, apple,etc. The other side shredscheese, carrot, potato and otherfoods of a similar texture. Double Sided Thin and ThickSlicing / Shredding Discs:Figure 1 and 2 Assembling Your High-SpeedSlicer /...
Page 14 - Assembling Your Fruit and Vegetable Strainer; ) Place the rough side up for removing fibers from; Operating Your Fruit and Vegetable Strainer
FRUIT AND VEGETABLE STRAINER(Model A9 92 : 5-Quart) (Model A9 30 : 7-Quart) Know Your Fruit andVegetable Strainer Assembling Your Fruit and Vegetable Strainer Coarse Screen: 1) Place the rough side up for removing fibers from cooked vegetables (Ex. rhubarb and spinach), and for pureeing fruit and ve...
Page 16 - For Your Juice Extractor; ) Never put your fingers in the feed tube. Use the; Know Your Juice Extractor
JUICE EXTRACTOR(Model A935) IMPORTANTSAFEGUARDS For Your Juice Extractor 1) Stomper2) Feed Tube3) Lid4) Pulp Shield5) Grater Plate 1) Never put your fingers in the feed tube. Use the stomper. 2) Fit the clip over the lid before switching “on” the stand mixer. 3) Do not remove the lid until the filte...
Page 19 - Care and Cleaning for Your Citrus Juicer; ) Wash parts by hand with mild detergent and; For Your Food Grinder
PROFESSIONAL-QUALITYFOOD GRINDER(Model A950) Care and Cleaning for Your Citrus Juicer 1) Wash parts by hand with mild detergent and warm water, and then rinse and dry thoroughly. 4) Insert the juicing cone by turning it until it drops.5) Cut the fruit in half, Then switch the stand mixer “on” to spe...
Page 20 - Be sure that the; Know Your Food Grinder
4) Loosely fit the ring nut (2). Assembling Your Food Grinder Figure 1 1) Fit the scroll (5) inside the grinder body (6). Then carefully fit the blade (4), with the cutting side onthe outermost part. Figure 1. Be sure that the blade is fitted properly, otherwise it could damagethe grinder. 2) Fit a ...
Page 22 - Care and Cleaning for Your Food Grinder
Care and Cleaning for Your Food Grinder 1) Loosen the ring nut manually or with the spanner and dismantle. 2) Wash all of the parts in warm water with mild detergent, and then rinse and dry thoroughly. Donot place the parts in your dishwasher. 3) Reassemble the parts.4) Wipe the screens with vegetab...
Page 23 - ) Check hopper for presence of foreign objects
Assembling Your Grain Mill 1) Insert the scroll (3) into the grain mill body (2). Add the milling ring (4). 2) Place the milling cone (5) in position. And then add the adjusting control (6), ensuring that theslot fits into the groove at the bottom of the grainmill body. Know Your Grain Mill 5) Milli...
Page 24 - Operating Your Grain Mill
Operating Your Grain Mill 3) Place the ring nut (7) in position and tighten. Then place the hopper (1) in position. 4) The assembly and location of your attachment onto the mixer is easier if the fine setting hasbeen selected on the grain mill. 5) Remove the low-speed outlet cover from the stand mix...
Page 25 - Care and Cleaning for Your Grain Mill
1) Remove the grain mill from the low-speed outlet and dismantle. 2) The metal components can be cleaned with a dry, coarse brush and the remaining parts can bewashed by hand in warm water with mild detergent, and then rinsed and dried thoroughly. Care and Cleaning for Your Grain Mill Operating Your...
Page 26 - For Your Blender
1.2-LITER (40-OUNCE) GLASS BLENDER(Model A994) 1) Never fit the base and blade unit to your machine without the glass container. 2) Never unscrew the glass container while it is on the machine. 3) Do no touch the sharp blades. Keep the blade unit away from children. 4) Only use the glass container, ...
Page 27 - 1) The blender runs at such high speeds that all
Assembling Your Blender Know Your Blender 1) Filler Cap2) Lid3) Lid Seal4) Glass Container5) Sealing Ring6) Blade Unit7) Base 1 2 3 4 5 6 7 1) Ensure the sealing ring (5) fits tightly in place on top of the bladeunit (6). SAVE THESEINSTRUCTIONS 11) The blender runs at such high speeds that all foods...
Page 28 - Purees; Operating Your Blender
Processing Dry Ingredients(Ex. chopping nuts, cheese, carrots, parsley, etc.) 1) Remove the filler cap from the lid and cut the food into pieces to drop through the hole. 2) Switch the stand mixer to “maximum” speed and drop food onto the revolving blades. 3) Wait for each piece to be processed befo...
Page 29 - Care and Cleaning for Your Blender; Blade Unit; Suggestions For Using Your Blender
Care and Cleaning for Your Blender 1) Always dismantle the blender from the stand mixer before cleaning. 2) Empty the glass container of its contents before unscrewing the base. 3) Blade Unit : Remove and wash the sealing ring by hand with warm water and mild detergent. Rinseand dry thoroughly. Brus...
Page 30 - Other Parts; Care and Cleaning for Your Blender (con’t)
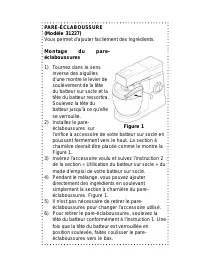
SPLASH GUARD(Model 31227) Allows you to easilyadd ingredients. Assembling YourSplash Guard 1) Turn the head-lift lever on your stand mixercounterclockwise andthe mixer head will popup. Raise the mixerhead until it locks intoplace. 2) Fit the splash guard onto the attachment outlet of your stand mixe...
Page 31 - Care and Cleaning for Your Splash Guard; ) Wash by hand with warm water and mild deter-; Assembling Your Bowl; ) Place the stainless steel bowl on the base and
Care and Cleaning for Your Splash Guard 1) Wash by hand with warm water and mild deter- gent, and then rinse and dry thoroughly. 6) To remove the splash guard, raise the mixer head according to direction 1. Once the mixer headhas been raised and is locked into place, slide thesplash guard down. Asse...
Page 32 - The bowl
Figure 1 Care and Cleaning for YourStainless Steel Bowl 1) Never use a wire brush, steel wool or bleach to clean thestainless steel bowl. The bowl can be placed in the top rack of the dishwasher. T he bowl can also be washed by hand withwarm water and mild detergent . To purchase an additional inclu...
Page 35 - AVANT LA PREMIÈRE UTILISATION
10) Éloignez vos doigts des pièces mobiles et des accessoires installés. 11) Ne laissez pas l’appareil sans surveillance.12) N’utilisez pas d’accessoires non autorisés. PRÉCAUTIONSIMPORTANTES (suite) AVANT LA PREMIÈRE UTILISATION Déballez soigneusement votre accessoire et retirez-en tous les matéria...
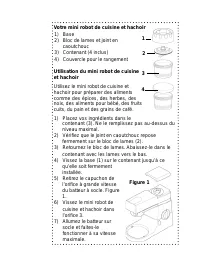
Page 37 - Votre mini robot de cuisine et hachoir; Figure
Votre mini robot de cuisine et hachoir 1 2 3 4 Utilisation du mini robot de cuisineet hachoir contenant (3). Ne le remplissez pas au-dessus duniveau maximal. 2) Vérifiez que le joint en caoutchouc repose fermement sur le bloc de lames (2). 3) Retournez le bloc de lames. Abaissez-le dans le contenant...
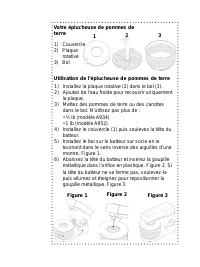
Page 39 - Utilisation de l’éplucheuse de pommes de terre; rotative
Votre éplucheuse de pommes deterre 1 3 1) Installez la plaque rotative (2) dans le bol (3).2) Ajoutez de l’eau froide pour recouvrir uniquement la plaque. 3) Mettez des pommes de terre ou des carottes dans le bol. N’utilisez pas plus de :• ½ lb (modèle A934)• 1 lb (modèle A952) 4) Installez le couve...
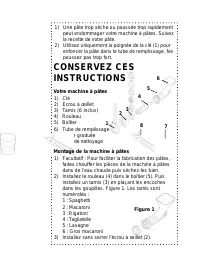
Page 41 - ) Une pâte trop sèche ou poussée trop rapidement; Votre machine à pâtes
1) Une pâte trop sèche ou poussée trop rapidement peut endommager votre machine à pâtes. Suivezla recette de votre pâte. 2) Utilisez uniquement la poignée de la clé (1) pour enfoncer la pâte dans le tube de remplissage. Nepoussez pas trop fort. Votre machine à pâtes 1) Clé2) Écrou à œillet3) Tamis (...
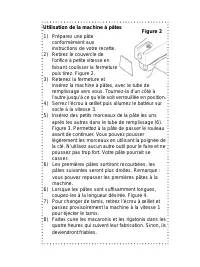
Page 42 - Utilisation de la machine à pâtes; Figure 2
Utilisation de la machine à pâtes 1) Préparez une pâte conformément auxinstructions de votre recette. 2) Retirez le couvercle de l’orifice à petite vitesse enfaisant coulisser la fermeturepuis tirez. Figure 2 . 3) Retenez la fermeture et insérez la machine à pâtes, avec le tube deremplissage vers vo...
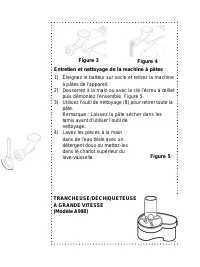
Page 43 - ) Éteignez le batteur sur socle et retirez la machine; Figure 5
Figure 3 Figure 4 Entretien et nettoyage de la machine à pâtes 1) Éteignez le batteur sur socle et retirez la machine à pâtes de l’appareil. 2) Desserrez à la main ou avec la clé l’écrou à œillet puis démontez l’ensemble. Figure 5 . 3) Utilisez l’outil de nettoyage (8) pour retirer toute la pâte.Rem...
Page 44 - déchiqueteuse à grande vitesse
1) Ne mettez jamais les doigts dans le tube de remplissage. 2) Ne retirez jamais le couvercle avant que le disque se soit complètement arrêté. 3) Manipulez les disques avec prudence, ils sont extrêmement tranchants. 4) Faites toujours fonctionner l’appareil une vitesse lente. 5) Évitez tout contact ...
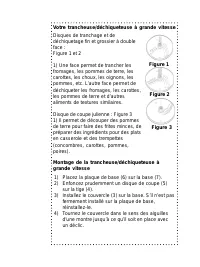
Page 45 - Votre trancheuse/déchiqueteuse à grande vitesse; Disque de coupe julienne : Figure 3
Votre trancheuse/déchiqueteuse à grande vitesse Disques de tranchage et dedéchiquetage fin et grossier à doubleface :Figure 1 et 2 1) Une face permet de trancher lesfromages, les pommes de terre, lescarottes, les choux, les oignons, lespommes, etc. L’autre face permet dedéchiqueter les fromages, les...
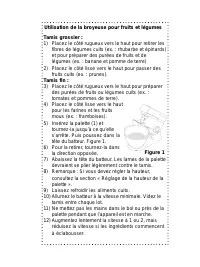
Page 47 - Montage de la broyeuse pour fruits et légumes
4) Remarque : Certains aliments, comme les carottes, peuvent tacher le plastique. Pour retirerles taches, frottez le plastique avec un chiffonimbibé d’huile végétale. Entretien et nettoyage de la trancheuse/déchiqueteuse à grande vitesse (suite) BROYEUSE POUR FRUITS ET LÉGUMES(Modèle A930 : 4,73 lit...
Page 48 - Utilisation de la broyeuse pour fruits et légumes
Utilisation de la broyeuse pour fruits et légumes Tamis grossier : 1) Placez le côté rugueux vers le haut pour retirer les fibres de légumes cuits (ex. : rhubarbe et épinards)et pour préparer des purées de fruits et delégumes (ex. : banane et pomme de terre) 2) Placez le côté lisse vers le haut pour...
Page 50 - ) Insérez le tamis en alignant les
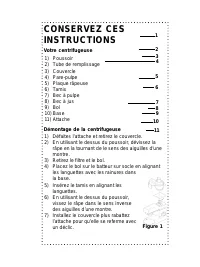
1) Poussoir2) Tube de remplissage3) Couvercle4) Pare-pulpe5) Plaque râpeuse6) Tamis7) Bec à pulpe8) Bec à jus9) Bol10) Base11) Attache 1 2 3 4 5 6 7 8 9 10 11 Votre centrifugeuse CONSERVEZ CESINSTRUCTIONS Démontage de la centrifugeuse 1) Défaites l’attache et retirez le couvercle.2) En utilisant le ...
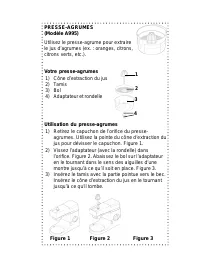
Page 52 - Utilisation du presse-agrumes; ) Retirez le capuchon de l’orifice du presse-
PRESSE-AGRUMES(Modèle A995) Utilisez le presse-agrume pour extrairele jus d’agrumes (ex. : oranges, citrons,citrons verts, etc.). Votre presse-agrumes 1) Cône d’extraction du jus2) Tamis3) Bol4) Adaptateur et rondelle 1 3 2 4 Utilisation du presse-agrumes 1) Retirez le capuchon de l’orifice du press...
Page 53 - Entretien et nettoyage du presse-agrumes; ) Lavez les pièces à la main dans le l’eau tiède avec; pour la broyeuse
4) Coupez le fruit en deux moitiés, puis allumez le batteur sur socle à la vitesse 4 et appuyez le fruitsur le cône. 5) L’adaptateur peut se serrer pendant l’utilisation. Pour le desserrer, réinstallez le bol puis tournez-ledans le sens inverse d’une montre. Réinstallez lecapuchon de l’orifice après...
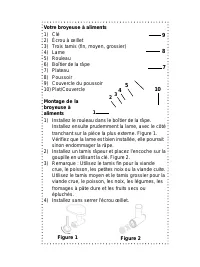
Page 54 - Votre broyeuse à aliments; ) Installez le rouleau dans le boîtier de la râpe.
Votre broyeuse à aliments 1 2 3 4 5 7 8 9 10 1) Clé2) Écrou à œillet3) Trois tamis (fin, moyen, grossier)4) Lame5) Rouleau6) Boîtier de la râpe7) Plateau8) Poussoir9) Couvercle du poussoir10) Plat/Couvercle Montage de labroyeuse àaliments 1) Installez le rouleau dans le boîtier de la râpe. Installez...
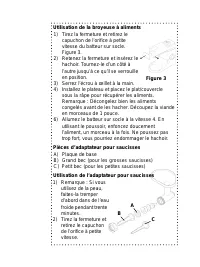
Page 55 - Utilisation de la broyeuse à aliments; ) Tirez la fermeture et retirez le; Pièces d’adaptateur pour saucisses; ) Tirez la fermeture et
Utilisation de la broyeuse à aliments 1) Tirez la fermeture et retirez le capuchon de l’orifice à petitevitesse du batteur sur socle. Figure 3 . 2) Retenez la fermeture et insérez le hachoir. Tournez-le d’un côté àl’autre jusqu’à ce qu’il se verrouilleen position. 3) Serrez l’écrou à œillet à la mai...
Page 58 - Utilisation du moulin à grains
4) Le montage et le positionnement de votre accessoire sur le batteur sont plus faciles si leréglage fin a été sélectionné sur le moulin à grains. 5) Mettez en place le cône de broyage, puis ajoutez la commande de réglage, en veillant à ce que lafente tienne dans la rainure au fond du boîtier dumoul...
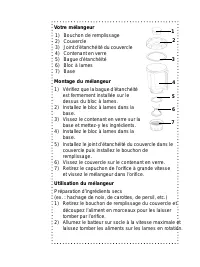
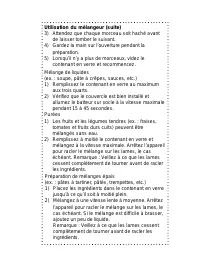
Page 60 - pour le mélangeur
4) Utilisez uniquement avec le contenant en verre, le bloc à lames et la base fournis. 5) Ne mélangez jamais de liquides très chauds. Si le couvercle n’est pas correctement installé et sedéfait, vous pourriez être éclaboussé. 6) Débranchez toujours la machine avant de mettre les mains ou des ustensi...
Page 62 - Purées
3) Attendez que chaque morceau soit haché avant de laisser tomber le suivant. 4) Gardez la main sur l’ouverture pendant la préparation. 5) Lorsqu’il n’y a plus de morceaux, videz le contenant en verre et recommencez. Utilisation du mélangeur (suite) Mélange de liquides(ex. : soupe, pâte à crêpes, sa...
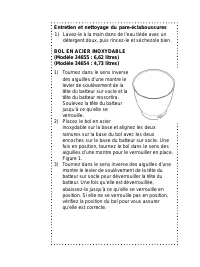
Page 65 - Entretien et nettoyage du pare-éclaboussures; ) Lavez-le à la main dans de l’eau tiède avec un
Entretien et nettoyage du pare-éclaboussures 1) Lavez-le à la main dans de l’eau tiède avec un détergent doux, puis rincez-le et séchezole bien. BOL EN ACIER INOXYDABLE(Modèle 34655 : 6,62 litres)(Modèle 34654 : 4,73 litres) 1) Tournez dans le sens inverse des aiguilles d’une montre lelevier de soul...
Page 66 - Entretien et nettoyage du bol en acier inoxydable; ) N’utilisez jamais une brosse métallique, de la laine
Entretien et nettoyage du bol en acier inoxydable 1) N’utilisez jamais une brosse métallique, de la laine de fer ou de l’eau de javel pour nettoyer le bol enacier inoxydable. Ne le mettez pas au lave-vaisselle. Lavez-le à la main dans de l’eau tièdeavec un détergent doux. Rincez-le et séchez-lebien.