Dell PowerEdge 1850 - User Manual
Dell PowerEdge 1850 – User Manual, read for free online in PDF format. We hope this helps you resolve any issues you may have. If you have further questions, please contact us through the contact form.


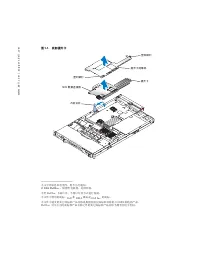
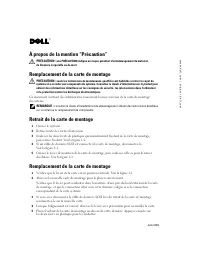
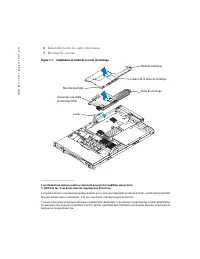


Table of Contents:
- Page 3 – 关于警告; 更换提升卡; 卸下提升卡; SCSI; 更换提升卡
- Page 5 – À propos de la mention “Précaution”; Remplacement de la carte de montage; Retrait de la carte de montage
- Page 6 – Réinstallez toutes les cartes d'extension.
- Page 7 – Warnhinweise; Riser-Karte entfernen; Öffnen Sie das System.; Riser-Karte austauschen
- Page 8 – Schließen Sie das System.
- Page 9 – 警告について; メモ:; ライザカードの取り外し; ライザカードの取り付け
- Page 10 – ライザカードにプラスチック製の絶縁カバーをかぶせ、
- Page 11 – 주의
- Page 13 – Información sobre los avisos de precaución; Extracción de la tarjeta vertical; Extraiga las tarjetas de expansión.; Sustitución de la tarjeta vertical
- Page 14 – Reinstale las tarjetas de expansión.
www
.dell.com | support.dell.com
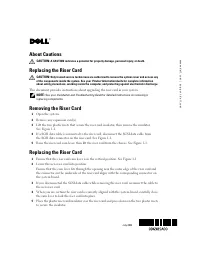
About Cautions
CAUTION:
A CAUTION indicates a potential for property damage, personal injury, or death.
Replacing the Riser Card
CAUTION:
Only trained service technicians are authorized to remove the system cover and access any
of the components inside the system. See your
Product Information Guide
for complete information
about safety precautions, working inside the computer, and protecting against electrostatic discharge.
This document provides instructions about upgrading the riser card in your system.
NOTE:
See your
Installation and Troubleshooting Guide
for detailed instructions on removing or
replacing components.
Removing the Riser Card
1
Open the system.
2
Remove any expansion card(s).
3
Lift the two plastic rivets that secure the riser card insulator, then remove the insulator.
See Figure 1-1.
4
If a SCSI data cable is connected to the riser card, disconnect the SCSI data cable from
the SCSI data connector on the riser card. See Figure 1-1.
5
Raise the riser card cam lever, then lift the riser card from the chassis. See Figure 1-1.
Replacing the Riser Card
1
Ensure that the riser card cam lever is in the vertical position. See Figure 1-1.
2
Lower the new riser card into position.
Ensure that the cam lever fits through the opening near the outer edge of the riser card and
the connector on the underside of the riser card aligns with the corresponding connector on
the system board.
3
If you disconnected the SCSI data cable while removing the riser card, reconnect the cable to
the new riser card.
4
When you are certain the riser card is correctly aligned with the system board, carefully close
the cam lever to lock the riser card into place.
5
Place the plastic riser card insulator over the riser card and press down on the two plastic rivets
to secure the insulator.
July 2004
"Loading the manual" means you need to wait until the file loads and becomes available for online reading. Some manuals are very large, and the time they take to appear depends on your internet speed.
Was this manual helpful?
About this manual
- Brand
- Dell
- Model
- PowerEdge 1850
- Document type
- User Manual
- Language(s)
- German, English, Spanish, French
- Pages
- 14
- File size
- 2.3 MB
- Format
Summary
www .dell.com | support.dell.com 关于警告 警告: 警告表示存在可能导致财产损失、人身伤害或死亡的潜在危险。 更换提升卡 警告: 只有经过培训的维修技术人员才能卸下主机盖并拆装系统内部的任何组件。有关安全预 防措施、拆装计算机内部组件以及防止静电释放的完整信息,请参阅 《产品信息指南》。 本说明文件提供了有关在系统中升级提升卡的说明。 注: 有关安装和更换组件的详情,请参阅 《安装与故障排除指南》。 卸下提升卡 1 打开系统外壳。 2 卸下扩充卡。 3 提起两颗固定提升卡绝缘体的塑料铆钉,然后卸下绝缘体。请参阅图 1-1 。 4 如果有一根 SCSI 数据电缆连...
www .dell.com | support.dell.com À propos de la mention “Précaution” PRÉCAUTION : une PRÉCAUTION indique un risque potentiel d'endommagement du matériel, de blessure corporelle ou de mort. Remplacement de la carte de montage PRÉCAUTION : seuls les techniciens de maintenance qualifiés sont habilités ...
www .dell.com | support.dell.com 6 Réinstallez toutes les cartes d'extension. 7 Refermez le système. Figure 1-1. Installation et retrait de la carte de montage ____________________ Les informations contenues dans ce document peuvent être modifiées sans préavis.© 2004 Dell Inc. Tous droits réservés. ...
Ask a question
Related manuals
Popular Dell Other


More Dell Other models
 Dell PowerEdge 850 User Manual
 Dell PowerEdge 860 Quick Guide
 Dell PowerEdge 1550 User Manual
 Dell PowerEdge 1600SC User Manual
 Dell PowerEdge 1750 Troubleshooting Guide
- Dell PowerEdge 1800 Troubleshooting Guide
 Dell POWEREDGE 1855 User Manual
 Dell PowerEdge 1900 Installation Manual
- Dell POWER EDGE 1950 User Manual
 Dell PowerEdge 1950 Quick Guide
- Dell POWEREDGE 1955 User Manual
 Dell PowerEdge 2420 User Manual