Page 2 - WARNING
2 English ANTI-TIP DEVICE WARNING To reduce the risk of tipping the range, the range must be secured by a properly installed Anti-Tip device. AFTER THE RANGE HAS BEEN INSTALLED, CONFIRM THAT THE ANTI-TIP DEVICE HAS BEEN PROPERLY INSTALLED AND VERIFY THAT THE ANTI-TIP DEVICE IS PROPERLY ENGAGED. Refe...
Page 3 - You can; Regulatory Notice; CAUTION; This device may not cause harmful interference, and
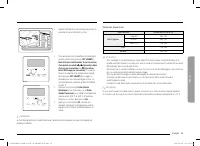
English 3 WARNING Do not step, lean, or sit on the oven door of the range. You can cause the range to tip, resulting in burns or serious injuries.Confirm that the Anti-Tip device is installed properly. Then, to verify that the Anti-Tip device is engaged, grasp the top rear edge of the range and care...
Page 4 - The term
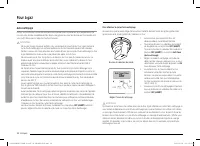
4 English 2. IC Notice The term IC before the radio certification number only signifies that Industry Canada technical specifications were met. Operation is subject to the following two conditions: (1) this device may not cause interference, and (2) this device must accept any interference, includin...
Page 5 - Bigger is better
English 5 Bigger is better With a capacity of 5.9 cubic feet, this gas oven range offers more space than many other leading brand in the United States and Canadian markets. The enhanced capacity means a better cooking experience. A cooktop with 6 burners Power burners provide flexible cooktop heat f...
Page 6 - Contents
6 English C ontents Contents Contents Important safety information 7 Symbols used in this manual 7 California Proposition 65 Warning 7 Commonwealth of Massachusetts 7 General safety 7 Fire safety 8 Gas safety 9 Electrical and grounding safety 9 Installation safety 10 Location safety 10 Cooktop safet...
Page 7 - Important safety information; Symbols used in this manual; California Proposition 65 Warning
English 7 Impor tant saf ety inf ormation Important safety information READ ALL INSTRUCTIONS BEFORE USING THIS APPLIANCE • All electrical and gas equipment with moving parts can be dangerous. Please read the important safety information for this appliance in this manual. The instructions must be fol...
Page 8 - Fire safety
8 English Impor tant saf ety inf ormation Important safety information • Do not operate the range if the range or any part of the range is damaged, malfunctioning, or missing parts. • Do not use the range as a space heater. Use the range for cooking only. • Do not use oven cleaners or oven liners in...
Page 9 - Electrical and grounding safety; Gas safety
English 9 Impor tant saf ety inf ormation Electrical and grounding safety WARNING To reduce the risk of fire, electric shock, personal injuries, and/or death, observe the following precautions. • Plug into a grounded 3-prong outlet. • Do not remove the ground prong. • Do not use an adapter or an ext...
Page 10 - Location safety; Installation safety
10 English Impor tant saf ety inf ormation Important safety information • Make sure your range is correctly installed and adjusted by a qualified service technician or installer for the type of gas (natural or LP) you will use. For your range to utilize LP gas, the installer must replace the 5 surfa...
Page 11 - Cooktop safety
English 11 Impor tant saf ety inf ormation Cooktop safety WARNING To reduce the risk of fire, electric shock, personal injuries, and/or death, observe the following precautions. • Make sure all burners are off when you are not using them. • Do not use aluminium foil to line the grates or any part of...
Page 13 - Self-cleaning oven safety; Usage in high altitude area
English 13 Impor tant saf ety inf ormation Self-cleaning oven safety WARNING To reduce the risk of fire, electric shock, personal injuries, and/or death, observe the following precautions. • The self-cleaning feature operates the oven at temperatures high enough to burn away food soils in the oven. ...
Page 14 - Overview; Layout
14 English O v ervie w Overview Layout 06 07 09 08 03 02 05 04 01 01 Surface burners 02 Oven vent cover 03 Ladder racks 04 Removable oven door 05 Kick panel 06 Broil oven burner 07 * Oven lights (2 locations) 08 Convection fan 09 Bake oven burner What’s included * Surface burner grates (3) Burner he...
Page 15 - Control panels and displays
English 15 O v ervie w Control panels and displays 06 05 07 03 04 01 01 02 01 Surface burner knobs (6 pcs) 02 Oven burner knobs (mode, temperature) (2 pcs) 03 Oven control panel 04 Oven light button 05 iQ Control LED 06 iQ Control button (beneath bullnose) 07 LED Ambient Lighting button (beneath bul...
Page 16 - Before you start; Display mode
16 English Befor e you s tar t Before you start Overview Mode selector knob 01 06 03 02 05 04 09 10 07 08 The Modes are printed on the knob itself. To select a mode, turn the knob so that the mode you want is aligned with the line on the knob frame. 01 OFF : Cancel the current operation. 02 Bake : B...
Page 17 - Kitchen timer
English 17 Befor e you s tar t Kitchen timer The kitchen timer gives you an extra timer you can use to time cooking tasks such as boiling eggs.It does not, however, start or stop any cooking operation. You can set the timer from 1 minute to 9 hours and 59 minutes. 1 4 3 2 1. Press the Timer button. ...
Page 18 - Oven vent/Cooling vent; Gas range
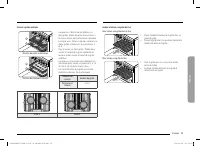
18 English Gas r ang e Before you start Oven vent/Cooling vent Oven vent Cooling vent Oven vent Both the oven vent and the cooling vent are located at the back of the oven range. Proper air circulation prevents combustion problems and ensures good performance. • Do not block the vent or its surround...
Page 19 - Cookware
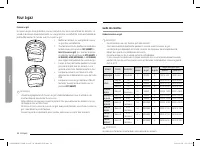
English 19 Gas r ang e Cookware Requirements • Flat bottom and straight sides • Tight-fitting lid • Well-balanced with the handle weighing less than the main portion of the pot or pan. Material characteristics • Aluminum : An excellent heat conductor. Some types of food may cause the aluminum to dar...
Page 20 - Gas burners; Ignition
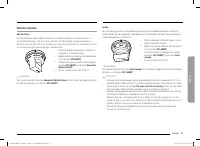
20 English Gas r ang e Gas range Gas burners LF CF RF LR CR RR Each burner has a corresponding knob that enables you to set the flame level from LO to HI . In addition, each burner has a Lite setting. Turning a knob to Lite ignites the corresponding burner. The burner indicators are located above th...
Page 21 - Gas oven
English 21 Gas o v en Flame level The flames on the burners should always stay under the cookware, and should not extend beyond the cookware bottom at any time. WARNING • Flames larger than the cookware bottom may result in a fire or physical injury. • When you set a burner to simmer, do not turn th...
Page 22 - Cooking modes
22 English Gas o v en Gas oven Baking Bake is used to cook cakes, cookies, and casseroles. Always preheat the oven first. Baking temperatures and times will vary depending on the ingredients and the size and shape of the baking pan used. Dark or nonstick coatings may cook faster with more browning. ...
Page 24 - Racks
24 English Gas o v en Gas oven Racks Position The gas oven range comes with 3 oven racks and 2 ladder racks (one on each side). The ladder racks serve as rack guides and support the oven racks in 5 different oven rack positions. Each rack guide has a stop that prevents you from accidentally pulling ...
Page 26 - Recipe guide
26 English Gas o v en Gas oven Recipe guide Broiling guide NOTE • This is for reference only. • Preheating for 5 minutes before broiling is recommended. • The size, weight, thickness, starting temperature, and your doneness preference will affect broiling times. • This guide is based on meat at refr...
Page 27 - Special features
English 27 Gas o v en Proof Proof mode provides an optimal temperature for the bread proofing process, and therefore does not require a temperature adjustment. For the best results, always start the Proof option with a cool oven. 1. Place the container with the dough on a rack, and then close the do...
Page 28 - Other features
28 English Gas o v en Gas oven Other features Temperature probe The temperature probe lets you cook roasts and poultry to the exact internal temperature you want, taking the guess work out of determining whether a piece of meat is done or not.You can use the temperature probe with the oven set to Ba...
Page 31 - Using Sabbath feature
English 31 Gas o v en Using Sabbath feature K (For use on the Jewish Sabbath and Holidays) Use this option only for baking on the Jewish Sabbath and Holidays.For more information, visit the website at http://www.star-k.org With the Sabbath feature • The oven temperature can be set higher or lower af...
Page 33 - Using the iQ control feature
English 33 Gas o v en Using the iQ control feature Your range has a built-in Wi-Fi module that you can use to sync the range with the SmartThings app. Using the SmartThings app, you can: • Monitor the operational status of your range or the notifications from your range, and then change options or s...
Page 35 - Using the hood control feature
English 35 Gas o v en Bluetooth on/off Press the Bluetooth icon on the hood's control panel. NOTE • The Bluetooth icon LED on the hood is on when Bluetooth is enabled. The Bluetooth icon LED on the hood is off when Bluetooth is not enabled. • If the iQ Control connection is not successful, you canno...
Page 36 - Settings
36 English Gas o v en Gas oven Screen Timeout You can adjust the screen timeout. 1. Press the Settings button. 2. Press < , > to select Screen Timeout . 3. Tap OK and then press, < , > to change time. (Default is 20 min.) 4. Tap OK . Wi-Fi On/Off You can turn the oven's Wi-Fi connection ...
Page 38 - Maintenance; Surface burners
38 English Maint enanc e Maintenance Maintenance Surface burners Burner controls Make sure all surface burner knobs are in the OFF position. 1. Pull the knobs off the control valve stems as shown. 2. Clean the knobs in warm, soapy water. Then, rinse and dry them thoroughly. 3. Clean the stainless st...
Page 40 - Cleaning; Gliding rack
40 English Maint enanc e Maintenance Cleaning Stainless steel surface 1. Remove any spills, spots, and grease stains using a soft, wet cloth. 2. Apply an approved stainless steel cleanser to a cloth or paper towel. 3. Clean one small area at a time, rubbing with the grain of the stainless steel if a...
Page 41 - Ladder racks
English 41 Maint enanc e To apply the graphite lubricant 1. Shake the graphite lubricant before opening it. 2. Apply 4 drops of lubricant to the inner side of the left sliding track and 4 drops to the outer side of the left sliding track. 3. Repeat Step 2 above on the right sliding track. 4. Extend ...
Page 42 - Door
42 English Maint enanc e Maintenance Replacing the Ladder racks 1. Put the top of the Ladder Rack back into the two support holes in the oven wall. 2. Rotate the Ladder Rack towards the oven wall. 3. Pull up on the Position 2 rack guide, and then press the Rack into the two supports on the oven wall...
Page 44 - Replacing the oven lights; Troubleshooting; Troubleshooting
44 English Tr ouble shoo ting Troubleshooting Replacing the oven lights Oven lights (2 Locations) There are 2 oven lights, one on each side oven wall. To replace a light, follow these steps : 1. Hold the lower end of the side oven light cover with one hand, and then use a flat-sharp tool such as a t...
Page 48 - Information codes
48 English Tr ouble shoo ting Troubleshooting Information codes OVEN Displayed Code Possible cause Solution C-d0 This code occurs if the control key is short for 1 minute. Clean the buttons and make sure there is no water on/around them. Turn off the oven and try again. If the problem continues, con...
Page 49 - Warranty
English 49 W arranty Warranty PLEASE DO NOT DISCARD. What Is Covered CERTIFICATE OF WARRANTIES: DACOR RANGESWITHIN THE FIFTY STATES OF THE U.S.A., THE DISTRICT OF COLUMBIA, AND CANADA: FULL TWO-YEAR WARRANTY The warranty applies only to the Dacor appliance sold to the first use purchaser, starting f...
Page 50 - Appendix; Open Source Announcement
50 English Appendix Appendix Out of Warranty Should you experience a service issue beyond the standard warranty period, please contact us. Dacor reviews each issue and customer concern to provide the best possible solution based on the circumstances. THE REMEDIES PROVIDED IN THE ABOVE EXPRESS WARRAN...
Page 51 - Memo
Memo Dear Valued Customer, Thank you for purchasing Dacor. We hope our products empower your passion for cooking! Inside this box is a set of brass burner caps. These caps are meant to provide an elegant look to your new Dacor product. These caps may be used for cooking, but please know beforehand t...
Page 53 - Manual del usuario; Estufa Gas Pro
Manual del usuario Estufa Gas Pro DOP36*86G** DOP36T86GLS_DG68-01105F-00_EN+MES+CFR.indb 1 DOP36T86GLS_DG68-01105F-00_EN+MES+CFR.indb 1 2023-02-28 오전 10:27:30 2023-02-28 오전 10:27:30
Page 54 - ADVERTENCIA
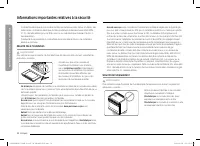
2 Español DISPOSITIVO ANTI INCLINACIÓN ADVERTENCIA Para reducir el riesgo de inclinación o vuelco de la estufa, ésta debe estar asegurada mediante un Dispositivo Anti Inclinación correctamente instalado. DESPUÉS DE INSTALAR LA ESTUFA, CONFIRME QUE EL DISPOSITIVO ANTI INCLINACIÓN ESTÉ CORRECTAMENTE I...
Page 55 - Puede causar que la estufa se incline o; Aviso sobre regulaciones; PRECAUCIÓN; Este dispositivo no puede causar interferencia dañina, y; seleccionar otros canales.
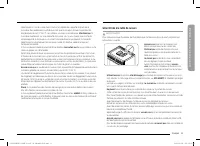
Español 3 ADVERTENCIA No se pare sobre la puerta del horno de la estufa, ni se apoye o siente sobre ella. Puede causar que la estufa se incline o vuelque, produciendo quemaduras o lesiones severas.Confirme que el dispositivo anti inclinación se encuentre instalado correctamente. Luego, para verifica...
Page 56 - El término
4 Español 2. Aviso de IC El término IC antes del número de certificación de radio indica que se cumplieron las especificaciones técnicas de Industry Canada. El funcionamiento se encuentra sujeto a las siguientes dos condiciones: (1) este dispositivo no puede causar interferencias, y (2) este disposi...
Page 57 - Cuanto más grande mejor; Funciones clave
Español 5 Cuanto más grande mejor Con una capacidad de 5.9 pies cúbicos, esta nueva estufa de gas Dacor provee más espacio que muchas otras marcas principales en los mercados estadounidense y canadiense. La mayor capacidad representa una mejor experiencia en el momento de cocinar. Una cubierta con 6...
Page 58 - Contenido
6 Español Contenido Contenido Contenido Información importante de seguridad 7 Símbolos usados en este manual 7 California Proposición 65 Advertencia 7 Mancomunidad de Massachusetts 7 Seguridad general 7 Seguridad contra incendios 8 Seguridad del gas 9 Seguridad de la electricidad y la conexión a tie...
Page 59 - Información importante de seguridad; Símbolos usados en este manual; California Proposición 65 Advertencia
Español 7 Inf ormación impor tante de seg uridad Información importante de seguridad LEA TODAS LAS INSTRUCCIONES ANTES DE USAR ESTE ARTEFACTO • Todos los equipos eléctricos y a gas con piezas móviles pueden ser peligrosos. Lea la información de seguridad importante para este electrodoméstico que se ...
Page 60 - Seguridad contra incendios
8 Español Inf ormación impor tante de seg uridad Información importante de seguridad • No opere la estufa si esta o alguna de sus partes se encuentran dañadas, no funcionan correctamente o si falta alguna pieza. • No utilice la estufa como calefactor del ambiente. Utilice la estufa solamente para co...
Page 61 - Seguridad de la electricidad y la conexión a tierra; Seguridad del gas
Español 9 Inf ormación impor tante de seg uridad Seguridad de la electricidad y la conexión a tierra ADVERTENCIA Para reducir el riesgo de incendio, descarga eléctrica, lesiones personales y/o muerte, respete las siguientes precauciones. • Enchufe el artefacto a un tomacorriente de 3 clavijas conect...
Page 62 - Seguridad de la ubicación; Seguridad de la instalación
10 Español Inf ormación impor tante de seg uridad Información importante de seguridad • Asegúrese de que un técnico de servicio o instalador calificado instale y ajuste correctamente la estufa según el tipo de gas (natural o LP) que utilizará. Para utilizar gas LP en su estufa, el instalador debe re...
Page 63 - Seguridad de la cubierta
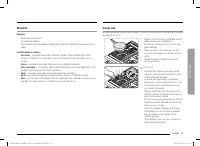
Español 11 Inf ormación impor tante de seg uridad Seguridad de la cubierta ADVERTENCIA Para reducir el riesgo de incendio, descarga eléctrica, lesiones personales y/o muerte, respete las siguientes precauciones. • Asegúrese de que todos los quemadores estén apagados cuando no los utilice. • No utili...
Page 65 - Seguridad durante la autolimpieza del horno; Uso en zonas de altitud alta
Español 13 Inf ormación impor tante de seg uridad Seguridad durante la autolimpieza del horno ADVERTENCIA Para reducir el riesgo de incendio, descarga eléctrica, lesiones personales y/o muerte, respete las siguientes precauciones. • La función de autolimpieza opera el horno a temperaturas lo suficie...
Page 66 - Descripción general; Esquema; Elementos incluidos
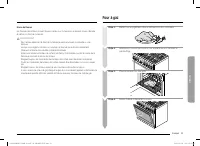
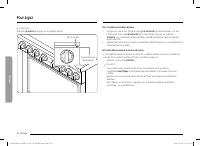
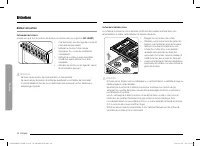
14 Español De scripción g ener al Descripción general Esquema 06 07 09 08 03 02 05 04 01 01 Quemadores superiores 02 Tapa de ventilación del horno 03 Rejillas escalonadas 04 Puerta del horno desmontable 05 Panel de protección 06 Quemador del horno para asar a la parrilla 07 * Luces del horno (2 ubic...
Page 67 - Panel de control y pantallas
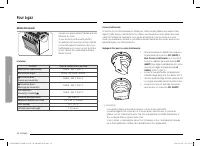
Español 15 De scripción g ener al Panel de control y pantallas 06 05 07 03 04 01 01 02 01 Perillas para los quemadores superiores (6 unidades) 02 Perillas para los quemadores del horno (modo, temperatura) (2 unidades) 03 Panel de control del horno 04 Botón de luz del horno 05 LED del control iQ 06 B...
Page 68 - Modo de visualización.
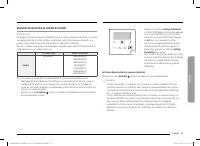
16 Español Antes de c omenz ar Antes de comenzar Descripción general Perilla selectora de modo 01 06 03 02 05 04 09 10 07 08 Los modos están impresos en la perilla. Para seleccionar un modo, gire la perilla hasta que el modo que desee esté alineado con la línea del marco de la perilla. 01 OFF (APAGA...
Page 69 - Temporizador de cocina
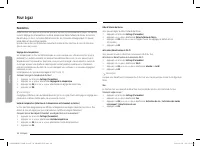
Español 17 Antes de c omenz ar Temporizador de cocina El temporizador de cocina le brinda un temporizador adicional que puede utilizar para programar las tareas de cocción, como hervir huevos.Sin embargo, no inicia ni detiene ninguna operación de cocción. El temporizador se puede fijar desde 1 minut...
Page 70 - Abertura de ventilación/Orificios de refrigeración; Estufa de gas
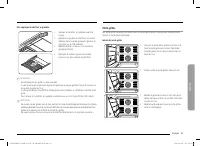
18 Español Es tuf a de g as Antes de comenzar Abertura de ventilación/Orificios de refrigeración Ventilación del horno Orificios de refrigeración Ventilación del horno Tanto la ventilación del horno como los orificios de refrigeración se ubican en la parte posterior de la estufa de gas. La adecuada ...
Page 71 - Utensilios de cocina; Aro para wok
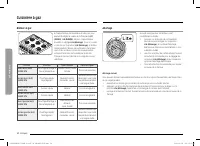
Español 19 Es tuf a de g as Utensilios de cocina Requisitos • Fondo plano y lados verticales • Tapa bien ajustada • Bien equilibrados con manijas que pesen menos que el cuerpo principal de la olla o sartén. Características de los materiales • Aluminio : Excelente conductor de calor. Algunos tipos de...
Page 72 - Quemadores de gas; Encendido
20 Español Es tuf a de g as Estufa de gas Quemadores de gas LF CF RF LR CR RR Cada quemador tiene una perilla correspondiente que permite ajustar el nivel de la llama de LO (BAJO) a HI (ALTO) . Además, cada quemador tiene el ajuste Lite (Encender) . Al girar la perilla hacia la posición Lite (Encend...
Page 73 - Horno de gas
Español 21 Horno de g as Nivel de la llama Las llamas de los quemadores siempre deben permanecer debajo de los recipientes de cocción y no deben extenderse más allá del fondo del utensilio en ningún momento. ADVERTENCIA • Si las llamas son mayores que el fondo del recipiente, pueden provocar un ince...
Page 74 - Modos de cocción
22 Español Horno de g as Horno de gas Horneado Hornear se usa para cocinar pasteles, galletas y guisos. Siempre precaliente el horno. La temperatura y el tiempo de horneado varían según los ingredientes y el tamaño y la forma de la bandeja de hornear utilizada. Los recubrimientos oscuros y antiadher...
Page 76 - Rejillas
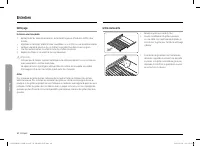
24 Español Horno de g as Horno de gas Rejillas Posición La estufa con horno de gas incluye 3 rejillas de horno y 2 rejillas escalonadas (una a cada lado). Las rejillas escalonadas sirven como guías y soportan las rejillas del horno en 5 posiciones diferentes. Cada una de las guías de las rejillas ti...
Page 78 - Guía de recetas
26 Español Horno de g as Horno de gas Guía de recetas Guía para asar a la parrilla NOTA • Esto es para referencia solamente. • Se recomienda precalentar 5 minutos antes de asar a la parrilla. • Los tiempos necesarios para asar a la parrilla dependerán del tamaño, peso, espesor, temperatura inicial y...
Page 79 - Funciones especiales
Español 27 Horno de g as Levantamiento El modo de levantamiento ofrece una temperatura óptima para el proceso de levantamiento del pan y, por ende, no requiere ningún ajuste de temperatura. Para obtener los mejores resultados, siempre inicie la opción de levantamiento del pan con el horno frío. 1. C...
Page 80 - Otras funciones
28 Español Horno de g as Horno de gas Otras funciones Sonda de temperatura La sonda de temperatura le permite cocinar carnes asadas y aves a la temperatura interna exacta que desea, eliminando así el trabajo de adivinar para determinar si un trozo de carne está cocido o no.Puede usar la sonda de tem...
Page 82 - Autolimpieza
30 Español Horno de g as Horno de gas Para realizar el ciclo de autolimpieza Asegúrese de que el bloqueo de la puerta esté liberado. Retire todas las rejillas (plana, deslizante, escalonada) de la cavidad del horno. 1. Asegúrese de que la puerta del horno esté destrabada y completamente cerrada. 2. ...
Page 83 - Uso de la función Sabbath
Español 31 Horno de g as Uso de la función Sabbath K (Para uso en el Sabbath y otras fechas sagradas judías) Use esta opción solo para hornear en el Sabbath y otras fechas sagradas judías.Para obtener más información, visite el sitio web http://www.star-k.org Con la función Sabbath • La temperatura ...
Page 85 - Uso de la función de control iQ
Español 33 Horno de g as Uso de la función de control iQ Su estufa cuenta con un módulo Wi-Fi incorporado que se puede utilizar para sincronizarla con la aplicación SmartThings. Con la aplicación SmartThings podrá: • Supervisar el estado operativo de la estufa o las notificaciones de esta, y cambiar...
Page 87 - Uso de la función de control de campana
Español 35 Horno de g as Activar/desactivar Bluetooth Presione el icono de Bluetooth en el panel de control de la campana. NOTA • El LED del icono de Bluetooth en la campana se enciende cuando Bluetooth está activado. El LED del icono de Bluetooth en la campana se apaga cuando Bluetooth está desacti...
Page 88 - Configuración
36 Español Horno de g as Horno de gas Tiempo de espera de pantalla Puede ajustar el tiempo de espera de la pantalla. 1. Presione el botón Settings (Configuración) . 2. Presione < , > para seleccionar Tiempo de espera de pantalla . 3. Toque OK y presione < , > para cambiar el tiempo. (La ...
Page 90 - Mantenimiento
38 Español Mant enimient o Mantenimiento Mantenimiento Quemadores superiores Controles de los quemadores Asegúrese de que todas las perillas de los quemadores superiores estén en la posición OFF (APAGADO) . 1. Retire las perillas de los vástagos de la válvula de control como se muestra. 2. Limpie la...
Page 92 - Limpieza; Rejilla deslizante
40 Español Mant enimient o Mantenimiento Limpieza Superficie de acero inoxidable 1. Elimine derrames, manchas y grasa con un paño suave humedecido. 2. Aplique un limpiador de acero inoxidable aprobado a un paño húmedo o una toalla de papel. 3. Limpie un área pequeña cada vez, frotando en la direcció...
Page 93 - Rejillas escalonadas
Español 41 Mant enimient o Para aplicar el lubricante de grafito 1. Agite el lubricante de grafito antes de abrirlo. 2. Aplique 4 gotas de lubricante a la parte interna del carril de deslizamiento izquierdo y 4 gotas a la parte externa. 3. Repita el paso 2 anterior sobre el carril de deslizamiento d...
Page 94 - Puerta
42 Español Mant enimient o Mantenimiento Cómo volver a colocar las rejillas escalonadas 1. Vuelva a colocar la parte superior de la rejilla escalonada en los dos orificios de soporte en la pared del horno. 2. Gire la rejilla escalonada hacia la pared del horno. 3. Jale de la guía de la rejilla en la...
Page 95 - Puerta del horno: retirar y volver a instalar
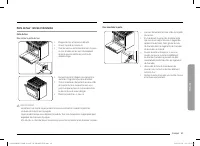
Español 43 Mant enimient o Puerta del horno: retirar y volver a instalar Puerta del horno Para retirar la puerta del horno 1. Apague el horno y deje que se enfríe. 2. Abra completamente la puerta del horno. 3. Jale las trabas de la bisagra fuera del cuerpo del horno y hacia abajo, hacia el marco de ...
Page 96 - Reemplazo de las luces del horno; Resolución de problemas; Resolución de problemas
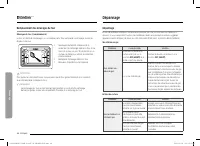
44 Español Re solución de pr oblemas Resolución de problemas Reemplazo de las luces del horno Luces del horno (2 ubicaciones) Hay 2 luces en el horno, una en cada pared lateral. Para reemplazar una luz, siga estos pasos: 1. Sostenga el extremo inferior de la tapa de la luz del horno lateral con una ...
Page 100 - Códigos de información
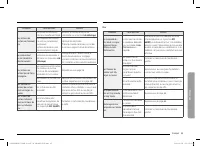
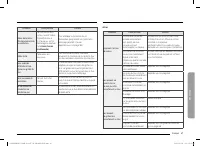
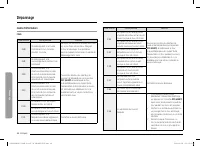
48 Español Re solución de pr oblemas Resolución de problemas Códigos de información HORNO Código mostrado Causa posible Solución C-d0 Este código se muestra si en la tecla de control hay un cortocircuito durante 1 minuto. Limpie los botones y asegúrese de que no quede agua sobre ellos ni alrededor. ...
Page 101 - Garantía
Español 49 Garantía Garantía NO LA DESECHE. Lo que esta garantía cubre CERTIFICADO DE GARANTÍAS: ESTUFAS DACORDENTRO DE LOS CINCUENTA ESTADOS DE EE. UU., EL DISTRITO DE COLUMBIA Y CANADÁ: GARANTÍA LIMITADA A LOS 2 AÑOS Esta garantía solo se aplica a los dispositivos Dacor vendidos al primer usuario,...
Page 102 - Apéndice; Anuncio de código abierto
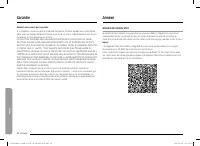
50 Español Apéndic e Apéndice Fuera de la garantía En caso de que experimente un problema de servicio luego del período de vigencia estándar de la garantía, comuníquese con nosotros. Dacor revisa cada problema e inquietud del cliente para ofrecer la mejor solución posible en base a las circunstancia...
Page 103 - NOTAS
NOTAS Estimado cliente: Gracias por adquirir Dacor. Esperamos que nuestros productos intensifiquen su pasión por cocinar. Esta caja contiene un conjunto de tapas de latón para los quemadores, diseñadas para dar un aspecto elegante a su nuevo producto Dacor. Pueden utilizarse para cocinar, pero deber...
Page 105 - Manuel d’utilisation; Cuisinière à gaz Pro
Manuel d’utilisation Cuisinière à gaz Pro DOP36*86G** DOP36T86GLS_DG68-01105F-00_EN+MES+CFR.indb 1 DOP36T86GLS_DG68-01105F-00_EN+MES+CFR.indb 1 2023-02-28 오전 10:27:43 2023-02-28 오전 10:27:43
Page 106 - AVERTISSEMENT
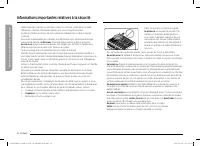
2 Français DISPOSITIF ANTI-BASCULEMENT AVERTISSEMENT Afin d'éviter tout risque de basculement de la cuisinière, fixez-la correctement à l'aide d'un dispositif anti-basculement. APRÈS AVOIR INSTALLÉ LA CUISINIÈRE, VÉRIFIEZ QUE LE DISPOSITIF ANTI-BASCULEMENT EST BIEN INSTALLÉ ET FIXÉ. Reportez- vous a...
Page 107 - L'appareil risquerait de; Informations relatives à la réglementation; ATTENTION; Cet appareil ne doit pas provoquer d'interférences néfastes, et; DÉCLARATION DE LA FCC :
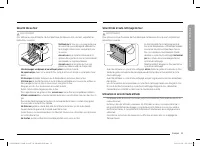
Français 3 AVERTISSEMENT Ne marchez pas, ne vous appuyez pas et ne vous asseyez pas sur la porte du four de la cuisinière. L'appareil risquerait de basculer et de provoquer de graves blessures.Confirmez que le dispositif anti-basculement est correctement installé. Puis, vérifiez que le dispositif an...
Page 108 - Le terme
4 Français 2. Avis IC Le terme IC placé avant le numéro de certification pour les radiofréquences signifie seulement que les spécifications techniques d'Industry Canada ont été respectées. Son fonctionnement est soumis aux deux conditions suivantes : (1) cet appareil ne doit pas provoquer d'interfér...
Page 109 - Table de cuisson à 6 brûleurs
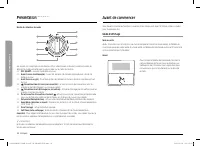
Français 5 Plus d'espace Dotée d'une capacité de 5,9 pieds cubes, cette cuisinière à gaz dispose d'un espace bien plus important que toutes les marques concurrentes présentes sur les marchés américain et canadien. La capacité accrue signifie une meilleure qualité de cuisson. Table de cuisson à 6 brû...
Page 110 - Table des matières; Informations importantes relatives à la sécurité
6 Français Table de s matièr es Table des matières Table des matières Informations importantes relatives à la sécurité 7 Symboles utilisés dans ce manuel 7 California Proposition 65 Avertissement 7 Commonwealth du Massachusetts 7 Sécurité générale 7 Sécurité incendie 8 Sécurité liée au gaz 9 Sécurit...
Page 111 - Symboles utilisés dans ce manuel; California Proposition 65 Avertissement
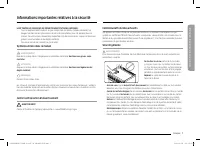
Français 7 Inf ormations impor tantes r elativ es à la sécurit é Informations importantes relatives à la sécurité LISEZ TOUTES LES CONSIGNES DE SÉCURITÉ AVANT D'UTILISER L'APPAREIL • Tous les appareils électriques et au gaz comportant des pièces mobiles présentent un danger. Veuillez lire les inform...
Page 112 - Sécurité incendie
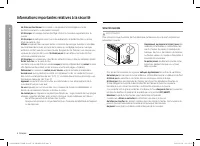
8 Français Inf ormations impor tantes r elativ es à la sécurit é Informations importantes relatives à la sécurité • Ne faites pas fonctionner la cuisinière si une partie est endommagée, en cas de dysfonctionnement ou si des pièces manquent. • N'utilisez pas la cuisinière comme chauffage. Utilisez la...
Page 113 - Sécurité électrique et mise à la terre; Sécurité liée au gaz
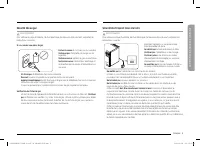
Français 9 Inf ormations impor tantes r elativ es à la sécurit é Sécurité électrique et mise à la terre AVERTISSEMENT Pour réduire le risque d'incendie, de choc électrique, de blessures et/ou de mort, respectez les précautions suivantes. • Branchez l'appareil sur une prise murale tripolaire reliée à...
Page 114 - Sécurité de l'emplacement; Sécurité liée à l'installation
10 Français Inf ormations impor tantes r elativ es à la sécurit é Informations importantes relatives à la sécurité • Assurez-vous que votre cuisinière est correctement installée et réglée pour le type de gaz que vous allez utiliser (naturel ou GPL) par un installateur qualifié ou un technicien quali...
Page 115 - Sécurité liée à la table de cuisson
Français 11 Inf ormations impor tantes r elativ es à la sécurit é Sécurité liée à la table de cuisson AVERTISSEMENT Pour réduire le risque d'incendie, de choc électrique, de blessures et/ou de mort, respectez les précautions suivantes. • Assurez-vous que tous les brûleurs sont éteints lorsque vous n...
Page 117 - Utilisation en zone de haute altitude
Français 13 Inf ormations impor tantes r elativ es à la sécurit é Sécurité liée à l'auto-nettoyage du four AVERTISSEMENT Pour réduire le risque d'incendie, de choc électrique, de blessures et/ou de mort, respectez les précautions suivantes. • La fonctionnalité d'auto-nettoyage porte le four à des te...
Page 118 - Présentation; Disposition; Accessoires fournis
14 Français Pr ésentation Présentation Disposition 06 07 09 08 03 02 05 04 01 01 Brûleurs de surface 02 Grille de ventilation du four 03 Porte-grilles 04 Porte du four amovible 05 Panneau décoratif 06 Brûleur de four pour cuisson au gril 07 * Éclairage du four (2 emplacements) 08 Ventilateur de conv...
Page 119 - Tableaux de commande et affichages
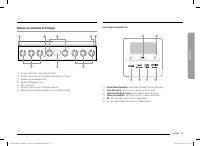
Français 15 Pr ésentation Tableaux de commande et affichages 06 05 07 03 04 01 01 02 01 Boutons des brûleurs de surface (6 pièces) 02 Boutons des brûleurs du four (mode, température) (2 pièces) 03 Panneau de commande du four 04 Bouton d'éclairage du four 05 DEL iQ Control 06 Bouton iQ Control (sous ...
Page 121 - Minuterie
Français 17 Av ant de c ommenc er Minuterie La minuterie de cuisine vous procure une minuterie supplémentaire que vous pouvez utiliser pour minuter les tâches de cuisson telles que les œufs durs.Cependant, elle ne permet pas de démarrer ou d'arrêter les opérations de cuisson. Pour régler la minuteri...
Page 122 - Ventilation du four/orifice de refroidissement; Cuisinière à gaz
18 Français Cuisinièr e à g az Avant de commencer Ventilation du four/orifice de refroidissement Ventilation du four Orifice de refroidissement Ventilation du four Les ventilations du four et de refroidissement sont situées à l'arrière de la cuisinière. Une circulation d'air correcte évite les probl...
Page 123 - Récipients; Anneau wok
Français 19 Cuisinièr e à g az Récipients Exigences • Fond plat et bords droits • Couvercle hermétique • Bien équilibré avec la poignée plus légère que la partie principale de la casserole ou de la poêle. Caractéristiques du matériau • Aluminium : un excellent conducteur thermique. Certains types d'...
Page 124 - Brûleurs à gaz; Allumage
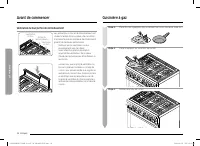
20 Français Cuisinièr e à g az Cuisinière à gaz Brûleurs à gaz LF CF RF LR CR RR A chaque brûleur correspond un bouton qui vous permet de régler le niveau de la flamme de LO (FAIBLE) à HI (ÉLEVÉE) . De plus, chaque brûleur possède un réglage Lite (Allumage) . Si vous tournez un bouton sur la positio...
Page 125 - Four à gaz
Français 21 Four à g az Niveau de flamme Les flammes des brûleurs doivent toujours rester sous l'ustensile et ne doivent jamais s'étendre en dehors du fond de l'ustensile. AVERTISSEMENT • Des flammes dépassant le fond de l'ustensile peuvent provoquer un incendie ou une blessure. • Lorsque vous régle...
Page 126 - Modes de cuisson
22 Français Four à g az Four à gaz Cuisson traditionnelle La fonction Cuisson traditionnelle est utilisée pour faire cuire des gâteaux, des cookies et des ragoûts. Faites toujours préchauffer le four d'abord. Les températures et les temps de cuisson varient en fonction des ingrédients, ainsi que de ...
Page 128 - Grilles
24 Français Four à g az Four à gaz Grilles Position La cuisinière à gaz est fournie avec 3 grilles de four et 2 porte-grilles (un de chaque côté). Les porte-grilles servent de guides et de supports aux grilles du four dans les 5 positions différentes des grilles. Chaque guide de grille comporte une ...
Page 130 - Guide des recettes
26 Français Four à g az Four à gaz Guide des recettes Guide de cuisson au gril REMARQUE • Ces informations ne sont fournies qu'à titre indicatif. • Il est recommandé de préchauffer pendant 5 minutes avant la cuisson au gril. • Les temps de gril dépendent de la taille, du poids, de l'épaisseur, de la...
Page 131 - Fonctions spéciales
Français 27 Four à g az Levage Le mode Levage procure une température optimale pour le procédé de levage du pain et ne nécessite donc pas de réglage de la température. Pour de meilleurs résultats, démarrez toujours l'option Levage dans un four froid. 1. Placez le récipient contenant la pâte sur une ...
Page 132 - Autres fonctionnalités
28 Français Four à g az Four à gaz Autres fonctionnalités Sonde thermique La sonde thermique vous permet de cuire des rôtis et de la volaille à la température interne exacte désirée, et vous permet ainsi de déterminer plus facilement si une pièce de viande est cuite ou non.Vous pouvez utiliser la so...
Page 135 - Utilisation de la fonction Sabbat
Français 31 Four à g az Utilisation de la fonction Sabbat K (utilisée pour les fêtes et le Shabbat juifs) Utilisez cette option uniquement pour la cuisson lors des fêtes et du Shabbat juifs.Pour de plus amples informations, visitez le site Web à l'adresse http://www.star-k.org. Avec l'option Sabbat ...
Page 137 - Utilisation de la fonction iQ Control
Français 33 Four à g az Utilisation de la fonction iQ Control Votre cuisinière intègre un module Wi-Fi que vous pouvez utiliser pour la synchroniser à l'application SmartThings. En utilisant l'application SmartThings, vous pouvez : • Contrôler l'état opérationnel de votre cuisinière ou les notificat...
Page 139 - Utilisation de la fonction de contrôle de la hotte
Français 35 Four à g az 4. Appuyez sur le bouton Settings (Paramètres) sur l'écran d'affichage de la cuisinière. Appuyez sur < , > pour sélectionner la fonction Hood Connection (Connexion de la hotte). Appuyez sur OK pour vous connecter à la hotte. 5. Une fois le jumelage par Bluetooth terminé...
Page 140 - Paramètres
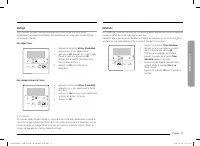
36 Français Four à g az Four à gaz Délai d'attente de l'écran Vous pouvez régler le délai d'attente de l'écran. 1. Appuyez sur le bouton Settings (Paramètres) . 2. Appuyez sur < , > pour sélectionner Délai d'attente de l'écran . 3. Appuyez sur OK puis sur < , > pour changer l'heure. (Le ...
Page 144 - Entretien; Nettoyage; Grille coulissante
40 Français Entretien Entretien Nettoyage Surface en acier inoxydable 1. Retirez toutes les traces de projections, les taches et la graisse à l'aide d'un chiffon doux humide. 2. Appliquez un nettoyant adapté à l'acier inoxydable sur un chiffon ou une serviette en papier. 3. Nettoyez une petite zone ...
Page 146 - Porte
42 Français Entretien Entretien Réinstallation des porte-grilles 1. Replacez le haut du porte-grille dans les deux orifices de soutien dans la paroi du four. 2. Faites pivoter le porte-grilles vers la paroi du four. 3. Tirez sur le guide de la grille en position 2, puis appuyez sur la grille pour l'...
Page 147 - Porte du four : retirez et réinstallez
Français 43 Entretien Porte du four : retirez et réinstallez Porte du four Pour retirer la porte du four : 1. Éteignez le four et laissez-le refroidir. 2. Ouvrez la porte au maximum. 3. Tirez les verrous de la charnière hors du corps du four et abaissez-les vers l'encadrement de porte pour les mettr...
Page 148 - Remplacement des éclairages du four; Dépannage; Dépannage
44 Français Dépannag e Dépannage Remplacement des éclairages du four Éclairages du four (2 emplacements) Le four est doté de 2 éclairages, un sur chaque paroi. Pour remplacer un éclairage, suivez les étapes ci-dessous : 1. Maintenez l'extrémité inférieure de la protection de l'éclairage latéral du f...
Page 153 - Garantie
Français 49 Garantie Garantie VEUILLEZ NE PAS JETER. Éléments couverts par la garantie CERTIFICAT DE GARANTIE : TABLES DE CUISSON AU GAZ DACORDANS LES CINQUANTE ÉTATS DES ÉTATS-UNIS, LE DISTRICT DE COLUMBIA ET AU CANADA* : GARANTIE LIMITÉE DE DEUX ANS La garantie s'applique uniquement à l'appareil D...
Page 154 - Annexe; Annonce de contenu libre
50 Français Anne xe Garantie Éléments non couverts par la garantie Si un problème survient au-delà de la période de garantie standard, appelez-nous quand même. Dacor examine chaque problème et chaque question de ses clients indépendamment pour fournir la meilleure solution possible pour le client.LE...
Page 155 - MÉMO
MÉMO Cher client estimé, Merci d’avoir acheté un appareil Dacor. Nous espérons que nos appareils décuplent votre passion pour la cuisine ! Dans ce coffret, nous vous fournissons un ensemble de chapeaux de brûleurs en laiton. Ces chapeaux ont pour but de conférer un style élégant à votre nouvel appar...