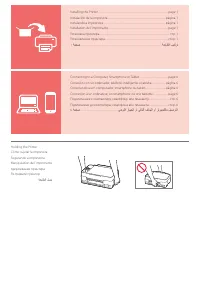
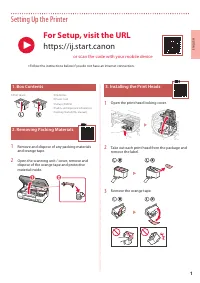
Page 3 - Setting Up the Printer; Removing Packing Materials; Open the print head locking cover.; For Setup, visit the URL; or scan the code with your mobile device
1 ENGLISH Setting Up the Printer 1. Box Contents • Print Heads • Ink Bottles • Power Cord • Setup CD-ROM • Safety and Important Information • Getting Started (this manual) 2. Removing Packing Materials 1 Remove and dispose of any packing materials and orange tape. 2 Open the scanning unit / cover, r...
Page 4 - Turning on the Printer; ON
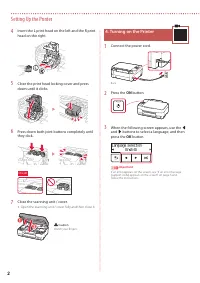
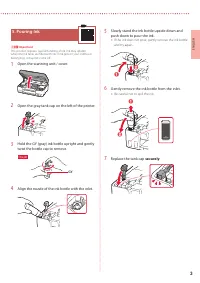
2 Setting Up the Printer 4 Insert the L print head on the left and the R print head on the right. 5 Close the print head locking cover and press down until it clicks. 6 Press down both joint buttons completely until they click. Check! 7 Close the scanning unit / cover. • Open the scanning unit / cov...
Page 5 - Open the gray tank cap on the left of the printer.; Align the nozzle of the ink bottle with the inlet.; Replace the tank cap; securely
3 ENGLISH 5. Pouring Ink Important This product requires careful handling of ink. Ink may splatter when the ink tanks are filled with ink. If ink gets on your clothes or belongings, it may not come off. 1 Open the scanning unit / cover. 2 Open the gray tank cap on the left of the printer. 3 Hold the...
Page 6 - Yes
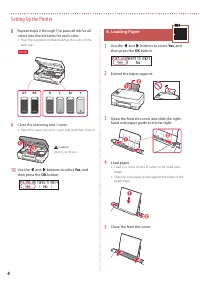
4 Setting Up the Printer 8 Repeat steps 2 through 7 to pour all ink for all colors into the ink tanks for each color. • Pour the supplied ink that matches the color of the tank cap. C M Y R GY BK Check! 9 Close the scanning unit / cover. • Open the scanning unit / cover fully and then close it. b a ...
Page 7 - Extend the paper output tray.; OK; If an error message (support code) appears on
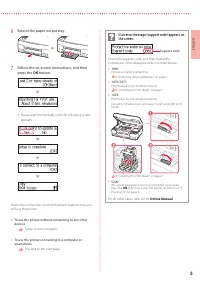
5 ENGLISH 6 Extend the paper output tray. 7 Follow the on-screen instructions, and then press the OK button. • Please wait momentarily until the following screen appears. Select the connection method that best matches how you will use the printer. • To use the printer without connecting to any other...
Page 8 - Connecting to a Computer; Set Up; Download; What device are you connecting?
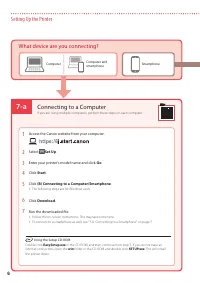
7-a 6 Setting Up the Printer Computer Smartphone Computer and smartphone Connecting to a Computer If you are using multiple computers, perform these steps on each computer. 1 Access the Canon website from your computer. 2 Select Set Up . 3 Enter your printer's model name and click Go . 4 Click Start...
Page 9 - Connecting to a Smartphone
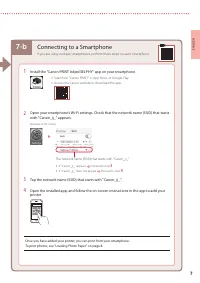
7-b 7 ENGLISH 1 Install the "Canon PRINT Inkjet/SELPHY" app on your smartphone. • Search for "Canon PRINT" in App Store, or Google Play. • Access the Canon website to download the app. 2 Open your smartphone's Wi-Fi settings. Check that the network name )SSID( that starts with "C...
Page 10 - Transporting Your Printer; Loading Photo Paper
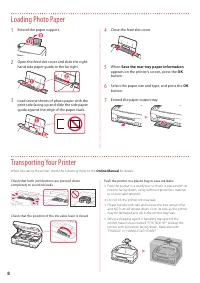
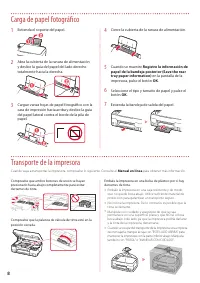
8 1 Extend the paper support. a b 2 Open the feed slot cover and slide the right-hand side paper guide to the far right. a b 3 Load several sheets of photo paper with the print side facing up and slide the side paper guide against the edge of the paper stack. b a 4 Close the feed slot cover. 5 When ...
Page 11 - Instalación de la impresora; Contenido de la caja; Retire la cinta naranja.; Para la configuración, visite la URL; o bien escanee el código con su dispositivo móvil
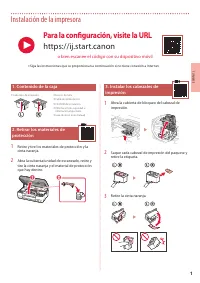
1 ESP AÑOL Instalación de la impresora 1. Contenido de la caja • Cabezales de impresión • Frascos de tinta • Cable de alimentación • CD-ROM de instalación • Información de seguridad e información importante • Guía de inicio (este manual) 2. Retirar los materiales de protección 1 Retire y tire los ma...
Page 12 - Encender la impresora; Conecte el cable de alimentación.; Pulse el botón
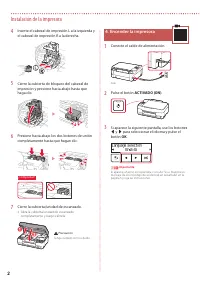
2 Instalación de la impresora 4 Inserte el cabezal de impresión L a la izquierda y el cabezal de impresión R a la derecha. 5 Cierre la cubierta de bloqueo del cabezal de impresión y presione hacia abajo hasta que haga clic. 6 Presione hacia abajo los dos botones de unión completamente hasta que haga...
Page 13 - Vuelva a colocar la tapa del depósito; firmemente
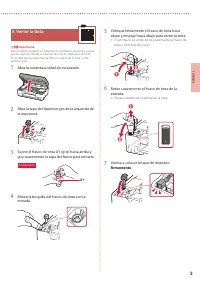
3 ESP AÑOL 5. Verter la tinta Importante Este producto requiere un tratamiento cuidadoso de la tinta, ya que puede salpicar cuando se rellenan de tinta los depósitos de tinta. Es posible que las manchas de tinta no salgan de la ropa u otras pertenencias. 1 Abra la cubierta/unidad de escaneado. 2 Abr...
Page 15 - Extienda la bandeja de salida del papel.; Si se muestra un mensaje de error (código de
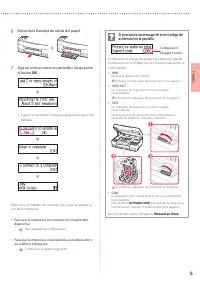
5 ESP AÑOL 6 Extienda la bandeja de salida del papel. 7 Siga las instrucciones en pantalla y luego pulse el botón OK . • Espere un momento hasta que aparezca la siguiente pantalla. Seleccione el método de conexión que mejor se adapte al uso de la impresora. • Para usar la impresora sin conectar con ...
Page 16 - Conectar al ordenador; Configurar; ¿Qué dispositivo va a conectar?
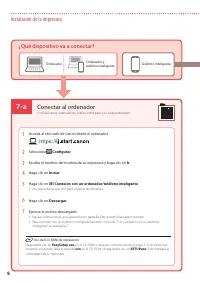
7-a 6 Instalación de la impresora Ordenador Teléfono inteligente Ordenador y teléfono inteligente Conectar al ordenador Si utiliza varios ordenadores, realice estos pasos en cada ordenador. 1 Acceda al sitio web de Canon desde el ordenador. 2 Seleccione Configurar . 3 Escriba el nombre del modelo de...
Page 17 - Conexión con un teléfono inteligente; -b. Conexión con un teléfono inteligente
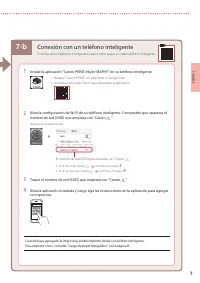
7-b 7 ESP AÑOL 1 Instale la aplicación "Canon PRINT Inkjet/SELPHY" en su teléfono inteligente. • Busque "Canon PRINT" en App Store o Google Play. • Acceda al sitio web Canon para descargar la aplicación. 2 Abra la configuración de Wi-Fi de su teléfono inteligente. Compruebe que apare...
Page 18 - Transporte de la impresora; Carga de papel fotográfico
8 1 Extienda el soporte del papel. a b 2 Abra la cubierta de la ranura de alimentación y deslice la guía del papel del lado derecho totalmente hacia la derecha. a b 3 Cargue varias hojas de papel fotográfico con la cara de impresión hacia arriba y deslice la guía del papel lateral contra el borde de...
Page 19 - Configurando a impressora; Remova a fita laranja.; Para configurar, visite a URL; ou digitalize o código com seu dispositivo celular
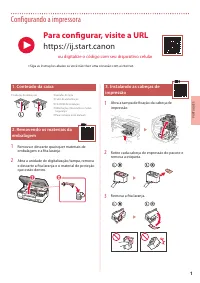
1 POR TUGUÊS Configurando a impressora 1. Conteúdo da caixa • Cabeças de impressão • Garrafas de tinta • Cabo de alimentação • CD-ROM de instalação • Informações Importantes e Sobre Segurança • Para Começar (este manual) 2. Removendo os materiais da embalagem 1 Remova e descarte quaisquer materiais ...
Page 20 - Ligando a impressora; Conecte o cabo de alimentação.; Pressione o botão
2 Configurando a impressora 4 Insira a L cabeça de impressão à esquerda e a R cabeça de impressão à direita. 5 Feche a tampa de fixação da cabeça de impressão e pressione para baixo até ouvir um clique. 6 Pressione os dois botões acoplados completamente até que eles emitam um clique. Verificar! 7 Fe...
Page 21 - Recoloque; a tampa do cartucho.
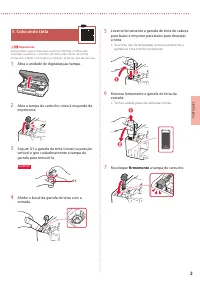
3 POR TUGUÊS 5. Colocando tinta Importante Este produto requer manuseio cauteloso da tinta. A tinta pode respingar quando os cartuchos de tinta estão cheios. Se a tinta entrar em contato com roupas ou objetos, pode ser que ela não saia. 1 Abra a unidade de digitalização/tampa. 2 Abra a tampa do cart...
Page 23 - Abra a bandeja de saída do papel.; Se uma mensagem de erro (código de
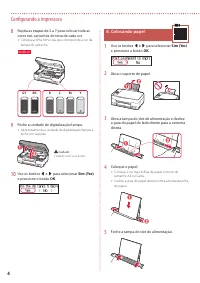
5 POR TUGUÊS 6 Abra a bandeja de saída do papel. 7 Siga as instruções na tela e pressione o botão OK . • Aguarde um momento até que a tela a seguir apareça. Selecione o método de conexão que melhor se adequa ao seu uso da impressora. • Para usar a impressora sem conectá-la a nenhum outro dispositivo...
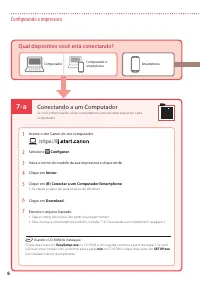
Page 24 - Conectando a um Computador; Qual dispositivo você está conectando?
7-a 6 Configurando a impressora Computador Smartphone Computador e smartphone Conectando a um Computador Se você estiver usando vários computadores, execute estas etapas em cada computador. 1 Acesse o site Canon do seu computador. 2 Selecione Configurar . 3 Insira o nome do modelo da sua impressora ...
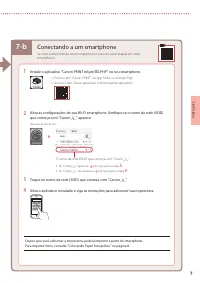
Page 25 - Conectando a um smartphone
7-b 7 POR TUGUÊS 1 Instale o aplicativo "Canon PRINT Inkjet/SELPHY" no seu smartphone. • Procure por "Canon PRINT" na App Store, ou Google Play. • Acesse o site Canon para fazer o download do aplicativo. 2 Abra as configurações do seu Wi-Fi smartphone. Verifique se o nome da rede )SS...
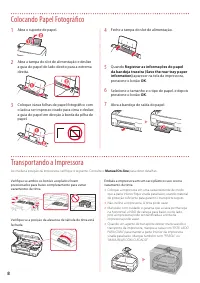
Page 26 - Transportando a Impressora
8 1 Abra o suporte de papel. a b 2 Abra a tampa do slot de alimentação e deslize a guia do papel do lado direito para a extrema direita. a b 3 Coloque várias folhas de papel fotográfico com o lado a ser impresso virado para cima e deslize a guia do papel em direção à borda da pilha de papel. b a 4 F...
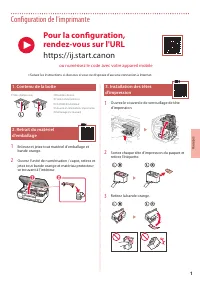
Page 27 - Configuration de l'imprimante; Contenu de la boîte; Retirez la bande orange.; Pour la configuration,; ou numérisez le code avec votre appareil mobile
1 Configuration de l'imprimante 1. Contenu de la boîte • Têtes d'impression • Bouteilles d'encre • Cordon d'alimentation • CD-ROM d'installation • Sécurité et informations importantes • Démarrage (ce manuel) 2. Retrait du matériel d'emballage 1 Enlevez et jetez tout matériel d'emballage et bande ora...
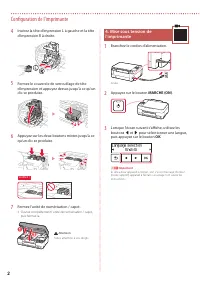
Page 28 - Appuyez sur le bouton
2 Configuration de l'imprimante 4 Insérez la tête d'impression L à gauche et la tête d'impression R à droite. 5 Fermez le couvercle de verrouillage de tête d'impression et appuyez dessus jusqu'à ce qu'un clic se produise. 6 Appuyez sur les deux boutons mixtes jusqu'à ce qu'un clic se produise. Vérif...
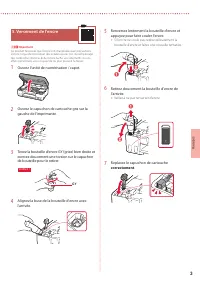
Page 29 - Replacez le capuchon de cartouche; correctement
3 FR ANÇ AIS 5. Versement de l'encre Important Ce produit nécessite que l'encre soit manipulée avec précautions. L'encre risque de provoquer des éclaboussures lors du remplissage des cartouches d'encre. Si de l'encre tache vos vêtements ou vos effets personnels, vous risquez de ne plus pouvoir l'enl...
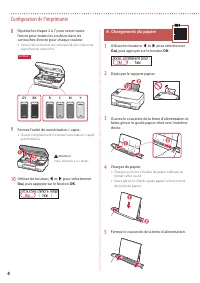
Page 30 - Chargement du papier; Oui
4 Configuration de l'imprimante 8 Répétez les étapes 2 à 7 pour verser toute l'encre pour toutes les couleurs dans les cartouches d'encre pour chaque couleur. • Versez l'encre fournie qui correspond à la couleur du capuchon de cartouche. C M Y R GY BK Vérifiez ! 9 Fermez l'unité de numérisation / ca...
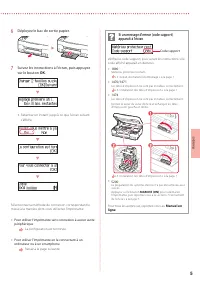
Page 31 - Déployez le bac de sortie papier.
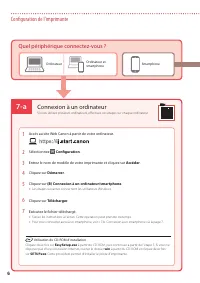
5 FR ANÇ AIS 6 Déployez le bac de sortie papier. 7 Suivez les instructions à l'écran, puis appuyez sur le bouton OK . • Patientez un instant jusqu'à ce que l'écran suivant s'affiche. Sélectionnez la méthode de connexion correspondant le mieux à la manière dont vous utiliserez l'imprimante. • Pour ut...
Page 32 - Connexion à un ordinateur; Configuration; Télécharger
7-a Utilisation du CD-ROM d'installation Cliquez deux fois sur EasySetup.exe à partir du CD-ROM, puis continuez à partir de l'étape 3. Si vous ne disposez pas d'une connexion Internet, ouvrez le dossier win à partir du CD-ROM et cliquez deux fois sur SETUP.exe . Cette procédure permet d'installer le...
Page 33 - Connexion à un smartphone
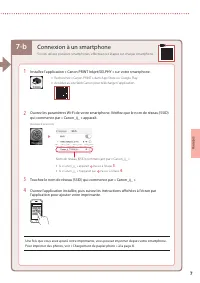
7-b 7 FR ANÇ AIS 1 Installez l'application « Canon PRINT Inkjet/SELPHY » sur votre smartphone. • Recherchez « Canon PRINT » dans App Store ou Google Play. • Accédez au site Web Canon pour télécharger l'application. 2 Ouvrez les paramètres Wi-Fi de votre smartphone. Vérifiez que le nom de réseau )SSI...
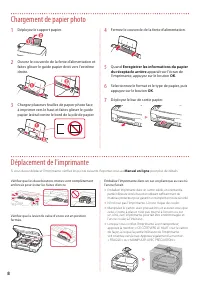
Page 34 - Enregistrer les informations du papier; apparaît sur l'écran de; Déplacement de l'imprimante; Chargement de papier photo
8 1 Déployez le support papier. a b 2 Ouvrez le couvercle de la fente d'alimentation et faites glisser le guide papier droit vers l'extrême droite. a b 3 Chargez plusieurs feuilles de papier photo face à imprimer vers le haut et faites glisser le guide papier latéral contre le bord de la pile de pap...
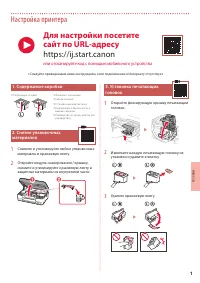
Page 35 - Настройка принтера; Содержимое коробки; Удалите оранжевую ленту.; Для настройки посетите; или отсканируйте код с помощью мобильного устройства
1 РУ ССКИЙ Настройка принтера 1. Содержимое коробки • Печатающие головки • Флаконы с чернилами • Кабель питания • Установочный компакт-диск • Информация о безопасности и важные сведения • Руководство по началу работы (это руководство) 2. Снятие упаковочных материалов 1 Снимите и утилизируйте любые у...
Page 36 - Включение принтера; Подключите кабель питания.; Нажмите кнопку
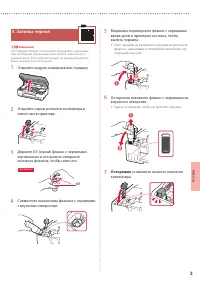
2 Настройка принтера 4 Вставьте печатающую головку L слева и печатающую головку R справа. 5 Закройте фиксирующую крышку печатающей головки и прижмите вниз до щелчка. 6 Нажмите до упора )щелчка( обе соединительные кнопки. Проверка! 7 Закройте модуль сканирования / крышку. • Полностью откройте модуль ...
Page 37 - Осторожно; установите на место колпачок
3 РУ ССКИЙ 5. Заливка чернил Внимание! Этот продукт требует осторожного обращения с чернилами. При заполнении чернильных контейнеров чернила могут разбрызгаться. Если чернила попадут на одежду или другие вещи, они могут не отстираться. 1 Откройте модуль сканирования / крышку. 2 Откройте серый колпач...
Page 38 - Да
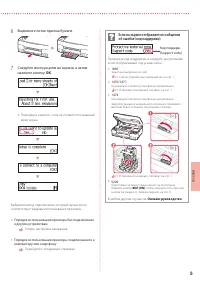
4 Настройка принтера 8 Повторите действия с 2 по 7, чтобы налить все чернила разных цветов в чернильные контейнеры для каждого цвета. • Заливайте поставляемые чернила в соответствии с цветом колпачка контейнера. C M Y R GY BK Проверка! 9 Закройте модуль сканирования / крышку. • Полностью откройте мо...
Page 39 - Выдвиньте лоток приема бумаги.; Если на экране отображается сообщение
5 РУ ССКИЙ 6 Выдвиньте лоток приема бумаги. 7 Следуйте инструкциям на экране, а затем нажмите кнопку OK . • Подождите немного, пока не появится показанный ниже экран. Выберите метод подключения, который лучше всего соответствует задачам использования принтера. • Порядок использования принтера без по...
Page 40 - Подключение к компьютеру; Настройка; Какое устройство вы подключаете?
7-a 6 Настройка принтера Компьютер Смартфон Компьютер и смартфон Подключение к компьютеру Если вы используете несколько компьютеров, выполните эти действия на каждом компьютере. 1 Откройте на своем компьютере сайт Canon. 2 Выберите Настройка . 3 Введите имя модели своего принтера и щелкните Перейти ...
Page 41 - Установите на смартфон приложение «Canon PRINT Inkjet/SELPHY».; Подключение к смартфону
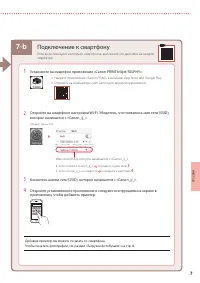
7-b 7 РУ ССКИЙ 1 Установите на смартфон приложение «Canon PRINT Inkjet/SELPHY». • Найдите приложение «Canon PRINT» в магазине App Store или Google Play. • Откройте на компьютере сайт Canon для загрузки приложения. 2 Откройте на смартфоне настройки Wi-Fi. Убедитесь, что появилось имя сети )SSID(, кот...
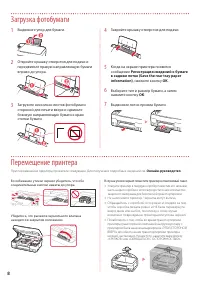
Page 42 - Регистрация сведений о бумаге; Перемещение принтера; Загрузка фотобумаги
8 1 Выдвиньте упор для бумаги. a b 2 Откройте крышку отверстия для подачи и передвиньте правую направляющую бумаги вправо до упора. a b 3 Загрузите несколько листов фотобумаги стороной для печати вверх и сдвиньте боковую направляющую бумаги к краю стопки бумаги. b a 4 Закройте крышку отверстия для п...
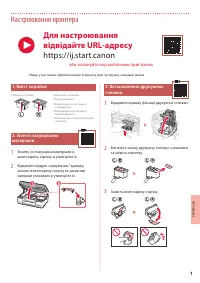
Page 43 - Настроювання принтера; Відкрийте кришку фіксації друкуючої головки.; або зіскануйте код мобільним пристроєм
1 УКР АЇНСЬК А Настроювання принтера 1. Вміст коробки • Друкуючі головки • Флакони з чорнилом • Шнур живлення • Компакт-диск із програмою встановлення • Інформація щодо безпеки й важливі відомості • Посібник для початку роботи (цей посібник) 2. Зняття пакувальних матеріалів 1 Зніміть усі пакувальні ...
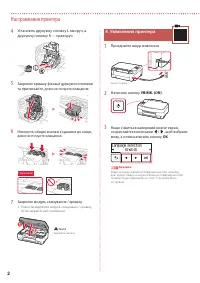
Page 44 - Увімкнення принтера; Приєднайте шнур живлення.; Натисніть кнопку
2 Настроювання принтера 4 Установіть друкуючу головку L ліворуч, а друкуючу головку R — праворуч. 5 Закрийте кришку фіксації друкуючої головки та притискайте, доки не почуєте клацання. 6 Натисніть обидві кнопки з'єднання до кінця, доки не почуєте клацання. Перевірте! 7 Закрийте модуль сканування / к...
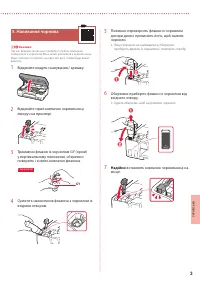
Page 45 - Надійно; встановіть ковпачок чорнильниці на
3 УКР АЇНСЬК А 5. Наливання чорнила Важливо Під час використання цього виробу потрібно обережно поводитися з чорнилом. Воно може розлитися з чорнильниць. Якщо чорнило потрапить на одяг або речі, плями буде важко вивести. 1 Відкрийте модуль сканування / кришку. 2 Відкрийте сірий ковпачок чорнильниці ...
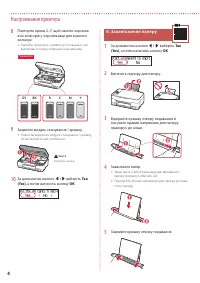
Page 46 - Завантаження паперу; Так
4 Настроювання принтера 8 Повторіть кроки 2–7, щоб налити чорнила всіх кольорів у чорнильниці для кожного кольору. • Налийте чорнило з комплекту постачання, яке відповідає кольору ковпачка чорнильниці. C M Y R GY BK Перевірте! 9 Закрийте модуль сканування / кришку. • Повністю відкрийте модуль сканув...
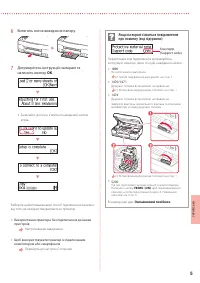
Page 47 - Витягніть лоток виведення паперу.; Якщо на екрані з’явиться повідомлення
5 УКР АЇНСЬК А 6 Витягніть лоток виведення паперу. 7 Дотримуйтесь інструкцій на екрані та натисніть кнопку OK . • Зачекайте, доки не з’явиться наведений нижче екран. Виберіть найоптимальніший спосіб підключення залежно від того, як використовуватиметься принтер. • Використання принтера без підключен...
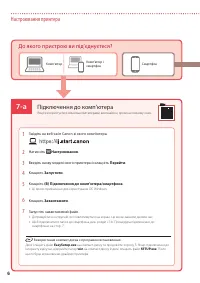
Page 48 - Підключення до комп’ютера; Настроювання; До якого пристрою ви під’єднуєтеся?
7-a 6 Настроювання принтера Комп’ютер Смартфон Комп’ютер і смартфон Підключення до комп’ютера Якщо ви користуєтеся кількома комп’ютерами, виконайте ці кроки на кожному з них. 1 Зайдіть на веб-сайт Canon зі свого комп’ютера. 2 Натисніть Настроювання . 3 Введіть назву моделі свого принтера й клацніть ...
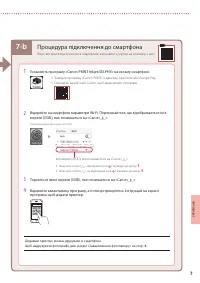
Page 49 - Процедура підключення до смартфона
7-b 7 УКР АЇНСЬК А 1 Установіть програму «Canon PRINT Inkjet/SELPHY» на своєму смартфоні. • Знайдіть програму «Canon PRINT» у магазині App Store або Google Play. • Перейдіть на веб-сайт Canon, щоб завантажити програму. 2 Відкрийте на смартфоні параметри Wi-Fi. Переконайтеся, що відображається ім’я м...
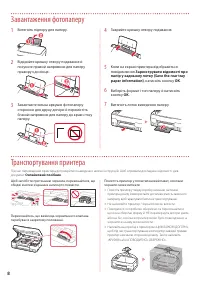
Page 50 - Зареєструвати відомості про; Транспортування принтера; Завантаження фотопаперу
8 1 Витягніть підпору для паперу. a b 2 Відкрийте кришку отвору подавання й посуньте правий напрямник для паперу праворуч до кінця. a b 3 Завантажте кілька аркушів фотопаперу стороною для друку догори й перемістіть бічний напрямник для паперу до краю стосу паперу. b a 4 Закрийте кришку отвору подава...
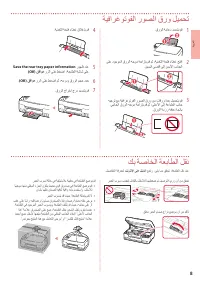
Page 51 - Save the rear tray paper information
8 ةيبرعلا 1 . قرولا ةماعد ديدمتب مق a b 2 ىلع دوجوملا قرولا هجوم ةحازإب مق مث ،ةيذغتلا ةحتف ءاطغ حتفا . نيميلا ىصقأ ىلإ نميلأا بناجلا a b 3 هيجوت عم ةيفارغوتوفلا روصلا قرو نم تاقرو ةدع ليمحتب مق يبناجلا قرولا هجوم ةحازإب مق مث ،ىلعلأا ىلإ ةعابطلا بناج . قرولا ةمزر ةفاح هاجتاب b a 4 . ةيذغتلا ةحتف ءا...
Page 52 - يكذ; يكذ فتاهب لاصتلاا
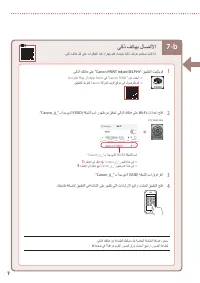
7-b 7 1 . يكذلا كفتاه ىلع "Canon PRINT Inkjet/SELPHY" قيبطتلا تيبثتب مق • .Google Play وأ ، App Store يف "Canon PRINT" نع ثحبا • . قيبطتلا ليزنتل Canon ةكرشل بيولا عقوم ىلإ لوصولاب مق 2 ."Canon_ij_" ـب أدبي يذلا )SSID( ةكبشلا مسا روهظ نم ققحت . يكذلا كفتاه ىلع Wi-Fi تادادعإ ح...
Page 53 - رتويبمك; Canon; ؟هليصوتب; رتويبمك زاهجب لاصتلاا; ةعباطلا
7-a 6 ةيبرعلا رتويبمكلا يكذلا فتاهلا يكذلا فتاهلاو رتويبمكلا رتويبمك زاهجب لاصتلاا .رتويبمك زاهج لك ىلع تاوطخلا هذه ءارجإب مقف ،ةددعتم رتويبمك ةزهجأ مدختست تنك اذإ 1 . كب صاخلا رتويبمكلا زاهج نم Canon ةكرشل بيولا عقوم ىلإ لوصولاب مق 2 . دادعلإا ددح 3 . لاقتنا قوف رقنا مث ،كب ةصاخلا ةعباطلا زارط مسا ...
Page 54 - قفاوم
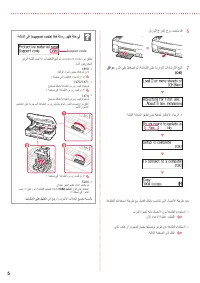
5 6 . قرولا جارخإ جرد ديدمتب مق 7 قفاوم رزلا ىلع طغضا مث ،ةشاشلا ىلع ةدراولا تاداشرلإا عبتا . (OK) • .ةيلاتلا ةشاشلا رهظت ىتح ةظحل راظتنلاا ءاجرلا .ةعباطلل كمادختسا ةقيرط عم لضفأ لكشب بسانتت يتلا لاصتلاا ةقيرط ددح • ىرخأ ةزهجأ ةيأب لاصتلاا نود ةعباطلا مادختسلا .نلآا دادعلإا ةيلمع تلمتكا • يكذ فتاه و...
Page 55 - قرولا ليمحت
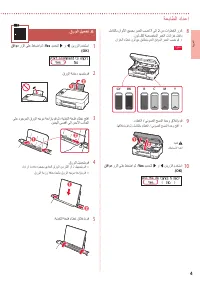
4 ةيبرعلا 8 لماكلاب ناوللأا عيمجب ربحلا بصل 7 ىلإ 2 نم تاوطخلا ررك . نول لكل ةصصخملا ربحلا تانازخ لخاد • .نازخلا ءاطغ نول عم قباطتي يذلا قفرملا ربحلا بصب مق C M Y R GY BK ! ققحت 9 . ءاطغلا / يئوضلا حسملا ةدحو قلاغإب مق • . اهقلاغإب مق مث ،لماكلاب ءاطغلا / يئوضلا حسملا ةدحو حتفا b a هيبنت .كعباصلأ هب...
Page 56 - ربحلا بص; ماكحإب
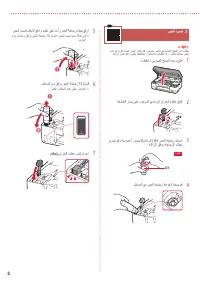
3 ربحلا بص .5 ماه تانازخ نوكت امدنع ربحلا رثانتي دقف .صرحب ربحلا عم لماعتلا جتنملا اذه بلطتي .هتلازإ رذعتت دقف ،ربحلاب كتاقلعتم وأ كسبلام تخطلت اذإو .ربحلاب ةئلتمم ربحلا 1 . ءاطغلا / يئوضلا حسملا ةدحو حتفا 2 . ةعباطلا راسي ىلع دوجوملا يدامرلا نازخلا ءاطغ حتفا 3 ريودتب مقو ةيدومع ةروصب ) ةيدامرلا ( G...
Page 57 - ةعباطلا ليغشت
2 ةيبرعلا 4 R ةعابطلا سأرو رسيلأا بناجلا ىلع L ةعابطلا سأر لخدأ .نميلأا بناجلا ىلع 5 يف رقتسي ىتح لفسلأ طغضلا عم ةعابطلا سأر لفق ءاطغ قلغأ . ةرقن توص ا ًردصم هناكم 6 توص عمست ىتح لماكلاب ليصوتلا يرز ىلع لفسلأ طغضا . امهرارقتسا ! ققحت 7 . ءاطغلا / يئوضلا حسملا ةدحو قلاغإب مق • . اهقلاغإب مق مث ،لماكل...
Page 58 - ةبلعلا تايوتحم; يلاتلا
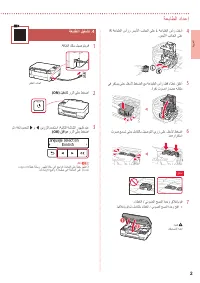
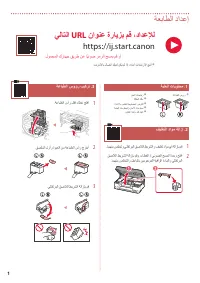
1 ةعباطلا دادعإ ةبلعلا تايوتحم .1 ربحلا تاجاجز ةقاطلا كلس دادعلإاب صاخلا طوغضملا صرقلا ةماهلا تامولعملاو ناملأا تامولعم ( ليلدلا اذه ) ءدبلا ليلد ةعابطلا سوؤر فيلغتلا داوم ةلازإ .2 1 . امهنم صلختو يلاقتربلا قصلالا طيرشلا و فيلغت داوم يأ ةلازإب مق 2 قصلالا طيرشلا ةلازإب مقو ،ءاطغلا / يئوضلا حسملا ةدح...
Page 60 - تنرتنلإا ىلع ليلدلا ىلإ لوصولا
تنرتنلإا ىلع ليلدلا ىلإ لوصولا كب صاخلا حفصتملا نم З вашого браузера Доступ до документа Онлайновий посібник Из вашего браузера Доступ к документу Онлайн-руководство À partir de votre navigateur Accès au Manuel en ligne Do seu navegador Acesse o Manual On-line Desde su navegador Acceso al Manual en ...