Page 2 - CAUTION: READ THIS BEFORE OPERATING YOUR UNIT.
i En 1 To assure the finest performance, please read this manual carefully. Keep it in a safe place for future reference. 2 Install this sound system in a well ventilated, cool, dry, clean place - away from direct sunlight, heat sources, vibration, dust, moisture, and/or cold. For proper ventilation...
Page 3 - CONTENTS; INTRODUCTION; About this manual; The icons used in this manual
1 En IN TRODUCTION PREPARATIONS Eng lish OPERATIONS SETTINGS ADDITIONAL INFORMATION WHAT YOU CAN DO WITH THIS UNIT ......... 2SUPPLIED PARTS ................................................ 2ABOUT DISCS AND FILES ................................. 3 Types of discs/files that can be used with this uni...
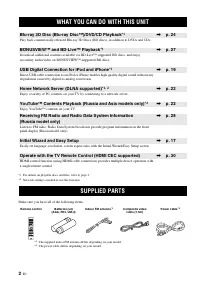
Page 4 - Make sure you have all of the following items.; WHAT YOU CAN DO WITH THIS UNIT; BONUSVIEWTM and BD-LiveTM Playback; Enjoy YouTubeTM contents on your TV.; Initial Wizard and Easy Setup; SUPPLIED PARTS
2 En INTRODUCTION * 1 For details on playable discs and files, refer to page 3. * 2 Network setting is needed to use this function. Make sure you have all of the following items. WHAT YOU CAN DO WITH THIS UNIT Blu-ray 3D Disc (Blu-ray Disc™)/DVD/CD Playback *1 \ p. 24 Play back commercially-released...
Page 5 - ABOUT DISCS AND FILES; Notes
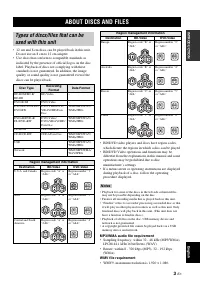
3 En IN TRODUCTION Eng lish • 12 cm and 8 cm discs can be played back in this unit. Do not use an 8 cm to 12 cm adapter. • Use discs that conform to compatible standards as indicated by the presence of official logos on the disc label. Playback of discs not complying with these standards is not guar...
Page 6 - Loading a disc; Disc precautions
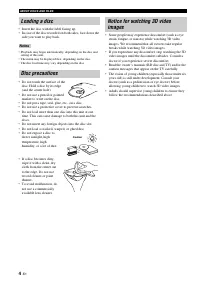
ABOUT DISCS AND FILES 4 En • Insert the disc with the label facing up.• In case of the disc recorded on both sides, face down the side you want to play back. • Playback may begin automatically, depending on the disc and setting of this unit. • The menu may be displayed first, depending on the disc.•...
Page 7 - Connect your iPod or USB memory device.; Disc tray door; Press to select a preset station.; PART NAMES AND FUNCTIONS; Front panel
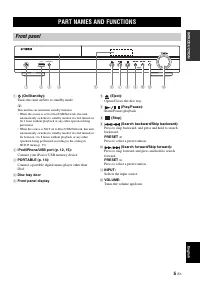
5 En IN TRODUCTION Eng lish 1 (On/Standby): Turns this unit on/Sets to standby mode. y This unit has an automatic standby function.• When the source is set to Disc/USB/Network, this unit automatically switches to standby mode if it is left turned on for 1 hour without playback or any other operation...
Page 8 - Note
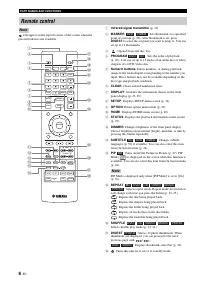
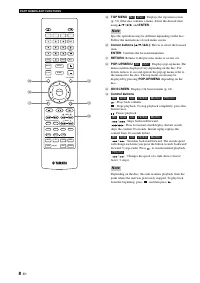
PART NAMES AND FUNCTIONS 6 En will appear on the top left corner of the screen when the pressed button is not available. 1 Infrared signal transmitter (p. 10) 2 MARKER : Sets Bookmark at a specified point of a movie (p. 26). After Bookmark is set, press DIGEST to select the set point you want to jum...
Page 9 - IN; Continued to the next page.
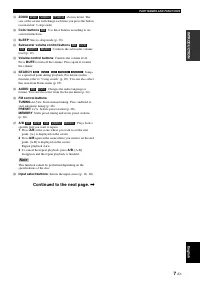
PART NAMES AND FUNCTIONS 7 En IN TRODUCTION Eng lish I ZOOM : Zooms in/out. The size of the screen will change each time you press the button (zoom in/out: 3 steps each). J Color buttons : Use these buttons according to on- screen instructions. K SLEEP : Sets to sleep mode (p. 30). L Subwoofer volum...
Page 11 - Connect the supplied power cable.; Rear panel
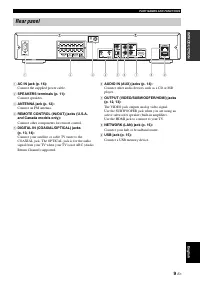
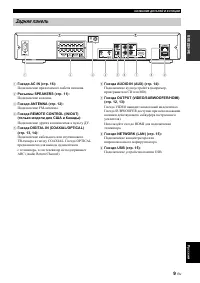
PART NAMES AND FUNCTIONS 9 En IN TRODUCTION Eng lish 1 AC IN jack (p. 16): Connect the supplied power cable. 2 SPEAKERS terminals (p. 11): Connect speakers. 3 ANTENNA jack (p. 12): Connect an FM antenna. 4 REMOTE CONTROL (IN/OUT) jacks (U.S.A. and Canada models only): Connect other components for re...
Page 12 - Notes on batteries; Using the remote control
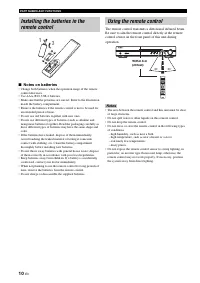
PART NAMES AND FUNCTIONS 10 En ■ Notes on batteries • Change both batteries when the operation range of the remote control decreases. • Use AAA, R03, UM-4 batteries.• Make sure that the polarities are correct. Refer to the illustration inside the battery compartment. • Remove the batteries if the re...
Page 13 - CONNECTION; Connecting speakers
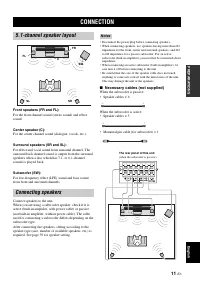
11 En PREPARATIONS Eng lish PREPARATIONS Front speakers (FR and FL): For the front channel sound (stereo sound) and effect sound. Center speaker (C): For the center channel sound (dialogue, vocals, etc.). Surround speakers (SR and SL): For effect and vocal sound from surround channel. The surround b...
Page 14 - Connecting speaker cables; About subwoofer speaker; Connecting the FM antenna; Connecting iPod
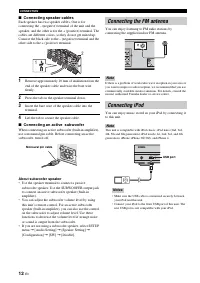
CONNECTION 12 En ■ Connecting speaker cables Each speaker has two speaker cables. One is for connecting the – (negative) terminal of the unit and the speaker, and the other is for the + (positive) terminal. The cables are different colors, so they do not get mixed up. Connect the black side to the –...
Page 15 - HDMI connection; Connecting to a TV; CAUTION
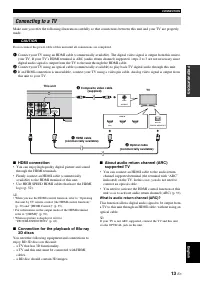
CONNECTION 13 En PREPARATIONS Eng lish Make sure you refer the following illustration carefully so that connections between this unit and your TV are properly made. Do not connect the power cable of this unit until all connections are completed. 1 Connect your TV using an HDMI cable (commercially av...
Page 16 - Video connection; • Firmly connect the composite video cable (supplied) to
CONNECTION 14 En ■ Video connection • Firmly connect the composite video cable (supplied) to the VIDEO jack. • Refer to page 40 for information on the video output formats. • If you play back the image via VCR, the image may deteriorate due to the copy guard function. • To enjoy BD 3D discs on this ...
Page 17 - • You can connect a USB memory device (2 GB or; After connecting; NETWORK AND USB CONNECTION; Connecting to the NETWORK terminal; Connecting to the USB port
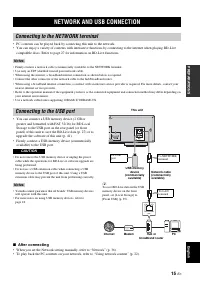
15 En PREPARATIONS Eng lish • PC contents can be played back by connecting this unit to the network.• You can enjoy a variety of contents with interactive functions by connecting to the internet when playing BD-Live compatible discs. Refer to page 27 for information on BD-Live functions. • Firmly co...
Page 18 - OTHER CONNECTION; Connecting the power cable
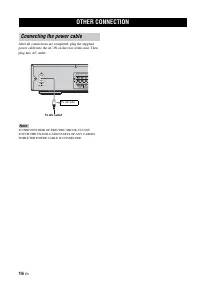
16 En After all connections are completed, plug the supplied power cable into the AC IN on the rear of this unit. Then plug into AC outlet. TO PREVENT RISK OF ELECTRIC SHOCK, DO NOT TOUCH THE UN-INSULATED PARTS OF ANY CABLES WHILE THE POWER CABLE IS CONNECTED. OTHER CONNECTION Connecting the power c...
Page 19 - INITIAL WIZARD/EASY SETUP
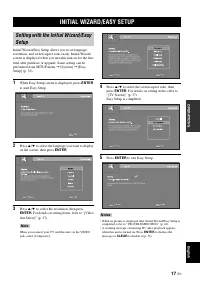
17 En OPERATIONS Eng lish OPERATIONS Initial Wizard/Easy Setup allows you to set language, resolution, and screen aspect ratio easily. Initial Wizard screen is displayed when you turn this unit on for the first time after purchase or upgrade. Same setting can be performed from SETUP menu = [System] ...
Page 20 - Follow the procedures below to play back the source.; BASIC OPERATION
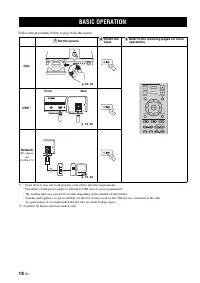
18 En Follow the procedures below to play back the source. * 1 · Some devices may not work properly even if they meet the requirements. · Playability of and power supply to all kind of USB devices are not guaranteed. · The reading time may exceed 30 seconds depending on the number of files/folders. ...
Page 21 - Eng
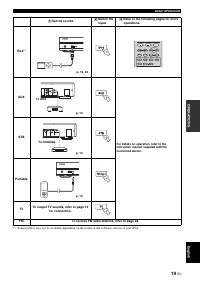
BASIC OPERATION 19 En Eng lish OPERATIONS * 1 Some features may not be available depending on the model or the software version of your iPod. Set the source Switch the input Refer to the following pages for more operations iPod *1 AUX For details on operation, refer to the instruction manual supplie...
Page 22 - Basic operation
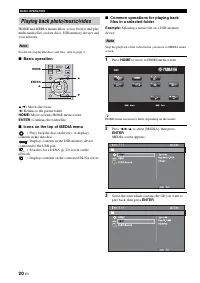
BASIC OPERATION 20 En HOME and MEDIA menus allow you to browse and play multi-media files on data discs, USB memory devices and your network. For details on playable discs and files, refer to page 3. ■ Basic operation 5 / a : Moves the focus. 2 : Returns to the parent folder. HOME: Moves to/exits HO...
Page 23 - Operations for viewing photos
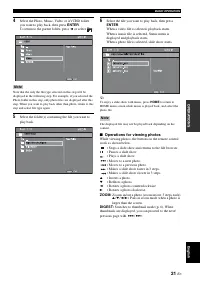
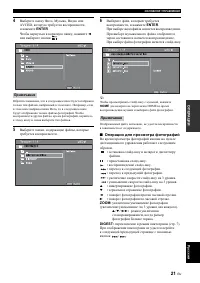
BASIC OPERATION 21 En Eng lish OPERATIONS 4 Select the Photo, Music, Video or AVCHD folder you want to play back, then press ENTER . To return to the parent folder, press 2 or select . Note that the only the file type selected on this step will be displayed in the following step. For example, if you...
Page 24 - About DLNA; Notices for network services; Using network content; Using network services
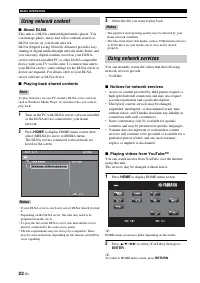
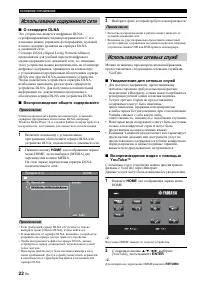
BASIC OPERATION 22 En ■ About DLNA This unit is a DLNA certified digital media player. You can manage photo, music and video contents stored on DLNA servers on your home network.DLNA (Digital Living Network Alliance) provides easy sharing of digital media through network in the home, and you can enj...
Page 25 - SHUFFLE; Operation for iPod; Operation for CDs
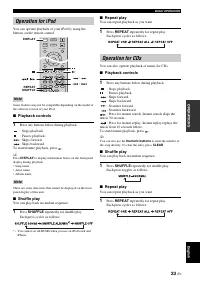
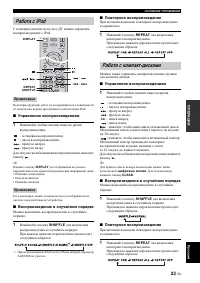
BASIC OPERATION 23 En Eng lish OPERATIONS You can operate playback of your iPod by using the buttons on the remote control. Some features may not be compatible depending on the model or the software version of your iPod. ■ Playback controls 1 Press any buttons below during playback. : Stops playback...
Page 26 - ADVANCED PLAYBACK OPERATION; On Screen menu
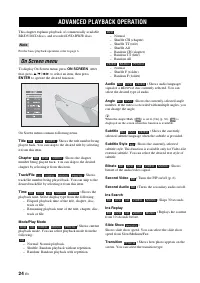
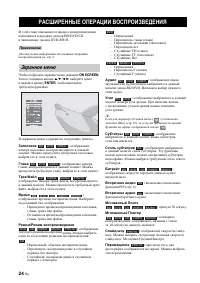
24 En This chapter explains playback of commercially available BD/DVD/CD discs, and recorded DVD-RW/R discs. For the basic playback operation, refer to page 6. To display On Screen menu, press ON SCREEN . After that, press 5 / a / 2 / 3 to select an item, then press ENTER to operate the desired func...
Page 27 - Status menu
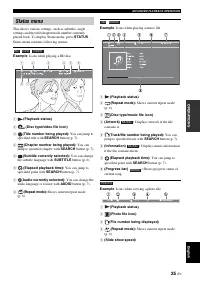
ADVANCED PLAYBACK OPERATION 25 En Eng lish OPERATIONS This shows various settings, such as subtitles, angle settings and the title/chapter/track number currently played back. To display Status menu, press STATUS . Status menu contains following menus. Example : Icons when playing a BD disc 1 (Playba...
Page 28 - Using Bookmark; Program play
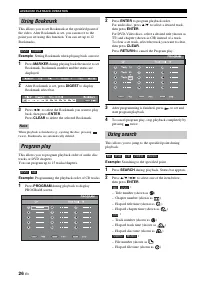
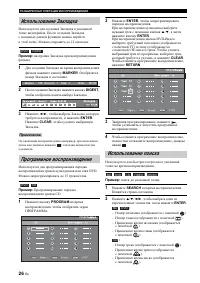
ADVANCED PLAYBACK OPERATION 26 En This allows you to set Bookmark at the specified point of the video. After Bookmark is set, you can move to the point you set using this function. You can set up to 12 Bookmarks. Example : Setting Bookmark when playing back a movie. 1 Press MARKER during playing bac...
Page 29 - Using the feature of BD-LiveTM
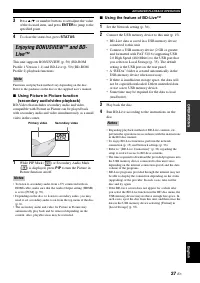
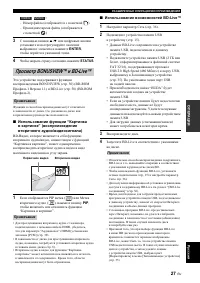
ADVANCED PLAYBACK OPERATION 27 En Eng lish OPERATIONS 3 Press 5 / a or number buttons to set/adjust the value of the focused item, and press ENTER to jump to the specified point. 4 To close the status bar, press STATUS . This unit supports BONUSVIEW (p. 50) (BD-ROM Profile 1 Version 1.1) and BD-Live...
Page 30 - LISTENING TO FM RADIO STATIONS; Tuning to radio stations
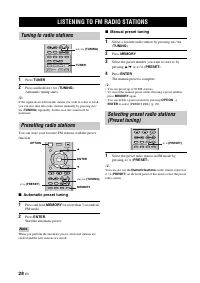
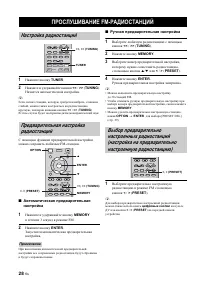
28 En 1 Press TUNER . 2 Press and hold << / >> ( TUNING ). Automatic tuning starts. y If the signal received from the station you want to select is weak, you can also tune into radio stations manually by pressing << / >> ( TUNING ) repeatedly. In this case, the sound will be ...
Page 31 - Deleting preset stations
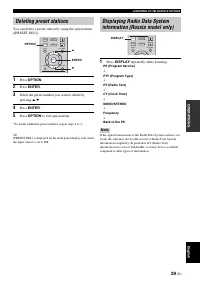
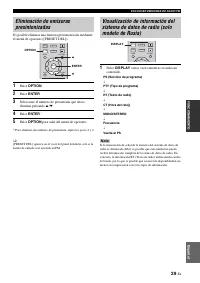
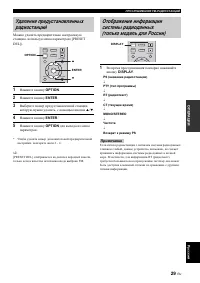
LISTENING TO FM RADIO STATIONS 29 En Eng lish OPERATIONS You can delete a preset station by using the option menu ([PRESET DEL]). 1 Press OPTION . 2 Press ENTER . 3 Select the preset number you want to delete by pressing 5 / a . 4 Press ENTER . * 5 Press OPTION to exit option menu. *To delete additi...
Page 32 - Setting the HDMI control function; Turn off the TV and then turn on it again.; USING USEFUL FUNCTIONS; Setting the sleep timer
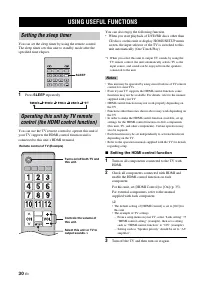
30 En You can set the sleep timer by using the remote control. The sleep timer sets this unit to standby mode after the specified time elapses. 1 Press SLEEP repeatedly. You can use the TV remote control to operate this unit if your TV supports the HDMI control function and is connected to this unit...
Page 33 - Registering HDMI components to TV; Select this unit as the input source of the TV.; If the HDMI control function is not working; • The HDMI control function is enabled on the TV. (Also
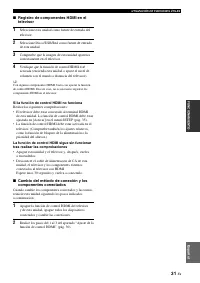
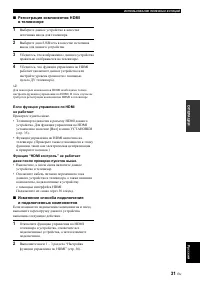
USING USEFUL FUNCTIONS 31 En Eng lish OPERATIONS ■ Registering HDMI components to TV 1 Select this unit as the input source of the TV. 2 Select Disc/USB/Network as the input source of this unit. 3 Check that the image from this unit is correctly displayed on the TV. 4 Check that the HDMI control fun...
Page 34 - SETUP MENU
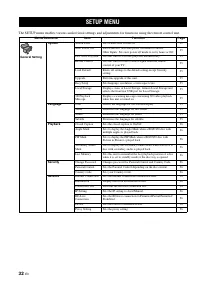
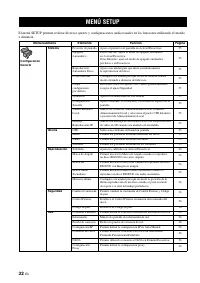
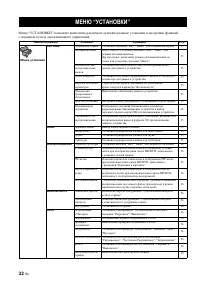
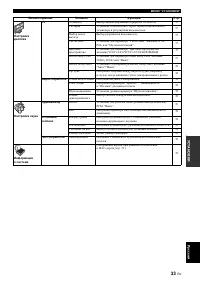
32 En SETTINGS The SETUP menu enables various audio/visual settings and adjustments for functions using the remote control unit. SETUP MENU Menu/Submenu Item Function Page General Setting System Screen Saver Sets screen saver to On/Off. 35 Auto Power Off Disc/USB/Net: Sets auto power off mode to On/...
Page 36 - Operation for SETUP menu
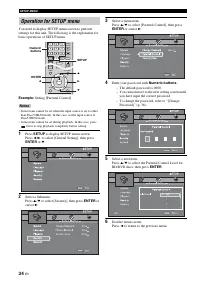
SETUP MENU 34 En You need to display SETUP menu screen to perform settings for this unit. The following is the explanation for basic operations of SETUP menu. Example: Setting [Parental Control] • Some items cannot be set when the input source is set to other than Disc/USB/Network. In this case, set...
Page 37 - System; Language; General Setting
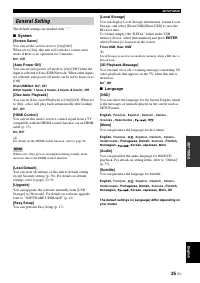
SETUP MENU 35 En Eng lish SETTINGS The default settings are marked with “ * ”. ■ System [Screen Saver] You can set the screen saver to [On]/[Off]. When set to [On], this unit will switch to screen saver mode if there is no operation for 3 minutes. On*, Off [Auto Power Off] You can set auto power off...
Page 38 - Playback
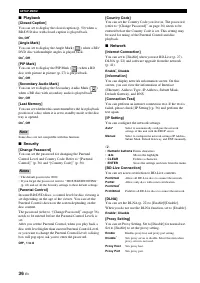
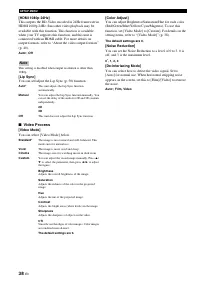
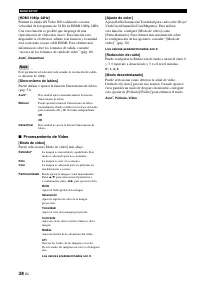
SETUP MENU 36 En ■ Playback [Closed Caption] You can set to display the closed caption (p. 50) when a BD/DVD disc with closed caption is played back. On, Off * [Angle Mark] You can set to display the Angle Mark ( ) when a BD/ DVD disc with multiple angles is played back. On * , Off [PIP Mark] You ca...
Page 39 - The default settings are marked with “; TV; You can select 3D or 2D video output from this unit.; Display Setting
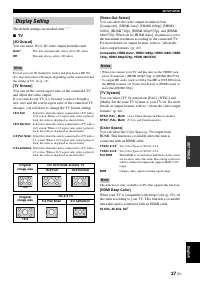
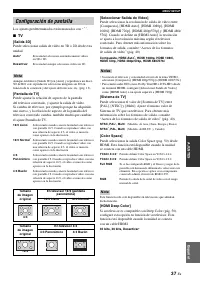
SETUP MENU 37 En Eng lish SETTINGS The default settings are marked with “ * ”. ■ TV [3D Output] You can select 3D or 2D video output from this unit. Even if you set [3D Output] to [Auto] and play back a BD 3D disc, this unit selects 2D images depending on the connection and the setting of TV, etc (p...
Page 40 - Video Process
SETUP MENU 38 En [HDMI 1080p 24Hz] This outputs the BD-Video encoded in 24Hz frame rate in HDMI 1080p 24Hz. Smoother video playback may be available with this function. This function is available when your TV supports this function, and this unit is connected with an HDMI cable. For more details on ...
Page 41 - Audio Output; Post Process; Audio Setting
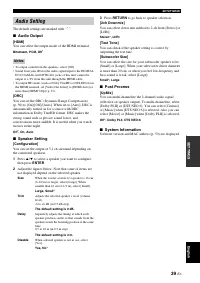
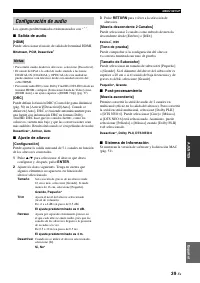
SETUP MENU 39 En Eng lish SETTINGS The default settings are marked with “ * ”. ■ Audio Output [HDMI] You can select the output mode of the HDMI terminal. Bitstream, PCM, Off * • To output sound from the speakers, select [Off].• Sound from your iPod or the audio signal input to the DIGITAL IN (COAXIA...
Page 42 - About the video output formats
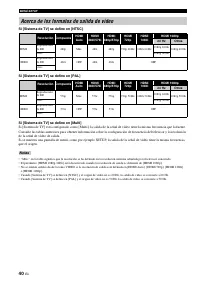
SETUP MENU 40 En When [TV System] is set to [NTSC] When [TV System] is set to [PAL] When [TV System] is set to [Multi] When [TV System] is set to [Multi], video signal is output at the same frequency as the source. Refer to the tables above for details on the frequency setting of the TV and resoluti...
Page 43 - To check for the availability of a software upgrade, visit; SETUP; to display SETUP menu screen.; SOFTWARE UPGRADE; Upgrading the software
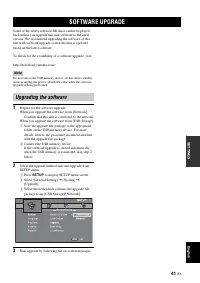
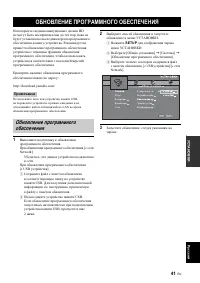
41 En Eng lish SETTINGS Some of the newly released BD discs cannot be played back unless you upgrade this unit software to the latest version. We recommend upgrading the software of this unit with software upgrade so that the unit is operated based on the latest software. To check for the availabili...
Page 44 - TROUBLESHOOTING; General
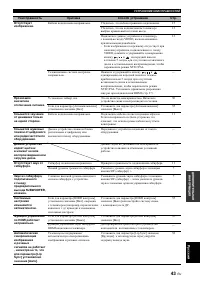
42 En ADDITIONAL INFORMATION Refer to the table below when this unit does not function properly. If the problem you are experiencing is not listed below or if the instruction below does not help, turn off this unit, disconnect the power cable, and contact the nearest authorized Yamaha dealer or serv...
Page 46 - Radio reception
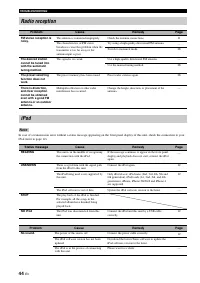
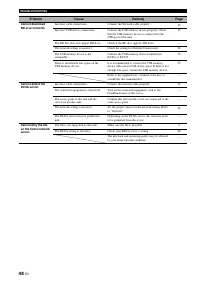
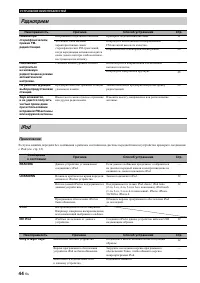
TROUBLESHOOTING 44 En In case of a transmission error without a status message appearing on the front panel display of this unit, check the connection to your iPod (refer to page 12). Radio reception Problem Cause Remedy Page FM stereo reception is noisy. The antenna is connected improperly. Check t...
Page 48 - Disc playback
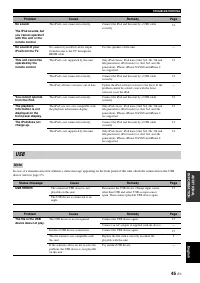
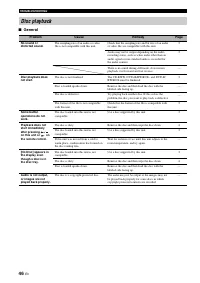
TROUBLESHOOTING 46 En ■ General Disc playback Problem Cause Remedy Page No sound or distorted sound. The sampling rate of an audio or video file is not compatible with this unit. Check that the sampling rate and bit rate of an audio or video file are compatible with this unit. 3 Audio may not be out...
Page 49 - Picture
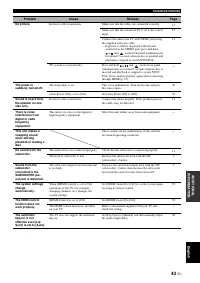
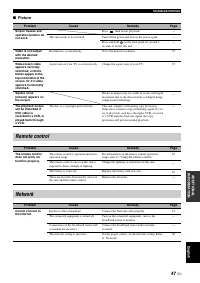
TROUBLESHOOTING 47 En Eng lish ADDITIONAL INFORMATION ■ Picture Problem Cause Remedy Page Screen freezes and operation buttons do not work. Press , then restart playback. — This unit needs to be restarted. Turn off the power and turn on the power again. — Press and hold on the front panel for around...
Page 51 - Messages on the screen
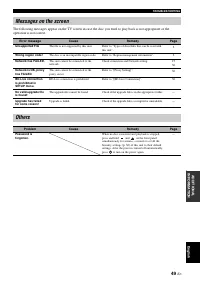
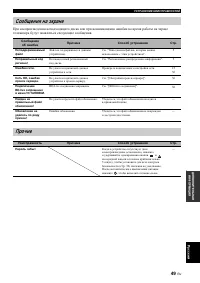
TROUBLESHOOTING 49 En Eng lish ADDITIONAL INFORMATION The following messages appear on the TV screen in case the disc you tried to play back is not appropriate or the operation is not correct. Messages on the screen Error message Cause Remedy Page Unsupported File The file is not supported by this u...
Page 52 - GLOSSARY
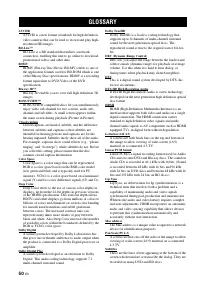
50 En AVCHD AVCHD is a new format (standard) for high definition video cameras that can be used to record and play high-resolution HD images. BD-Live™ BD-Live is a BD standard that utilizes a network connection, enabling this unit to go online to download promotional videos and other data. BDMV BDMV...
Page 53 - PLAYER SECTION; AMPLIFIER SECTION; SPECIFICATIONS
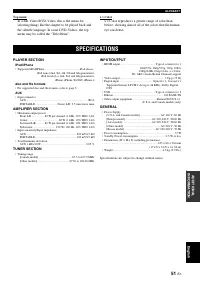
GLOSSARY 51 En Eng lish ADDITIONAL INFORMATION Top menu In a BD-Video/DVD-Video, this is the menu for selecting things like the chapter to be played back and the subtitle language. In some DVD-Videos, the top menu may be called the “Title Menu”. x.v.Color x.v.Color reproduces a greater range of colo...
Page 54 - Copyright; HDMI
SPECIFICATIONS 52 En ■ Copyright • iPhone, iPod, iPod classic, iPod nano, and iPod touch are trademarks of Apple Inc., registered in the U.S. and other countries. “Made for iPod,” and “Made for iPhone” mean that an electronic accessory has been designed to connect specifically to iPod, or iPhone, re...
Page 55 - PRECAUCIÓN: LEA LAS INDICACIONES SIGUIENTES ANTES
i Es 1 Para asegurar el mejor rendimiento de este aparato, lea atentamente este manual. Y luego guárdelo en un lugar seguro para poder consultarlo en el futuro en caso de ser necesario. 2 Instale esta unidad en un lugar bien ventilado, fresco, seco y limpio, alejado de la luz directa del sol, fuente...
Page 56 - CONTENIDO; INTRODUCCIÓN; Acerca de este manual; Iconos utilizados en este manual
1 Es INTRODUCCIÓN PREPA RACIÓN Esp añol FUNCIONAMIENT O AJUSTES IN FORMACIÓN ADIC IONAL FUNCIONES DE ESTA UNIDAD........................ 2PIEZAS INCLUIDAS ............................................ 2INFORMACIÓN SOBRE DISCOS Y ARCHIVOS ..................................................... 3 Tipos d...
Page 57 - Asegúrese de que dispone de todos los elementos siguientes.; FUNCIONES DE ESTA UNIDAD; Reproducción de BONUSVIEWTM y BD-LiveTM; Disfrute de los contenidos de YouTubeTM en su televisor.; Asistente inicial y Configuración Sencilla; PIEZAS INCLUIDAS
2 Es INTRODUCCIÓN * 1 Para obtener información sobre los discos y archivos que se pueden reproducir, consulte la página 3. * 2 Para utilizar esta función es necesaria la configuración de red. Asegúrese de que dispone de todos los elementos siguientes. FUNCIONES DE ESTA UNIDAD Reproducción de discos ...
Page 58 - INFORMACIÓN SOBRE DISCOS Y ARCHIVOS; Notas
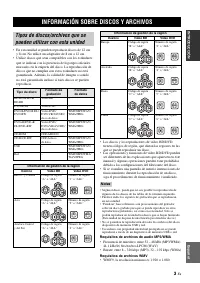
3 Es INTRODUCCIÓN Esp añol • En esta unidad se pueden reproducir discos de 12 cm y 8 cm. No utilice un adaptador de 8 cm a 12 cm. • Utilice discos que sean compatibles con los estándares que se indican con la presencia de logotipos oficiales marcados en la etiqueta del disco. La reproducción de disc...
Page 59 - Para cargar un disco; Precauciones con los discos
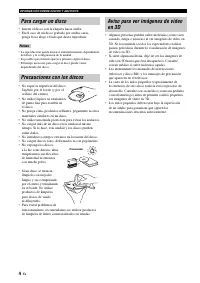
INFORMACIÓN SOBRE DISCOS Y ARCHIVOS 4 Es • Inserte el disco con la etiqueta hacia arriba.• En el caso de un disco grabado por ambas caras, ponga boca abajo el lado que desea reproducir. • La reproducción puede iniciarse automáticamente, dependiendo del disco y la configuración de la unidad. • Es pos...
Page 60 - NOMBRES Y FUNCIONES DE LAS OPCIONES; Panel delantero
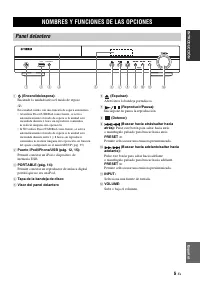
5 Es INTRODUCCIÓN Esp añol 1 (Encendido/espera): Enciende la unidad/activa el modo de reposo. y Esta unidad cuenta con una función de espera automática.• Al utilizar Disco/USB/Red como fuente, se activa automáticamente el modo de espera si la unidad está encendida durante 1 hora sin reproducir conte...
Page 61 - Mando a distancia; Nota
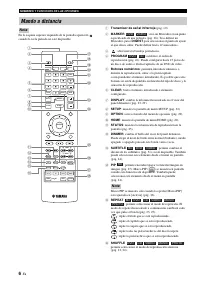
NOMBRES Y FUNCIONES DE LAS OPCIONES 6 Es En la esquina superior izquierda de la pantalla aparecerá cuando la tecla pulsada no esté disponible. 1 Transmisor de señal infrarroja (pág. 10) 2 MARKER : crea un Marcador en un punto especificado de una película (pág. 26). Tras definir un Marcador, pulse DI...
Page 62 - Continúa en la página siguiente.
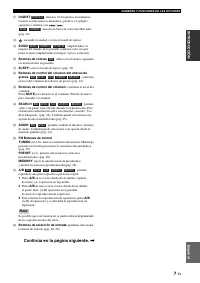
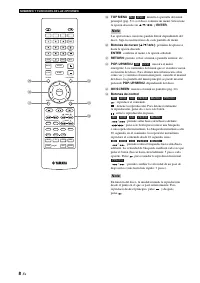
NOMBRES Y FUNCIONES DE LAS OPCIONES 7 Es INTRODUCCIÓN Esp añol G DIGEST : muestra 12 fotografías en miniatura. Cuando se muestran las miniaturas, puede ir a la página siguiente o anterior con / . : muestra la barra de selección Marcador (pág. 26). H : enciende la unidad o activa el modo de reposo. I...
Page 64 - Panel posterior
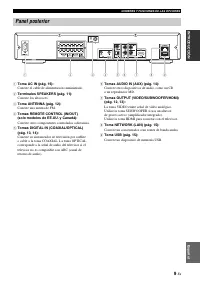
NOMBRES Y FUNCIONES DE LAS OPCIONES 9 Es INTRODUCCIÓN Esp añol 1 Toma AC IN (pág. 16): Conecte el cable de alimentación suministrado. 2 Terminales SPEAKERS (pág. 11): Conecte los altavoces. 3 Toma ANTENNA (pág. 12): Conecte una antena de FM. 4 Tomas REMOTE CONTROL (IN/OUT) (solo modelos de EE.UU. y ...
Page 65 - Notas acerca de las pilas; Utilización del mando a distancia
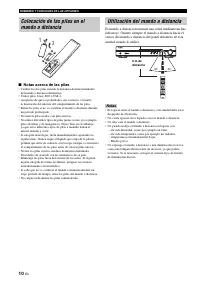
NOMBRES Y FUNCIONES DE LAS OPCIONES 10 Es ■ Notas acerca de las pilas • Cambie las dos pilas cuando la distancia de funcionamiento del mando a distancia disminuya. • Utilice pilas AAA, R03 o UM-4.• Asegúrese de que las polaridades son correctas. Consulte la ilustración del interior del compartimento...
Page 66 - • Cable de clavijas monoaural (para altavoz de graves) × 1; CONEXIÓN; Conexión de los altavoces
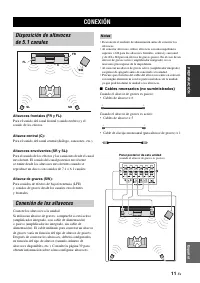
11 Es PREPA RACIÓN Esp añol PREPARACIÓN Altavoces frontales (FR y FL): Para el sonido del canal frontal (sonido estéreo) y el sonido de los efectos. Altavoz central (C): Para el sonido del canal central (diálogo, canciones, etc.). Altavoces envolventes (SR y SL): Para el sonido de los efectos y las ...
Page 67 - Conexión de los cables del altavoz; Acerca del altavoz de graves; Conexión de la antena FM; Conexión del iPod
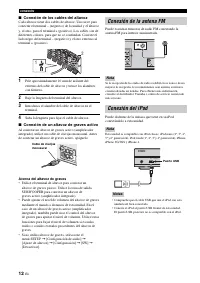
CONEXIÓN 12 Es ■ Conexión de los cables del altavoz Cada altavoz tiene dos cables de altavoz. Uno sirve para conectar el terminal – (negativo) de la unidad y el altavoz y, el otro, para el terminal + (positivo). Los cables son de diferentes colores, para que no se confundan. Conecte el lado negro de...
Page 68 - RACIÓN; Conexión HDMI; Conexión de un televisor; PRECAUCIÓN
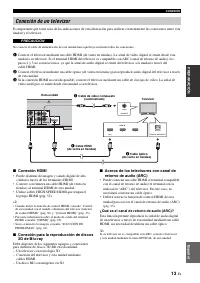
CONEXIÓN 13 Es PREPA RACIÓN Esp añol Es importante que tome nota de las indicaciones de esta ilustración para realizar correctamente las conexiones entre esta unidad y el televisor. No conecte el cable de alimentación de esta unidad hasta que haya realizado todas las conexiones. 1 Conecte el televis...
Page 69 - Conexión de vídeo; • Conecte con firmeza el cable de vídeo compuesto
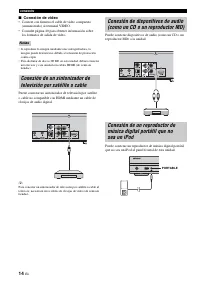
CONEXIÓN 14 Es ■ Conexión de vídeo • Conecte con firmeza el cable de vídeo compuesto (suministrado) al terminal VIDEO. • Consulte página 40 para obtener información sobre los formatos de salida de vídeo. • Si reproduce la imagen mediante una videograbadora, la imagen puede deteriorarse debido a la f...
Page 70 - • Puede conectar un dispositivo de memoria USB (2 GB; Después de la conexión; CONEXIÓN DE RED Y USB; Conexión con el terminal NETWORK; Conexión al puerto USB
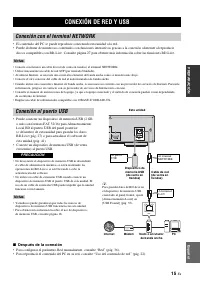
15 Es PREPA RACIÓN Esp añol • El contenido del PC se puede reproducir conectando esta unidad a la red.• Puede disfrutar de numerosos contenidos con funciones interactivas gracias a la conexión a Internet al reproducir discos compatibles con BD-Live. Consulte página 27 para obtener más información so...
Page 71 - OTRA CONEXIÓN
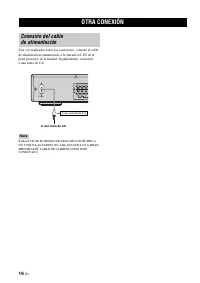
16 Es Una vez realizadas todas las conexiones, conecte el cable de alimentación suministrado a la entrada AC IN de la parte posterior de la unidad. Seguidamente, conéctela a una toma de CA. PARA EVITAR EL RIESGO DE DESCARGA ELÉCTRICA, NO TOQUE LAS PARTES NO AISLADAS DE LOS CABLES MIENTRAS EL CABLE D...
Page 72 - ASISTENTE INICIAL/CONFIGURACIÓN SENCILLA
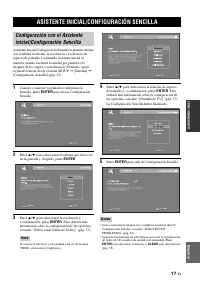
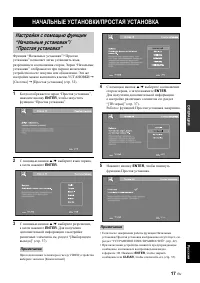
17 Es FUNCIONAMIENT O Esp añol FUNCIONAMIENTO Asistente inicial/Configuración Sencilla le permite definir con facilidad el idioma, la resolución y la relación de aspecto de pantalla. La pantalla Asistente inicial se muestra cuando enciende la unidad por primera vez después de la compra o actualizaci...
Page 73 - FUNCIONAMIENTO BÁSICO
18 Es Siga los procedimientos que se indican a continuación para reproducir la fuente. * 1 · Es posible que algunos dispositivos no funcionen correctamente aunque cumplan con los requisitos. · No se garantizan la reproducción y alimentación de todos los tipos de dispositivos USB. · El tiempo de lect...
Page 74 - Esp
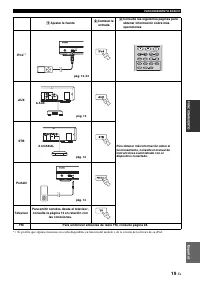
FUNCIONAMIENTO BÁSICO 19 Es Esp añol FUNCIONAMIENT O * 1 Es posible que algunas funciones no estén disponibles en función del modelo o de la versión del software de su iPod. Ajustar la fuente Cambiar la entrada Consulte las siguientes páginas para obtener información sobre más operaciones iPod *1 AU...
Page 75 - Funcionamiento básico
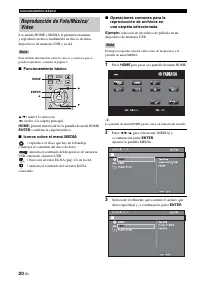
FUNCIONAMIENTO BÁSICO 20 Es Los menús HOME y MEDIA le permiten examinar y reproducir archivos multimedia en discos de datos, dispositivos de memoria USB y su red. Para obtener información sobre los discos y archivos que se pueden reproducir, consulte la página 3. ■ Funcionamiento básico 5 / a : muev...
Page 76 - Operaciones para visualización de fotos
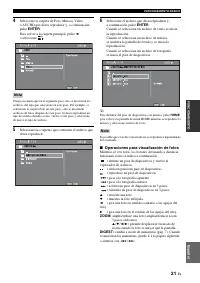
FUNCIONAMIENTO BÁSICO 21 Es Esp añol FUNCIONAMIENT O 4 Seleccione la carpeta de Foto, Música, Vídeo o AVCHD que desea reproducir y, a continuación, pulse ENTER . Para volver a la carpeta principal, pulse 2 o seleccione . Tenga en cuenta que en el siguiente paso solo se mostrarán los archivos del tip...
Page 77 - Acerca de DLNA; Avisos sobre los servicios de red; Uso del contenido de red; Uso de los servicios de red
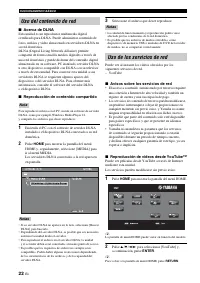
FUNCIONAMIENTO BÁSICO 22 Es ■ Acerca de DLNA Esta unidad es un reproductor multimedia digital certificado para DLNA. Puede administrar contenido de fotos, música y vídeo almacenado en servidores DLNA en su red doméstica.DLNA (Digital Living Network Alliance) permite compartir de forma sencilla medio...
Page 78 - Funcionamiento para iPod; Operaciones con un CD
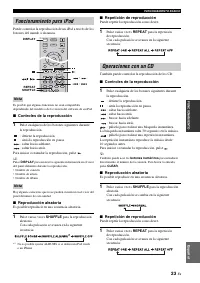
FUNCIONAMIENTO BÁSICO 23 Es Esp añol FUNCIONAMIENT O Puede controlar la reproducción de un iPod a través de los botones del mando a distancia. Es posible que algunas funciones no sean compatibles dependiendo del modelo o de la versión del software de su iPod. ■ Controles de la reproducción 1 Pulse c...
Page 79 - FUNCIONAMIENTO DE REPRODUCCIÓN AVANZADO; Menú en pantalla
24 Es En este capítulo se explica la reproducción de discos BD/DVD/CD de venta en tiendas y discos DVD-RW/R grabados. Para conocer el funcionamiento básico de reproducción, consulte la página 6. Para mostrar el menú en pantalla, pulse ON SCREEN . A continuación, pulse 5 / a / 2 / 3 para seleccionar ...
Page 80 - Menú de estado
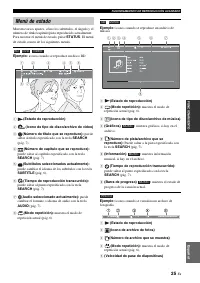
FUNCIONAMIENTO DE REPRODUCCIÓN AVANZADO 25 Es Esp añol FUNCIONAMIENT O Muestra varios ajustes, cómo los subtítulos, el ángulo y el número de título/capítulo/pista reproducido actualmente. Para mostrar el menú de estado, pulse STATUS . El menú de estado consta de los siguientes menús. Ejemplo: iconos...
Page 81 - Uso de Marcador; Reproducción de programa
FUNCIONAMIENTO DE REPRODUCCIÓN AVANZADO 26 Es Le permite establecer un Marcador en un punto especificado del vídeo. Después de establecer el Marcador, puede saltar al punto utilizando esta función. Puede definir hasta 12 marcadores. Ejemplo : establecer un Marcador al reproducir una película. 1 Puls...
Page 82 - Utilización de la función BD-LiveTM
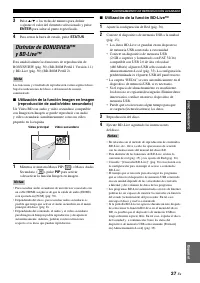
FUNCIONAMIENTO DE REPRODUCCIÓN AVANZADO 27 Es Esp añol FUNCIONAMIENT O 3 Pulse 5 / a o las teclas de número para definir o ajustar el valor del elemento seleccionado y pulse ENTER para saltar al punto especificado. 4 Para cerrar la barra de estado, pulse STATUS . Esta unidad admite las funciones de ...
Page 83 - ESCUCHAR EMISORAS DE RADIO FM; Sintonización de emisoras de radio
28 Es 1 Pulse TUNER . 2 Mantener pulsado << / >> ( TUNING ). Comenzará el proceso de sintonización automática. y Si la señal recibida de la emisora que desea seleccionar es débil, también es posible sintonizar emisoras de radio de forma manual pulsando << / >> ( TUNING ) vari...
Page 85 - Ajuste de la función de control HDMI; Apague el televisor y después vuelva a encenderlo.; UTILIZACIÓN DE FUNCIONES ÚTILES; Ajuste del temporizador de apagado
30 Es Puede ajustar el temporizador de apagado con el mando a distancia. El temporizador de apagado pone esta unidad en modo de espera una vez transcurrido un tiempo especificado. 1 Pulse SLEEP varias veces. Puede utilizar el mando a distancia del televisor para controlar esta unidad si el televisor...
Page 86 - • La función de control HDMI debe estar activada en el
UTILIZACIÓN DE FUNCIONES ÚTILES 31 Es Esp añol FUNCIONAMIENT O ■ Registro de componentes HDMI en el televisor 1 Seleccione esta unidad como fuente de entrada del televisor. 2 Seleccione Disco/USB/Red como fuente de entrada de esta unidad. 3 Compruebe que la imagen de esta unidad aparezca correctamen...
Page 87 - MENÚ SETUP
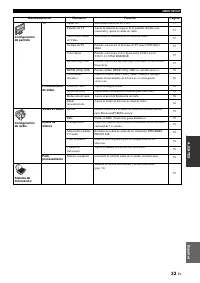
32 Es AJUSTES El menú SETUP permite realizar diversos ajustes y configuraciones audiovisuales en las funciones utilizando el mando a distancia. MENÚ SETUP Menú/submenú Elemento Función Página Configuración General Sistema Protector de pantalla Ajusta el protector de pantalla en Activar/Desactivar. 3...
Page 89 - Utilización del menú SETUP
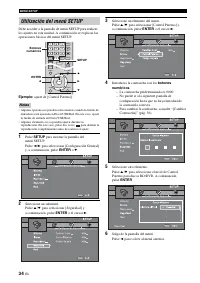
MENÚ SETUP 34 Es Debe acceder a la pantalla de menú SETUP para realizar los ajustes en esta unidad. A continuación se explican las operaciones básicas del menú SETUP. Ejemplo: ajuste de [Control Paterno] • Algunas opciones no pueden seleccionarse cuando la fuente de entrada no está ajustada en Disco...
Page 90 - Sistema; Idioma; Configuración General
MENÚ SETUP 35 Es Esp añol AJUSTES Los ajustes predeterminados están marcados con “ * ”. ■ Sistema [Protector de pantalla] Puede definir el protector de pantalla en [Activar]/ [Desactivar]. Cuando la opción [Activar] está seleccionada, esta unidad pasa al modo de protector de pantalla si no se utiliz...
Page 91 - Reproducción
MENÚ SETUP 36 Es ■ Reproducción [Subtítulos] Puede ajustar que se visualicen los subtítulos (pág. 50) cuando se reproduce un disco BD/DVD con subtítulos. Activar, Desactivar * [Marca de Angulo] Puede ajustar la visualización de la Marca de Angulo ( ) cuando se reproduce un disco BD/DVD con ángulos m...
Page 92 - Los ajustes predeterminados están marcados con “; Configuración de pantalla
MENÚ SETUP 37 Es Esp añol AJUSTES Los ajustes predeterminados están marcados con “ * ”. ■ TV [Salida 3D] Puede seleccionar salida de vídeo en 3D o 2D desde esta unidad. Aunque establezca [Salida 3D] en [Auto] y reproduzca un disco 3D de BD, este reproductor selecciona imágenes en 2D en función de la...
Page 93 - Procesamiento de Video
MENÚ SETUP 38 Es [HDMI 1080p 24Hz] Permite la salida del Vídeo BD codificado con una velocidad de fotogramas de 24 Hz en HDMI 1080p 24Hz. Con esta función es posible que disponga de una reproducción de vídeo más suave. Esta función está disponible si el televisor admite esta función y la unidad está...
Page 94 - Salida de audio; Ajuste de altavoz; Sistema de Información; Configuración de audio
MENÚ SETUP 39 Es Esp añol AJUSTES Los ajustes predeterminados están marcados con “ * ”. ■ Salida de audio [HDMI] Puede seleccionar el modo de salida del terminal HDMI. Bitstream, PCM, Desactivar * • Para emitir sonido desde los altavoces, seleccione [Desactivar].• El sonido del iPod o la señal de au...
Page 95 - Acerca de los formatos de salida de vídeo
MENÚ SETUP 40 Es Si [Sistema de TV] se define en [NTSC] Si [Sistema de TV] se define en [PAL] Si [Sistema de TV] se define en [Multi] Si [Sistema de TV] está configurado como [Multi], la salida de la señal de vídeo tiene la misma frecuencia que la fuente. Consulte las tablas anteriores para obtener ...
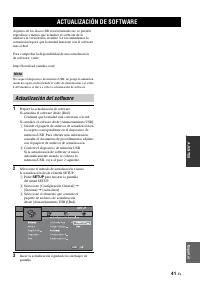
Page 96 - Confirme que la unidad está conectada a la red.; para mostrar la pantalla; ACTUALIZACIÓN DE SOFTWARE; Actualización del software
41 Es Esp añol AJUSTES Algunos de los discos BD recién lanzados no se pueden reproducir a menos que actualice el software de la unidad a la versión más reciente. Le recomendamos la actualización para que la unidad funcione con el software más actual. Para comprobar la disponibilidad de una actualiza...
Page 97 - SOLUCIÓN DE PROBLEMAS; Problemas generales
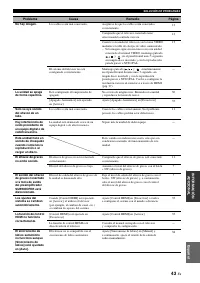
42 Es INFORMACIÓN ADICIONAL Consulte la tabla de abajo cuando esta unidad no funcione correctamente. Si el problema no está en la lista de abajo o las instrucciones no sirven de ayuda, apague esta unidad, desconecte el cable de alimentación y póngase en contacto con el centro de servicio o concesion...
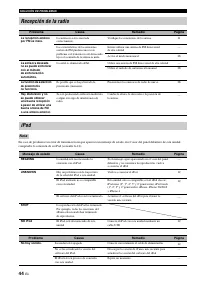
Page 99 - Recepción de la radio
SOLUCIÓN DE PROBLEMAS 44 Es En caso de producirse un error de transmisión sin que aparezca un mensaje de estado en el visor del panel delantero de esta unidad, compruebe la conexión de su iPod (consulte la 12). Recepción de la radio Problema Causa Remedio Página La recepción estéreo por FM es mala. ...
Page 101 - Reproducción de disco
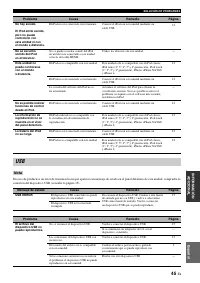
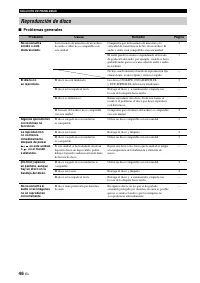
SOLUCIÓN DE PROBLEMAS 46 Es ■ Problemas generales Reproducción de disco Problema Causa Remedio Página No se escucha sonido o está distorsionado. La frecuencia de muestreo de un archivo de audio o vídeo no es compatible con esta unidad. Compruebe que la frecuencia de muestreo y la velocidad de transf...
Page 102 - Imagen
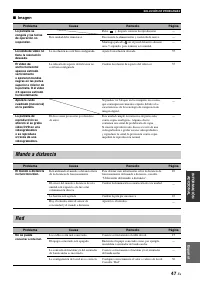
SOLUCIÓN DE PROBLEMAS 47 Es Esp añol IN FORMACIÓN ADIC IONAL ■ Imagen Problema Causa Remedio Página La pantalla se congela y las teclas de operación no responden. Pulse y, después, reinicie la reproducción. — Esta unidad debe reiniciarse. Desconecte la alimentación y conéctela de nuevo. — Mantenga p...
Page 104 - Mensajes en pantalla
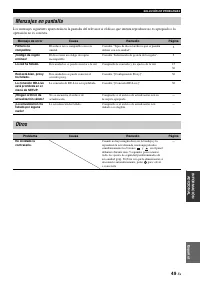
SOLUCIÓN DE PROBLEMAS 49 Es Esp añol IN FORMACIÓN ADIC IONAL Los mensajes siguientes aparecerán en la pantalla del televisor si el disco que intenta reproducir no es apropiado o la operación no es correcta. Mensajes en pantalla Mensaje de error Causa Remedio Página Fichero no compatible El archivo n...
Page 105 - GLOSARIO
50 Es AVCHD AVCHD es un nuevo formato (estándar) para cámaras de vídeo de alta definición que se puede utilizar para grabar y reproducir imágenes de alta definición (HD). BD-Live™ BD-Live es un estándar de BD que utiliza una conexión de red y permite a esta unidad conectarse a Internet para descarga...
Page 106 - SECCIÓN DEL REPRODUCTOR; SECCIÓN DEL AMPLIFICADOR; ESPECIFICACIONES
GLOSARIO 51 Es Esp añol IN FORMACIÓN ADIC IONAL Sincronismo de labios Sincronismo de labios, una abreviatura de “lip synchronization”, o sincronización de labios, es un término que hace referencia tanto a un problema habitual como a la posibilidad de mantener sincronizadas las señales de audio y víd...
Page 107 - Propiedad intelectual
ESPECIFICACIONES 52 Es ■ Propiedad intelectual • iPhone, iPod, iPod classic, iPod nano y iPod touch son marcas comerciales de Apple Inc., registradas en EE.UU. y otros países. “Made for iPod,” y “Made for iPhone” significan que un accesorio electrónico se ha diseñado para conectarse específicamente ...
Page 109 - “iPod”
1 Ru .... 2 ................. 2 ..................................... 3 / , ...................... 3 .......................................................... 4 ................................................................ 4 3D ........................................................ 4 ............
Page 110 - DVD; BONUSVIEWTM BD-LiveTM; USB iPod; FM
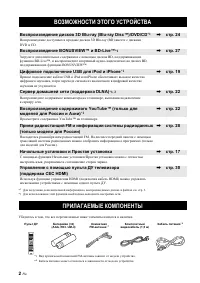
2 Ru * 1 . . 3. * 2 . , . 3D Blu-ray (Blu-ray Disc™)/DVD/CD * 1 \ . 24 3D Blu-ray (BD) DVD CD. BONUSVIEW™ BD-Live™ * 1 \ . 27 BD, BD-Live™, -/ BD, BONUSVIEW™. USB iPod iPhone * 1 \ . 19 USB iPod iPhone , . ( DLNA) * 1, 2 \ . 22 , . YouTube™ ( ) * 2 \ . 22 YouTube™ . FM ( ...
Page 111 - WMV; • WMV9
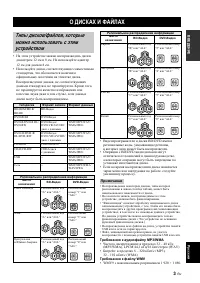
3 Ru • 12 8 . 12 8 . • , , . , , . , , . • BD/DVD , , . • BD/DVD , . • , . • , , . • , , . • “ ” , , / , . . ( .) • , USB . • , , USB . MP3/WMA • : 32 – 48 (MP3/WMA), LPCM 44,1 /16 / (WAV) • : 8 – 320 / (MP3), 32 – 192 / (WMA) WMV • WMV9 1 920 × 1 080. / , B...
Page 113 - iPod
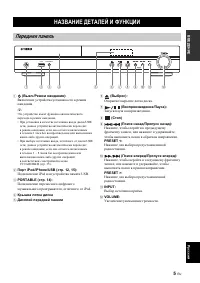
5 Ru 1 ( ./ ): / . y . • /USB/ , , 1 - . • , /USB/ , , 1 – 8 - ( . 35). 2 iPod/iPhone/USB ( . 12, 15): iPod USB. 3 PORTABLE ( . 14): , iPod. 4 5 6 ( ): / . 7 ( / ): / . 8 ( ) 9 ( / ): , , , . PRESET <: . 0 ( / ): , , , . PRESET >: . A INPUT: . B VOLUME: / . 、、...
Page 114 - ри еч ие
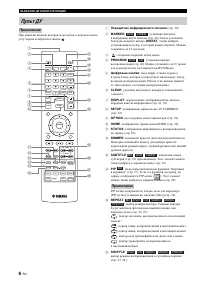
А А А 6 Ru , , . 1 ( . 10) 2 MARKER : ( . 26). DIGEST , , . 12 . 3 : / . 4 PROGRAM : ( . 26). 15 / DVD- . 5 : , / , , . . 6 CLEAR : / . 7 DISPLAY : ( . 23, 29). 8 SETUP : ( . 32). 9 OPTION : ( . 29). 0 HOME : HOME ( . 20). A STATUS : ( . 25). B DIMMER : . : ( ), . C...
Page 118 - ри еч ия
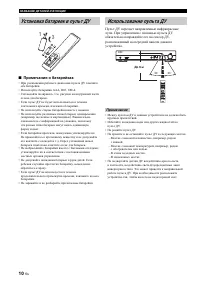
А А А 10 Ru ■ • . • AAA, R03, UM-4. • . . . • , . • . • ( , ). , . • , . . . . • ; . • . , . • , . • . . , . • . • . • . • . – , , . – , , . – . – . • , , . . , . 1 3 22 ри еч ия USB PORTABLE iPod/iPhone 30˚ 30˚ 6
Page 123 - NETWORK
15 Ru • , . • , BD-Live- . BD-Live . . 27. • ( ) NETWORK. • STP ( ). • , . • . • . . • , . • / , 10BASE-T/100BASE-TX. • USB (2 , FAT 32/16) BD USB ( ) , BD-Live ( . 27) ( . 41). • USB ( ) USB. • USB BD-Live . • USB USB USB . USB . • Yamaha ...
Page 128 - MEDIA
А 20 Ru HOME MEDIA , USB . . . 3. ■ 5 / a : . 2 : . HOME: / HOME. ENTER: . ■ MEDIA : . : USB, USB. : DLNA ( . 22) . : DLNA. ■ : USB , MEDIA, . 1 HOME HOME. y HOME . 2 2 / 3 / 5 [MEDIA], ENTER . MEDIA. 3 , , , ENTER . , ри еч ие VOLUME SETUP DISPLAY HOME OPTION ENTER TOP MENU RE...
Page 130 - YouTubeTM
А 22 Ru ■ DLNA DLNA- . , , DLNA . DLNA (Digital Living Network Alliance) , , DLNA DLNA- . DLNA, DLNA. . DLNA DLNA. ■ , DLNA, Windows Media Player 12, , , . 1 DLNA DLNA, . 2 HOME HOME, [MEDIA] MEDIA. DLNA, . • DLNA , [ DLNA], . • DLNA, , . • DLNA, . • . DLN...
Page 131 - REPEAT
А 23 Ru iPod. iPod. ■ 1 . : . : . : . : . / . y DISPLAY . • • • , . ■ . 1 SHUFFLE . : * 1 iPod touch iPhone ALBUMS . ■ . 1 REPEAT . : - . ■ 1 . : . : . : . : . : . : . : , . 30 . : , . , 10 . / . y . CLEAR . ■ . 1 SHUF...
Page 133 - BD
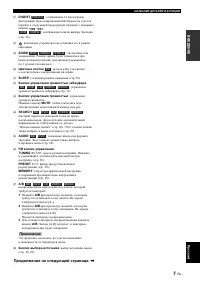
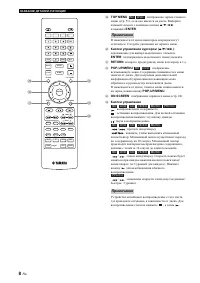
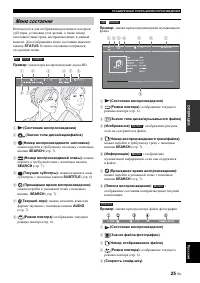
А А 25 Ru : , , / / , . STATUS . . : BD 1 ( ) 2 ( / ) 3 ( ): SEARCH ( . 7). 4 ( ): SEARCH ( . 7). 5 ( ): , SUBTITLE ( . 6). 6 ( ): SEARCH ( . 7). 7 ( ): AUDIO ( . 7). 8 (P ): ( . 6). : 1 ( ) 2 (P ): ( . 6). 3 ( / ) 4 ( ) : , . 5 ( / ): SEARCH ( . 7). 6 ( )...
Page 139 - “HDMI
А 31 Ru ■ HDMI 1 . 2 /USB/ . 3 , . 4 , HDMI ( ). y HDMI HDMI. HDMI . HDMI . • HDMI . HDMI [ ] ( . 35). • HDMI . ( , .) “HDMI ” . • , . • , , HDMI. 30 . ■ , , . 1 HDMI , , . 2 1 – 3 “ HDMI” ( . 30).
Page 145 - Deep Color
“ А ” 37 Ru “ * ”. ■ TV [3D ] 3D 2D . [3D ] [ ] BD 3D, 2D , . . ( . 13). [ ] . ( , - ) “ ”. [ ] [ ], [HDMI ], [HDMI 1080p], [HDMI 1080i], [HDMI 720p], [HDMI 480p/576p] [HDMI 480i/576i]. [HDMI ] . . “ ” ( . 40). , HDMI * , HDMI 1080p, HDMI 1080i, HDMI 720p, HDMI 480p/576p,...
Page 147 - DRC
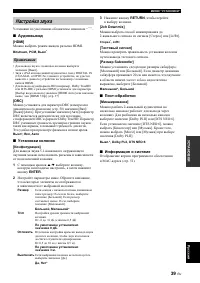
“ А ” 39 Ru “ * ”. ■ [HDMI] HDMI. Bitstream, PCM, * • [ ]. • iPod DIGITAL IN (COAXIAL OPTICAL) , HDMI. • HD ( , Dolby TrueHD DTS-HD) HDMI [ ] [HDMI ] , [HDMI 720p] ( . 37) [DRC] DRC ( ) ( . 50) [ ]/ [ ]/[ ]. [ ] DRC DRC Dolby TrueHD. DRC , , . . * , , ■ [ ] 5.1- . 1 5...
Page 159 - Linear PCM; “lip synchronization”
А 51 Ru Letterbox (LB 4:3) , (16:9) 4:3. Linear PCM Linear PCM , CD, DVD Blu-ray. CD 44,1 16- . ( 48 16- 96 24- DVD 48 16- 192 24- BD.) Lip Sync Lip Sync - “lip synchronization” ( ). , - . - , HDMI , . Mac- Mac- – , . Pan Scan (PS 4:3) , (16:...
Page 161 - 注意:在操作本机之前请阅读 部
i Zh 1 要确保 好的性能,请仔细阅读 手 请将它保 在 安全的地方以备将来参考 2 请将 声音系 安装在通风良好,凉爽并 燥, 净 的地方 - 离直射 ,热源,振动, 尘,潮湿 和 里 或寒冷的地方 了使通风良好,请在周围 少留 以 间隙部 从重 销上 背面 从重 销上侧面 从重 销上 3 请将 机 离 它电子 备 马达或 压器以避免嗡嗡声 4 请勿使 机经 于 冷到热的突然温 改 ,勿将 机放置于高湿 的 境中 例如有加湿器的 间 以 机内部发生结露,否则 能导 触电 火灾,损害 机,和 里 或人体伤害 5 请避免在外部物体 能落入 机的地方或 机 能 遇液体滴落或飞溅的地方安装 机 ...
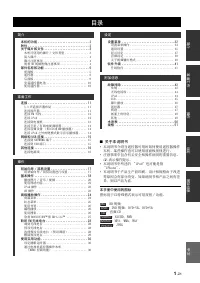
Page 162 - 目录; 简介; 关于本说明书; 本手册中使用的 标
1 Zh 简介 准备作 中文 操作 设定 附信息 本机的 能 ............................... 2附件 ..................................... 2关于碟 和文件 ........................... 3 机 使用的碟 里 文件类型 ............... 运 装入碟 ................................. 近 碟 注意 ............................. 近 看 运D 视频 像注意 .................. 近 部件 称和 能 .........
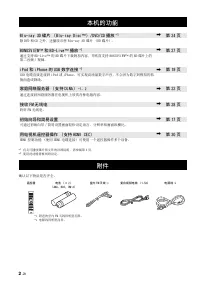
Page 163 - 本机的 能
2 Zh 简介 * 从 有关 播放碟 和文件的 细说明,请参阅第 运 * 2 使用 功能需要网 定 确认以 物品是否齐全 本机的 能 迟lu-r图y 3D 碟 迟lu-r图y D分sc ™ /DVD/CD 播放 * 从 \ 第 24 除 D至D 和 CD 之外, 播放 迟三u-r图y 运D 碟 迟D 碟 迟ONU台V左EW ™ 和 迟D-L分v市 ™ 播放 * 从 \ 第 27 通过支持 迟D-L分专适 ™ 的 迟D 碟 载附加内容,并 赏支持 迟括NU台至详E致 ™ 的 迟D 碟 的 第 音频 里 视频 分闭同d 和 分闭h同下市 的 U台迟 数 接 * 从 \ 第 从9 U台迟 电缆直接 ...
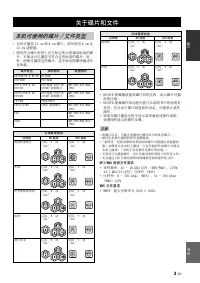
Page 164 - 关于碟 和文件; 本机 使用的碟; 注意
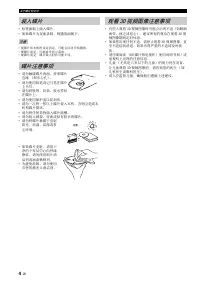
3 Zh 简介 中文 • 机 播放 从2 销上 和 8 销上 碟 请勿使用 8 销上 从2 销上 配器 • 使用符合碟 标签 官方标 示的兼容标准的碟 保证 以播放 符合 标准的碟 外,即使 播放 碟 ,也 保证 像质量或声 音质量 • 迟D里D至D 视频播放器和碟 有区码,表示碟 播 放的区域 • 迟D里D至D 视频操作和功能 能 说明书中的说明有 差 ,并 由于碟 商的 定, 能禁 某 操作 • 如果在碟 播放过程中显示菜单画面或操作说明,请遵照 显示的操作 骤 • 视碟 而定, 能无法播放 侧列表中的某 碟 • 终化 机中播放的 有录 媒体 • 终化 是指录像机处理录 的碟 以便能在 他...
Page 165 - 装入碟; 碟 注意 项; 观看 3D 视频 像注意 项
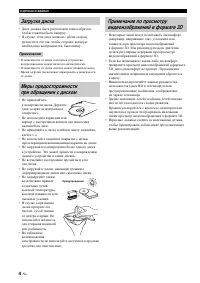
关于碟 和文件 4 Zh • 标签面朝 插入碟 • 如果碟 面录 ,则播放面朝 • 视碟 和 机的 定而定, 能会自动开始播放 • 视碟 而定, 能首 显示菜单 • 视碟 而定,碟 载入时间 能 • 请勿触 碟 表面 持拿碟边缘 和中心孔 • 请勿使用铅笔或 号笔在碟 书写 • 请勿将胶 封条 胶水等粘 在碟 • 请勿使用保 盖以 刮伤 • 请勿一 将一张以 碟 装入 机 否则会 成机和碟 损坏 • 请勿将任何 物插入碟 插槽 • 请勿装入破裂 弯曲或粘有胶水的碟 • 请勿将碟 暴露于直射 高温 高湿或多 尘 境 • 如果碟 脏,请用 净的 中心向外缘 擦 请勿使用唱 清 洁剂或油漆稀释剂 •...
Page 166 - 部件 称和 能; 前面板
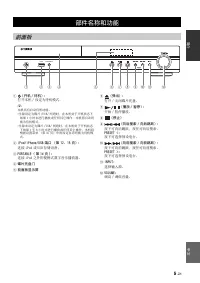
5 Zh 简介 中文 1 开机 / 待机 : 打开 机 里 定 机模式 y 机 有自动 机功能 • 当源 定 碟 里U台迟里 网 时,在 机处于开机状态 如果 从 小时 行播放或任何 它操作, 机将自动 换 机模式 • 当源 定 碟 里U台迟里 网 时,在 机处于开机状态 如果 从 8 小时 行播放或任何 它操作, 机将 根据 置菜单 第 运秒 中的 定自动 换 机模 式 2 分闭同d/分闭h同下市/U台迟 端口 第 从2 从5 : 接 分闭同锁 或 U台迟 储 备 3 闭O可T连迟LE ( 第 从4 )受 接 分闭同锁 之外的便携式数 音 播放器 4 碟 托盘门 5 前面板显示屏 6 弹出 ...
Page 167 - 遥控器
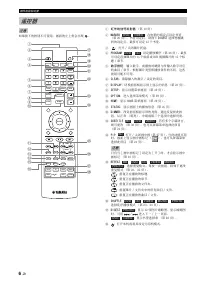
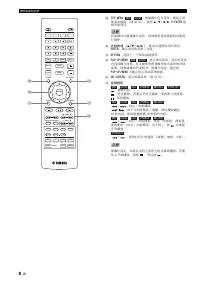
部件 称和 能 6 Zh 如果按 的按钮 使用,画面的 角会 1 红外线信号发射器 第 从重 2 M连可KE可 在电影的指定点 定书签 第 26 书签 定 ,请按 D左GE台T 选择想要跳 到的 定点 多 定 从2 个书签 3 打开 里 关 碟 托盘 4 闭可OG可连M 定播放 序 第 26 多 定音频碟 的 从秒 个曲目或 D至D 视频碟 的 从秒 个标 题 里 章节 5 数 按钮 输入数 ,或播放时跳到 输入数 的曲目 里 章节 根据碟 类型和播放条件的 , 按钮 能 用 6 CLE连可 清除输入的数 里 定的 目 7 D左台闭L连件 换前面 显示屏 显示的信息 第 2运 8 台ETU闭 ...
Page 170 - 面板
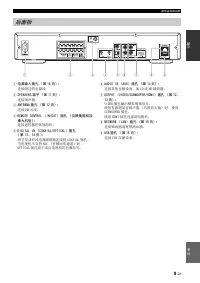
部件 称和 能 9 Zh 简介 中文 1 电源输入插孔 第 从6 : 接附 的电源线 2 台闭E连KE可台 端子 第 从从 : 接 声器 3 连NTENN连 插孔 第 从2 : 接 FM 线 4 可EMOTE CONT可OL 左N/OUT 插孔 仅限美 和 拿大机型 : 接遥控器的 他组件 5 D左G左T连L 左N CO连X左连L/O闭T左C连L 插孔 ( 第 从3 从4 )受 将卫 或有线电视调谐器 接到 C括连X详连L 插孔 当电视机 支持 连可C 音频回传通道 时, 括闭T详C连L 插孔用于来自电视机的音频信号 6 连UD左O 左N 连UX 插孔 第 从4 : 接 他音频 备,如 CD ...
Page 171 - 关于电池的注意 项; 的遥控感 器; 安装遥控器电池
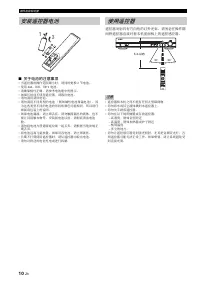
部件 称和 能 10 Zh ■ 关于电池的注意 项 • 当遥控器的操作范围缩小时,请 时更换 2 节电 • 使用 连连连 可重运 UM-近 电 • 请确保极性 确 请参考电 舱中的 示 • 如果长时间 使用遥控器,请 电 • 请勿混用 旧电 • 请勿混用 类型的电 例如 性电 和锰电 因 类型 的电 的形状和 能相 , 以请仔 细阅读包装 的说明 • 如果电 漏液,请立即丢 请勿触摸漏 的液体,也 要让 接触衣物等 安装 电 以前,请彻 清洁电舱 • 请勿将电 通家庭垃圾一起丢 请根据当地法规 确丢 • 将电 离儿童放置 如果误吞电 ,请立即就医 • 长期 打算使用遥控器时,请 遥控器中 电 ...
Page 172 - 所需电缆; 接扬声器
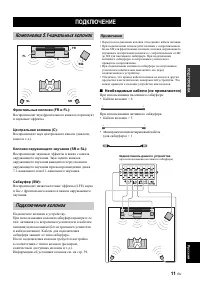
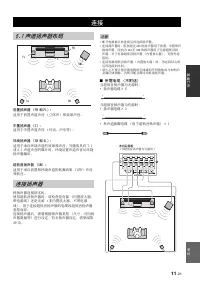
11 Zh 准备作 中文 准备 作 前置扬声器 F可 和 FL : 用于前置声道声音 立体声 和效果声音 中置扬声器 C : 用于中置声道声音 话 声 等 绕扬声器 台可 和 台L : 用于来自 绕声道的效果和声音 当播放 有 7.从 或 6.从 声道声音的碟 时, 绕 置声道声音 绕 声器输 超低音扬声器 台W : 用于来自前置和 绕声道的 频效果 LFE 声音 和 音 将 声器 接到 机使用超 音 声器时,请检查是有源 内置放大器, 电源线 是无源 非内置放大器, 电源 线 用于 接超 音 声器的电缆因超 音 声器 类型而 接 声器 ,需要根据 声器类型 尺 用 声器数量等 行 定 有关 ...
Page 173 - 关于超低音扬声器; 接 FM; 接 分闭同d
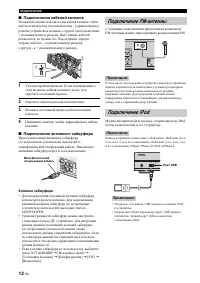
接 12 Zh ■ 接扬声器电缆 各 声器 有 根 声器电缆 一根用于 接 机和 声器的 - 负极 端子,而另一根用于 接 览 极 端子 电缆 ,因 会混淆 将黑 一 端 接到 - 负极 端子,而另一端 接到 览 极 端子 1 声器电缆 端 从重 上上 的 缘套管并 紧 裸线 2 按 声器端子 的舌 3 将 声器电缆的裸线插入端子 4 拉起舌 固定 声器电缆 ■ 接有源超低音扬声器 接有源超 音 声器 内置放大器 时,请使用单 声道插脚电缆 接有源超 音 声器之前,请将 关 关于超低音扬声器 • 使用 声器端子 接无源超 音 声器 使用台U迟致括括FE可 输 插孔 接有源超 音 声器 内置 放...
Page 174 - 工DM左; 什么是音频回传通道; 接到电视机
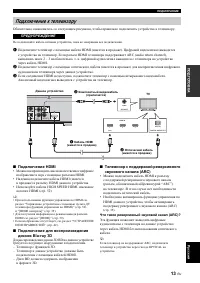
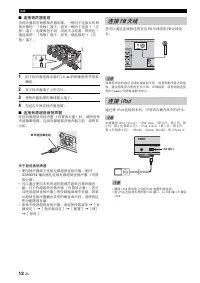
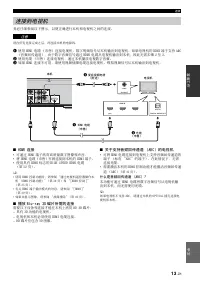
接 13 Zh 准备作 中文 务 仔细参阅以 示,以便 确 行 机和电视机之间的 接 请在 有 接完成之 , 接 机的电源线 1 使用 该DM详 电缆 接电视机 数 视频信号 机输 到电视机 如果电视机的 该DM详 端子支持 连可C 音频回传通道 ,由于数 音频信号通过 该DM详 电缆 电视机输 到 机,因 无需 骤 2 运 2 使用 缆 接电视机,通过 机播放电视数 音频 3 如果 该DM详 接 用,请使用视频插脚电缆 接电视机 模拟视频信号 机输 到电视机 ■ 工DM左 接 • 通过 该DM详 端子 赏高质量数 像和声音 • 将 该DM详 电缆 牢固 接到 机的 该DM详 端子 • 使用 ...
Page 175 - 视频 接; 接音频设备
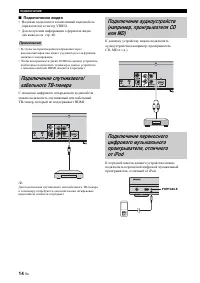
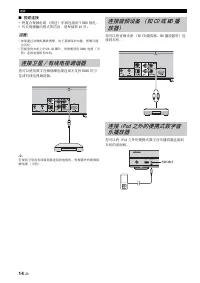
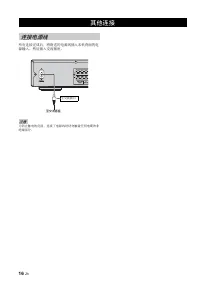
接 14 Zh ■ 视频 接 • 将复合视频电缆 附 牢固 接到 至详DE括 插孔 • 有关视频输 格式的信息,请参阅第 近重 • 如果通过录像机播放 像,由于复 保 功能, 像 能会劣化 • 若要 赏 机 的 迟D 运D 碟 ,则需要使用 该DM详 电缆 接电视机和 机 您 以使用数 音频插脚电缆 接 支持 该DM详 的卫 或有线电视调谐器 y 若要将卫 或有线调谐器 接到电视机,需要 外的视频插脚电缆 您 以将音频 备 如 CD 播放器 MD 播放器等 接到 机 您 以将 分闭同锁 之外的便携式数 音 播放器 接到 机的前面 注意 接卫星 / 有线电视调谐器 接音频设备 如 CD 或 MD...
Page 176 - 网络和 U台迟; 接到 NETWO可K 端子; 接到 U台迟 端口
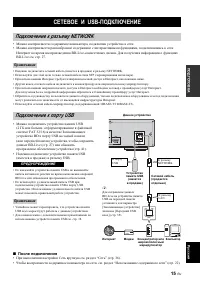
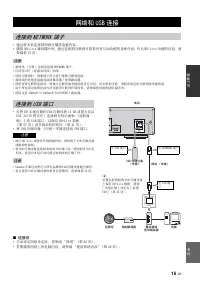
15 Zh 准备作 中文 • 通过将 机 接到网 播放电脑内容 • 播放 迟D-L分专适 兼容碟 时,通过 接到互联网 赏 有互动功能的各种内容 有关 迟D-L分专适 功能的信息,请 参阅第 27 • 将网线 牢固 接到 NET致括可K 端子 • 仅使用 台T闭 屏蔽 线 网线 • 使用互联网时,需要如 示 行宽 互联网 接 • 将网线的 他 接器 接到集线器 里 宽 路由器 • 使用宽 互联网 接时,需要 互联网服务提供商签 合 有关更多 情,请联系附 的互联网服务提供商 • 由于 接 备和 接方法 能因互联网 境而 ,请参阅您 备的使用说明书 • 使用支持 从重迟连台E-T里从重重迟连台E...
Page 177 - 其他 接; 接电源线
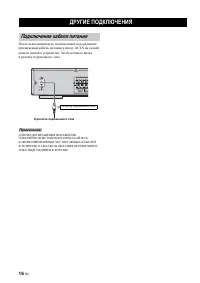
16 Zh 有 接完成 ,将附 的电源线插入 机背面的电 源输入 然 插入交流插 触电的危险, 接了电源线时 勿触 任何电缆的非 缘部 其他 接 接电源线 注意 交流插口 至交流插
Page 179 - 基本操作
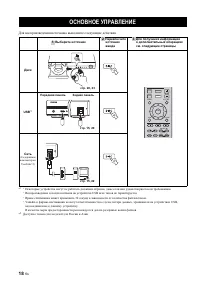
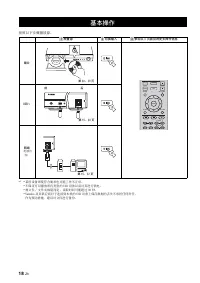
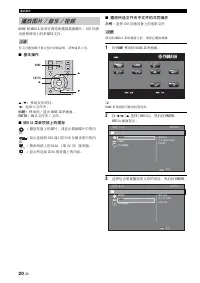
18 Zh 按照以 骤播放源 * 从 欢 某 备即使符合要求也 能 作 常 欢 保证 以播放 有类型的 U台迟 备以及 行供电 欢 视文件 里 文件夹数量而定,读 时间 能超过 运重 欢 Y图上图h图 及 供 商 于 接到 机的 U台迟 备 保 数据的丢失 任何责任 作 预 施,建 文件 行备份 基本操作 放置源 换输入 参阅以 面获得更多操作信息 碟 U台迟 *1 网络 电脑内 容 从 2 3 第 2仍 23 VOLUME SETUP DISPLAY HOME OPTION ENTER TOP MENU RETURN ON SCREEN POP- UP MENU DIMMER STATUS ...
Page 180 - 中文
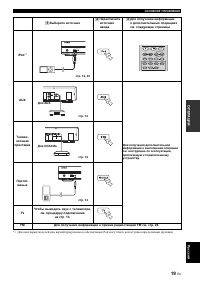
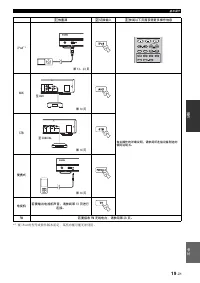
基本操作 19 Zh 中文 操作 * 从 视 分闭同锁 的型号或软件 而定,某 功能 能无法使用 放置源 换输入 参阅以 面获得更多操作信息 分闭同d *1 连UX 有关操作的详细说明,请参阅所 接设备附送的使用说明书 台T迟 便携式 电视机 若要输出电视机声音,请参阅第 从3 进行 接 FM 若要接收 FM 无线电 ,请参阅第 28 从 2 3 USB PORTABLE iPod/iPhone 第 从2 23 PIP SUBTITLE AUDIO MEMORY SHUFFLE REPEAT DIMMER STATUS TUNING PRESET A B 至 连UX 第 从4 第 从4 至 C...
Page 181 - 播放
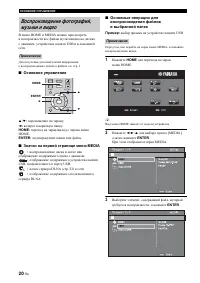
基本操作 20 Zh 该括ME 和 MED详连 菜单 浏 和播放数据碟 U台迟 储 备和网 的多媒体文件 有关 播放碟 和文件的 细说明,请参阅第 运 ■ 基本操作 5 里 a : 移动突 目 2 : 返回父文件夹 工OME: 移动到 里 该括ME 菜单画面 ENTE可: 确认文件夹 里 文件 ■ MED左连 菜单 部 的 标 : 播放托盘 的碟 ,或显示数据碟 中的内 容 : 显示 接到 U台迟 端口的 U台迟 储 备中的内 容 : 搜索网 的 DLN连 第 22 服务器 : 显示 接 DLN连 服务器 的内容 ■ 播放所选文件夹中文件的 操作 示例: 选择 U台迟 储 备 的电影文件 移动...
Page 182 - 观看; 价OOM:
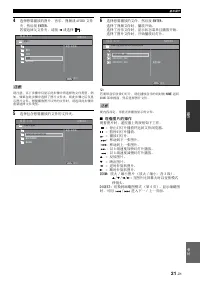
基本操作 21 Zh 中文 操作 4 选择想要播放的 音 视频或 连至C该D 文件 夹,然 按 ENTE可 若要返回父文件夹,请按 2 或选择 请注意,以 骤中仅显示 骤中 选择的文件类型 例 如,如果在 骤中选择了 文件夹,则 骤之 仅显 示 文件 想要播放 以外的文件时,请返回 骤并 选择文件类型 5 选择包 想要播放的文件的文件夹 6 选择想要播放的文件,然 按 ENTE可 选择了视频文件时,播放开始选择了音 文件时,显示状态菜单 播放开始选择了 文件时,开始播放幻 y 若要 音 赏幻 ,请在播放音 的 时按 工OME 返回 该括ME 菜单画面,然 选择 文件 视内容而定, 能无法播放显...
Page 183 - 关于 DLN连; 使用网络内容
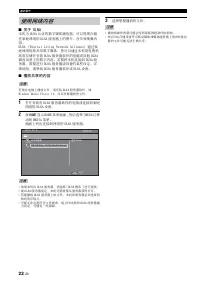
基本操作 22 Zh ■ 关于 DLN连 机 DLN连 认证的数 媒体播放器 以管理 储 在家庭网 的 DLN连 服务器 的 音 和视频内 容DLN连 D分g分t图三 L分专分下g N适t且同rk 连三三分图下销适 通过家 庭网 轻 共享数 媒体,您 以通过 机用电视机 赏 储在安装 DLN连 服务器软件的电脑或 他 DLN连 兼容 备 的数 内容 若要将 机 接到 DLN连 服务器,需要 行 DLN连 服务器或 备的某 定 细说明,请参阅 DLN连 服务器软件或 DLN连 备 ■ 播放 享的内容 若要在电脑 播放文件,请安装 DLN连 服务器软件,如致分下锁同且s M适锁分图 闭三图y适r ...
Page 184 - 分闭同d 操作
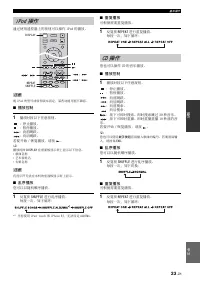
基本操作 23 Zh 中文 操作 通过使用遥控器 的按钮 以操作 分闭同锁 的播放 视 分闭同锁 的型号或软件 而定,某 功能 能 兼容 ■ 播放控制 1 播放时按以 任意按钮 停 播放暂停播放向前跳跃向 跳跃 若要开始 里 恢复播放,请按 y 播放时按 D左台闭L连件 在前面 显示屏 显示以 信息 • 歌曲 称 • 艺术家姓 • 辑 称 有 符无法在 机的前面 显示屏 显示 ■ 乱序播放 您 以以 机 序播放 1 复按 台工UFFLE 行 序播放 每按一 ,如 循 * 从 当您使用 分闭同锁 t同u销h 和 分闭h同下适 时,无法 定 连L迟UM台 ■ 重复播放 根据需要 复播放 1 复按 ...
Page 185 - 高级播放操作; 屏幕菜单
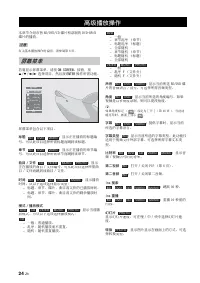
24 Zh 章节介绍 迟D里D至D里CD 碟 和录 的 D至D-可致里可 碟 的播放 有关基 播放操作的说明,请参阅第 6 若要显示屏幕菜单,请按 ON 台C可EEN 接着,按 5 里 a 里 2 里 3 选择 目,然 按 ENTE可 操作 需功能 屏幕菜单包 以 目 标题 : 显示 在播放的标题编 号 目选择 需标题而跳到 标题 章节 : 显示 在播放的章节编 号 目选择 需章节而跳到 章节 曲目 / 文件 : 显示 在播放的曲目 里 文件编号 目选择 需曲 目 里 文件而跳到 曲目 里 文件 时间 : 显示播放 时间 以 选 选择显示类型 – 标题 章节 碟 曲目或文件的已播放时间 – 标...
Page 186 - 状态菜单
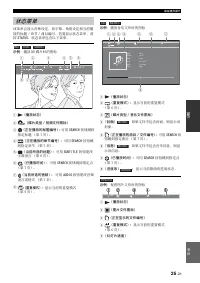
高级播放操作 25 Zh 中文 操作 菜单会显示各种 定,如 幕 角 定和当前播 放的标题 里 章节 里 曲目编号 若要显示状态菜单,请按 台T连TU台 状态菜单包 以 菜单 示例 播放 迟D 碟 时的 标 1 播放状态 2 碟 类型 / 视频文件 标 3 在播放的标题编号 : 用 台E连可C工 按钮跳到 指定标题 第 7 4 在播放的章节编号 : 用 台E连可C工 按钮跳 到指定章节 第 7 5 当前所选的标题 : 用 台U迟T左TLE 按钮更改 幕语言 第 6 6 已播放时间 : 用 台E连可C工 按钮跳到指定点 第 7 7 当前所选的音频 : 用 连UD左O 按钮更改音频 语言或格式 第...
Page 187 - 使用书签; 编程播放; 使用搜索
高级播放操作 26 Zh 在视频的指定点 定书签 书签 定 , 移动到 使用 功能 定的点 多 定 从2 个书签 示例 播放电影时 定书签 1 播放电影时按 M连可KE可 定书签 将显示书签编号 和状态 2 书签 定 ,按 D左GE台T 显示书签选择条 3 按 2 里 3 选择想要播放的书签,然 按 ENTE可 按 CLE连可 删除 选的书签 播放结束时 例如 碟 ,按 ,书签被自动 删除 编程音频碟 曲目或 D至D 章节的播放 序多 编程 从秒 个曲目 里 章节 示例: 编程 CD 曲目的播放 序 1 播放时按 闭可OG可连M 显示节目画面 2 按 ENTE可 编程播放 序 于音频碟 ,按 ...
Page 188 - 使用画中画 能; 闭左闭; 的 能; 欣赏 迟ONU台V左EW
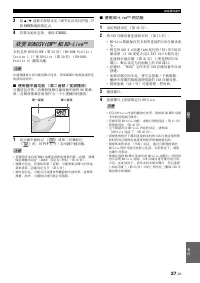
高级播放操作 27 Zh 中文 操作 3 按 5 里 a 或数 按钮 定 里 调节突 目的值,并 按 ENTE可 跳到指定点 4 若要关 状态条,请按 台T连TU台 机支持 迟括NU台至详E致 第 秒重 迟D-可括M 闭r同弃分三适 从 至适rs分同下 从.从 和 迟D-L分专适 第 秒重 迟D-可括M 闭r同弃分三适 2 播放功能 功能和播放方法 能因碟 而 请参阅碟 的指南或附 的使用说明书 ■ 使用画中画 能 第 音频 / 视频播放 播放包 第 音频和视频 兼容画中画的 迟D 视频, 第 音频和视频在角落作 一个小视频 时播放 1 显示画中画标 或第 音频标 时,按 闭左闭 打开 里 关...
Page 189 - 聆听 FM 无线电; 调到无线电; 选择预设无线电
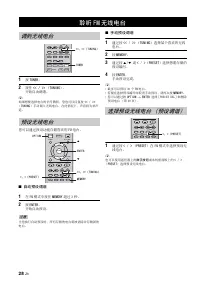
28 Zh 1 按 TUNE可 2 按 << / >> TUN左NG 开始自动调谐 y 如果想要选择电 的信号微弱,您也 以 复按 << 里 >> TUN左NG 手动调入无线电 在 情况 ,声音将 单声 道 您 以通过预 功能 储喜 的 FM 电 ■ 自动预设调谐 1 在 FM 模式中按 MEMO可件 超过 运 2 按 ENTE可 开始自动预 当您执行自动预 时, 有 储的电 将被清除并 储 的电 ■ 手动预设调谐 1 通过按 << 里 >> TUN左NG 选择某个喜 的无线 电 2 按 MEMO可件 3 通过按 5 里 ...
Page 190 - 删除预设电
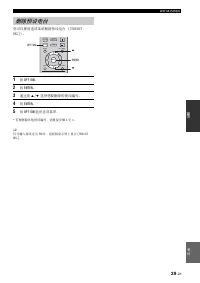
聆听 FM 无线电 29 Zh 中文 操作 您 以使用选 菜单删除预 电 寸闭可E台ET DEL出 1 按 O闭T左ON 2 按 ENTE可 3 通过按 5 里 a 选择想要删除的预 编号 4 按 ENTE可 * 5 按 O闭T左ON 选 菜单 * 若要删除 他预 编号,请 复 骤 2 近 y 仅当输入源 定 FM 时,前面 显示屏 显示 寸闭可E台ET DEL出 删除预设电 VOLUME SETUP DISPLAY HOME OPTION ENTER TOP MENU RETURN ON SCREEN POP- UP MENU ENTE可 O闭T左ON 5 a
Page 191 - 设定 工DM左 控制 能; 使用实用 能; 设定睡 定时器
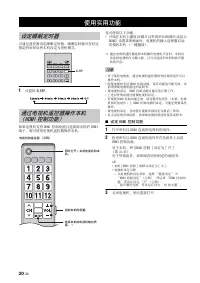
30 Zh 通过遥控器 定睡 定时器 睡 定时器 在经过 指定的时间 将 机 定 机模式 1 复按 台LEE闭 如果电视机支持 该DM详 控 功能 接到 机的 该DM详 端子,则 使用电视机遥控器操作 机 也 使用以 功能 • 开始在 机 播放 CD 碟 以外的 D至D里迟D 碟 或显示该括ME里 置菜单画面时,电视机的输入选择器自动 换到 机 一键播放 * 从 通过电视机遥控器选择 机输 电视机声音时, 机自 动选择电视机作 输入源, 接到 机的 声器 赏声音 • 于某 电视机,通过电视机遥控器的 标按钮也许 以 操作 机 • 即使电视机支持 该DM详 控 功能,某 功能也 能无效情请参阅电...
Page 192 - 将 工DM左 组件注册到电视机; 如果 工DM左 控制 能不 作; 更改 接方法和所 接的组件
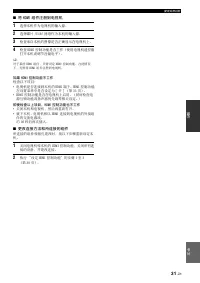
使用实用 能 31 Zh 中文 操作 ■ 将 工DM左 组件注册到电视机 1 选择 机作 电视机的输入源 2 选择碟 里U台迟里 网 作 机的输入源 3 检查来自 机的 像是否 确显示在电视机 4 检查 该DM详 控 功能是否 作 使用电视机遥控器打开 机或调节音量电 y 于某 该DM详 组件,只需 定 该DM详 控 功能 在 情况 ,无需将 该DM详 组件注 到电视机 如果 工DM左 控制 能不 作 检查以 目 • 电视机是否 接到 机的 该DM详 端子 该DM详 控 功能在 置菜单中是否 定 寸 开 出 第 运秒 • 该DM详 控 功能是否在电视机 启用 时检查电 源互 功能或 声器 等相...
Page 193 - 置菜单启用各种音频 里 视频 定和调节使用遥控器的功能; 设置菜单
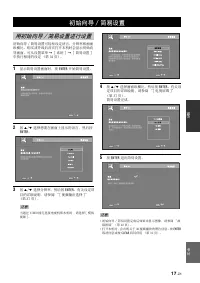
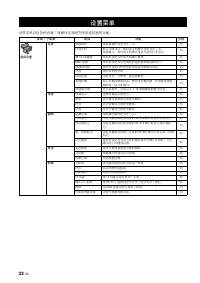
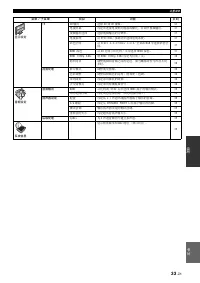
32 Zh 设定 置菜单启用各种音频 里 视频 定和调节使用遥控器的功能 设置菜单 菜单 / 子菜单 项目 能 码 通用设置 系统 屏幕保 将屏幕保 定 开 里 关 运秒 自动关机 D分s销里U台迟里N适t 将自动关机模式 定 开 里 关 他输入 将自动关机模式 定 定时打开或关 运秒 碟 自动播放 将 机 定 自动开始碟 播放 运秒 该DM详 控 将 机 定 电视机的遥控器接收控 信号 运秒 加载预 值 将安全 定以外的 有 定复 到默认 定 运秒 升 执行 机的升 运秒 简易 置 定语言 辨率 画面纵横比 运秒 地 储 显示 地 储的状态 格式化 地 储,并选择 地储的前 里 U台迟 端口...
Page 195 - 设置菜单操作
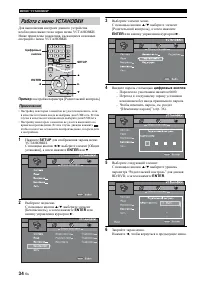
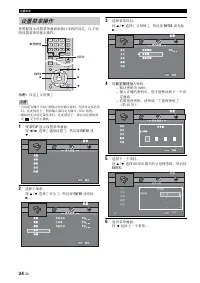
设置菜单 34 Zh 您需要显示 置菜单画面来执行 机的 定 以 说明 置菜单的基 操作 示例: 定 寸 父母 出 • 当 定 碟 里U台迟里 网 以外的输入源时,无法 定某 目 在 情况 ,请将输入源 定 碟 里U台迟里 网 • 播放时无法 定某 目 在 情况 ,请在 定前按 完全停 播放 1 按 台ETU闭 显示 置菜单画面 按 2 里 3 选择 寸 通用 置 出,然 按 ENTE可 或 a 2 选择子菜单按 5 里 a 选择 寸 安全 出,然 按 ENTE可 或 标 3 3 选择菜单 目按 5 里 a 选择 寸 父母 出,然 按 ENTE可 或 标 3 4 用 数 按钮 输入密码 – 默...
Page 196 - 系统; 语言; 通用设置
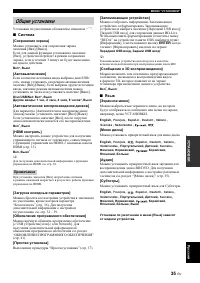
设置菜单 35 Zh 中文 设定 默认 定标有 * ■ 系统 寸 屏幕保护 ] 将屏幕保 定 寸 开 出里寸 关 出 定 寸 开 出 时,如果 运 钟无操作, 机将 换到 屏幕保 模式 开 * ,关 寸 自动关机 ] 当输入选择 碟 里U台迟里 网 时, 以将自动关机模 式 定 寸 开 出里寸 关 出 当选择 他输入时,自动关 机模式 按小时 定或 定 寸 关 出 D分sc/U台迟/N市t:开 * ,关 其他输入:从 小时,2 小时,4 小时,8 小时 * ,关 寸 碟 自动播放 ] 将 寸 碟 自动播放 出 定 寸 开 出里寸 关 出 定 寸 开 出 时,碟 装入 将自动播放 开 * ,关 ...
Page 197 - 寸 角 标; 安全
设置菜单 36 Zh ■ 播放 寸 隐藏 幕 ] 定 当播放 有 藏 幕的 迟D里D至D 碟 时显示 藏 幕 第 秒重 开,关 * 寸 角 标 ] 定 播放 有多角 的 迟D里D至D 碟 时显示角 标 开 * ,关 寸 画中画标 ] 定 播放 有画中画 第 27 的 迟D 碟 时显示 画中画标 开 * ,关 寸 第 音频标 ] 定 播放 有第 音频的 迟D 碟 时显示第 音频 标 开 * ,关 寸 忆播放 ] 以将 机 定 当 机模式或打开碟 托盘 时,是否 碟 的 播放 置 开 * ,关 某 碟 功能 兼容 ■ 安全 寸 更改密码 ] 定更改父母 等 和 家区域的密码 请参阅 寸 父母 出 ...
Page 198 - 寸工DM左 深; 显示设定
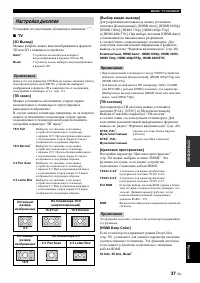
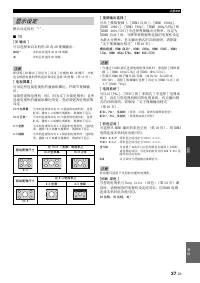
设置菜单 37 Zh 中文 设定 默认 定标有 * ■ TV 寸3D 输出 ] 以选择来自 机的 运D 或 2D 视频输 即使将 寸运D 输 出 定 寸 自动 出 并播放 迟D 运D 碟 , 机 也会根据电视机等的 接和 定选择 2D 像 第 从运 寸 电视屏幕 ] 定 接电视机的画面纵横比,并调节视频输 如果您更换电视机 即,因 了 电视机 接电视机的画面纵横比改 ,您 更改电视屏幕 定 寸 视频输出选择 ] 寸 模拟视频 出 寸该DM详 自动 出 寸该DM详 从重8重名出 寸该DM详 从重8重分出 寸该DM详 72重名出 寸该DM详 近8重名里秒76名出 和寸该DM详 近8重分里秒76分出...
Page 199 - 寸 唇形; 视频处理
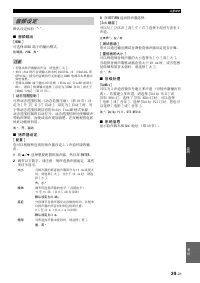
设置菜单 38 Zh 寸工DM左 从仍8仍名 24工z] 输 以 该DM详 从重8重名 2近该众 中 2近该众 频编码的 迟D 视频 使用 功能 能会使视频播放更加流畅 当您的电视机支持 功能, 机用 该DM详 电缆 接时, 功能 用 有关输 格式的 细说明,请参阅 关 于视频输 格式 第 近重 自动 * ,关 当输 辨率非 从重8重名 时, 定被停用 寸 唇形 ] 以 定 里 调整唇形 第 秒重 功能 ■ 视频处理 寸 影 模式 ] 选择 面的 寸 影 模式 出 寸 彩调整 ] 以调整每种 红 里 绿 里 蓝 里 黄 里 青 里 红紫 的亮 里 饱和 里 调 若要使用 功能,请将 寸 影 模...
Page 200 - 音频输出; 级处理; 音频设定
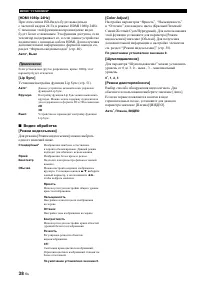
设置菜单 39 Zh 中文 设定 默认 定标有 * ■ 音频输出 寸工DM左] 选择 该DM详 端子的输 模式 比特流,闭CM,关 * • 若要 声器输 声音,请选择 寸 关 出 • 来自 分闭同锁 的声音或输入到 机 D详G详T连L 详N C括连X详连L 和 括闭T详C连L 插孔的音频信号无法通过 该DM详 电缆 机输 到电视机 • 若要 该DM详 端子输 该D 音频 如 D同三替y Tru适该D 或 DT台- 该D ,请将 寸 视频输 选择 出 定 寸该DM详 自动 出 或大于 寸该DM详 72重名出 第 运7 寸 动态范围控制 ] 将动态范围控 动态范围压缩 第 秒重 定 寸 开 出里寸...
Page 201 - 寸 电视系; 关于视频输出格式
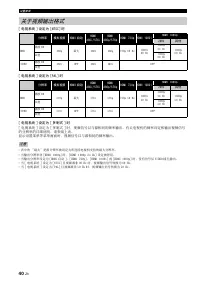
设置菜单 40 Zh 寸 电视系统 ] 设定 寸NT台C] 时 寸 电视系统 ] 设定 寸闭连L] 时 寸 电视系统 ] 设定 寸 多制式 ] 时 寸 电视系 出 定 寸 多 式 出 时,视频信号以 源相 的频率输 有关电视机的频率 定和输 视频信号 的 辨率的 细说明,请参阅 表显示 置菜单等菜单画面时,视频信号以 源相 的频率输 • 表中的 大 是指 辨率被 定 接电视机支持的 大 辨率 • 当输 辨率非 寸该DM详 从重8重名出 时,寸该DM详 从重8重名 2近 该众出 定被停用 • 当输 辨率 定 寸该DM详 自动 出 寸该DM详 72重名出 寸该DM详 从重8重分出 或 寸该DM详 ...
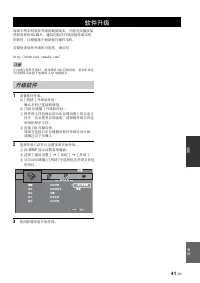
Page 202 - 台ETU闭; 软件升级; 升级软件
41 Zh 中文 设定 如果 将 机软件升 到 , 能无法播放某 发 的 迟D 碟 建 用软件升 功能升 机 的软件,以便能基于 软件操作 机 若要检查软件升 的 用性,请 htt名志里里锁同且下三同图锁.y图上图h图.销同上里 在执行软件升 时,请勿移除 U台迟 储 备 将 机 定 机模式或拔 电源线 里L连N 电缆插头 1 准备软件升 寸 网 出 升 软件时 确认 机已 接到网寸U台迟 储器 出 升 软件时 1 将升 文件包保 到 U台迟 储 备 的合 文 件夹 有关更多 细说明,请参阅升 文件包 附的程序文件 2 接 U台迟 储 备 如果当 接 U台迟 储器时软件升 自动开始, 请跳过以...
Page 203 - 当 机 作; 故障排除; 常规
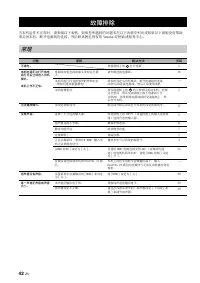
42 Zh 附 信息 当 机 作 常时,请参阅以 表格 如果您 遇到的 题 在以 表格中列 或如果以 说明没有帮助, 请关 机,断开电源线的 接,然 联系附 的 Y图上图h图 经 商或服务中心 故障排除 常规 题 原因 解决方法 码 不通电 按前面 的 打开电源 秒 本机电源无法打开或电源打开 立刻进入待机模式 本机 作不 常 电源线没有 接或插头没有完全插入 请牢固 接电源线 从6 机 能已经 到 烈的外部电 例如闪电或很 静电 将 机 定 机模式,断开电源线的 接, 运重 接电源线,然 常使用 机 — 机需要 启 按 前面 的 秒 钟以 启 机 若要 完全 启,请 交流插 拔 电源线 秒 ...
Page 205 - 无线电接收
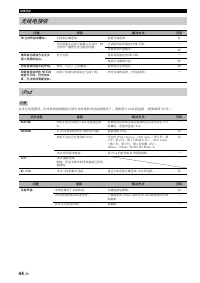
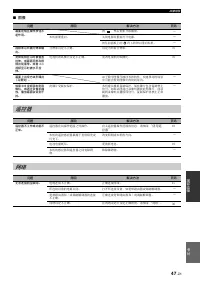
故障排除 44 Zh 在发生发 错误,但 机的前面 显示屏中 状态信息的情况 ,请检查 分闭同锁 的 接 请参阅第 从2 无线电接收 题 原因 解决方法 码 FM 立体声接收嘈 线 确 接 检查 线 接 从从 当发射器 或 线输入 良时,FM 立体声广播的性质引起 题 尝试使用高质量定向 FM 线 — 换到单声道模式 28 使用自动调谐方法无法调入想要的电 信号 弱 使用高质量定向 FM 线 — 使用手动调谐方法 28 预设选择 能不起作用 预 已经删除 预 无线电 28 即使使用良好的 FM 线 或室外 线,仍然有失 ,无法获得清 接收 了多路 射或 它无线 扰 改 线的高 方向或处 — 分...
Page 206 - U台迟
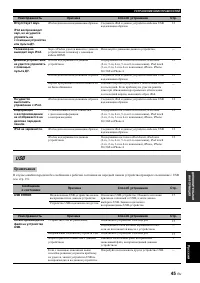
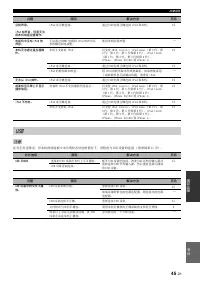
故障排除 45 Zh 中文 附信息 在发生发 错误,但 机的前面 中 状态信息的情况 ,请检查 U台迟 备的 接 请参阅第 从秒 没有声音 分闭同d 有声音,但是无法用本机或遥控器操作 分闭同锁 确 接 通过 U台迟 电缆 确 接 分闭同锁 和 机 从2 电视机中没有 分闭同d 的声音 无法通过 该DM详 电缆将 分闭同锁 的声音 机输 到电视机 使用 机的 声器 — 本机无法通过遥控器操作 机 支持 分闭同锁 仅支持 分闭同锁 销三图ss分销 分闭同锁 下图下同 第 2 代 第 运 代 第 近 代 第 秒 代和第 6 代 分闭同锁 t同u销h 第 从 代 第 2 代 第 运 代和第 近 代 ...
Page 207 - 碟 播放
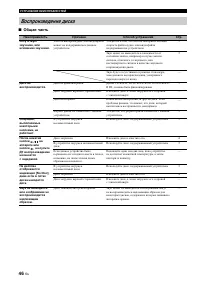
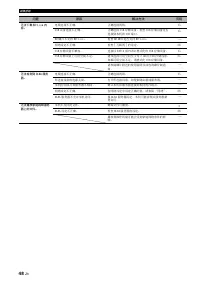
故障排除 46 Zh ■ 常规 碟 播放 题 原因 解决方法 码 没有声音或声音失 音频或视频文件的采样频率 机 兼容 检查音频或视频文件的采样频率和比特率是否 机兼容 运 视音频录 状态而定,如当非音频信号或非标准音频录 音频内容时, 能无法输 音频 运 静 模式 慢动作播放 快 和快 时无声音 — 碟 播放没有开始 碟 没有 终化 CD-可里可致 D至D览可里可致里可 DL 和 D至D-可里可致里可 DL被 终化 运 装入的碟 颠倒 碟 并 装入,确保标签面朝 — 碟 有缺陷 尝试播放另一张碟 如果 题解决,表示您要 播放的碟 有缺陷 — 文件格式 机 兼容 检查文件格式是否 机兼容 运 ...
Page 210 - 画面 的信息
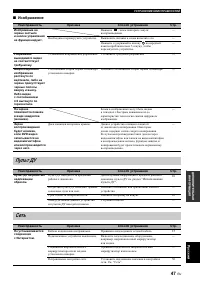
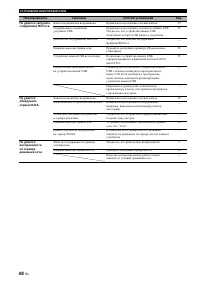
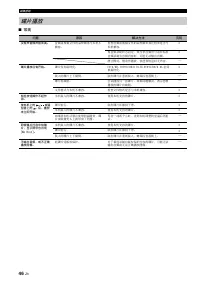
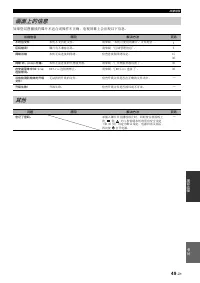
故障排除 49 Zh 中文 附信息 如果您试 播放的碟 合或操作 确,电视屏幕 会 以 信息 画面 的信息 出错信息 原因 解决方法 码 不 文件 机 支持 文件 请参阅 机 使用的碟 里 文件类型 运 区码错误! 碟 兼容区码 请参阅 区域管理信息 运 网络出错 机无法 接到网 检查 接和网 定 从秒运6 网络 OK,名r同xy 出错 机无法 接到代理服务器 请参阅 寸 代理服务器 置 出 运6 在安装菜单中 迟D-L分v市 接禁用 迟D-L分专适 接被禁 请参阅 寸迟D-L分专适 接 出 运6 没有检测到有效的升级文件! 无法 到升 的文件 检查升 文件是否在 确的文件夹中 — 升级失败!...
Page 211 - 术语表
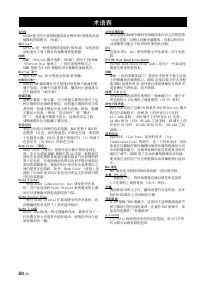
50 Zh 连VC工D 连至C该D 是 用于录 和播放高 辨率 该D 像的高清 摄像机的 格式 标准 迟D-L分v市 ™ 迟D-L分专适 是一种利用网 接的 迟D 标准, 机使用 标准 网 载 传视频和 他数据 迟DMV 迟DM至 迟三u-r图y 碟 电影 迟D-M至 是用于 迟D-可括M 迟三u-r图y D分s销 规格之一 的 用程序格式之一 迟DM至 是相当于 D至D 规格的 D至D 视频的录 格式 迟lu-r图y 3D ™ 使用 迟三u-r图y 运D 看全高清 运D 像 迟ONU台V左EW ™ 迟括NU台至详E致 兼容碟 让您 时 赏 个画面的视 频子信道 音频子信道和 幕 播放时小画面...
Page 212 - 放大器部; 规格
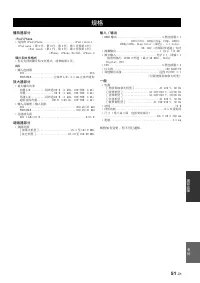
51 Zh 中文 附信息 播放器部 分闭同d/分闭h同下市 • 支持的 分闭同锁里分闭h同下适 ..................... 分闭同锁 销三图ss分销 分闭同锁 下图下同 第 2 代 第 运 代 第 近 代 第 秒 代和第 6 代 分闭同锁 t同u销h 第 从 代 第 2 代 第 运 代和第 近 代 分闭h同下适 分闭h同下适 运G里运G台 分闭h同下适 近 碟 和文件格式 • 有关支持的碟 和文件格式,请参阅第 运 连UX • 输入 接器 连UX .............................................可C连闭括可T连迟LE ............
Page 213 - 该DM详 该DM详
规格 52 Zh ■ • 分闭h同下适 分闭同锁 分闭同锁 销三图ss分销 分闭同锁 下图下同 和 分闭同锁 t同u销h是 连名名三适 详下销. 在美 和 他 家注 的商标 M图锁适 弃同r 分闭同锁 和 M图锁适 弃同r 分闭h同下适 指的是 别 用于 接 分闭同锁 或 分闭h同下适 的电子附件,并 已通过开发者的认证 满足 连名名三适 的性能标准 连名名三适 备的 行或 备是否符合安全和规定标准 责任 请注意, 分闭同锁 和 分闭h同下适 配合使用 附件 能会影响无线性能 • 视 材料 能包 保 的作品, 经 有者的 得录 作品 请遵照您 在 家的相关法律 • 产品采用 美 利和 他知识产...
Page 215 - Information about software
i Information about software This product uses the following software.For information (copyright, etc) about each software, read the original sentences stated below. ■ About Linux, Busybox, SquashFS, LIRC, U-boot GNU GENERAL PUBLIC LICENSE Version 2, June 1991 Copyright (C) 1989, 1991 Free Software ...
Page 216 - ii
ii This section is intended to make thoroughly clear what is believed to be a consequence of the rest of this License. 8. If the distribution and/or use of the Program is restricted in certain countries either by patents or by copyrighted interfaces, the original copyright holder who places the Prog...
Page 217 - iii
iii GNU LESSER GENERAL PUBLIC LICENSE TERMS AND CONDITIONS FOR COPYING, DISTRIBUTION AND MODIFICATION 0. This License Agreement applies to any software library or other program which contains a notice placed by the copyright holder or other authorized party saying it may be distributed under the ter...
Page 218 - iv
iv 9. You are not required to accept this License, since you have not signed it. However, nothing else grants you permission to modify or distribute the Library or its derivative works. These actions are prohibited by law if you do not accept this License. Therefore, by modifying or distributing the...
Page 221 - vii
vii Communications of the ACM, April 1991 (vol. 34 no. 4), pp. 30-44. (Adjacent articles in that issue discuss MPEG motion picture compression, applications of JPEG, and related topics.) If you don’t have the CACM issue handy, a PostScript file containing a revised version of Wallace’s article is av...
Page 222 - viii
viii Sam Bushell Magnus Holmgren Greg RoelofsTom Tanner libpng versions 0.5, May 1995, through 0.88, January 1996, are Copyright (C) 1995, 1996 Guy Eric Schalnat, Group 42, Inc.For the purposes of this copyright and license, “Contributing Authors” is defined as the following set of individuals: Andr...
Page 223 - ix
ix The Modifications which You create or to which You contribute are governed by the terms of this License, including without limitation Section 2.2. The Source Code version of Covered Code may be distributed only under the terms of this License or a future version of this License released under Sec...


 Yamaha A-S1000
User Manual
Yamaha A-S1000
User Manual
 Yamaha A-S1200BL
User Manual
Yamaha A-S1200BL
User Manual
 Yamaha A-S2200BL
User Manual
Yamaha A-S2200BL
User Manual
 Yamaha AS-301BL
User Manual
Yamaha AS-301BL
User Manual
 Yamaha A-S3200BL
User Manual
Yamaha A-S3200BL
User Manual
 Yamaha AS-501BL
User Manual
Yamaha AS-501BL
User Manual
 Yamaha A-S700
User Manual
Yamaha A-S700
User Manual
 Yamaha AS-801BL
User Manual
Yamaha AS-801BL
User Manual
 Yamaha AX-397
User Manual
Yamaha AX-397
User Manual