Yamaha AS-301BL - Manuals
Yamaha AS-301BL Amplifier – User Manual in PDF format online.
Manuals:
User Manual Yamaha AS-301BL


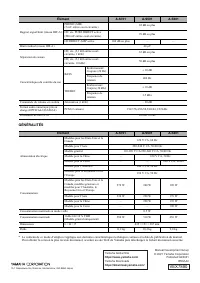
Summary
i En The above warning is located on the rear of the unit. Explanation of Graphical Symbols The lightning flash with arrowhead symbol within an equilateral triangle is intended to alert the user to the presence of uninsulated “dangerous voltage” within the product’s enclosure that may be of sufficie...
ii En English • If you plan not to use the product for a long period of time, remove the power cord plug from the AC outlets.Otherwise, fire or damage to the product may be caused. Do not disassemble • Do not modify or disassemble this product. Otherwise, fire, electrical shock, injury or damage to ...
iii En • Before turning on the power to or using this product, set the volume level to minimum. Before turning off the power to this product, set the volume levels of this product and all connected devices to minimum.Otherwise, hearing loss or damage to the product may be caused. • When turning on t...
Yamaha Amplifiers Manuals
-
 Yamaha A-S1000
User Manual
Yamaha A-S1000
User Manual
-
Yamaha A-S1000
Manual
-
 Yamaha A-S1200BL
User Manual
Yamaha A-S1200BL
User Manual
-
Yamaha A-S1200SL
User Manual
-
 Yamaha A-S2200BL
User Manual
Yamaha A-S2200BL
User Manual
-
Yamaha A-S2200SL
User Manual
-
 Yamaha A-S3200BL
User Manual
Yamaha A-S3200BL
User Manual
-
Yamaha A-S3200SL
User Manual
-
 Yamaha AS-501BL
User Manual
Yamaha AS-501BL
User Manual
-
Yamaha AS-501SL
User Manual
-
 Yamaha A-S700
User Manual
Yamaha A-S700
User Manual
-
Yamaha A-S700
Manual
-
Yamaha AS-701SL
User Manual
-
 Yamaha AS-801BL
User Manual
Yamaha AS-801BL
User Manual
-
Yamaha AS-801SL
User Manual
-
 Yamaha AX-397
User Manual
Yamaha AX-397
User Manual
-
Yamaha AX-397
Manual
-
Yamaha AX-497
User Manual
-
Yamaha AX-497
Manual
-
 Yamaha BRX-610
User Manual
Yamaha BRX-610
User Manual