Page 2 - CONTENTS; WELCOME 3
2 CONTENTS WELCOME 3 Introduction ..................................................................................................... 3Specifications ................................................................................................... 3 SAFETY 4 General Safety Rules ...................
Page 3 - safety for both yourself and others.
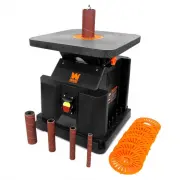
3 Replacement sanding belts and sanding discs can be purchased from wenproducts.com by searching the follow- ing model nubmers. For 400-grit, 240-grit, 180-grit, or 120-grit sanding belts search model numbers 6515SP400, 6515SP240, 6515SP180, or 6515SP120 respectively. For 120-grit, 240-grit, or 80-g...
Page 4 - GENERAL SAFETY RULES; WORK AREA SAFETY
4 GENERAL SAFETY RULES WORK AREA SAFETY 1. Keep work area clean and well lit. Cluttered or dark areas invite accidents. 2. Do not operate power tools in explosive atmo- spheres, such as in the presence of flammable liquids, gases or dust. Power tools create sparks which may ig- nite the dust or fume...
Page 5 - POWER TOOL USE AND CARE
5 GENERAL SAFETY RULES 7. If devices are provided for the connection of dust extraction and collection facilities, ensure these are connected and properly used. Use of dust collection can reduce dust-related hazards. POWER TOOL USE AND CARE 1. Do not force the power tool. Use the correct power tool ...
Page 6 - BELT SANDER SAFETY; BELT / DISC SANDER SAFETY WARNINGS
6 BELT SANDER SAFETY 1. TOOL PURPOSE. This sander is designed to sand wood or wood-like products only. Sanding or grinding other materials could result in fire, injury, or damage to the workpiece. Using the machine for any other purpose for which it is not designed may result in serious inju- ries, ...
Page 8 - ELECTRICAL INFORMATION; AMPERAGE; GROUNDING INSTRUCTIONS; In the event of a malfunction or breakdown; GUIDELINES AND RECOMMENDATIONS FOR EXTENSION CORDS
8 ELECTRICAL INFORMATION AMPERAGE REQUIRED GAUGE FOR EXTENSION CORDS 25 ft. 50 ft. 100 ft. 150 ft. 2.3A 18 gauge 16 gauge 16 gauge 14 gauge 3. Check with a licensed electrician or service personnel if you do not completely under- stand the grounding instructions or whether the tool is properly groun...
Page 9 - KNOW YOUR BELT / DISC SANDER
9 TOOL PURPOSE Belt and disc sanders shape and finish wood and a variety of other materials. The belt and disc rotates to help smooth workpiece surfaces quickly and evenly. Refer to the diagram below to become familiarized with the parts and controls of your belt/disc sander. CLEANING THE WORK TABLE...
Page 10 - UNPACKING; PACKING LIST; UNPACKING & PACKING LIST
10 UNPACKING With the help of a friend or trustworthy foe, carefully remove the belt / disc sander from the packaging. Make sure to take out all contents and accessories. Do not discard the packaging until everything is removed. Check the packing list below to make sure you have all of the parts and...
Page 11 - INSTALL SANDING BELT TABLE; Install the locking lever:; ASSEMBLY & ADJUSTMENTS
11 INSTALL SANDING BELT TABLE 1. Pass the sanding belt through the slot on the belt table (Fig. 2 - 1) and position the table on the machine. 2. Secure the belt table into position using the locking lever (Fig. 2 - 2). NOTE: You will have to follow the instructions below to install the locking lever...
Page 12 - DUST COLLECTION; To connect the sanding belt dust port adapter:; INSTALL SANDING DISC TABLE
12 DUST COLLECTION For optimal dust removal and minimal clean-up, this sander is equipped with two dust ports: one for the belt and one for the disc. To connect the sanding belt dust port adapter: 1. Insert the belt dust port adapter into the dust port (p. 11, Fig. 2 - 3) on the left side of the san...
Page 13 - To adjust the belt tracking:; SQUARING THE TABLE
13 UPPER GUARD Install the upper guard (Fig. 8 - 2) onto the belt sanding arm using the upper guard locking knob (Fig. 8 - 3) to secure it in place. BELT TRACKING Belt tracking means adjusting the belt to ride in the center of the rollers so that it runs true (does not wander left or right during op...
Page 14 - BELT SANDER PLATEN; To adjust the platen:; TESTING THE MACHINE
14 BELT SANDER PLATEN The platen (p. 13, Fig. 8 - 4) is the steel support plate that is positioned behind the sanding belt and underneath the sanding belt table. It rises from the body of the sander to a point several inches above the belt table’s surface. The platen provides the necessary support t...
Page 15 - SURFACE SANDING ON THE BELT; END SANDING AND OUTSIDE CURVE SANDING ON THE DISC; MITER GAUGE - DISC SANDER; OPERATION
15 ON/OFF SWITCH 1. To start the sander, push the switch to the ON position. 2. To stop the sander, push switch to the OFF position. SURFACE SANDING ON THE BELT Hold the workpiece firmly with both hands. Keep fingers away from sanding belt. Keep the workpiece flat against the belt table and move it ...
Page 16 - ROUTINE INSPECTION; NOTE; LUBRICATION; MAINTENANCE
16 ROUTINE INSPECTION Before each use, inspect the general condition of the tool. If any of these following conditions exist, do not use until parts are replaced or the sander is properly repaired. Check for: • Loose hardware or improper mounting, • Misalignment or binding of moving parts, • Damaged...
Page 18 - TROUBLESHOOTING GUIDE
18 PROBLEM CAUSE SOLUTION Sanding grains easily rub off belt or discs Sanding belt/disc has been stored in an incorrect environment. Store sanding accessories away from extremely hot / dry temperatures. Sanding belt/disc has been damaged or folded. Store sanding accessories flat—not bent or folded. ...
Page 19 - EXPLODED VIEW & PARTS LIST
Page 21 - WARRANTY STATEMENT; LIMITED WARRANTY OF WEN PRODUCTS FOR HOME USE
21 WARRANTY STATEMENT WEN Products is committed to building tools that are dependable for years. Our warranties are consistent with this commitment and our dedication to quality. LIMITED WARRANTY OF WEN PRODUCTS FOR HOME USE GREAT LAKES TECHNOLOGIES, LLC (“Seller”) warrants to the original purchaser...
Page 22 - NOTES