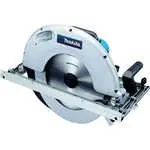
Page 2 - SPECIFICATIONS; General power tool safety warnings; Save all warnings and instruc
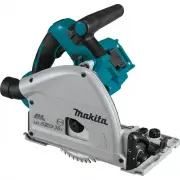
2 ENGLISH ENGLISH (Original instructions) SPECIFICATIONS Model: XPS01 XPS02 Blade diameter 165 mm (6-1/2″) Max. Cutting depth at 0° 56 mm (2-3/16″) at 45° bevel 40 mm (1-9/16″) at 48° bevel 38 mm (1-1/2″) No load speed 2,500 - 6,300 /min Overall length 346 mm (13-5/8″) Rated voltage D.C. 36 V Batter...
Page 4 - Circular saw safety warnings
4 ENGLISH Circular saw safety warnings Cutting procedures 1. DANGER: Keep hands away from cutting area and the blade. Keep your second hand on auxil- iary handle, or motor housing. If both hands are holding the saw, they cannot be cut by the blade. 2. Do not reach underneath the workpiece. The guard...
Page 6 - Symbols; Important safety instructions for; SAVE THESE INSTRUCTIONS.; Tips for maintaining maximum; Important safety instructions for
6 ENGLISH 12. Keep blade sharp and clean. Gum and wood pitch hardened on blades slows saw and increases potential for kickback. Keep blade clean by first removing it from tool, then cleaning it with gum and pitch remover, hot water or kerosene. Never use gasoline. 13. Wear a dust mask and hearing pr...
Page 7 - FUNCTIONAL; Installing or removing battery
7 ENGLISH 7. Do not operate the wireless unit in places where automated devices are near by. If oper- ated, automated devices may develop malfunction or error. 8. The wireless unit can produce electromagnetic fields (EMF) but they are not harmful to the user. 9. The wireless unit is an accurate inst...
Page 8 - Tool / battery protection system; Indicating the remaining battery
8 ENGLISH Tool / battery protection system The tool is equipped with a tool/battery protection sys - tem. This system automatically cuts off power to the motor to extend tool and battery life. The tool will auto - matically stop during operation if the tool or battery is placed under one of the foll...
Page 9 - Automatic speed change function; Quick stop button for 2 to 3 mm
9 ENGLISH NOTE: Depending on the conditions of use and the ambient temperature, the indication may differ slightly from the actual capacity. Automatic speed change function NOTE: Automatic speed change function is only available when the speed adjusting dial is in 5. This tool has "high speed mo...
Page 11 - Electronic function
11 ENGLISH When using the tool without guide rail For straight cuts, align the A position on the front of the base with your cutting line. For 45° bevel cuts, align the B position with it. When using the tool with guide rail For both straight cuts and 45° bevel cuts, always align the A position on t...
Page 12 - ASSEMBLY; Hex wrench storage
12 ENGLISH ASSEMBLY CAUTION: Always be sure that the tool is switched off and the battery cartridge is removed before carrying out any work on the tool. Hex wrench storage When not in use, store the hex wrench as shown in the figure to keep it from being lost. 1 ► 1. Hex wrench Removing or installin...
Page 13 - OPERATION
13 ENGLISH 4 3 2 1 ► 1. Hex bolt 2. Outer flange 3. Inner flange 4. Circular saw blade WARNING: If the inner flange is removed, be sure to install it on the spindle. When installing, choose a correct side on which protrusion fits into the saw blade hole perfectly. Mounting the blade on the wrong sid...
Page 14 - Guide rail
14 ENGLISH Hold the tool firmly. The tool is provided with both a front grip and rear handle. Use both to best grasp the tool. If both hands are holding saw, they cannot be cut by the circular saw blade. Set the base on the workpiece to be cut without the circular saw blade making any contact. Then ...
Page 15 - Guide device; WIRELESS ACTIVATION; What you can do with the wireless
15 ENGLISH 1 1 2 ► 1. Clamping screw 2. Sub base Plunge cutting (Cutting-out) WARNING: To avoid a kickback, be sure to observe the following instructions. 12 ► 1. Rear edge of tool base 2. Fixed stop When using the tool without guide rail, place the tool on the workpiece with the rear edge of tool b...
Page 16 - Installing the wireless unit; Tool registration for the vacuum
16 ENGLISH The overview of the wireless activation function setting is as follows. Refer to each section for detail procedures. 1. Installing the wireless unit 2. Tool registration for the vacuum cleaner 3. Starting the wireless activation function Installing the wireless unit CAUTION: Place the too...
Page 18 - Description of the wireless activation lamp status
18 ENGLISH 1 2 ► 1. Wireless activation button 2. Wireless activation lamp 5. Pull the switch trigger of the tool. Check if the vac- uum cleaner runs while the switch trigger is being pulled. To stop the wireless activation of the vacuum cleaner, push the wireless activation button on the tool. NOTE...
Page 20 - Troubleshooting for wireless activation function
20 ENGLISH Troubleshooting for wireless activation function Before asking for repairs, conduct your own inspection first. If you find a problem that is not explained in the manual, do not attempt to dismantle the tool. Instead, ask Makita Authorized Service Centers, always using Makita replace - men...
Page 21 - MAINTENANCE
21 ENGLISH State of abnormality Probable cause (malfunction) Remedy The vacuum cleaner does not run along with the switch operation of the tool. The wireless unit is not installed into the tool. The wireless unit is improperly installed into the tool. Install the wireless unit correctly. The termina...
Page 22 - OPTIONAL ACCESSORIES; MAKITA LIMITED ONE YEAR; Warranty Policy
22 ENGLISH To adjust the 0°-cut accuracy, make the base perpen - dicular to the blade using a triangular rule, square rule, etc. by turning the adjusting bolt. 1 ► 1. Adjusting bolt for 0°-cut To adjust the 45°-cut accuracy, make the base 45° to the blade using a triangular rule by turning the adjus...
Page 23 - ESPECIFICACIONES; ADVERTENCIAS DE; Advertencias generales de; Conserve todas las advertencias
23 ESPAÑOL ESPAÑOL (Instrucciones originales) ESPECIFICACIONES Modelo: XPS01 XPS02 Diámetro del disco 165 mm (6-1/2″) Profundidad de corte máxima a 0° 56 mm (2-3/16″) bisel a 45° 40 mm (1-9/16″) bisel a 48° 38 mm (1-1/2″) Velocidad sin carga 2 500 r/min - 6 300 r/min Longitud total 346 mm (13-5/8″) ...
Page 27 - GUARDE ESTAS
27 ESPAÑOL 4. Antes de dejar la sierra en el banco o en el suelo, observe siempre que el protector esté cubriendo el disco. Un disco desprotegido, girando por inercia, hará que la sierra se desplace hacia atrás, cortando todo lo que encuentre a su paso. Tenga presente el tiempo que el disco tarda en...
Page 28 - Consejos para alargar al máximo
28 ESPAÑOL Símbolos A continuación se muestran los símbolos utilizados para la herramienta. volts o voltios corriente directa o continua velocidad sin carga revoluciones o alternaciones por minuto, frecuencia de rotación Instrucciones importantes de seguridad para el cartucho de batería 1. Antes de ...
Page 29 - DESCRIPCIÓN DEL; Instalación o extracción del
29 ESPAÑOL 8. La unidad inalámbrica puede producir campos electromagnéticos (CEM), sin embargo éstos no son dañinos para el usuario. 9. La unidad inalámbrica es un instrumento de precisión. Tenga cuidado de no dejar caer ni golpear la unidad inalámbrica. 10. Evite tocar la terminal de la unidad inal...
Page 31 - Ajuste de la profundidad de corte; Botón de parada rápida para una
31 ESPAÑOL NOTA: Dependiendo de las condiciones de uso y la temperatura ambiente, la indicación podrá diferir ligeramente de la capacidad real. Función de cambio de velocidad automática NOTA: La función de cambio de velocidad automá - tica sólo está disponible cuando el selector de ajuste de velocid...
Page 33 - Guía visual; Accionamiento del interruptor; Freno eléctrico
33 ESPAÑOL Guía visual 1 A B ► 1. Base La línea de corte varía en función del ángulo de corte y de si se utiliza el carril guía (accesorio opcional). Cuando la herramienta es utilizada sin el carril guía Para cortes rectos, alinee la posición A de la parte delantera de la base con la línea de corte ...
Page 34 - Función eléctrica; MONTAJE; Almacenamiento de la llave Allen
34 ESPAÑOL Número Velocidad de rotación del disco por minuto (r/min) 1 2 500 r/min 2 2 900 r/min 3 3 900 r/min 4 4 900 r/min 5 6 300 r/min PRECAUCIÓN: El selector de ajuste de velocidad no debe usarse para discos de la sierra con una velocidad menor especificada, sino para obtener una velocidad adec...
Page 35 - OPERACIÓN
35 ESPAÑOL 2. Presione el bloqueo del eje por completo de forma que el disco no pueda girar y use la llave hexagonal para aflojar el perno hexagonal. 2 1 3 4 ► 1. Bloqueo del eje 2. Llave hexagonal 3. Apretar 4. Aflojar 3. Retire el perno hexagonal, la brida exterior y el disco de la cierra circular...
Page 36 - Carril guía
36 ESPAÑOL Corte de secciones (corte habitual) Sujete firmemente la herramienta. La herramienta está provista de empuñadura delantera y mango trasero. Utilice ambos para sujetar de forma óptima la herra - mienta. Si ambas manos están sujetando la sierra, éstas no podrán ser cortadas por el disco de ...
Page 38 - Dispositivo de guía; FUNCIÓN DE; Lo que puede hacer con la función
38 ESPAÑOL Dispositivo de guía Accesorio opcional El uso de la guía de bisel permite realizar cortes en inglete con ángulos y encajes exactos. El uso de la pinza asegura una sujeción firme de la pieza de trabajo sobre la mesa. FUNCIÓN DE ACTIVACIÓN INALÁMBRICA Para el modelo XPS02 únicamente Lo que ...
Page 39 - Registro de la herramienta para la
39 ESPAÑOL 1 2 3 ► 1. Unidad inalámbrica 2. Gancho 3. Tapa Una vez extraída la unidad inalámbrica, guárdela en el estuche suministrado o en un contenedor libre de elec- tricidad estática. AVISO: Use siempre los ganchos en la parte posterior de la tapa cuando extraiga la unidad inalámbrica. Si los ga...
Page 44 - MANTENIMIENTO; Ajuste de la precisión de corte a 0°
44 ESPAÑOL Estado de la anomalía Causa probable (avería) Remedio La aspiradora no funciona junto con el interruptor de la herramienta. La unidad inalámbrica no está instalada en la herramienta. La unidad inalámbrica está instalada incorrectamente en la herramienta. Instale la unidad inalámbrica corr...
Page 45 - GARANTÍA LIMITADA DE UN AÑO; Ésta Garantía no aplica para México
45 ESPAÑOL 1 1 0° 45° ► 1. Regla triangular Para ajustar la precisión de corte a 0°, haga que la base quede perpendicular al disco usando una regla triangu- lar o escuadra, etc. girando el perno de ajuste. 1 ► 1. Perno de ajuste para el corte a 0° Para ajustar la precisión de corte a 45°, haga que l...
Page 48 - WARNING; productos químicos son:; Makita Corporation
Some dust created by power sanding, sawing, grinding, drilling, and other construction activities contains chemicals known to the State of California to cause cancer, birth defects or other reproductive harm. Some examples of these chemicals are: • lead from lead-based paints, • crystalline silica f...