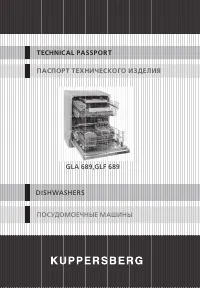
Page 2 - CO N T E N T S
2 Technical passporT english Dishwasher 1. D I S H WA S H E R ......................................................................................................................... 32 I M P O RTA N T S A F E T Y I N S T R U CT I O N S .................................................................
Page 3 - Explanation of symbols
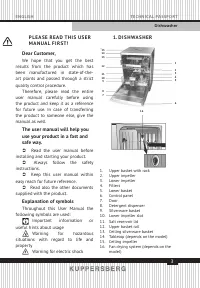
3 english Technical passporT Dishwasher P L E A S E R E A D T H I S U S E R M A N U A L F I R S T! Dear Customer, We hope that you get the best results from the product which has been manufactured in state-of-the-art plants and passed through a strict quality control procedure. Therefore, please rea...
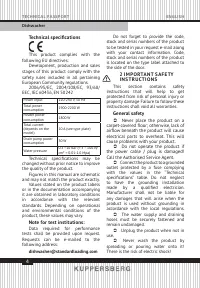
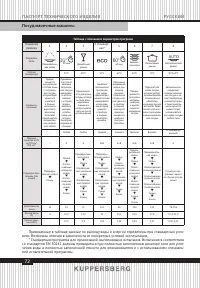
Page 4 - Technical specifi cations; Technical specifi cations may be; Note for test institutions:; airfl ow beneath the product will cause
4 Technical passporT english Dishwasher Technical specifi cations This product complies with the following EU directives: Development, production and sales stages of this product comply with the safety rules included in all pertaining European Community regulations. 2006/95/EC, 2004/108/EC, 93/68/ EE...
Page 5 - Intended use; are not, call a qualifi ed technician
5 english Technical passporT Dishwasher  Never touch the plug with wet hands! Never unplug by pulling on the cable, always pull out by grabbing the plug.  The product must be unplugged during installation, maintenance, cleaning and repairing procedures.  Always have the installation and repairing...
Page 6 - Appropriate installation
6 Technical passporT english Dishwasher Authorised Service Agent. Manufacturer shall not be held liable for damages that may arise from procedures carried out by unauthorised persons. Prior to installation, visually check if the product has any defects on it. If so, do not have it installed. Damaged...
Page 7 - Connection to the drain; Tightly fi x the water discharge hose to; Adjusting the feet
7 english Technical passporT Dishwasher  Open the taps completely after making the connections to check for water leaks. For your safety, close the water inlet tap completely after the washing programme is over. Connection to the drain Water discharge hose can directly be connected to the drain hol...
Page 8 - Transportation of the product
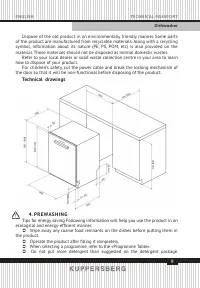
8 Technical passporT english Dishwasher initial use, fi ll the salt reservoir with 1 litre of water prior to fi lling it with salt. Some water might have remained in the product due to the quality control processes in the production. It is not harmful for the product. Disposing of packaging material...
Page 9 - P R E WA S H I N G; Operate the product after fi lling it completely.; Technical drawings; how to dispose of your product.
9 english Technical passporT Dishwasher 4. P R E WA S H I N G Tips for energy saving Following information will help you use the product in an ecological and energy-effi cient manner. Â Wipe away any coarse food remnants on the dishes before putting them in the product. Â Operate the product after f...
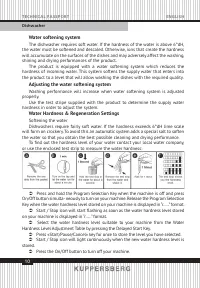
Page 10 - Water softening system; shining and drying performances of the product.; Adjusting the water softening system; hardness in order to adjust the system.; Water Hardness & Regeneration Settings; Softening the water
10 Technical passporT english Dishwasher Water softening system The dishwasher requires soft water. If the hardness of the water is above 6°dH, the water must be softened and descaled. Otherwise, ions that create the hardness will accumulate on the surfaces of the dishes and may adversely affect the...
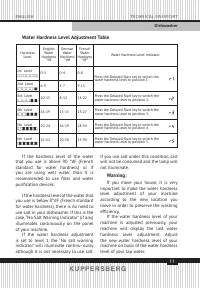
Page 11 - Water Hardness Level Adjustment Table; recommended to use fi lter and water
11 english Technical passporT Dishwasher Water Hardness Level Adjustment Table Hardness Level English Water Hardness °dE German Water Hardness °dH French Water Hardness °dF* Water Hardness Level Indicator 1st Level 0-5 0-4 0-8 Press the Delayed Start key to switch the water hardness level to positio...
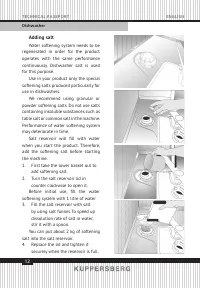
Page 12 - Adding salt; Salt reservoir will fi ll with water
12 Technical passporT english Dishwasher Adding salt Water softening system needs to be regenerated in order for the product operates with the same performance continuously. Dishwasher salt is used for this purpose. Use in your product only the special softening salts produced particularly for use i...
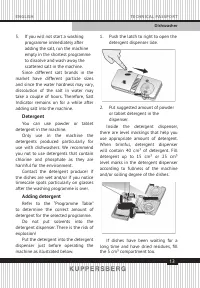
Page 13 - Detergent; Refer to the “Programme Table”
13 english Technical passporT Dishwasher 5. If you will not start a washing programme immediately after adding the salt, run the machine empty in the shortest programme to dissolve and wash away the scattered salt in the machine. Since different salt brands in the market have different particle size...
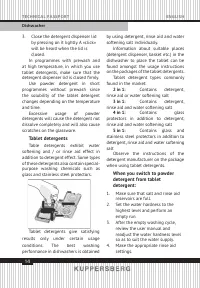
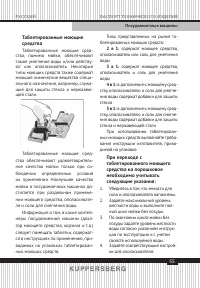
Page 14 - detergent dispenser lid is closed fi rmly.; Tablet detergents
14 Technical passporT english Dishwasher 3. Close the detergent dispenser lid by pressing on it lightly. A «click» will be heard when the lid is closed. In programmes with prewash and at high temperature, in which you use tablet detergents, make sure that the detergent dispenser lid is closed fi rml...
Page 15 - Rinse aid; drying effi ciency and prevent water or; Items not suitable for washing
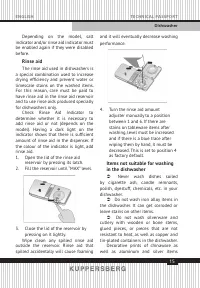
15 english Technical passporT Dishwasher Depending on the model, salt indicator and/or rinse aid indicator must be enabled again if they were disabled before. Rinse aid The rinse aid used in dishwashers is a special combination used to increase drying effi ciency and prevent water or limescale stain...
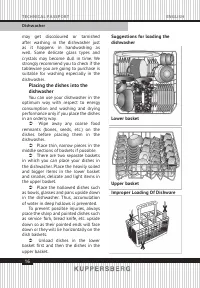
Page 16 - Suggestions for loading the; Placing the dishes into the; basket fi rst and then the dishes in the
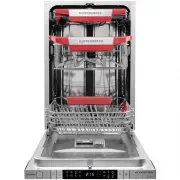
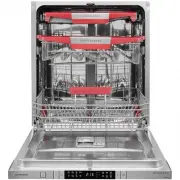
16 Technical passporT english Dishwasher Suggestions for loading the dishwasher Lower basket Upper basketImproper Loading Of Dishware Placing the dishes into the dishwasher You can use your dishwasher in the optimum way with respect to energy consumption and washing and drying performance only if yo...
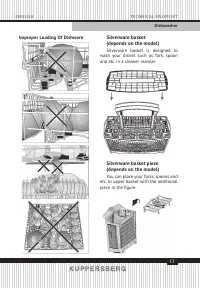
Page 17 - Improper Loading Of Dishware; Silverware basket; Silverware basket is designed to; Silverware basket piece; You can place your forks, spoons and
17 english Technical passporT Dishwasher Improper Loading Of Dishware Silverware basket (depends on the model) Silverware basket is designed to wash your dishes such as fork, spoon and etc. in a cleaner manner. Silverware basket piece (depends on the model) You can place your forks, spoons and etc. ...
Page 18 - Movable silverware basket
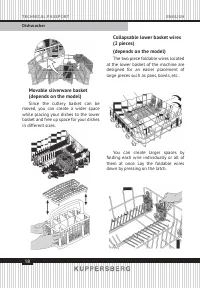
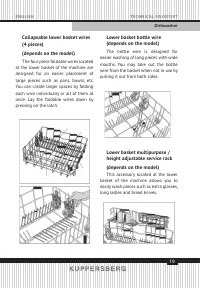
18 Technical passporT english Dishwasher Movable silverware basket (depends on the model) Since the cutlery basket can be moved, you can create a wider space while placing your dishes to the lower basket and free up space for your dishes in different sizes. Collapsable lower basket wires (2 pieces)(...
Page 19 - The four piece foldable wires located; Lower basket multipurpose /; This accessory located at the lower
19 english Technical passporT Dishwasher Collapsable lower basket wires (4 pieces) (depends on the model) The four piece foldable wires located at the lower basket of the machine are designed for an easier placement of large pieces such as pans, bowls, etc. You can create larger spaces by folding ea...
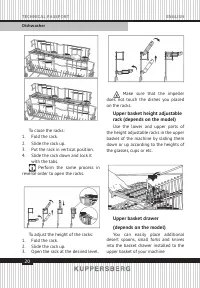
Page 20 - Upper basket height adjustable
20 Technical passporT english Dishwasher To close the racks: 1. Fold the rack.2. Slide the rack up.3. Put the rack in vertical position.4. Slide the rack down and lock it with the tabs. Perform the same process in reverse order to open the racks. To adjust the height of the racks: 1. Fold the rack. ...
Page 21 - Upper basket glass support; fi rst collapsable wire and push it in
21 english Technical passporT Dishwasher Upper basket glass support piece(depends on the model) When placing long stemmed glasses or wine glasses, do not lean them against other pieces but to the edge of the basket or to the rack. Do not lean long glasses against each other. They can move and get da...
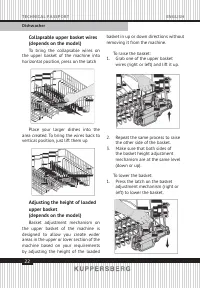
Page 22 - Collapsable upper basket wires
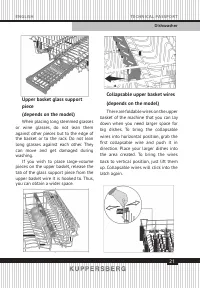
22 Technical passporT english Dishwasher Collapsable upper basket wires (depends on the model) To bring the collapsable wires on the upper basket of the machine into horizontal position, press on the latch Place your larger dishes into the area created. To bring the wires back to vertical position, ...
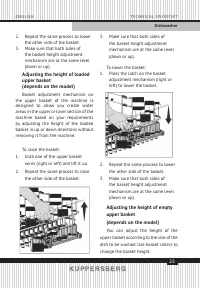
Page 23 - Adjusting the height of loaded
23 english Technical passporT Dishwasher 2. Repeat the same process to lower the other side of the basket. 3. Make sure that both sides of the basket height adjustment mechanism are at the same level (down or up). Adjusting the height of loaded upper basket (depends on the model) Basket adjustment m...
Page 24 - that are too long to fi t into the lower; Ceiling silverware basket
24 Technical passporT english Dishwasher 1. Turn the stoppers on the ends of the upper basket rails by turning them aside. 2. Take the basket out. 3. Change the position of the rollers, place the basket into the rail and close the stoppers. that are too long to fi t into the lower silverware basket....
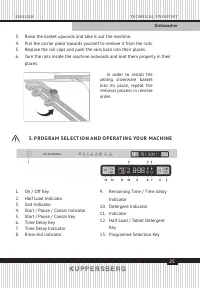
Page 25 - P RO G RA M S E L E CT I O N A N D O P E RAT I N G YO U R M AC H I N E
25 english Technical passporT Dishwasher 3. Raise the basket upwards and take it out the machine.4. Pull the carrier piece towards yourself to remove it from the rails.5. Replace the rail caps and push the rails back into their places.6. Turn the rails inside the machine outwards and seat them prope...
Page 26 - When the visual fi ll indicator is dark,; Rinse aid level indicator light; dispenser and refi ll rinse aid.
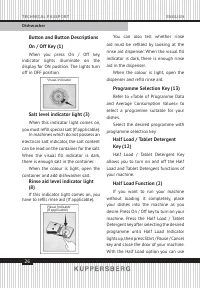
26 Technical passporT english Dishwasher Button and Button DescriptionsOn / Off Key (1) When you press On / Off key, indicator lights illuminate on the display for ON position. The lights turn off in OFF position. Visual Indicator Visual Indicator (If applicable) Salt level indicator light (3) When ...
Page 27 - Tablet Detergent Function
27 english Technical passporT Dishwasher every part of your lower and upper baskets and you can save from both water and power. Tablet Detergent Function Depending on the hardness level of the tap water, the Tablet Detergent function allows obtaining a better drying performance from the multi- purpo...
Page 28 - Canceling a programme; indicator starts fl ashing. Once you; Changing a Programme; fi rst you must cancel the current; Starting your machine; Put suffi cient amount of
28 Technical passporT english Dishwasher after you turn on the machine by pressing the On / Off key. Canceling a programme To cancel the program selection while the machine is operating open the door. ! Care must be taken when opening the door, as steam will escape. Press and hold Start / Pause / Ca...
Page 29 - the door of your machine be careful.
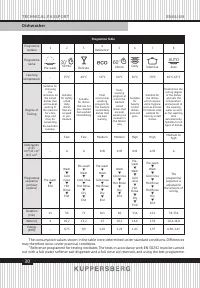
29 english Technical passporT Dishwasher may vary, dissolution of the salt in water may take a couple of hours. Therefore, Salt Indicator remains on for a while after adding salt into the machine. Â You may use Half Load / Tablet Detergent Key and Time Delay key features as necessary. Â Refer to «Ta...
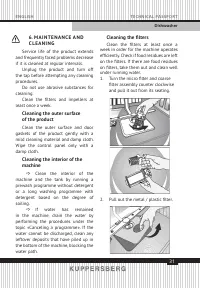
Page 31 - M A I N T E N A N C E A N D; Clean the fi lters and impellers at; Cleaning the fi lters; Clean the fi lters at least once a
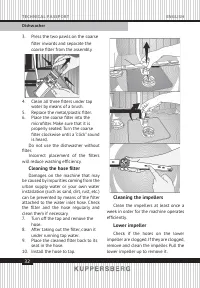
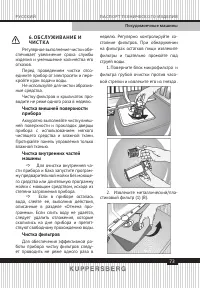
31 english Technical passporT Dishwasher 6. M A I N T E N A N C E A N D C L E A N I N G Service life of the product extends and frequently faced problems decrease if it is cleaned at regular intervals. Unplug the product and turn off the tap before attempting any cleaning procedures. Do not use abra...
Page 32 - Cleaning the impellers
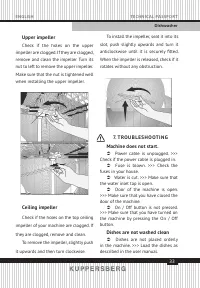
32 Technical passporT english Dishwasher 3. Press the two pawls on the coarse fi lter inwards and separate the coarse fi lter from the assembly. Cleaning the impellers Clean the impellers at least once a week in order for the machine operates effi ciently. Lower impeller Check if the holes on the lo...
Page 33 - Upper impeller; anticlockwise until it is securely fi tted.; T RO U B L E S H O OT I N G
33 english Technical passporT Dishwasher Upper impeller Check if the holes on the upper impeller are clogged. If they are clogged, remove and clean the impeller. Turn its nut to left to remove the upper impeller.Make sure that the nut is tightened well when installing the upper impeller. Ceiling imp...
Page 34 - programme definitions. We recommend
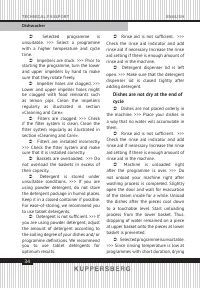
34 Technical passporT english Dishwasher  Selected programme is unsuitable. >>> Select a programme with a higher temperature and cycle time.  Impellers are stuck. >>> Prior to starting the programme, turn the lower and upper impellers by hand to make sure that they rotate freely....
Page 35 - flow easily on deteriorated surfaces. It is; Tea, cafe or lipstick stains; salt filling hole while adding salt.
35 english Technical passporT Dishwasher performance will also be low. Select programmes with longer duration for a higher drying performance. Â Surface quality of the kitchen utensils is deteriorated. >>> Desired washing performance can not be obtained at kitchen utensils with deteriorated...
Page 36 - spill salt around the salt filling hole
36 Technical passporT english Dishwasher There is a different odour in the machine new machine has a peculiar odour. It will fade out after a couple of washing. Â Filters are clogged. >>> Check if the filter system is clean. Clean the filter system regularly as illustrated in section «Clean...
Page 37 - Detergent remains in
37 english Technical passporT Dishwasher migrate to other stainless steel surfaces and cause corrosion on those surfaces as well. Such items should not be washed in dishwashers. Detergent remains in detergent dispenser. Â Detergent dispenser was damp when adding detergent. >>> Make sure tha...
Page 38 - Foam forms in the machine.; in the machine when you are filling it.; Kitchen utensils are broken.
38 Technical passporT english Dishwasher  Striking of the glasses to each other or to other dishes due to the impact of water during washing can cause breaks, or scratches on their surfaces. A smear remains on glasses that resembles milk stain which can not be removed when wiped by hand. A bluish /...
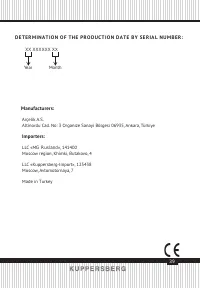
Page 39 - D E T E R M I N A T I O N O F T H E P R O D U C T I O N D A T E B Y S E R I A L N U M B E R :; Year
39 Manufacturers: Arçelik A.S. Altinordu Cad. No: 3 Organize Sanayi Bölgesi 06935, Ankara, Türkiye Importers: LLC «M G Rusland », 141400 Moscow region, Khimki, Butakovo, 4 LLC «Kuppersberg-Import», 125438 Moscow, Avtomotornaya, 7 Made in Turkey D E T E R M I N A T I O N O F T H E P R O D U C T I O N...
Page 40 - СОД Е Ржа Н И Е
40 паспорт технического изделия русский посудомоечные машины 1. П О СУДО М О Е Ч Н А Я М А Ш И Н А ...................................................................................... 41 2. О С Н О В Н Ы Е Т Р Е Б О В А Н И Я Б Е З О П АС Н О С Т И ....................................................
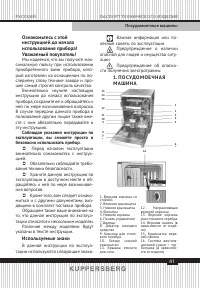
Page 41 - Соблюдая указания инструкции по
41 русский паспорт технического изделия посудомоечные машины Ознакомьтесь с этой инструкцией до начала использования прибора! уважаемый покупатель! Мы надеемся, что вы получите мак- симальную пользу при использовании приобретенного вами прибора, кото- рый изготовлен на оснащенном по по- следнему сло...
Page 43 - Назначение прибора
43 русский паспорт технического изделия посудомоечные машины Â Не используйте прибор в слу - чае повреждения кабеля питания или вилки. Обратитесь в официальный сервисный центр. Â Данный прибор следует под - ключать к заземленной и защищенной предохранителем розетке, параметры которой соответствуют д...
Page 45 - Выбор места для установки
45 русский паспорт технического изделия посудомоечные машины ления или разрывов во впускном и сливном шлангах. При размещении прибора следите за тем, чтобы случайно не были по - вреждены пол, стены, трубопроводы и другие предметы. При перемещении прибора не удерживайте его за дверь или панель. Выбор...
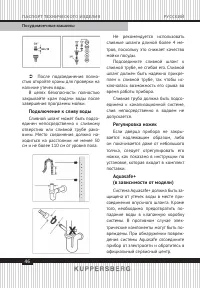
Page 46 - Подключение к сливу воды
46 паспорт технического изделия русский посудомоечные машины Â После подсоединения полно- стью откройте краны для проверки на наличие утечек воды. В целях безопасности полностью закрывайте кран подачи воды после завершения программы мойки. Подключение к сливу воды Сливной шланг может быть подсо- еди...
Page 47 - Подключение к электросети
47 русский паспорт технического изделия посудомоечные машины Поскольку в комплект входят шлан- ги с электрическими соединениями и цепями, не допускается укорачивать шланги или удлинять их с помощью дополнительных шлангов. Подключение к электросети Данный прибор следует подклю- чить к заземленной и з...
Page 48 - Транспортировка прибора
48 паспорт технического изделия русский посудомоечные машины вавшейся в процессе контроля каче-ства на предприятии-изготовителе. Это не влияет на нормальную работу прибора. утилизация упаковочных материалов Упаковочные материалы представ- ляют опасность для детей. Храните упаковочные материалы в без...
Page 49 - Технические чертежи
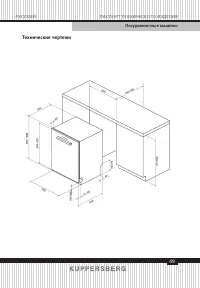
49 русский паспорт технического изделия посудомоечные машины Технические чертежи
Page 50 - П Р Е Д В а Р И Т Е л Ь Н а Я М О Й К а
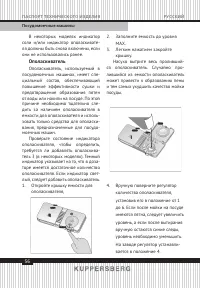
50 паспорт технического изделия русский посудомоечные машины 4. П Р Е Д В а Р И Т Е л Ь Н а Я М О Й К а Рекомендации по экономии электроэнергии Выполнение приведенных ниже рекомендаций при использовании посудо- моечной машины позволит вам предотвратить загрязнение окружающей среде и обеспечить эконо...
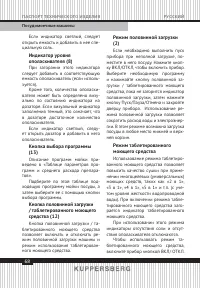
Page 51 - Таблица настройки уровня жесткости воды
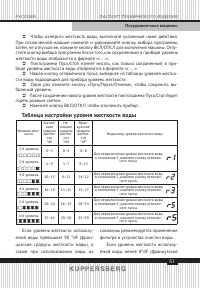
51 русский паспорт технического изделия посудомоечные машины Â Чтобы измерить жесткость воды, выполните указанные ниже действия: При отключенной машине нажмите и удерживайте кнопку выбора программы, затем, не отпуская ее, нажмите кнопку ВКЛ/ОТКЛ для включения машины. Отпу- стите кнопку выбора програ...
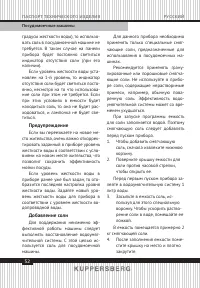
Page 52 - Предупреждение
52 паспорт технического изделия русский посудомоечные машины градусы жесткости воды), то использо - вать соль в посудомоечной машине не требуется. В таком случае на панели прибора будет постоянно светиться индикатор отсутствия соли (при его наличии). Если уровень жесткости воды уста - новлен на 1-й ...
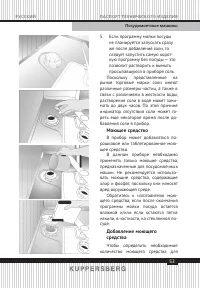
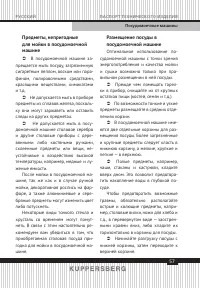
Page 53 - Моющее средство
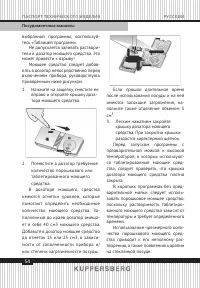
53 русский паспорт технического изделия посудомоечные машины 5. Если программу мойки посуды не планируется запускать сразу же после добавления соли, то следует запустить самую корот-кую программу без посуды — это позволит растворить и вымыть просыпавшуюся в приборе соль. Поскольку представленные на ...
Page 56 - В некоторых моделях индикатор; Ополаскиватель; Ополаскиватель, используемый в
56 паспорт технического изделия русский посудомоечные машины В некоторых моделях индикатор соли и/или индикатор ополаскивате-ля должны быть снова включены, если они не использовались ранее. Ополаскиватель Ополаскиватель, используемый в посудомоечных машинах, имеет спе-циальный состав, обеспечивающий...
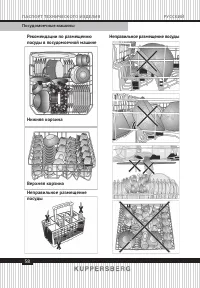
Page 58 - Рекомендации по размещению
58 паспорт технического изделия русский посудомоечные машины Рекомендации по размещению посуды в посудомоечной машине Нижняя корзина Верхняя корзинаНеправильное размещение посуды Неправильное размещение посуды
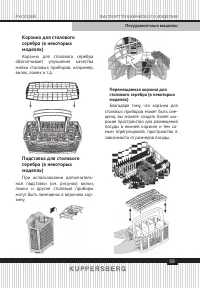
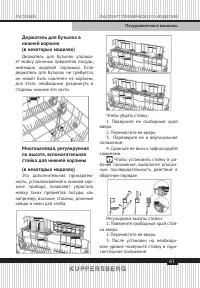
Page 59 - Корзина для столового; Корзина для столового серебра; Подставка для столового; При использовании дополнитель-
59 русский паспорт технического изделия посудомоечные машины Корзина для столового серебра (в некоторых моделях) Корзина для столового серебра обеспечивает улучшение качества мойки столовых приборов, например, вилок, ложек и т.д. Подставка для столового серебра (в некоторых моделях) При использовани...
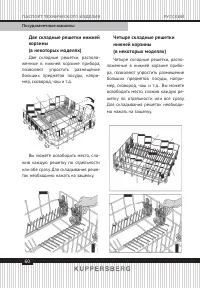
Page 60 - Две складные решетки нижней
60 паспорт технического изделия русский посудомоечные машины Две складные решетки нижней корзины (в некоторых моделях) Две складные решетки, располо- женные в нижней корзине прибора, позволяют упростить размещение больших предметов посуды, напри-мер, сковород, чаш и т.д. Вы можете освободить место, ...
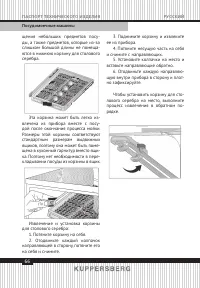
Page 61 - Держатель для бутылок в
61 русский паспорт технического изделия посудомоечные машины Держатель для бутылок в нижней корзине (в некоторых моделях) Держатель для бутылок упроща- ет мойку длинных предметов посуды, имеющих широкое горлышко. Если держатель для бутылок не требуется, он может быть извлечен из корзины, для этого н...
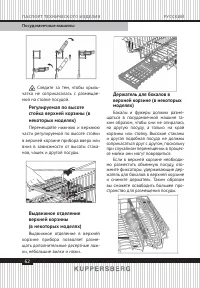
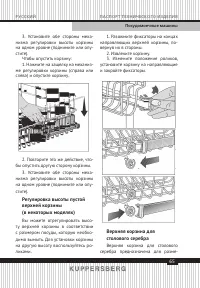
Page 62 - Выдвижное отделение
62 паспорт технического изделия русский посудомоечные машины Следите за тем, чтобы крыль- чатка не соприкасалась с размещае-мой на стойке посудой. Регулируемая по высоте стойка верхней корзины (в некоторых моделях) Перемещайте нижнюю и верхнюю части регулируемой по высоте стойки в верхней корзине пр...
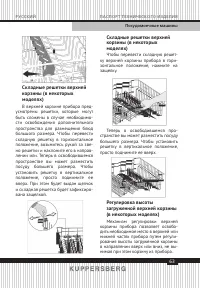
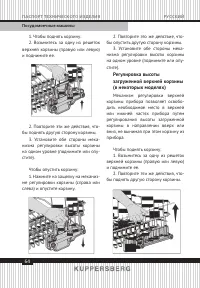
Page 64 - бы поднять другую сторону корзины.; Регулировка высоты; Механизм регулировки верхней
64 паспорт технического изделия русский посудомоечные машины 1. Чтобы поднять корзину:2. Возьмитесь за одну из решеток верхней корзины (правую или левую) и поднимите ее. 2. Повторите эти же действия, что- бы поднять другую сторону корзины. 3. Установите обе стороны меха- низма регулировки высоты кор...
Page 65 - Верхняя корзина для
65 русский паспорт технического изделия посудомоечные машины 3. Установите обе стороны меха- низма регулировки высоты корзины на одном уровне (поднимите или опу- стите). Чтобы опустить корзину: 1. Нажмите на защелку на механиз- ме регулировки корзины (справа или слева) и опустите корзину. 2. Повтори...
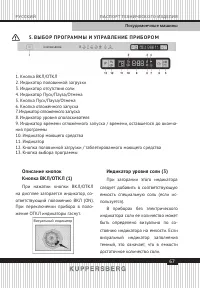
Page 67 - В Ы б О Р П Р О г Ра М М Ы И у П Ра В л Е Н И Е П Р И б О Р О М; При нажатии кнопки ВКЛ/ОТКЛ; При загорании этого индикатора
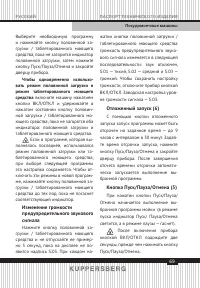
67 русский паспорт технического изделия посудомоечные машины 5. В Ы б О Р П Р О г Ра М М Ы И у П Ра В л Е Н И Е П Р И б О Р О М 1. Кнопка ВКЛ/ОТКЛ2. Индикатор половинной загрузки3. Индикатор отсутствия соли4. Индикатор Пуск/Пауза/Отмена5. Кнопка Пуск/Пауза/Отмена6. Кнопка отложенного запуска7. Индик...
Page 69 - Чтобы одновременно использо-; включите машину нажатием; Изменение громкости; Нажмите кнопку половинной за-
69 русский паспорт технического изделия посудомоечные машины Выберите необходимую программу и нажимайте кнопку половинной за-грузки / таблетированного моющего средства, пока не загорится индикатор половинной загрузки, затем нажмите кнопку Пуск/Пауза/Отмена и закройте дверцу прибора. Чтобы одновремен...
Page 70 - Отмена программы
70 паспорт технического изделия русский посудомоечные машины Отмена программы Чтобы отменить выбранную про- грамму, откройте дверцу работающего прибора. ! При открывании дверцы прояв- ляйте осторожность, чтобы не обжечь-ся паром. Нажмите кнопку Пуск/Пауза/Отме- на и не отпускайте ее примерно 3 се-ку...
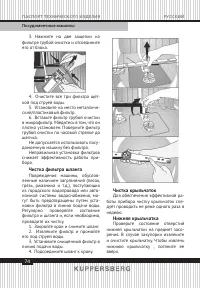
Page 74 - Чистка фильтра шланга
74 паспорт технического изделия русский посудомоечные машины 3. Нажмите на две защепки на фильтре грубой очистки и отсоедините его от блока. 4. Очистите все три фильтра щет- кой под струей воды. 5. Установите на место металличе- ский/пластиковый фильтр. 6. Вставьте фильтр грубой очистки в микрофильт...
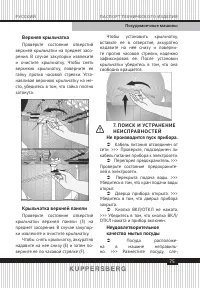
Page 76 - По окончании цикла посуда
76 паспорт технического изделия русский посудомоечные машины дуя указаниям инструкции по эксплу - атации. Â Выбрана неправильная про - грамма. >>> Выберите программу с бо - лее высокой температурой и большей длительностью. Â Заблокировано вращение крыльчаток. >>> Перед тем как запу...
Page 77 - На посуде остаются пятна от
77 русский паспорт технического изделия посудомоечные машины Â Выбрана неправильная про - грамма. >>> Поскольку в коротких про - граммах температура при ополаскива - нии низкая, то и эффективность сушки невысокая. Для обеспечения более ка - чественной сушки выбирайте более длительные програ...
Page 78 - Наличие постороннего запаха
78 паспорт технического изделия русский посудомоечные машины быть ослаблена, поэтому по завер - шении программы проверьте крышку еще раз. Наличие постороннего запаха внутри прибора Новая посудомоечная машина из - дает специфический запах. После не - скольких моек он исчезает. Â Засорены фильтры. >...
Page 79 - Моющее средство остается в
79 русский паспорт технического изделия посудомоечные машины Â В посудомоечной машине вы - полнялась мойка уже корродирован - ных кухонных принадлежностей. >>> Ржавчина с корродированной посуды может попасть на другие поверхно - сти из нержавеющей стали и вызвать их коррозию. Такую посуду н...
Page 80 - В машине образуется пена.; Если, следуя указаниям этого раздела, вы
80 паспорт технического изделия русский посудомоечные машины клянной посуды друг о друга либо о другую посуду под действием струй воды в процессе мойки могут привести к разбиванию или появлению царапин на их поверхностях. На стеклянной посуде остаются загрязнения, напоминающие пятна от молока, при э...
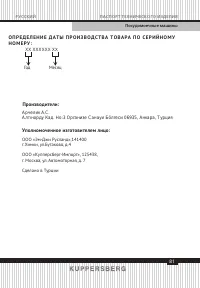
Page 81 - Арчелик; Уполномоченное изготовителем лицо:
81 русский паспорт технического изделия посудомоечные машины О П Р Е Д Е л Е Н И Е Д а Т Ы П Р О И З В О Д С Т В а Т О В а Р а П О С Е Р И Й Н О М уН О М Е Р у : Производители: Арчелик А . С . Алт ı норду Кад. Но:3 Организе Санаyи Б ö лгеси 06935, Анкара, Турция ООО «Эм-Джи Русланд»,141400 г.Химки, ...
Page 82 - ус та н О в ка, га ра н т и й нО е и п О с т га ра н т и й нОе Об с л уж и в а н и е; телефон горячей линии Kuppersberg:; полный список авторизованных сервисных центров Kuppersberg; услО виЯ гарантии
82 - О О О « ку п п е р с б е р г - с е р в и с » ус та н О в ка, га ра н т и й нО е и п О с т га ра н т и й нОе Об с л уж и в а н и е пО МО с к в е и М О с кОв с кОй Об л ас т и « +7 ( 495 ) 236-90-67 телефон горячей линии Kuppersberg: « 8 (800) 250-17-18 (Звонки для всех регионов бесплатные). >...
Page 84 - Kuppersberg; Д а Н Н Ы Й П а С П О Р Т И З Д Е л И Я
 Kuppersberg  www.kuppersberg.ru  [email protected] Â В Н И М а Н И Е ! Д а Н Н Ы Й П а С П О Р Т И З Д Е л И Я Та К ж Е Я В л Я Е ТС Я га Ра Н Т И Й Н Ы М Та л О Н О М, П Р О С Ь б а Н Е у Н И Ч ТО ж аТ Ь Д О К О Н Ц а Э К С П л уаТа Ц И И Т Е Х Н И К И.


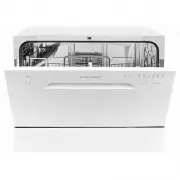 Kuppersberg GFM 5560
User Manual
Kuppersberg GFM 5560
User Manual
 Kuppersberg GIM 4578
User Manual
Kuppersberg GIM 4578
User Manual
 Kuppersberg GIM 6078
User Manual
Kuppersberg GIM 6078
User Manual
 Kuppersberg GL 4588
User Manual
Kuppersberg GL 4588
User Manual
 Kuppersberg GL 6033
User Manual
Kuppersberg GL 6033
User Manual
 Kuppersberg GL 6088
User Manual
Kuppersberg GL 6088
User Manual
 Kuppersberg GLM 4537
User Manual
Kuppersberg GLM 4537
User Manual
 Kuppersberg GLM 4575
User Manual
Kuppersberg GLM 4575
User Manual
 Kuppersberg GLM 6075
User Manual
Kuppersberg GLM 6075
User Manual
 Kuppersberg GLM 6080
User Manual
Kuppersberg GLM 6080
User Manual
 Kuppersberg GS 4505
User Manual
Kuppersberg GS 4505
User Manual
 Kuppersberg GSA 489
User Manual
Kuppersberg GSA 489
User Manual
 Kuppersberg GSM 4572
User Manual
Kuppersberg GSM 4572
User Manual
 Kuppersberg GSM 4573
User Manual
Kuppersberg GSM 4573
User Manual
 Kuppersberg GSM 6072
User Manual
Kuppersberg GSM 6072
User Manual
 Kuppersberg GSM 6073
User Manual
Kuppersberg GSM 6073
User Manual